

Have you ever taken the perfect family photo only to find everyone has glowing red eyes? This often happens when the camera flash bounces off the back of the eye, especially in dim lighting. People with lighter skin and blue eyes are more prone to this due to lower melanin levels. Many cameras include red-eye reduction settings, but the issue can still happen. Good news is removing the red eye effect in photos is now easier than ever.
Whether you’re using Photoshop, your iPhone’s built-in tools or free online editors, there are simple ways to fix it. This article will show you the fastest and easiest ways to remove red eye from photos, whether you’re using a desktop, mobile or online editor. So your memories stay flawless and natural, let’s fix those eyes and bring your pictures back to life!
In this article
Part 1: What Causes Red Eyes in Photos?
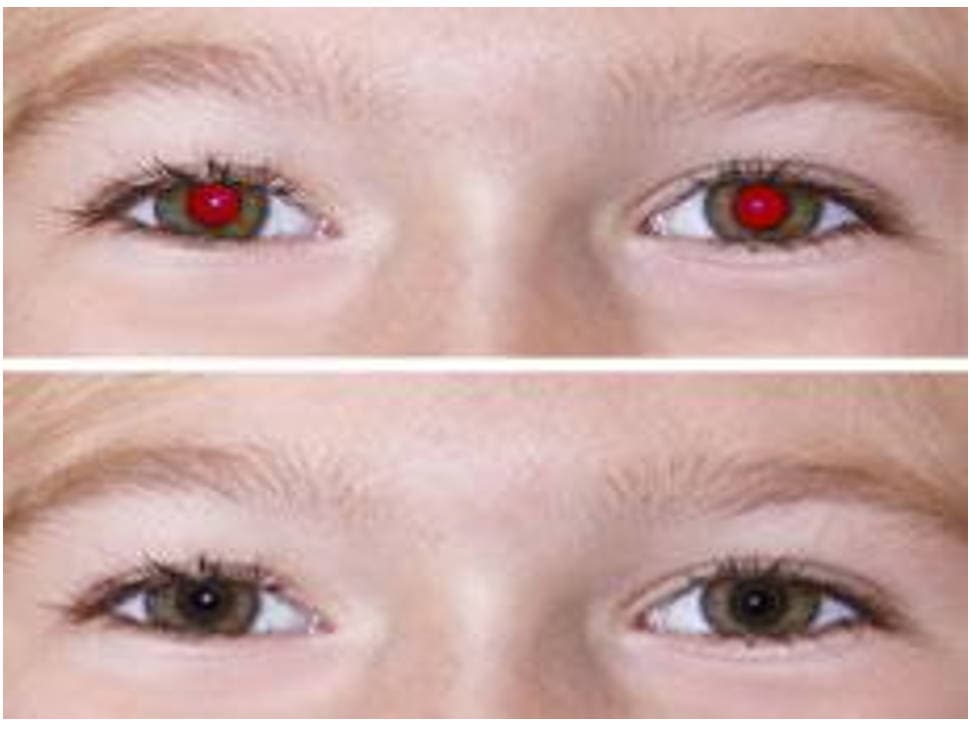
Red eye in photos occurs mainly because of the eye’s anatomy and how it interacts with the camera flash. Understanding this phenomenon requires a closer look at how our eyes work.
When a camera flash goes off in dim lighting conditions, light passes through the cornea and pupil before reaching the retina at the back of the eye. The retina functions like camera film, capturing light and converting it to electronic pulses that travel through the optic nerve to create visual images in the brain.
But not all light is absorbed by the retina. Some light reflects back to the camera lens, illuminating the blood-rich choroid layer behind the retina. This layer feeds the retina and provides it with a natural red color, so the eyes appear red when this reflection is captured on film.
Several factors increase the likelihood of red-eye effect:
- Pupil dilation: In dark settings, the pupils get larger to allow more light into the eyes. When a flash goes off suddenly, the pupils can’t constrict fast enough to prevent the light from reflecting off the retina.
- Direct gaze: Looking directly at the camera lens creates a perfect angle for light to reflect straight back to the camera.
- Eye anatomy: People with larger pupils naturally experience more pronounced red-eye effect regardless of lighting conditions.
- Melanin levels: People with lighter colored eyes (blue or green) have less melanin and are more prone to red-eye in photos.
- Flash proximity: The closer the flash is to the camera lens, especially in cameras with built-in flash, the more likely red eye is to occur.
Part 2: [Most Recommended] Fix Red Eye Effect in Batch without Manual Editing
Fixing red-eye effect on multiple photos can be a real pain, especially if you edit each one manually. Fortunately, UniConverter’s AI Watermark Remover makes it quick and easy to automatically fix red eyes in multiple photos with high accuracy. The software uses advanced AI algorithms to detect and correct red-eye instances while preserving natural eye coloration and detail.
Also, it keeps the original image quality throughout the process. Whether you’re working with professional portraits or casual snaps, this tool enhances facial clarity and removes red-eye distortion without any design skills required. Ideal for users who want high-quality, fast and automated results.
Key Features:
- One-Click Fix: No need to edit manually. Just upload and click—done!
- Smart Red Eye Removal: It detects human eyes and removes the red glare while keeping the eyes looking natural.
- Batch Editing: Fix many photos at once, which is great for saving time.
- Keeps Details Sharp: Your photos stay high-quality with clear eye details and skin textures.
- Auto Color Adjustment: Makes eyes look more vibrant, not over-edited.
- HD or 4K Output: It also improves photo quality while fixing red eyes.
How to Use This Photo Eye Fixer:
Step 1
Launch Wondershare UniConverter
Download and install Wondershare UniConverter from your preferred browser. Once installed, open the software and access the home interface. Select “AI Image Enhancer” from the available tools to start.

Step 2
Upload Your Photos
The tool will open a new window where you can add your photos. Select AI Watermark Remover from the options. Then click the “+” icon to open your files. Find and select all the photos with red-eye, and upload them all at once.

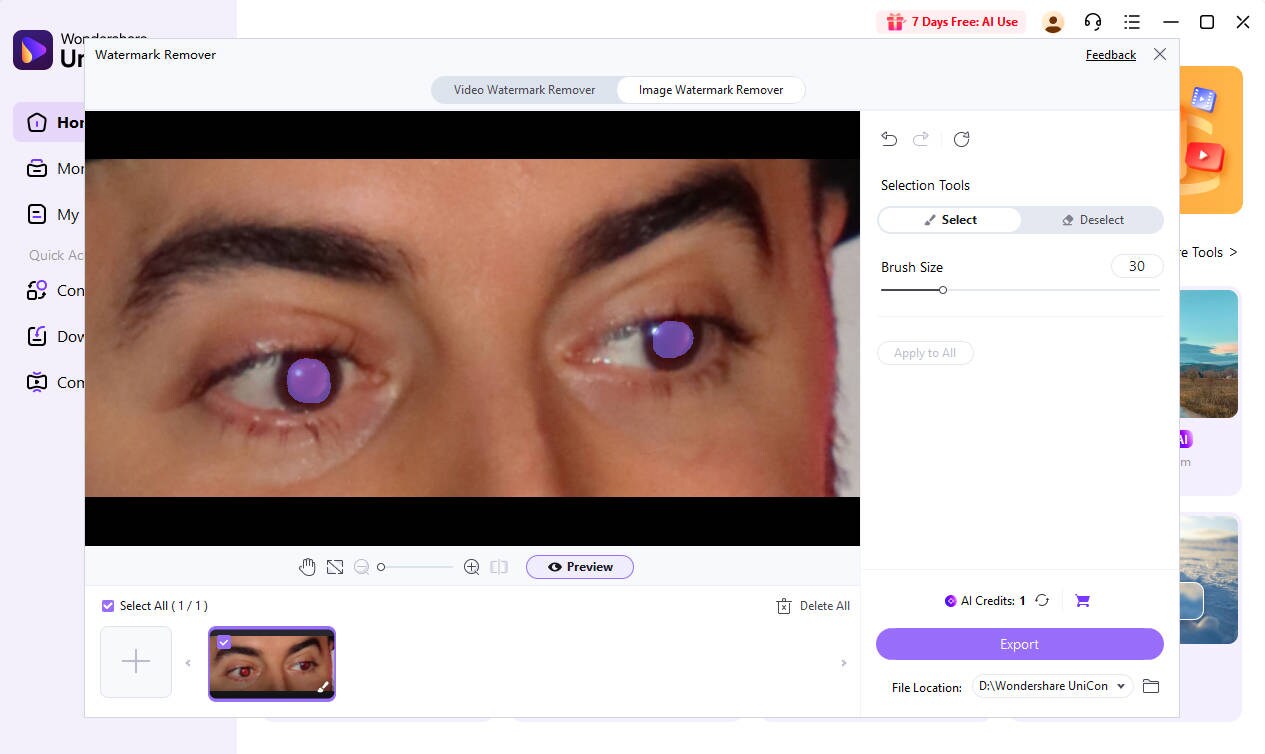
Step 3
Fix the Red Eye Part
Use customizable brush to cover the red eyes you need to remove and click preview to check the effect.
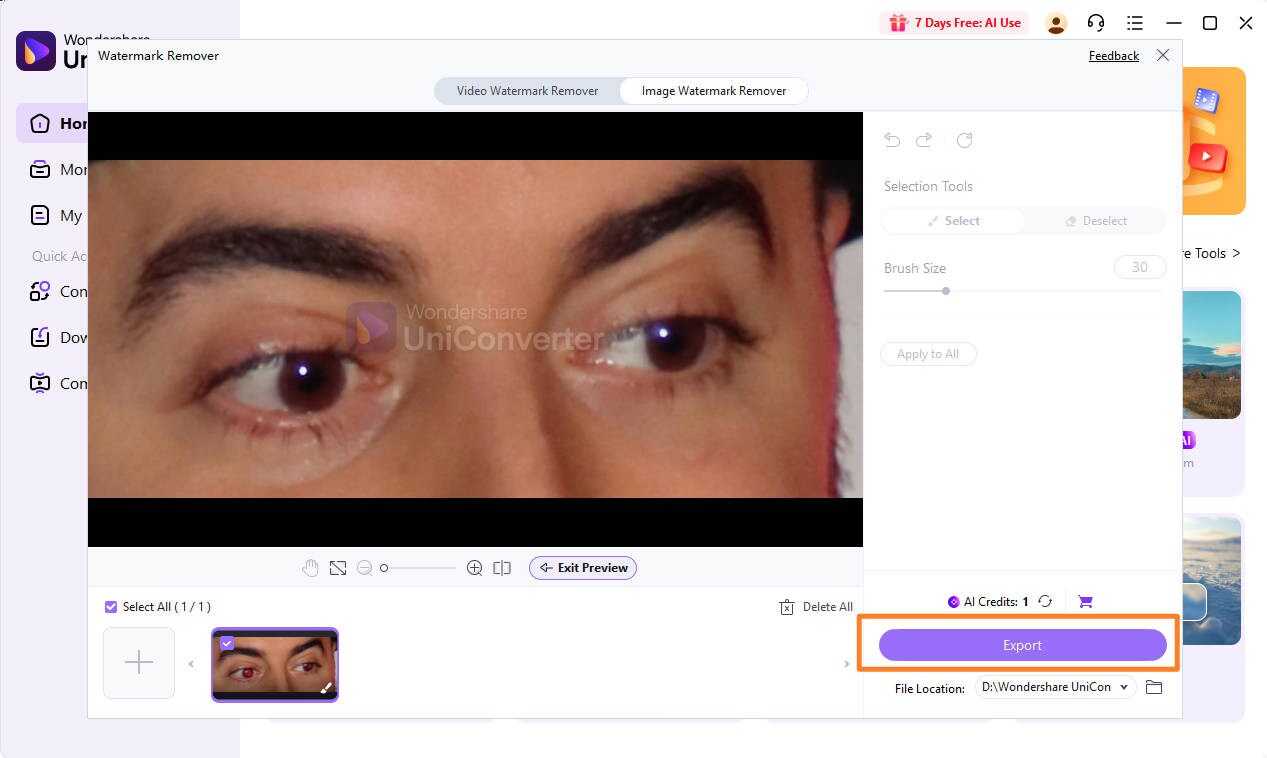
Step 4
Fix and Save Enhanced Images
If the final effect is satisfying and you can then choose export to save the fixed photos.
*Note:
UniConverter’s tool is for human red eye correction. It may not remove light spots in the eyes of animals caused by the camera flash. For that, more advanced manual editing (like Photoshop) is required.
It’s the best app to fix red eye in photos in bulk, saving you hours of editing work. Try UniConverter AI Image Enhancer today and let AI fix red eyes in your photos in seconds, professionally, automatically and effortlessly.

Super Easy to AI Image Object Remover for Win and Mac
Part 3: How to Fix Red Eye in Photoshop
Photoshop red eye removal tool is the top choice for professional photo editing. It’s packed with powerful tools to achieve perfect results. While it has a steep learning curve overall, fixing red-eye is surprisingly easy, even for beginners.
Professional photographers and editors use this software regularly to achieve natural-looking results with minimal effort. Whether you’re on Windows 11 or earlier, or macOS 10.15 and newer, Photoshop makes it easy to correct red eyes in just a few clicks.
Here’s how you can fix red eye in Photoshop:
Step 1
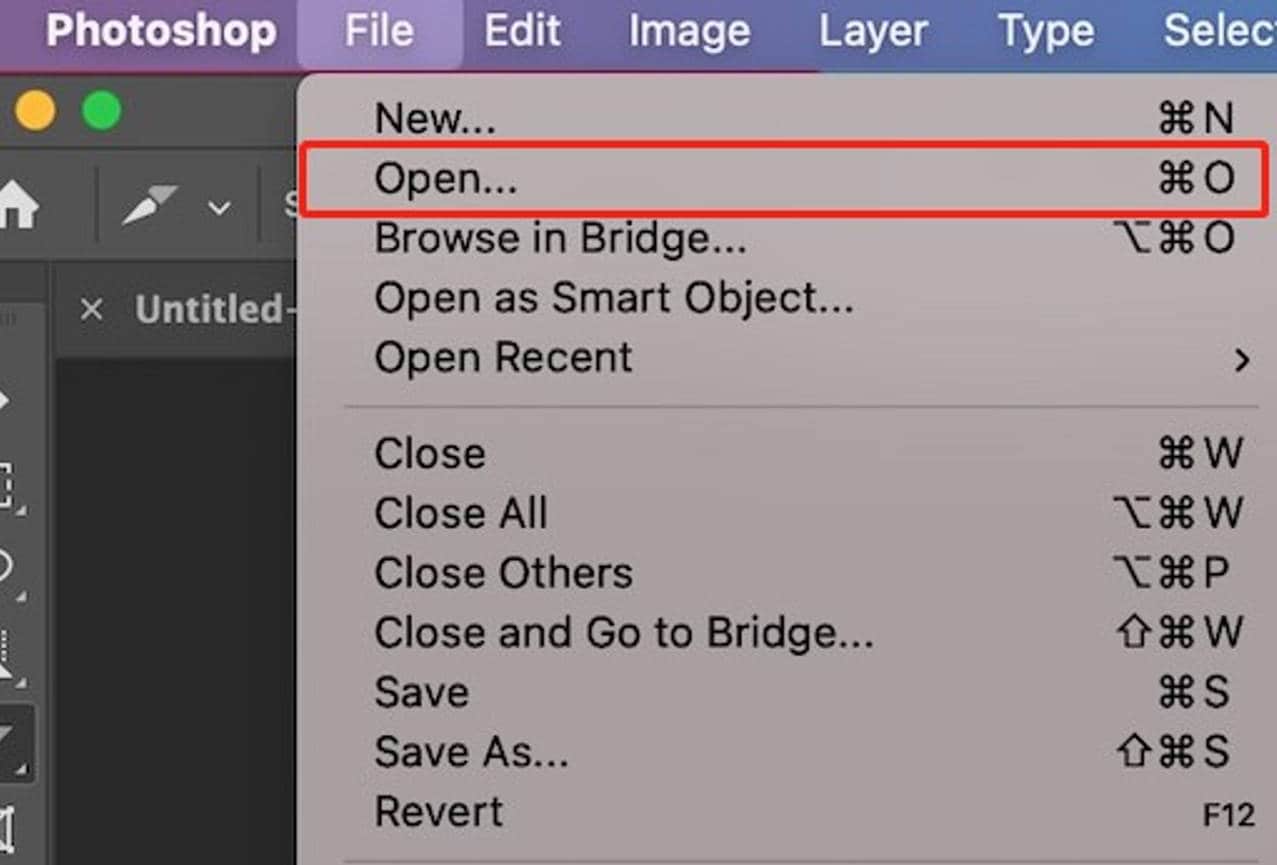
Open your image in Adobe Photoshop by going to File > Open and select your photo.
Step 2
Zoom in on the affected eyes using the Zoom tool (Z) or press Ctrl/Cmd + to get a closer view of the area you’ll be working on.
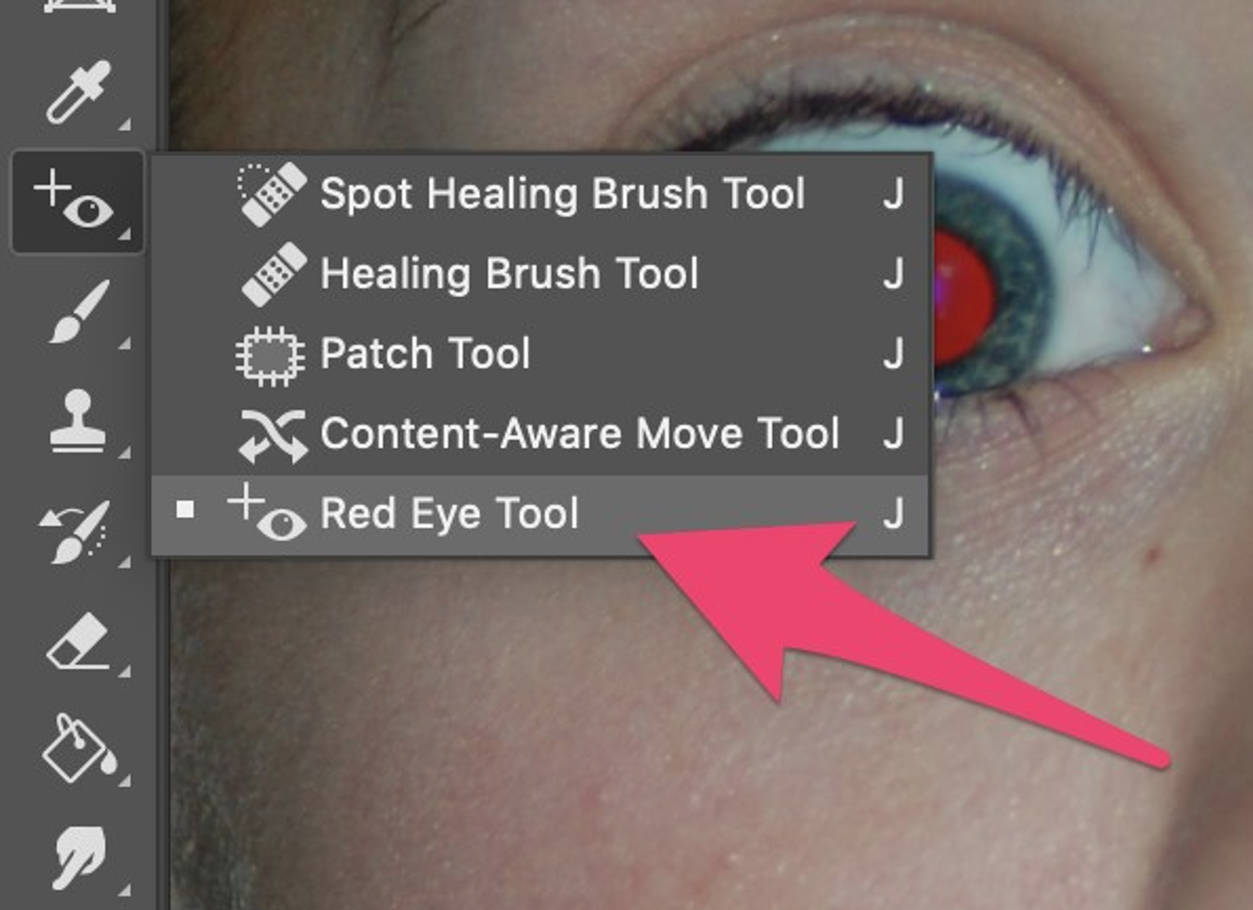
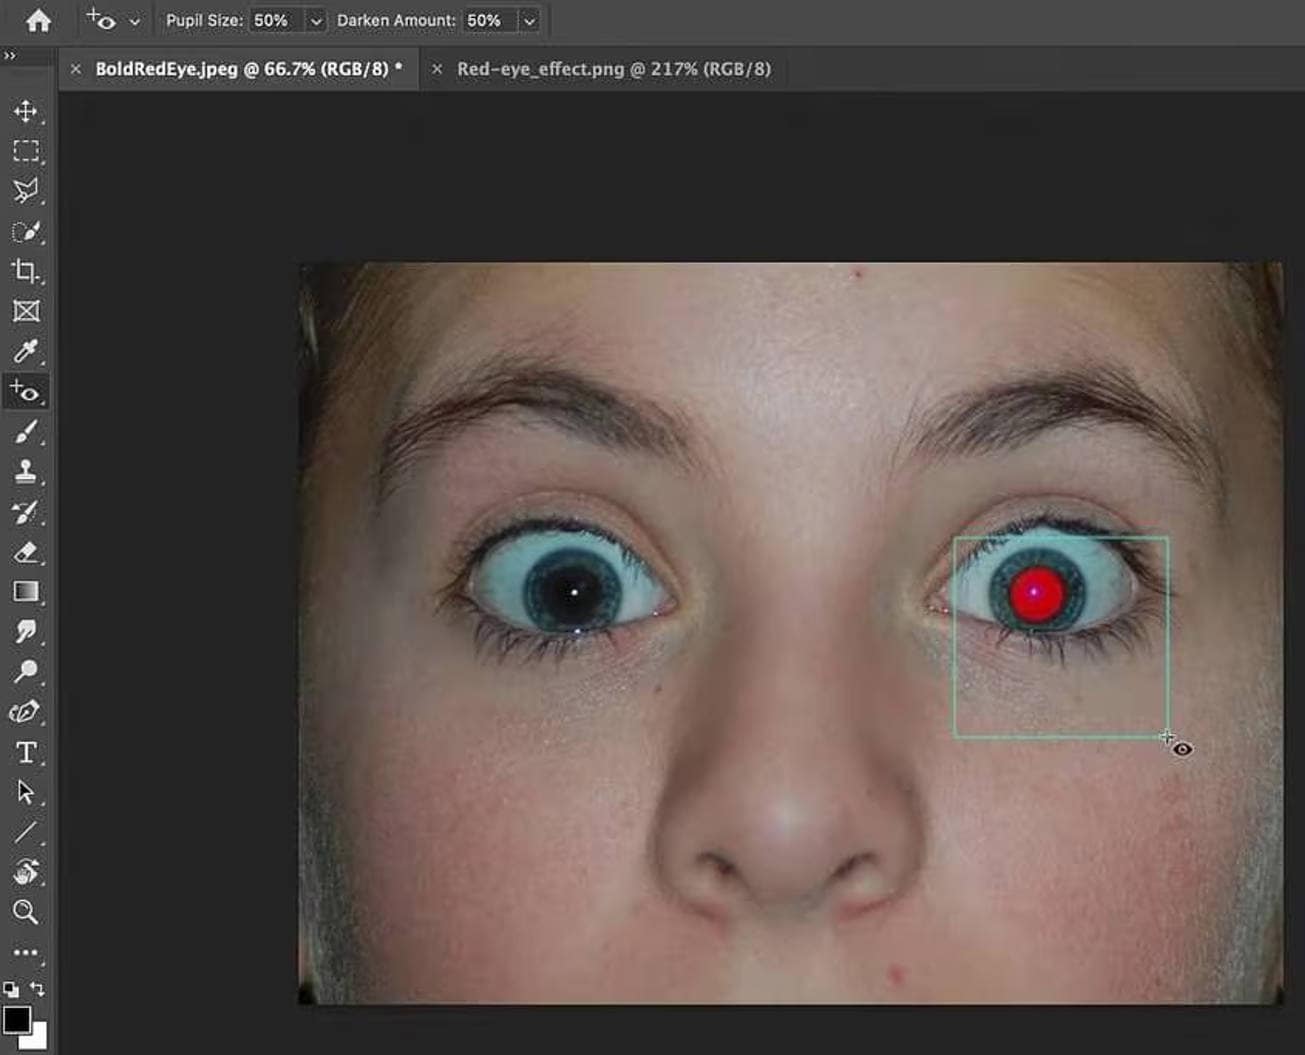
Select the Red Eye Tool from the toolbar. It's typically found with the Spot Healing Brush Tool. If you don’t see it immediately, click and hold on the Spot Healing Brush to reveal the hidden tools, then select the Red Eye Tool.
Step 3
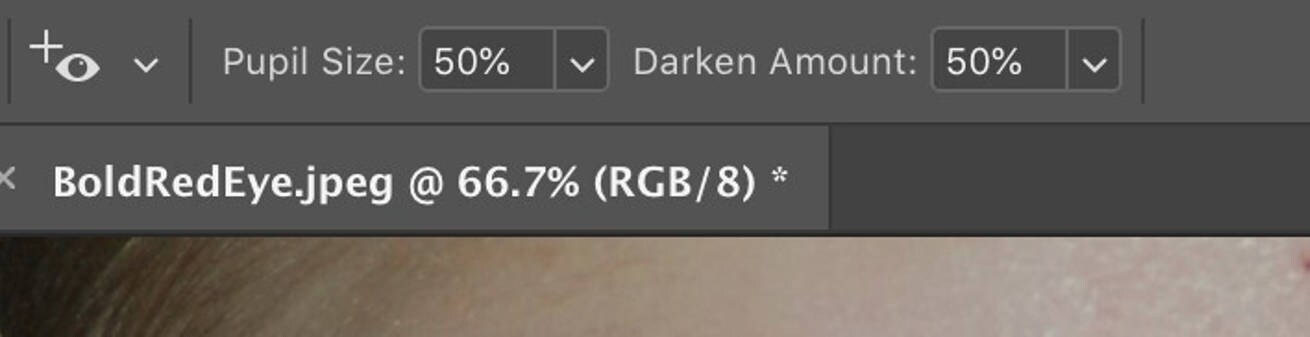
You can update your settings using the options bar at the top of the screen. The default settings of 50% work well for most photos, but you can customize them.
Step 4
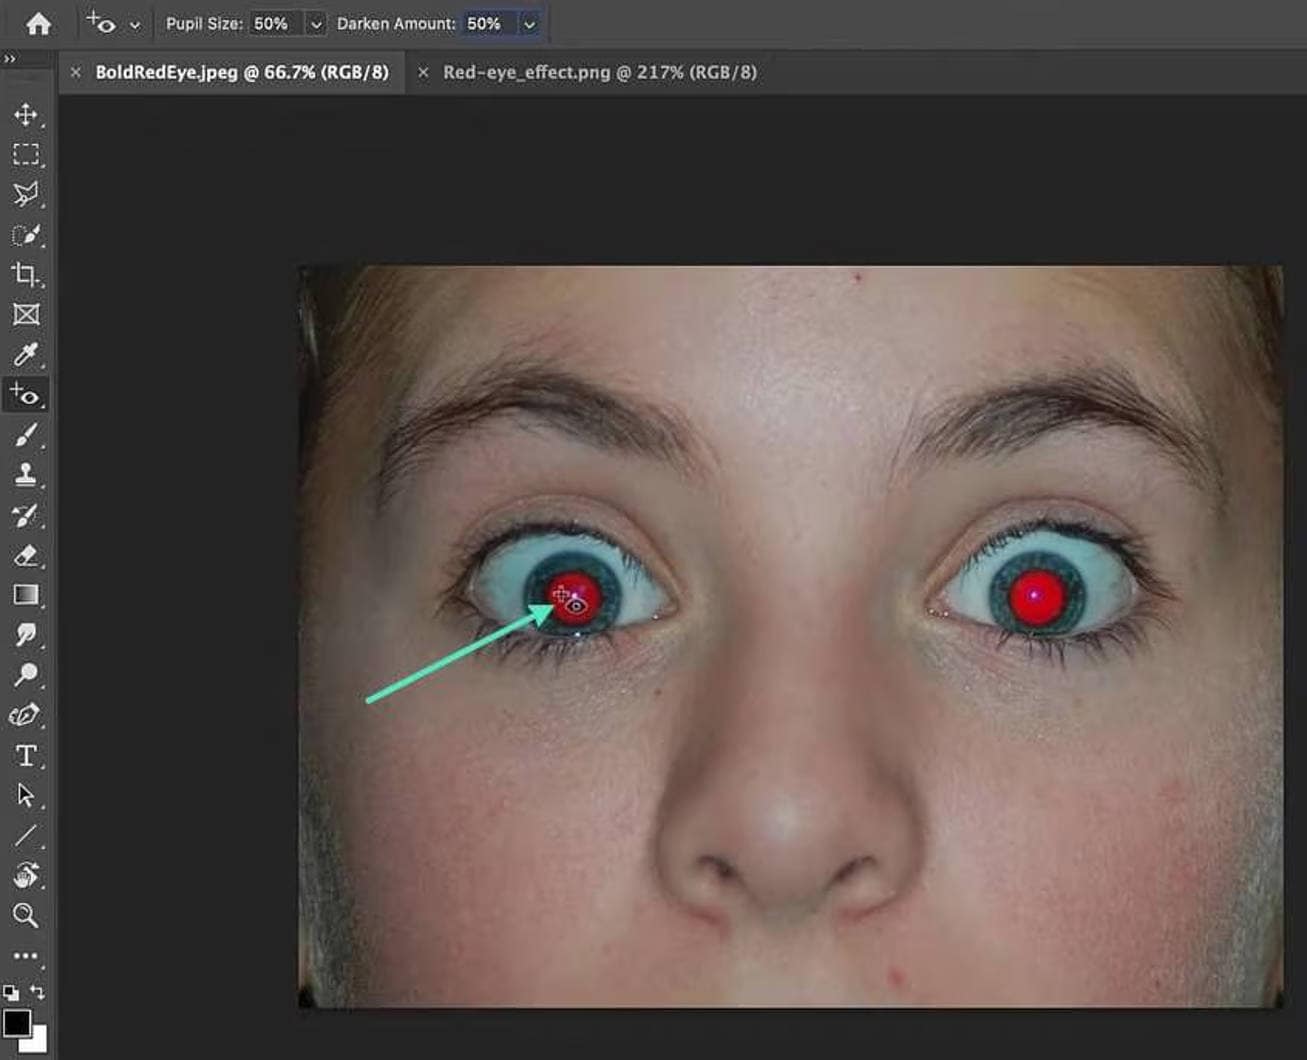
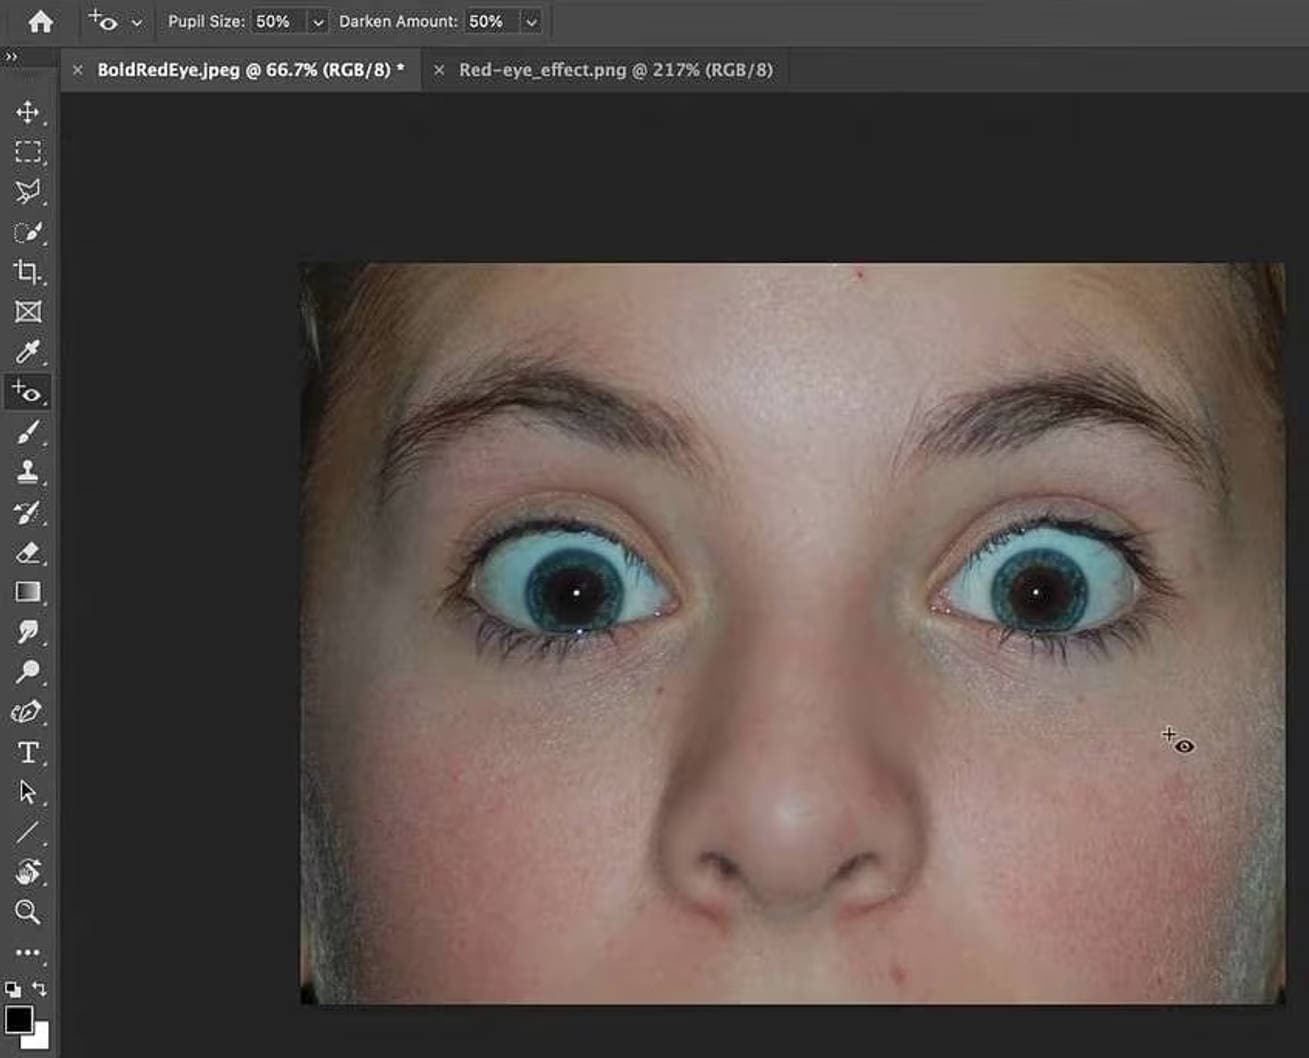
Click directly on the red part in your photo. Photoshop will automatically detect the red area and replace it with a natural-looking black pupil while preserving eye highlights.
Step 5
Repeat for each affected eye in your image.
Step 6
Check the result. If the red eye is still visible, try increasing the Darken Amount (and Pupil Size if needed), then click on the affected eyes again.
Once you’re happy with your edits, save your work by going to File > Save or Save As to keep the original photo.
Whether you want to remove red eye Photoshop style or quick fixes, Adobe delivers great results.
Part 4: How to Fix Red Eye in Lightroom
Adobe Lightroom is a simple way to fix red eye in photos without switching to more complex editing software. It’s part of Adobe’s Creative Suite and is designed to be powerful yet easy to use. Lightroom Classic has more precision with the Adjustment Brush for tougher cases.
One advantage of using Lightroom for red eye correction is it’s non-destructive. Your original image remains untouched, so you can adjust or remove corrections anytime. Plus, once you’ve perfected your correction technique, you can save it as a preset to apply to other photos with similar issues.
Follow these steps to remove red-eye from your photos online using Lightroom:
Step 1
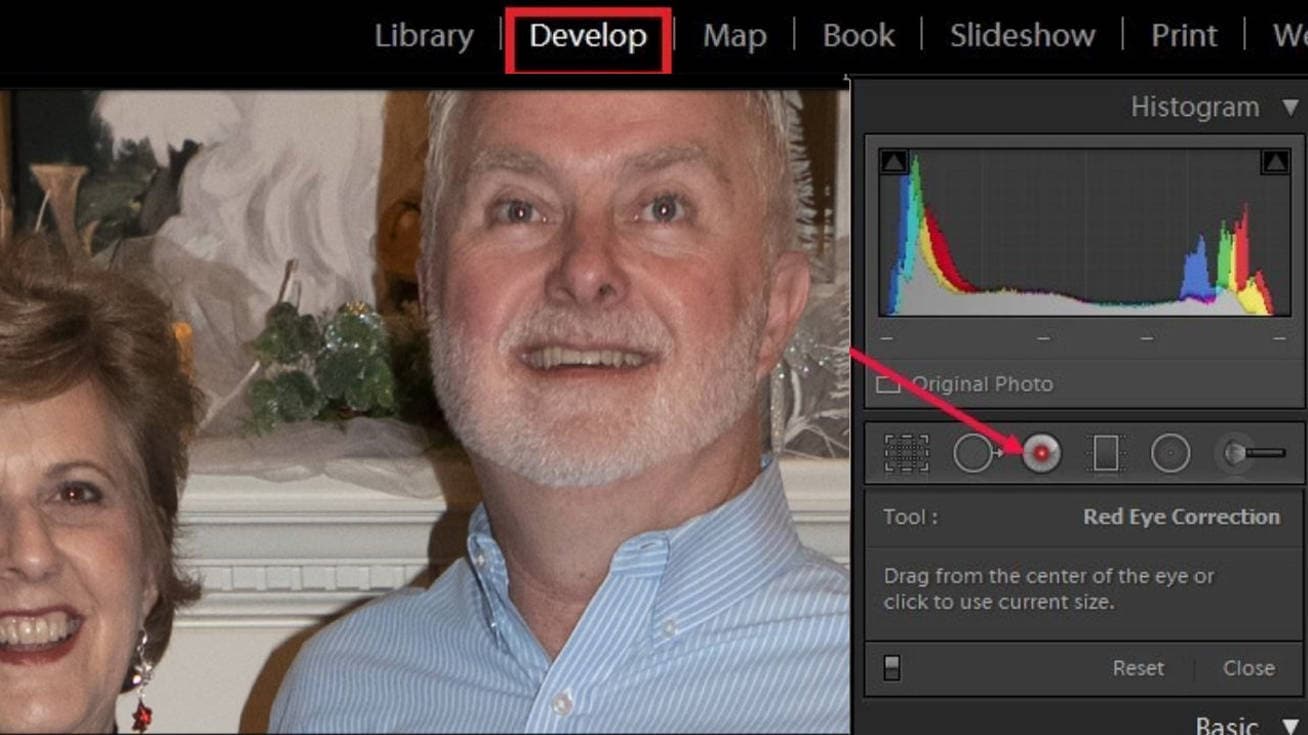
Import the image you want to edit into Lightroom. Go to the Develop module from the top panel.
Step 2
Click the Red Eye Correction tool in the toolbar, usually located on the right side panel. You can also press Ctrl + Plus (Windows) or Command + Plus (Mac) to zoom in for better accuracy.

Step 3
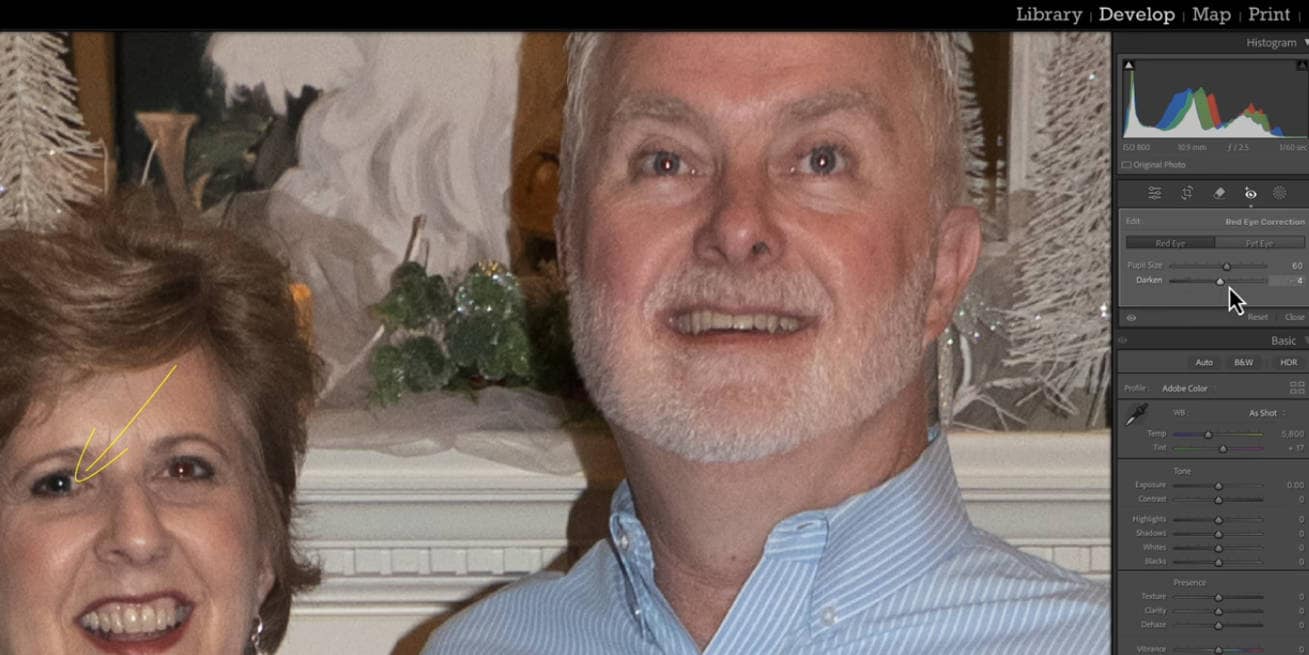
By default, the tool is set to Red Eye, for human subjects. For pets, switch to the Pet Eye tab. Click the center of one red pupil to correct it, then do the same for the other eye.

Step 4
Click on a circled area to select it, then adjust the result using the Pupil Size and Darken sliders.

Step 5
If the subject isn’t facing the camera directly, use the Hand Tool to move the circle. Then, adjust the pupil size and darkness again for better accuracy.
Step 6
Zoom out to view the entire image and review the final result. If needed, go back and adjust again.

With Lightroom, you can remove red eye Photoshop style, without the full Photoshop suite. The red eye removal Lightroom process is fast, and you can easily undo or fine-tune edits without changing the original image.
Super Easy to AI Image Object Remover for Win and Mac
Part 5: How to Fix Red Eye with Pixlr AI
Red eye, caused by the camera flash reflecting off the retina, is one of the most common photography mistakes. Whether you’re editing a portrait or a selfie, Pixlr AI makes it easy to remove red eyes in seconds, right from your browser.
Pixlr’s suite of AI tools makes professional quality editing accessible to everyone. No software download required, no experience necessary. Pixlr has two powerful tools to fix red eye: Pixlr Editor (Advanced Photo Editor) and Pixlr Express (AI Photo Editor), both online and mobile.
To fix red eye using Pixlr AI eye photo editor, follow these simple steps:
Step 1
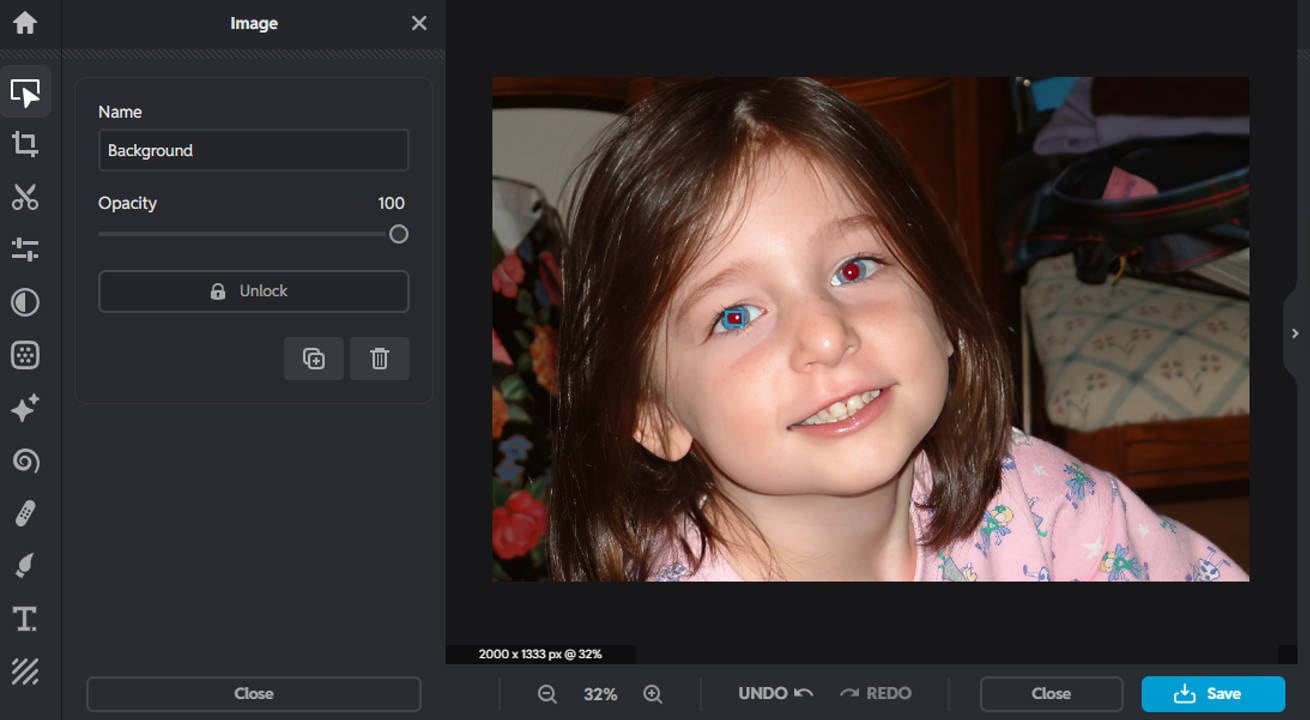
Open Your Image: Go to pixlr.com and choose “Pixlr E (Advanced Editor).” Open your photo with red eye.

Step 2
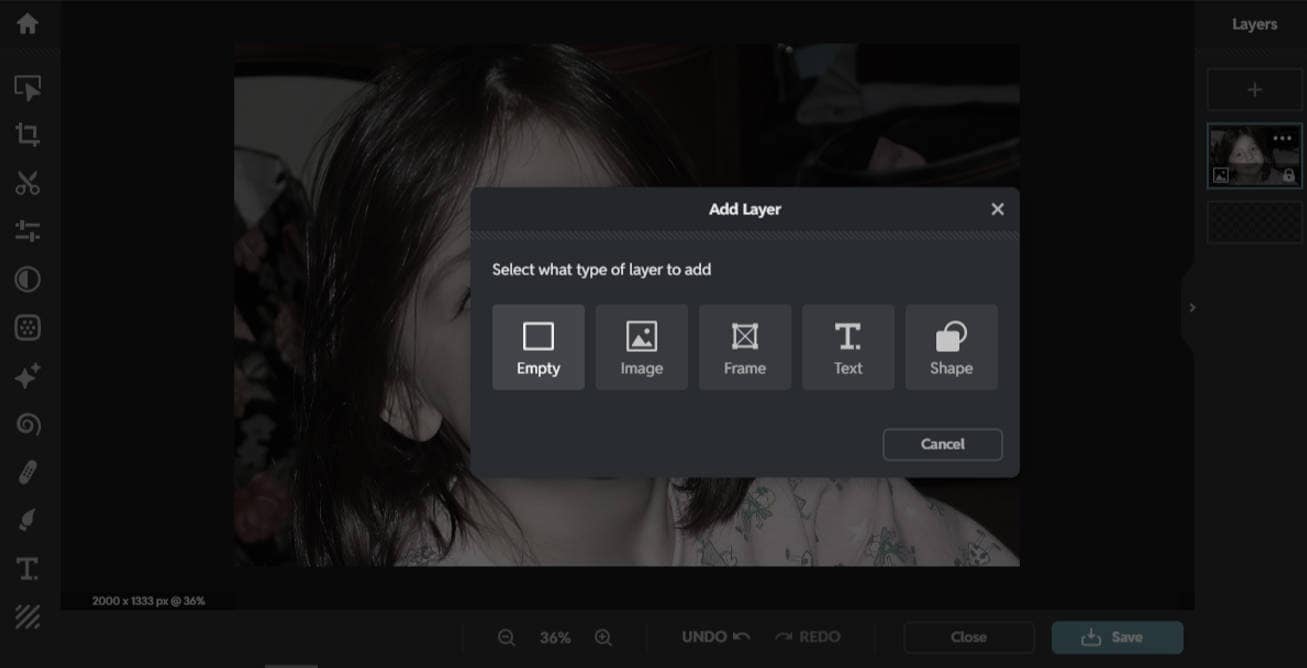
Create a New Layer: In the Layers panel, click the “+” and choose “Empty”. A new layer titled “Layer 2” will appear.
Step 3
Select the Red Area: Choose the “Marquee Select Tool” in Ellipse mode and draw a circle around the red part of the eye.
Step 4
Fill with a Dark Color: Pick the “Fill Tool” and use a very dark color, such as black or dark gray.

Step 5
Blur the Edges: Go to “Filter”, then “Gaussian Blur”, and slide until the edges of the circle soften and look natural.
Step 6
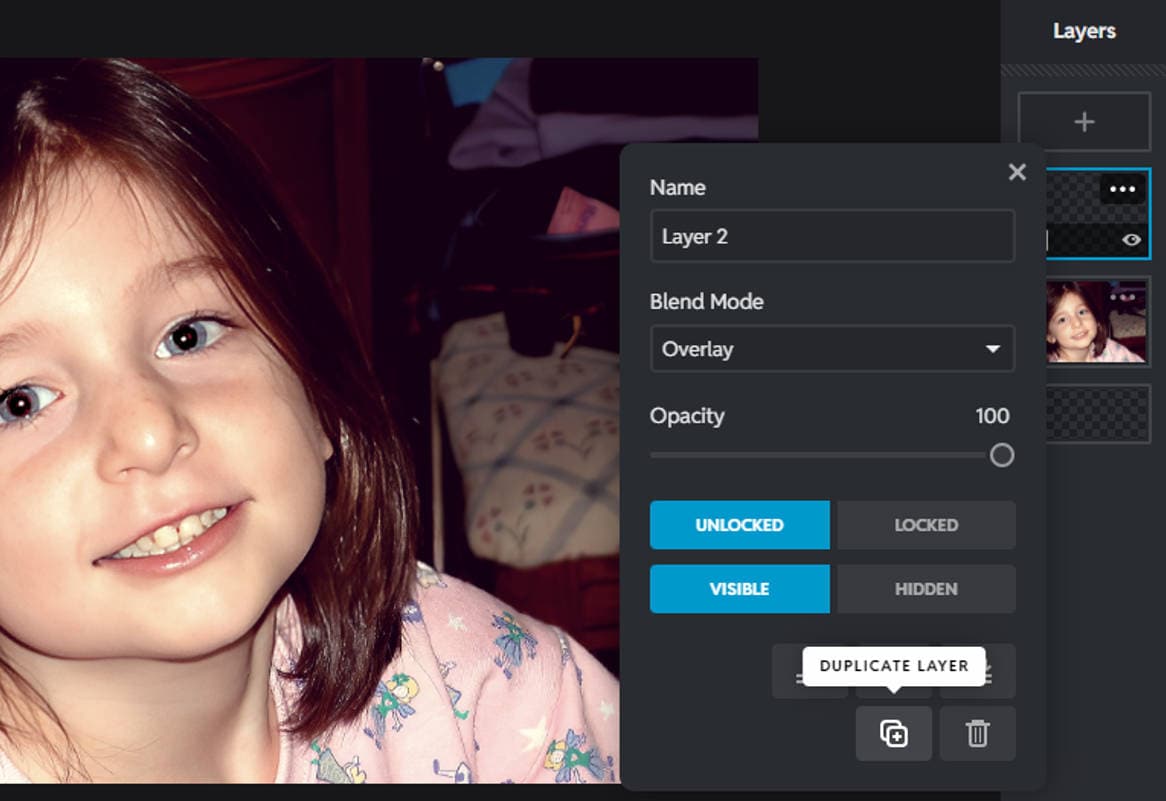
Duplicate the Layer: Right-click on “Layer 2” and select “Duplicate Layer.” You now have two ellipse layers.
Step 7
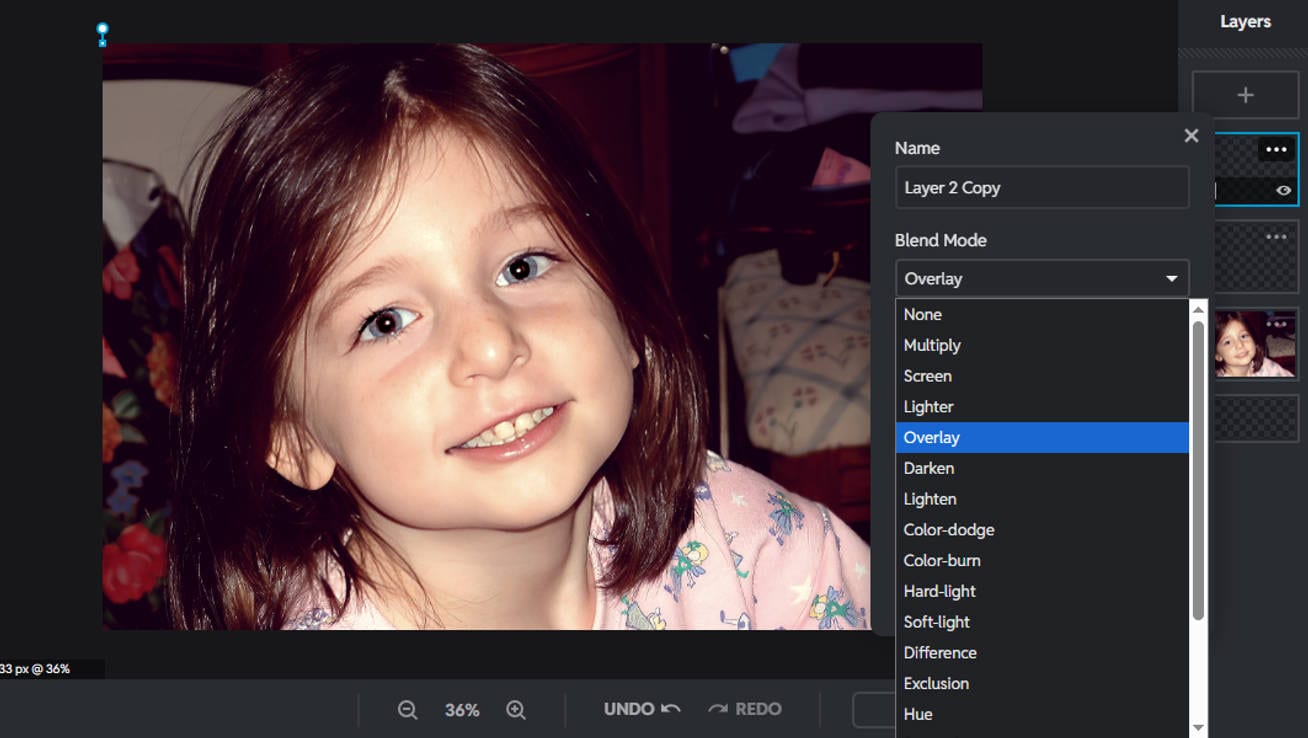
Blend Smoothly: On Layer 2, change the blend mode to “Overlay”. On the duplicated layer (Layer 2 Copy), change the blend mode to “Saturation.” This will make the dark overlay blend with the skin and eye tones.
Repeat for the Other Eye: Repeat the same steps on the second eye while working on the “Background Layer.”
*Pro Tip:
If the correction looks too harsh or unrealistic, flatten the image from the Layers menu. Then use the Blur/Sharpen Tool with the brush set to blur, and gently brush around the edges of the iris to fix it and blend it in even better.
You now have a fixed result using a free red eye remover tool that’s powerful and flexible.
How to Stop Red Eye When Taking Photos
Prevention is always better than correction when dealing with the notorious red eye effect in photos. Instead of spending time editing photos after they're taken, photographers can implement several strategies to minimize or completely avoid this issue in the first place.
Here are six effective techniques to prevent red eye when taking photos:
Use the red eye reduction feature on your camera.
Most modern digital cameras and smartphones have this setting, which emits a pre-flash or series of small flashes before the main flash. This makes the pupils contract before the photo is taken, so less light reflects back.
Increase the ambient light in the room.
The main cause of red eye is dilated pupils in low light. By brightening the overall environment, you naturally constrict the pupils, reducing the likelihood of red eye.
Position your light source away from the camera.
When using external flash units, position them at an angle rather than directly above or beside the camera. This changes the angle of reflection so the light doesn’t bounce straight back into the lens.
Ask your subject to look slightly away from the lens.
Direct eye contact with the camera creates the perfect angle for light to reflect back from the retina. Having your subject look slightly to one side eliminates this direct path.
Let your subject’s eyes adjust to the light before shooting.
If possible, have your subject spend a few minutes in well lit areas before taking photos. This natural adjustment period allows the pupils to constrict.
Use natural or off-camera light whenever possible.
Natural light photography never produces red eye. Bounce flash off ceilings or walls for indoor shots rather than pointing it directly at your subject.
Conclusion
Red eye in photos may seem like a minor issue, but it can really impact the overall quality and impression of your images. Whether you’re a pro photographer or just capturing everyday moments, knowing how to remove red eyes efficiently is crucial. There are plenty of options from powerful desktop tools like Photoshop red eye tool and Lightroom red eye removal, to online solutions like Pixlr AI, and even apps to remove red eye in pictures like UniConverter’s AI batch tool. And don’t forget, prevention is better than correction. Follow simple camera setup tips to avoid the red eye effect before it even starts. Now you’re ready to edit out red eye with confidence, on PC, mobile or online.
Super Easy to AI Image Object Remover for Win and Mac
FAQs
-
1. Can red eye removal tools fix animal eye shine?
Most standard red eye removal tools are designed for human eyes and struggle with animal eye shine. Animal eyes reflect light differently, typically producing a green or yellow glow instead of red. Specialized animal eye shine correction features or manual editing techniques work better for pet photos. -
2. Will red eye correction work on old scanned photos?
Yes, red eye correction tools work on digitized old photographs. Once scanned, these images can be processed using any of the methods mentioned above. But you may need to adjust contrast and brightness first to improve the tool’s ability to detect the red areas accurately. -
3. Why do some people get red eye more frequently than others?
Eye color and pupil size mainly determine susceptibility to red eye effect. People with lighter colored eyes (blue, green, gray) get more noticeable red eye because they have less melanin to absorb the flash. Larger pupils naturally allow more light to enter and reflect back, increasing the chance of red eye in photos. -
4. Can smartphone cameras prevent red eye?
Modern smartphones have various technologies to reduce red eye, including separate flash positioning, pre-flash functions and computational photography. But in low light, even the best camera still needs some help from a get rid of red eye app. -
5. Is there a way to remove red eye from photo of multiple people in a group photo at once?
Batch-processing tools like Wondershare UniConverter can correct an entire image at once, while other programs require treating each eye individually. For group photos with multiple subjects, dedicated red eye removal software saves a lot of time compared to manual editing.

