AVCHD
- TRY IT FREE TRY IT FREE
- 1. AVCHD Knowledge+
- 2. Convert & Play AVCHD+
AVCHD Editor: How to Edit AVCHD Files Effortlessly
by Christine Smith • 2026-01-21 18:54:06 • Proven solutions
It's most likely that you want to edit AVCHD videos recorded by your high-definition camcorder to keep or share your sweet memories with others. However, it's not easy to do this. Many common editing tools don't support AVCHD formats. However, there are still some available tools to edit AVCHD files. In this article, you can learn the best 2 AVCHD editors for Windows and Mac and convert AVCHD files for editing in more programs.
- Part 1. How to Convert and Edit AVCHD Files Easily on Windows/Mac
- Part 2. How to Edit AVCHD with Wondershare Filmora
Part 1. How to Convert and Edit AVCHD Files Easily on Windows/Mac
Suppose you want to own a professional video editor. In that case, you can use Wondershare Filmora in the next part. Still, if you require more functions than an editor, as a converter, downloader, recorder, Wondershare UniConverter would be a much better choice. It can not only edit your videos but also convert your videos to many other formats like MP4/MOV so that you can import it to any video editor for further editing. You can also download/record videos from YouTube using Wondershare UniConverter.
 Wondershare UniConverter - Best AVCHD Converter and Editor Mac/Windows

- Edit AVCHD videos with trimming, cutting, merging, cropping, adding subtitles, applying effects, etc.
- Convert AVCHD files to 1000+ formats, including MP4, MOV, WMV, AVI, MKV, etc.
- Convert MOV files to optimized preset for almost all devices, like iPhone, iPad, Huawei phone, etc.
- 90X faster conversion speed than common converters with unique APEXTRANS technology.
- Burn and customize videos to your DVD or Blu-ray disc with free DVD menu templates.
- Download or record videos from YouTube and other 10,000+ video sharing sites.
- Transfer videos from computer to iPhone, iPad, and other devices directly and vice versa.
- Versatile toolbox: Add video metadata, GIF maker, video compressor, and screen recorder.
- Supported OS: Windows 10/8/7/XP/Vista, macOS 11 Big Sur, 10.15 (Catalina), 10.14, 10.13, 10.12, 10.11, 10.10, 10.9, 10.8, 10.7, 10.6.
Steps to Convert and Edit AVCHD file on Windows/Mac
Step 1 Import the AVCHD files to AVCHD editor.
After you download and install the video converter on your computer, then you can just drag and drop your AVCHD files to the program or click the Add Files to browse and load AVCHD files from the pop-up window.

Step 2 Edit the AVCHD file.
Click one of the Edit buttons under the video thumbnail shown on the above picture, and you will enter the Editing window. You can crop, trim, adjust the video, and add subtitles, etc. You can learn more detailed steps to edit AVCHD videos.
![]()
Step 3 Select output format and convert AVCHD videos.
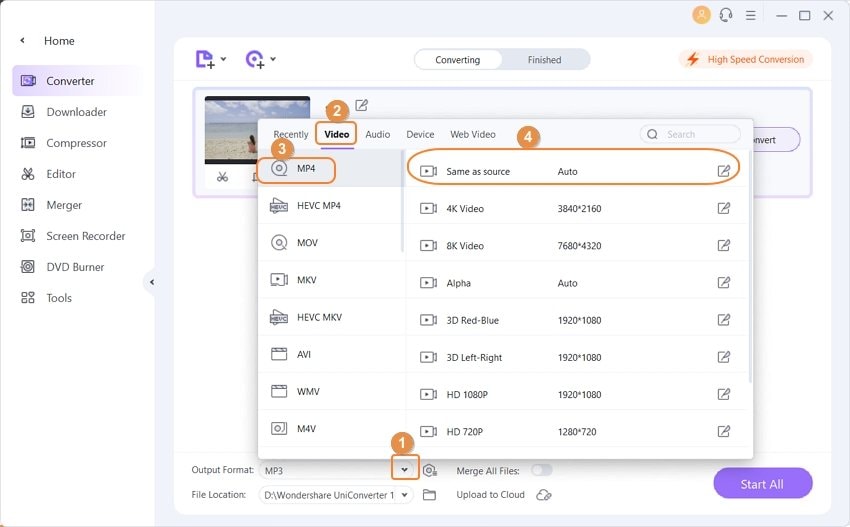
There are many formats you can choose. Click the drop-down icon beside Output Format and select the output format like MP4 and the resolution from the Video tab. Finally, click the Start All button to finish the conversion process.

After conversion, you can find the converted files under the Finished tab, and now you can transfer or import AVCHD files to any devices you need.
Part 2. How to Edit AVCHD with Wondershare Filmora
Wondershare Filmora is a professional but easy to use video editor for Windows and Mac. You can edit AVCHD files with trimming, cropping, cutting, adding effects, and more others. Download, install, and run this AVCHD editor and then follow the guide here.
Step 1: Import AVCHD files to the User's album.
Click the "Import" option to import AVCHD videos from your computer to this AVCHD editing app's album. Also, you can directly drag AVCHD files from the computer to the User's album.
Note: If your AVCHD files are on your camcorder, you need to connect it to the computer, and then take the AVCHD videos off.

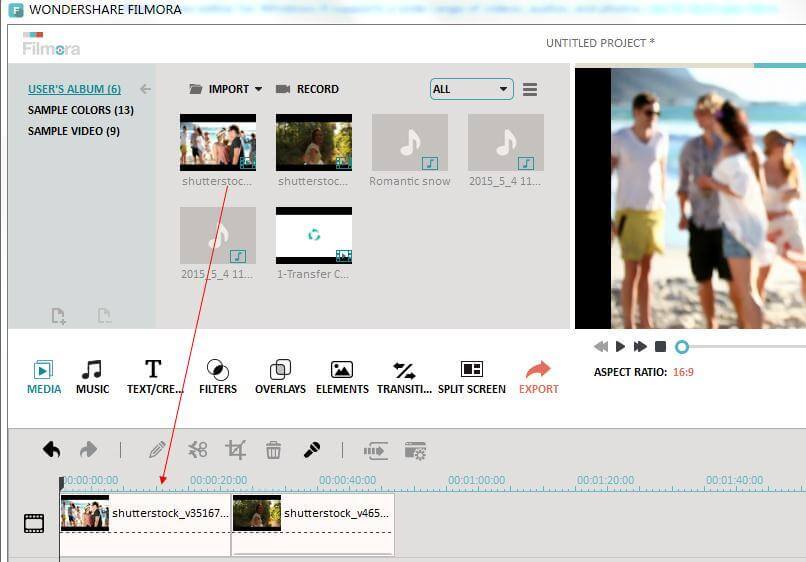
Step 2: Drag AVCHD files to the User's Timeline.
Drag one or several AVCHD files from your Album to the Timeline at the bottom. Note that please don't cover one video to another unless you want to split it. To add multiple files better, you can drag the slide bar (next to the Create button)to adjust the Timeline's view size.
Step 3: Edit AVCHD files.
Select your wanted video clip on the Timeline and then right-click it and then select Edit option, or directly double-click on the media clip to open the editing panel, where you can rotate, crop video, and change video effect and speed in the video bar, edit audio track in Audio bar.
If you want to trim video to the specified length, click the video clip, mouse over its left or right edge to show the "double arrow" indicator, and then drag it to any length you want.
To split a video clip, you need to select it by clicking, drag the top of the red Time Indicator to any position you want, and then click the scissor button.

Note: This smart AVCHD Editor also allows you to join AVCHD files, add titles, transition effects, and intro/credit, etc. to your videos. Importantly, you can view all the real-time editing effect in the Preview window. If you are not satisfied with the editing effect, just do it again.
Step 4: Share your videos.
When you've finished the AVCHD editing job, click the Export button to save the settings.
After learning these 2 AVCHD editors, you can choose one of them to help you edit AVCHD videos easily on Windows/Mac. If you want to convert the AVCHD formats too, then Wondershare UniConverter will be your better choice.


Christine Smith
chief Editor