If you’ve ever captured a cherished memory only to end up with agrainy photo, you’re not alone. Understanding why this grainy photo effect happens is the first step to improving your shots.
In this guide, you’ll learn how to remove graininess from photo batches using desktop apps, fix grainy photos in Photoshop, and even enhance images captured on your phone. Plus, we offer quick mobile solutions and Lightroom tweaks—all designed to help you how to make a photo less grainy and color-rich again.
In this article
Part 1. Why Pictures Become Grainy
Photos often develop a grainy photo effect mainly because of image noise. This graininess typically happens due to several factors. One primary reason is shooting in low light conditions, which forces the camera to increase the ISO setting, resulting in noise. Another common cause is high ISO, which makes the sensor more sensitive but introduces more grain. Underexposure during shooting also contributes to grainy images because lifting shadows in editing amplifies noise. Additionally, older or lower-quality cameras tend to produce grainier photos due to sensor limitations. Understanding why do my photos look grainy helps in preventing it next time.
1. Low Light Conditions
When shooting in dim environments, cameras struggle to capture enough light. To compensate, they boost ISO or exposure, which raises noise levels—making your final result look like a grainy photo effect.
2. High ISO Settings
ISO acts like the sensitivity dial on your camera sensor. Increasing it lets you capture darker scenes but also magnifies tiny electrical disruptions—often appearing as blotchy or speckled noise. This is why many beginners ask, “Why are my photos so grainy?”
3. Underexposure
If your photo is too dark initially, you might raise brightness in post-production. However, boosting underexposed shadows also amplifies noise, turning your once - decent image into a patchy, messy one.
4. Small Sensor or Limited Dynamic Range
Many inexpensive cameras or smartphones have small sensors that can’t collect enough light. Coupled with limited dynamic range, this results in color or luminance noise. Ever wonder why do my photos look grainy? Sensor limitations are often the culprit.
Understanding these causes empowers you to adjust camera settings—like aperture, shutter speed, and ISO—before snapping a picture. Even basic adjustments can dramatically reduce noise. Ready to reset grainy images and make them look clear? Let’s dive into batch processing next!
Part 2. [Most Recommended] How to Easily Batch Fix Grainy Pictures with High Resolution
If you're wondering how to fix grainy photos, UniConverter offers a user-friendly solution. It can remove graininess from photo batches effectively while maintaining high resolution. To start, upload your grainy photos into the software. Next, use the AI-powered enhancer to reduce noise. The tool automatically adjusts brightness and contrast to make the image clear without losing detail. Finally, export your images in the preferred format. This process is fast and ideal for fixing multiple images at once. With UniConverter Imgae Enhancer , you can fix grainy photos free in bulk, saving valuable time and effort.
Why You Should Use UniConverter
UniConverter isn’t just a video tool—it also includes a powerful Image Enhancer that applies denoise + resolution upscale. This makes it ideal for those searching how to fix grainy images all at once. It supports over 1000 formats (JPG, PNG, TIFF, RAW) and outputs in high-res options like 4K, making it a top pick for users wanting to fix grainy photos free trial or full version.
Step-by-Step Guide:
Step 1: Open UniConverter and Go to Toolbox → Image Enhancer
Launch the software and navigate to the Toolbox tab, where you’ll find the Image Enhancer tool. This is where how to fix a grainy photo at scale begins.

Step 2: Add One or Multiple Grainy Photos
Click Add Files or drag folders containing grainy images. UniConverter allows you to import entire shoots, solving how to fix grainy pictures in minutes instead of hours.

Step 3: Select ‘Auto Enhancer’ Mode
Select the Auto Enhancer option to eliminate graininess and achieve perfect sharpness, which is ideal for users who want to reduce photo grain while preserving clarity.

Step 4: Preview One Sample Photo
Before batch processing, preview a single image to ensure the tool removes noise without over-smoothing. This step is essential if you want to make image grainy tastefully or fully remove it.

Step 5: Export
Click Export. UniConverter will swiftly process all selected files if you have selected multiple files, applying Auto Enhancer. You’ll soon have a folder full of crisp, clean photos—fully addressing the common desire of how to fix grainy photo collections.

Benefits You’ll Get
- High-Speed Batch Fixes – No more tedious single-image editing.
- Professional Results – Clear images without sacrificing detail.
- Quality Control – Preview helps maintain natural textures.
- Format Flexibility – Supports RAW, JPG, and PNG with custom output.
Part 3. How to Fix Grainy Pictures in Photoshop
Photoshop provides advanced controls if you want to fix grainy photos in photoshop or how to fix grainy images in photoshop. Start by opening your grainy photo in Photoshop. Use the “Reduce Noise” filter under the Noise menu to smooth out grain. Adjust sliders for strength, preserve details, reduce color noise, and sharpen details. Next, apply subtle sharpening to avoid further grain enhancement. Using layers and masks helps you fix only specific areas. Photoshop is perfect for precise edits when you want to how to fix grainy photo in photoshop or how to fix grainy pictures in photoshop with professional quality.
Why Photoshop Works Best for Precision
Graininess in photos—whether caused by high ISO, underexposure, or low-light settings—can be tackled in Photoshop through layer adjustments, filters, and masking. If you’re asking how to fix grainy images in Photoshop with control over luminance, detail, and color noise, this method is ideal.
Photoshop lets you zoom in, analyze pixels, and selectively apply effects, giving complete control compared to auto-tools. It’s also highly beneficial l when learning how to make grainy photos clear while still keeping the image’s natural feel.
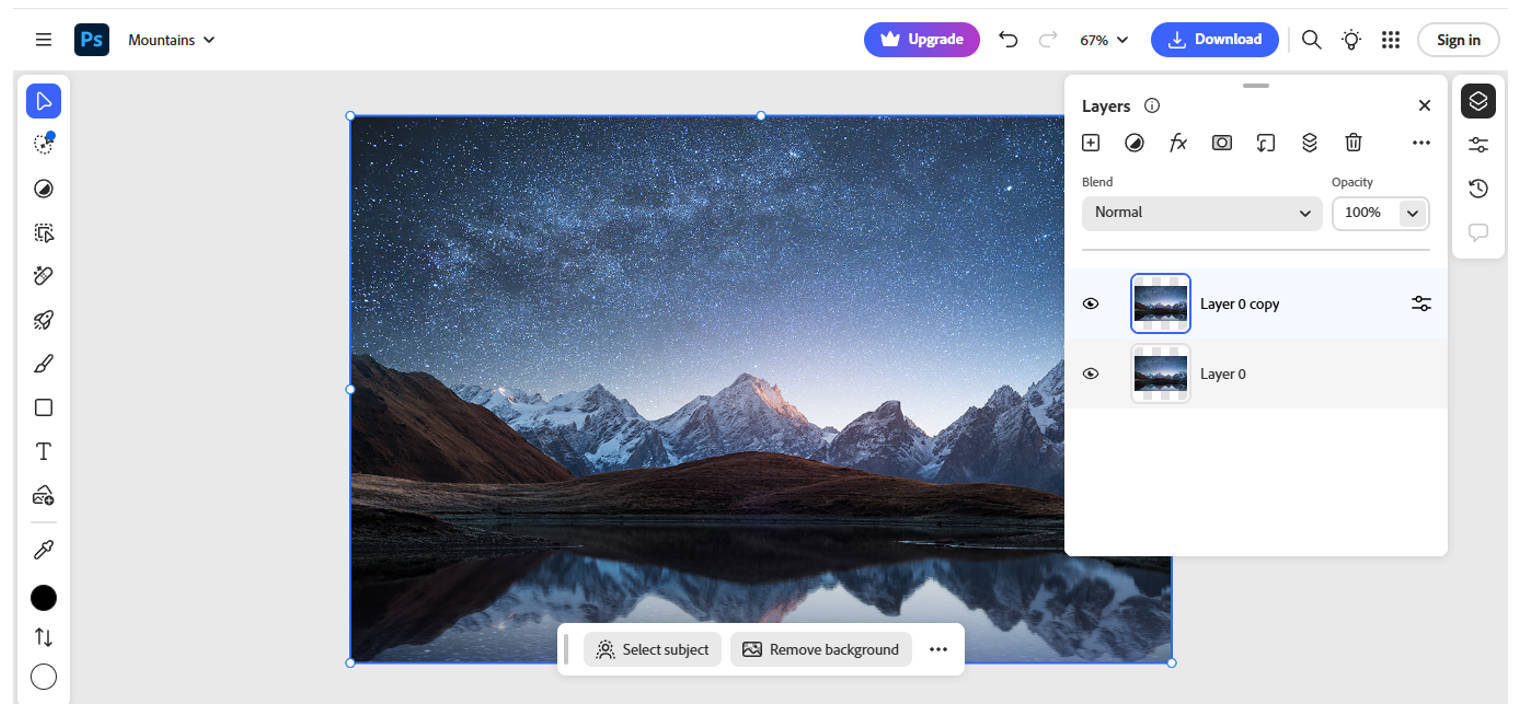
Step 1: Open Your Image and Duplicate the Layer
Launch Photoshop and import the grainy image. Press Ctrl + J (Cmd + J on Mac) to duplicate the layer—this lets you apply edits non-destructively while keeping the original safe.
Step 2: Use the Filter
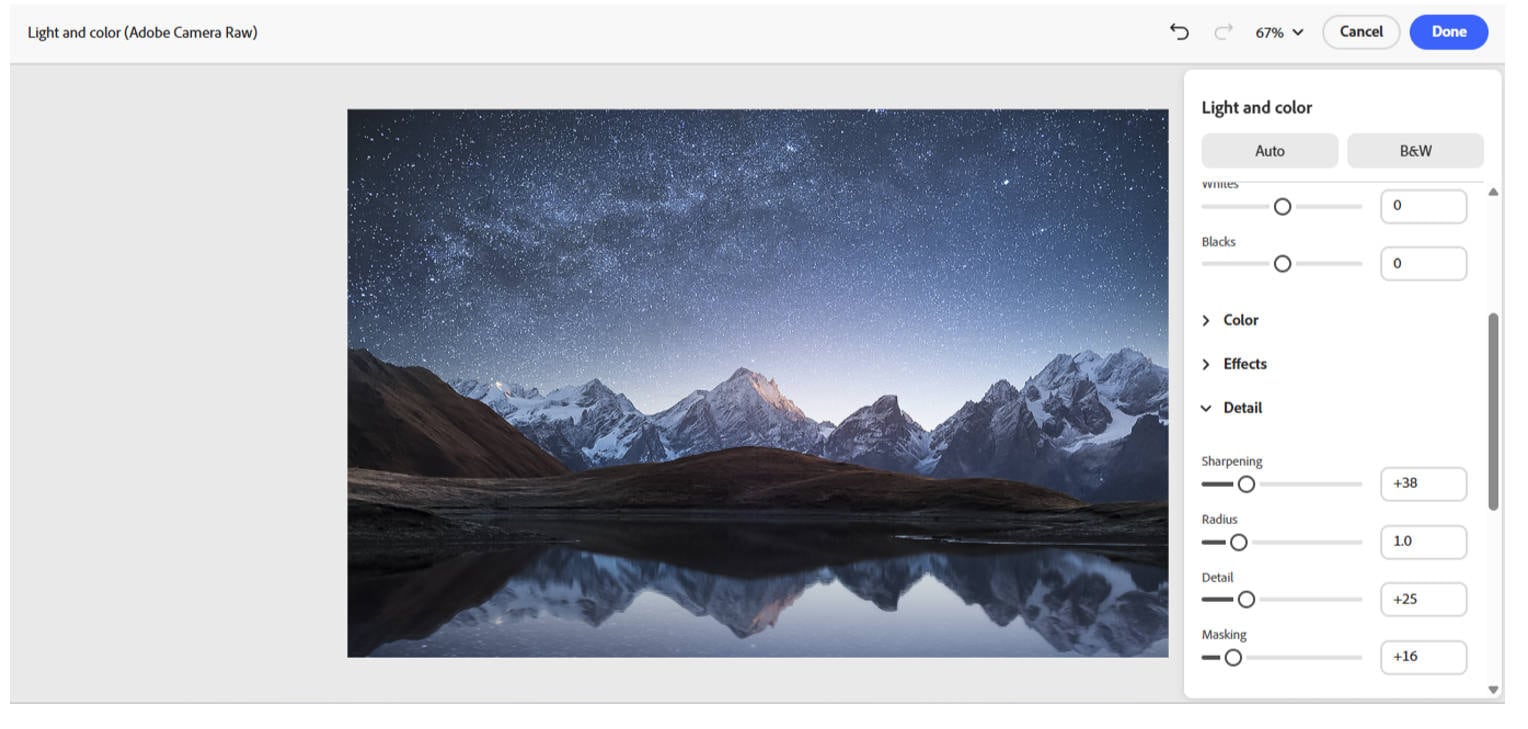
Navigate to Filter > Light and Color(Camera Raw). Once open, click the Detail tab. This section contains sliders for reducing both luminance (brightness noise) and color noise.
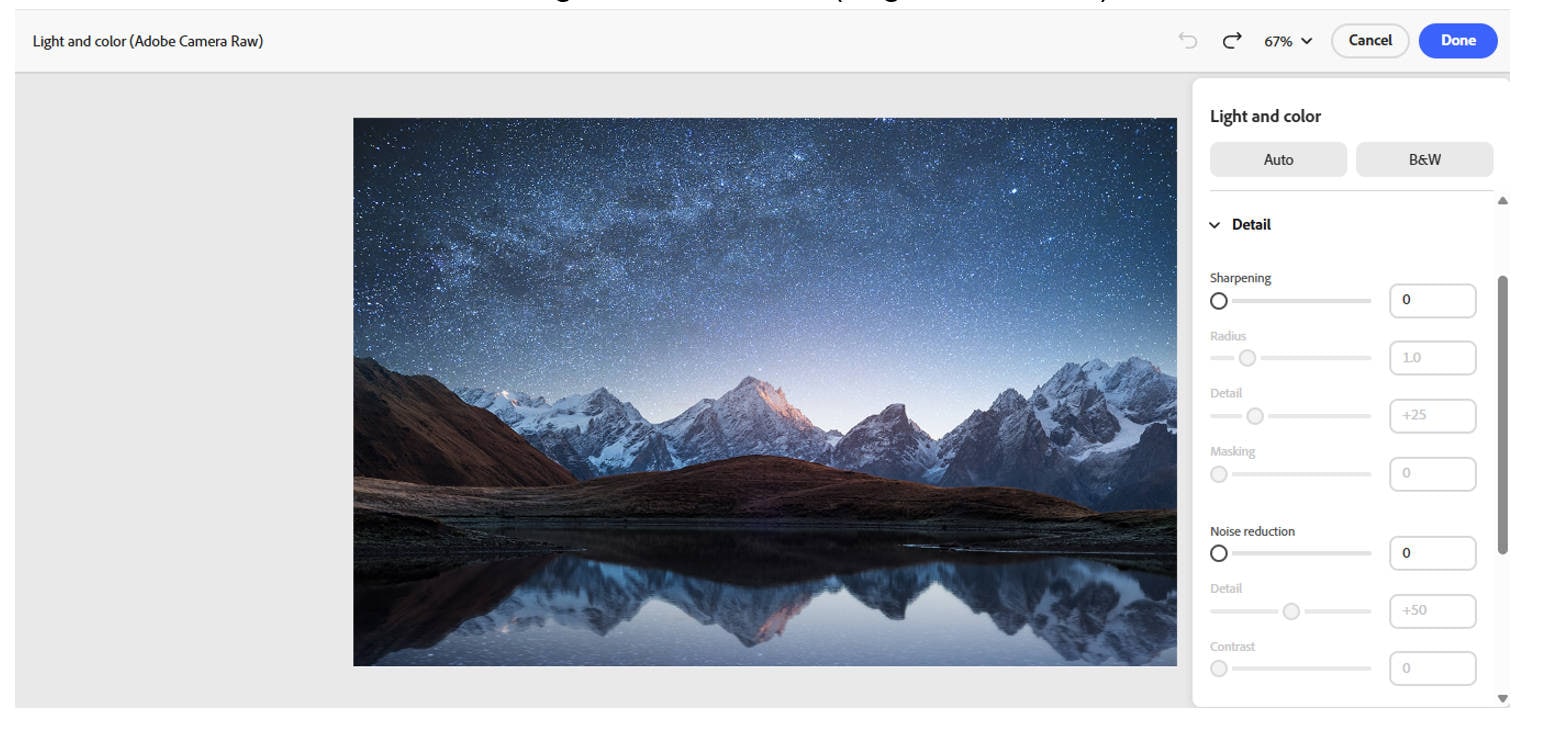
Step 3: Reduce Luminance Noise
Slide the Luminance control up slowly—start around 25–40 to smooth out grain without losing too much detail. Keep checking the image zoomed in to strike the right balance.
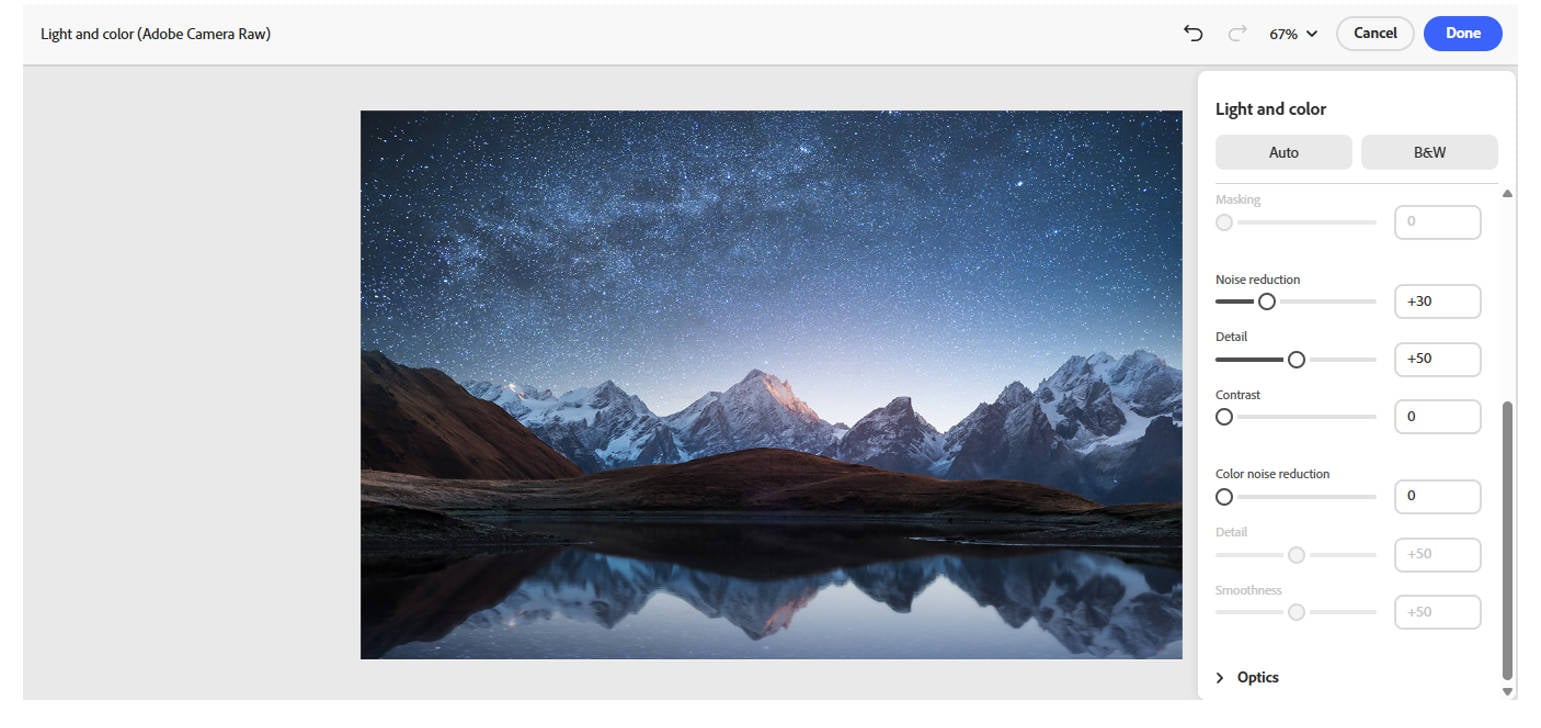
Step 4: Refine Color and Detail Settings
Boost Color Noise Reduction slightly to fix splotchy areas. Adjust the Detail and contrast; adjust the sliders under the Noise Reduction settings to avoid plastic-like textures and to maintain image clarity.
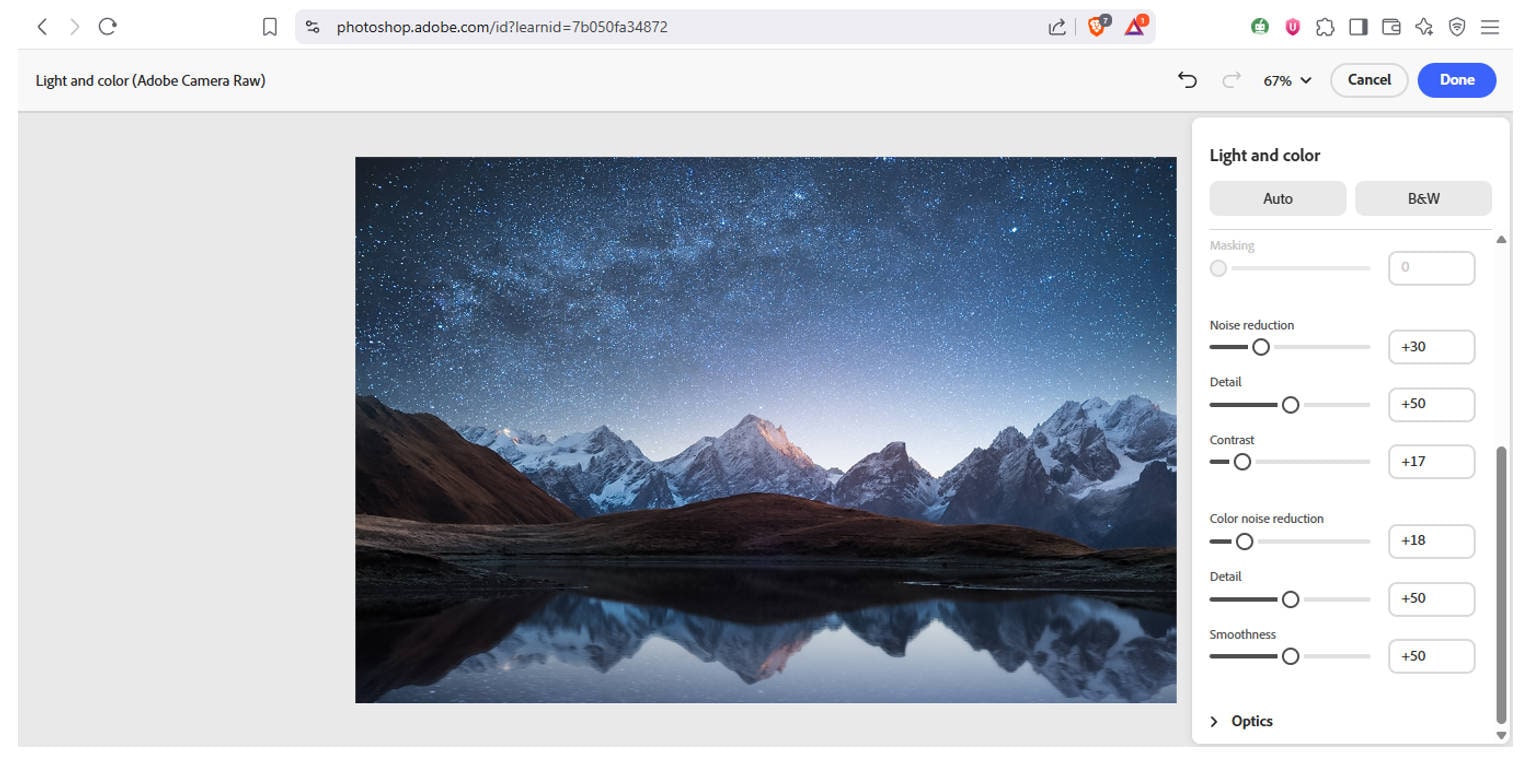
Step 5: Add Sharpening (Optional but Useful)
Go to Filter > Detail > Sharpening to enhance edges and restore clarity lost during noise reduction. Use small values to avoid over-sharpening the cleaned image. For speed and ease, use the Auto option to avoid doing all these steps and let AI make your image grain-free and visually appealing with clarity.
Ideal For:
- Professionals fixing studio images or night shots.
- iPhone users are asking how to fix grainy iPhone photos post-import.
- Editors working with high-res files and wanting granular control.
Part 4. How to Fix Grainy Pictures with Mobile
To fix grainy photos on iPhone or Android, apps like Snapseed work great for on-the-go fixes. Snapseed's “Details” tool lets you adjust the structure and sharpen while the “Noise Reduction” feature reduces grainy photo effects effectively.Open your grainy image in Snapseed, select the Noise Reduction tool, and adjust the sliders to make the photo more straightforward. This app works well for grainy iPhone photos and Android alike. You can quickly learn how to make photos less grainy from your mobile device without needing complex software.
Why Snapseed is Ideal
Snapseed is great for mobile users who want to know how to fix grainy photos on iPhone or Android. It’s lightweight, intuitive, and has specific filters for noise reduction, detail enhancement, and smart sharpening. Plus, the app doesn’t compress images heavily, so you won’t lose quality while trying to make a photo less grainy.
Step-by-Step: How to Fix Grainy Photos Using Snapseed
Step 1: Download and open Snapseed
Head to the Google Play Store or Apple App Store and install Snapseed. Open the app and tap the “+” icon to import your grainy photo.

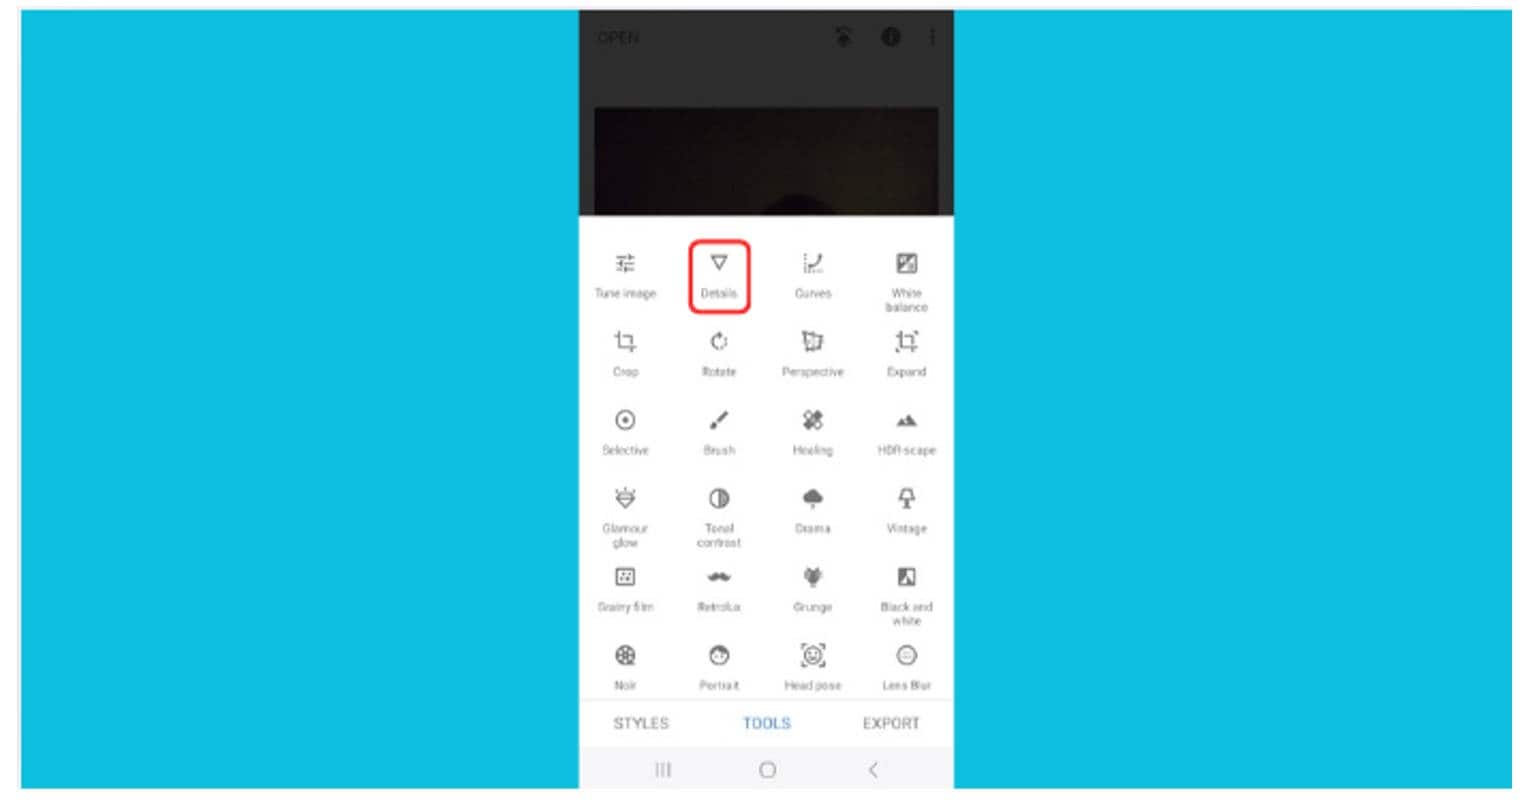
Step 2: Go to Tools → Details
Tap on “Tools” at the bottom and select “Details.” This allows you to control Structure and Sharpening. Slightly increase the structure to bring out details, then apply mild sharpening.
Step 3: Use the Tune Image Tool
Select “Tune Image” from the tools menu. Increase Brightness and Shadows slightly to offset any underexposure that’s amplifying grain. Adjust Contrast and Ambiance carefully.

Step 4: Apply the ‘Portrait’ Filter (Optional)
For selfies or portraits, the “Portrait” filter smooths skin and reduces minor grain in facial areas. This is useful for those wondering how to fix grainy photos on iPhone using simple tap-based edits.

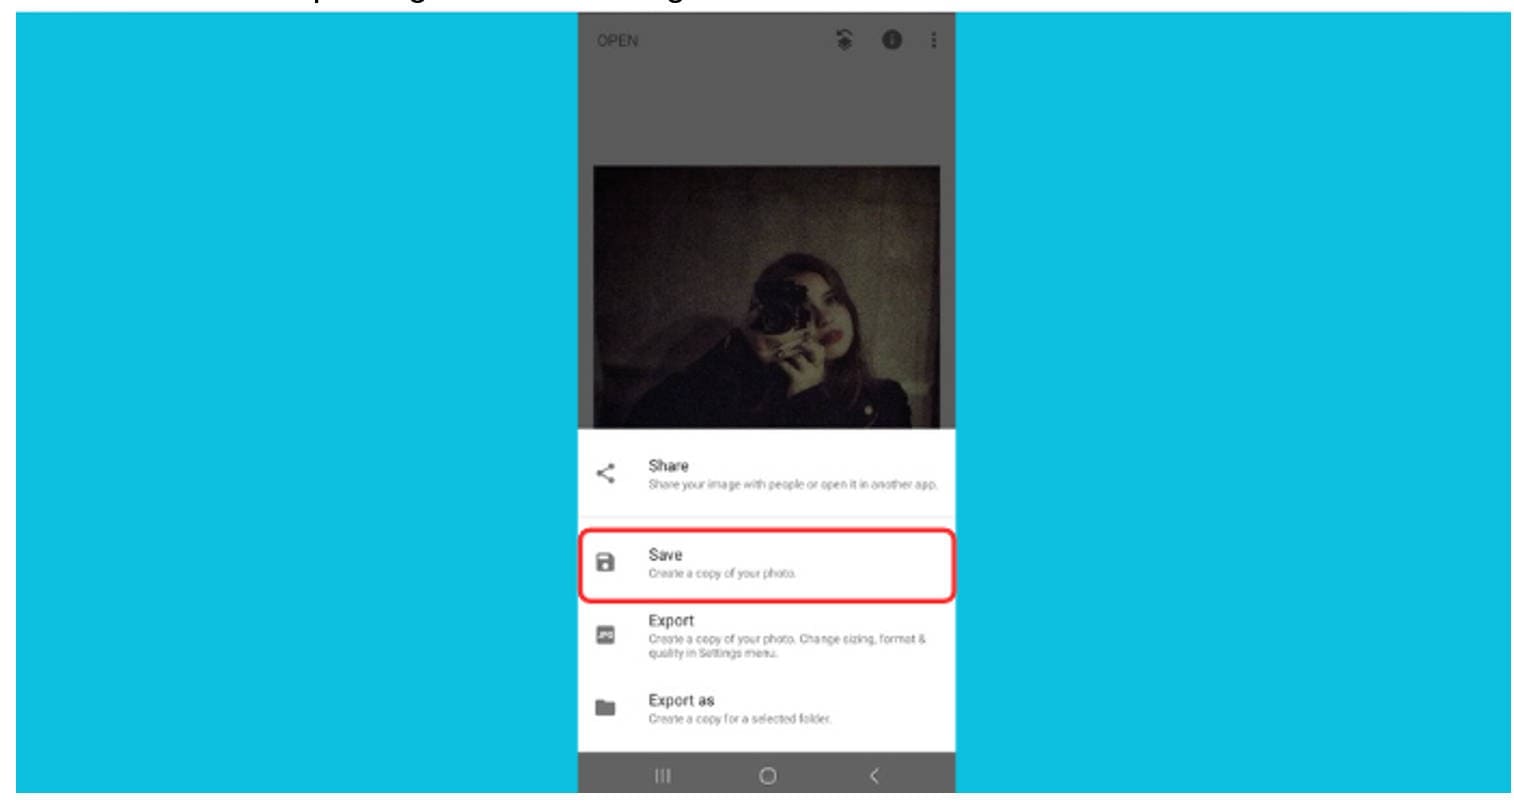
Step 5: Export Your Edited Photo
Once done, tap Export → Save. This keeps your image in high resolution, making it suitable for social media or printing without visible grain.
Pro Tips for Mobile Fixes
- Avoid over-sharpening; it can make image grainy again.
- Use Snapseed’s Healing tool to fix specific noisy patches.
- On iPhone 13+ models, try editing in the Photos app first, then refine in Snapseed.
- Always shoot in good lighting to reduce the need for post-processing.
Part 5. Tips to Make Photos Less Grainy
To make image grainy less visible and capture clearer photos, follow these tips. First, use the lowest possible ISO setting to minimize sensor noise. Shooting with wider apertures and slower shutter speeds lets in more light, reducing grain. Next, avoid underexposing photos, as brightening shadows later increases noise. Also, shooting in RAW format allows better control over noise reduction during editing. By applying these techniques, you’ll know how to make a photo less grainy naturally without heavy post-processing.
1. Use the Lowest Possible ISO Setting
The ISO setting controls your camera’s sensitivity to light. A higher ISO may brighten your photo but also introduce grain. If you want to fix grainy photos, start by preventing grain in the first place. Always shoot with the lowest ISO possible for your scene—ideally ISO 100 or 200.
*Pro Tip: If you're indoors or shooting at night, try increasing the light in the environment rather than bumping up the ISO. A desk lamp or phone flashlight can help.
2. Opt for a Wider Aperture
A wider aperture (lower f-number like f/1.8 or f/2.0) allows more light to enter the camera, helping you avoid underexposed and grainy photo results. It also gives a pleasing blur to backgrounds (bokeh), improving both aesthetics and clarity.
Helpful Hint: Use portrait mode on mobile cameras, which automatically widens the aperture and reduces grain in low-light selfies or grainy iPhone photos.
*Caution: If you're slowing the shutter speed, use a tripod or steady surface to avoid motion blur.
3. Slow Down the Shutter Speed
Fast shutter speeds may freeze motion but often cause images to be underexposed in low light—leading to grainy images. Slowing down the shutter allows more light in, reducing the need for high ISO and helping you remove graininess from photo scenes naturally.
*Caution: If you're slowing the shutter speed, use a tripod or steady surface to avoid motion blur.
4. Shoot in RAW Format
Shooting in RAW retains more image data and gives you more flexibility when editing. Even if a photo is slightly grainy, RAW files let you fix grainy photos with better clarity using editing tools like Lightroom or Photoshop.
*Note: Many smartphones (like iPhones or Samsungs) now allow RAW capture via their Pro or Manual modes.
5. Use Noise Reduction in-Camera or In-App
Many DSLRs and phones offer in-camera noise reduction. Additionally, mobile apps like Snapseed, Lightroom Mobile, or UniConverter AI Enhancer help you fix grainy photos free with just a few taps.
*Best Practice: Avoid over-processing as it can lead to overly smooth, plastic-looking photos. Always balance clarity and realism.
By applying these photography techniques, you can avoid the need to constantly wonder how to fix grainy photos in Photoshop or how to make grainy photos clear afterward. Prevention is the easiest way to ensure your photos come out clean, detailed, and print-ready.
Conclusion
Dealing with a grainy photo can be frustrating, but now you know how to fix grainy photo problems using various tools and techniques. Whether you want to fix grainy photos free with UniConverter, use Photoshop’s advanced noise reduction, or fix grainy photos on iPhone through mobile apps, there are effective solutions for everyone. Remember, proper camera settings and good lighting conditions help prevent graininess. Understanding why are my photos so grainy helps you avoid it in future shoots and ensures crisp, clean images every time.
FAQs
-
1. Why do my photos look grainy even in good lighting?
Grainy photos often result from high ISO settings, even in bright environments. Double-check your ISO and avoid excessive digital zoom. -
2. How to fix grainy photos in Photoshop quickly?
Use the “Reduce Noise” filter and Camera Raw’s detail panel to smooth grain and sharpen details. It’s ideal for fixing grainy images in Photoshop. -
3. Can I fix grainy photos on iPhone without an app?
Yes, using the iPhone’s native editor or Apple Photos' noise reduction. For more control, try third-party apps to fix grainy iPhone photos. -
4. What’s the easiest way to fix grainy photos?
Online tools like UniConverter or Snapseed offer free, fast options to fix grainy photos without installing heavy software. -
5. How do I make a picture less grainy during shooting?
Use a lower ISO, shoot in RAW, and choose brighter settings. These reduce the risk of grainy photo effect in the first place.


