User Guide
How to use Wondershare UniConverter (originally Wondershare Video Converter
Ultimate)?
Learn the step-by-step guide below.

UniConverter User Guide
-
Get Started for Mac
-
Video Converter (Mac)
- Convert Videos to Any Format | Wondershare UniConverter for Mac
- Convert DVD to Video | Wondershare UniConverter for Mac
- Mute Video | Wondershare UniConverter for Mac
- Add Audio to Video | Wondershare UniConverter for Mac
- Convert 4K and 8K Videos | Wondershare UniConverter for Mac
- Batch Convert Video Formats | Wondershare UniConverter for Mac
- Convert Videos to MP3 | Wondershare UniConverter for Mac
- Convert Videos to GIF | Wondershare UniConverter for Mac
- Convert SDR Video to HDR | Wondershare UniConverter For Mac
- Convert Video to Image Sequence | Wondershare UniConverter for Mac
-
Audio Converter (Mac)
-
Video Compressor (Mac)
-
Downloader (Mac)
-
Screen Recorder (Mac)
-
Merger (Mac)
-
DVD Burner (Mac)
-
Media Player (Mac)
-
Video Editor (Mac)
- Trim Video | Wondershare UniConverter for Mac
- Add Watermark | Wondershare UniConverter for Mac
- Crop Video | Wondershare UniConverter for Mac
- Apply Effect | Wondershare UniConverter for Mac
- Add Subtitle | Wondershare UniConverter for Mac
- Audio Track Volume | Wondershare UniConverter for Mac
- How to Edit Video - Wondershare UniConverter for Mac
- Auto Video Cutter | Wondershare UniConverter for Mac
-
Tools (Mac)
- Transfer | Wondershare UniConverter for Mac
- Image Converter | Wondershare UniConverter for Mac
- GIF Maker | Wondershare UniConverter for Mac
- Fix Media Metadata | Wondershare UniConverter for Mac
- CD Converter | Wondershare UniConverter for Mac
- CD Burner | Wondershare UniConverter for Mac
- VR Converter | Wondershare UniConverter for Mac
- Subtitle Editor | Wondershare UniConverter for Mac
- Watermark Editor | Wondershare UniConverter for Mac
- Smart Trimmer | Wondershare UniConverter for Mac
- Background Remover | Wondershare UniConverter for Mac
- Auto Crop Video | Wondershare UniConverter for Mac
- AI Portrait | Wondershare UniConverter for Mac
- Intro & Outro | Wondershare UniConverter for Mac
- Vocal Remover | Wondershare UniConverter for Mac
- Noise Remover | Wondershare UniConverter for Mac
- MP3 Cutter | Wondershare UniConverter for Mac
- Video Stabilization | Wondershare UniConverter for Mac
- AI Image Enhancer | Wondershare UniConverter for Mac
- AI Script Generator | Wondershare UniConverter for Mac
- AI Thumbnail Maker | Wondershare UniConverter for Mac
- AI Video Enhancer | Wondershare UniConverter for Mac
- Auto Highlight | Wondershare UniConverter for Mac
- Remove Watermark | Wondershare UniConverter for Mac
- AI Subtitle Translator | Wondershare UniConverter for Mac
- Text To Speech | Wondershare UniConverter for Mac
- AI Voice Changer | Wondershare UniConverter for Mac
- How to Upscale Image | Wondershare UniConverter for Mac
- How to Crop Image | Wondershare UniConverter for Mac
- How to Rotate Image | Wondershare UniConverter for Mac
- How to Resize Image | Wondershare UniConverter for Mac
- Anime Enhancement | Wondershare UniConverter for Mac
- Face Enhancement | Wondershare UniConverter for Mac
- Adjust Speed of TTS Audio | Wondershare UniConverter for Mac
- Voice Clone | Wondershare UniConverter for Mac
- Smart Summarizer on Mac| Wondershare UniConverter for Windows
FAQs
Video/Audio Solutions
How to Clone Your Voice With UniConverter For Mac
Part 1: Introduction
When producing longer videos, the process of recording narration can be time-consuming. At the same time, you may wish to replace the original audio in a downloaded video with your own voice in order to create a more engaging effect. In such cases, the sound cloning feature in UniConverter can be utilised to clone your own voice, thereby saving time by choosing your preferred voice directly when generating narration audio.
With UniConverter, you can create your own sound type by recording your voice and saving it to a library.
Part 2: Step-by-Step Guide on Voice Clone of UniConverter for Mac
Step 1 Download and launch UniConverter
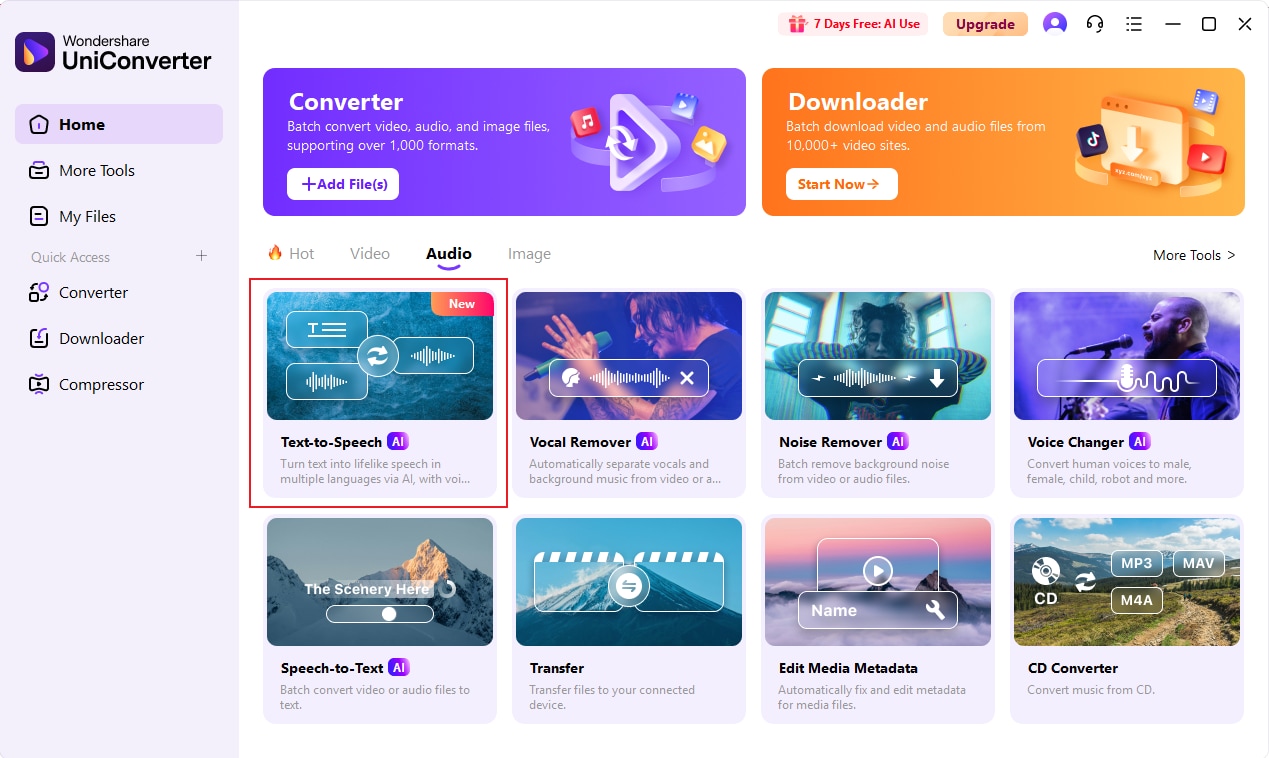
Install UniConverter on your macOS, After you log in with your account credentials, Click “Text to Speech” under the “Audio” section of the software’s interface.
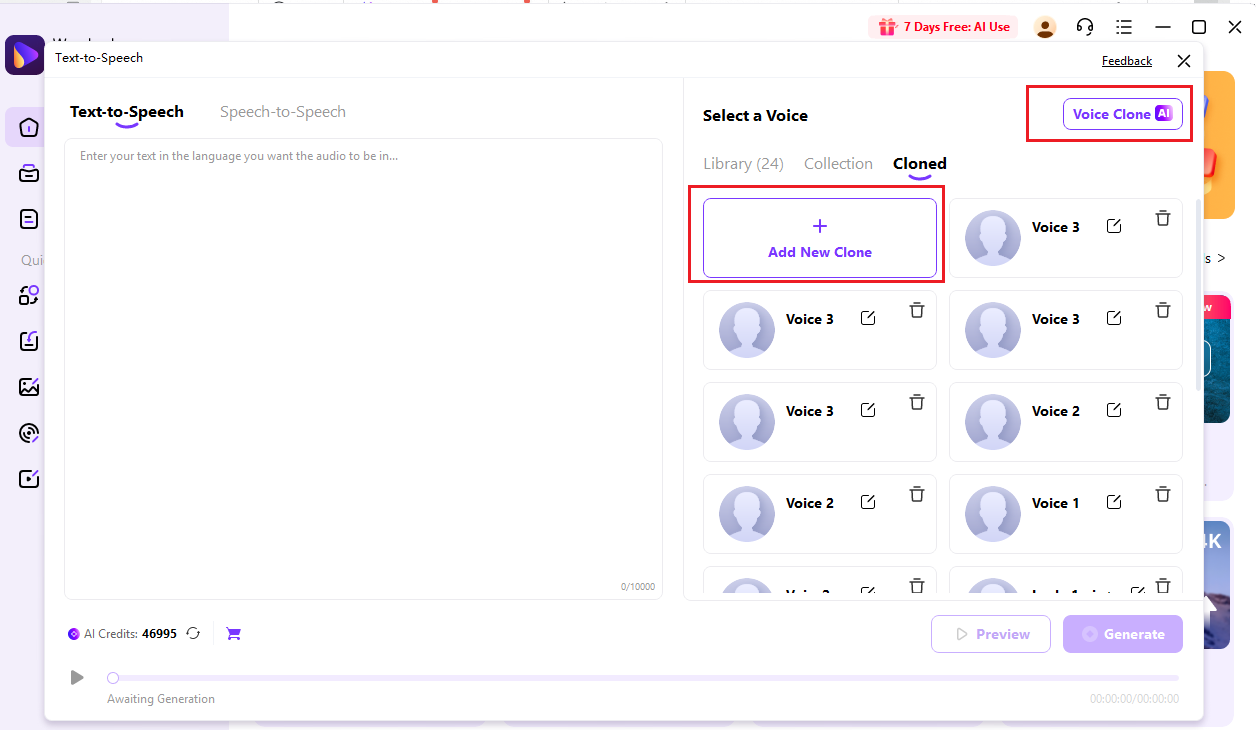
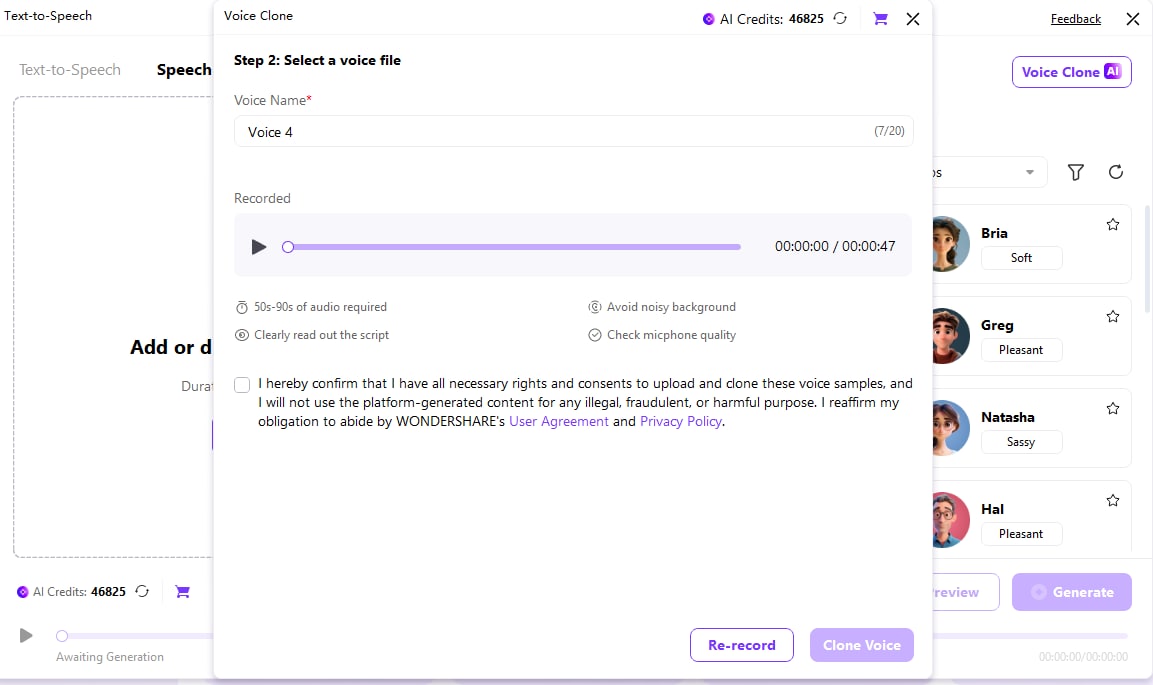
Step 2 Record Audio
By clicking on the 'Add new clone' option, the user will be presented with an audio recording pop-up window containing text corresponding to the selected language. You have the option to switch the microphone supported by your system for recording; by default, the system microphone is available for use.
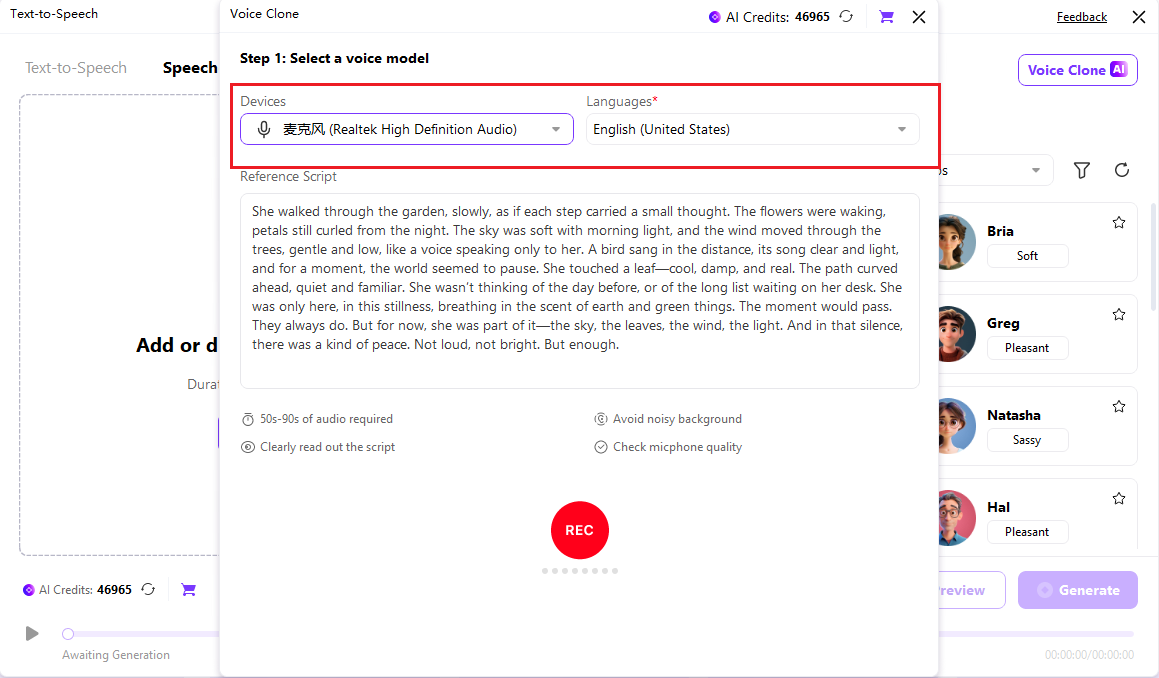
Click the Record button after the countdown is over to start recording. A progress bar will then appear on the page to show how long the recording is taking and if the microphone is working. When the recording is 10 seconds or more, the progress bar will change from red to green.
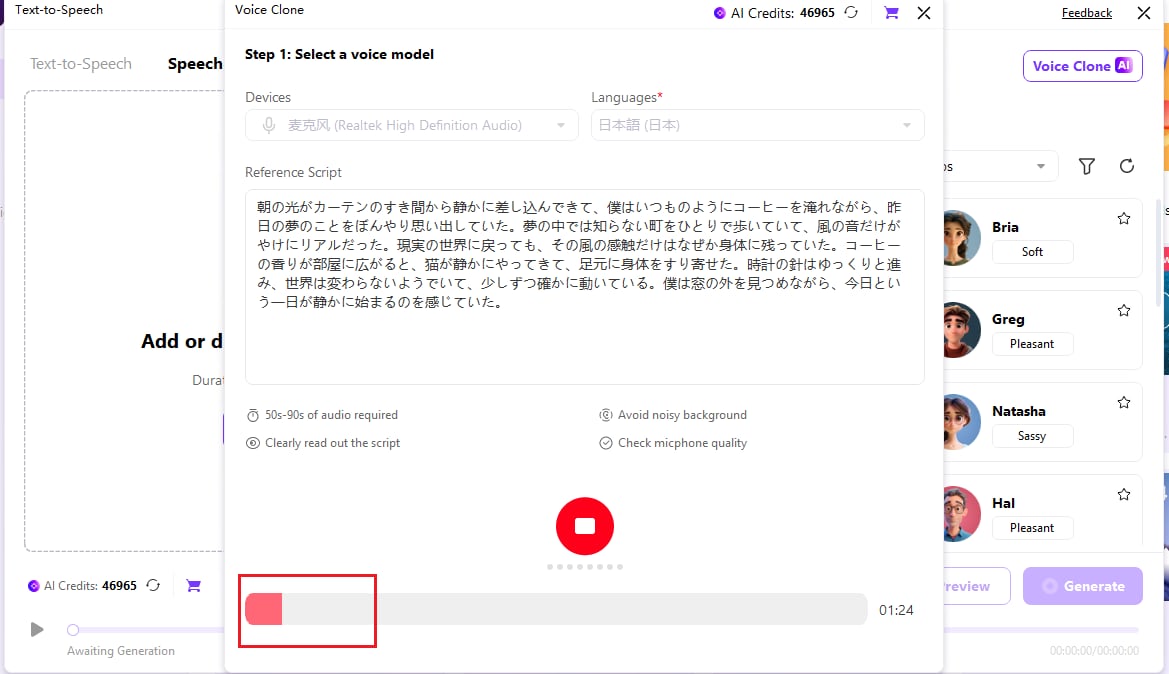
Once the cloning process is complete, please click the Record button again to end the recording. Once the recording has finished, you can then proceed to the final page. In this section, you have the option to rename the tone. You can also preview the tone. If you are not satisfied with the result, please click Re-record to start again. Once you have verified that there are no issues, you can commence the cloning process by selecting the user statement.
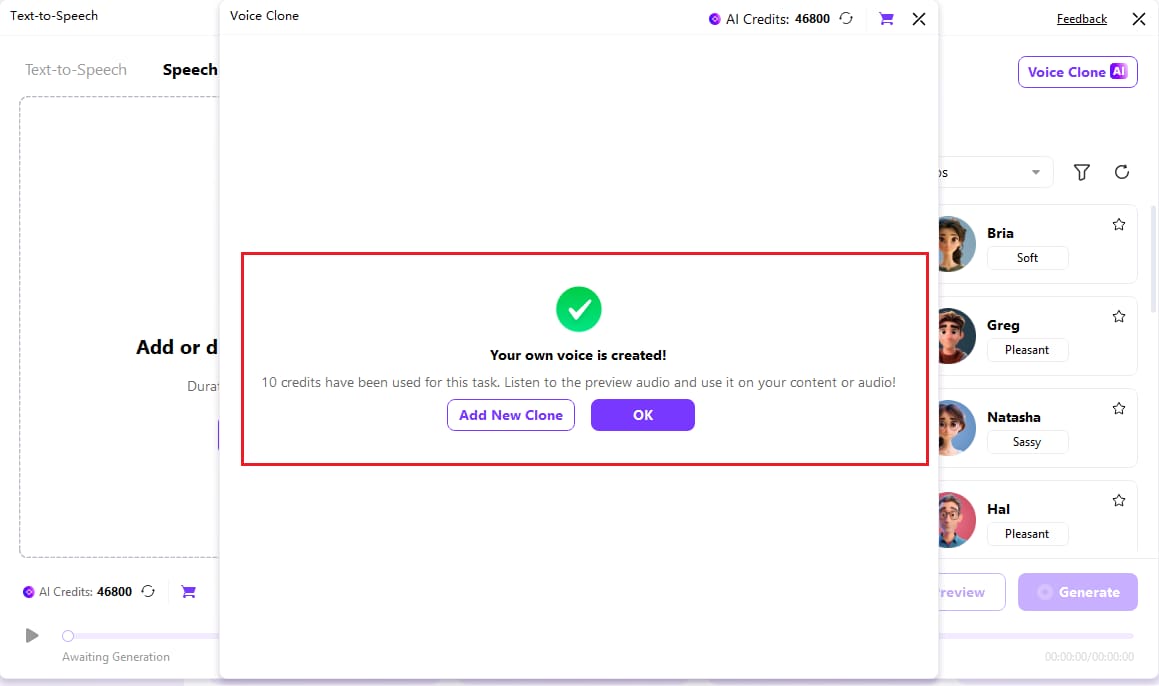
Step 3 Clone Voice
Please click on the 'Clone Voice' option in order to access the tone clone waiting page. In this section, you have the option to cancel the clone and return to the page where the recording is complete. Once the clone process has been successfully completed, the completion page will be displayed, showing the prompt.

Click on the ok button to go directly to the “Cloned” tab and you will see the cloned tone in the list.
 print
print
