User Guide
How to use Wondershare UniConverter (originally Wondershare Video Converter
Ultimate)?
Learn the step-by-step guide below.

UniConverter User Guide
-
Get Started for Mac
-
Video Converter (Mac)
- Convert Videos to Any Format | Wondershare UniConverter for Mac
- Convert DVD to Video | Wondershare UniConverter for Mac
- Mute Video | Wondershare UniConverter for Mac
- Add Audio to Video | Wondershare UniConverter for Mac
- Convert 4K and 8K Videos | Wondershare UniConverter for Mac
- Batch Convert Video Formats | Wondershare UniConverter for Mac
- Convert Videos to MP3 | Wondershare UniConverter for Mac
- Convert Videos to GIF | Wondershare UniConverter for Mac
- Convert SDR Video to HDR | Wondershare UniConverter For Mac
- Convert Video to Image Sequence | Wondershare UniConverter for Mac
-
Audio Converter (Mac)
-
Video Compressor (Mac)
-
Downloader (Mac)
-
Screen Recorder (Mac)
-
Merger (Mac)
-
DVD Burner (Mac)
-
Media Player (Mac)
-
Video Editor (Mac)
- Trim Video | Wondershare UniConverter for Mac
- Add Watermark | Wondershare UniConverter for Mac
- Crop Video | Wondershare UniConverter for Mac
- Apply Effect | Wondershare UniConverter for Mac
- Add Subtitle | Wondershare UniConverter for Mac
- Audio Track Volume | Wondershare UniConverter for Mac
- How to Edit Video - Wondershare UniConverter for Mac
- Auto Video Cutter | Wondershare UniConverter for Mac
-
Tools (Mac)
- Transfer | Wondershare UniConverter for Mac
- Image Converter | Wondershare UniConverter for Mac
- GIF Maker | Wondershare UniConverter for Mac
- Fix Media Metadata | Wondershare UniConverter for Mac
- CD Converter | Wondershare UniConverter for Mac
- CD Burner | Wondershare UniConverter for Mac
- VR Converter | Wondershare UniConverter for Mac
- Subtitle Editor | Wondershare UniConverter for Mac
- Watermark Editor | Wondershare UniConverter for Mac
- Smart Trimmer | Wondershare UniConverter for Mac
- Background Remover | Wondershare UniConverter for Mac
- Auto Crop Video | Wondershare UniConverter for Mac
- AI Portrait | Wondershare UniConverter for Mac
- Intro & Outro | Wondershare UniConverter for Mac
- Vocal Remover | Wondershare UniConverter for Mac
- Noise Remover | Wondershare UniConverter for Mac
- MP3 Cutter | Wondershare UniConverter for Mac
- Video Stabilization | Wondershare UniConverter for Mac
- AI Image Enhancer | Wondershare UniConverter for Mac
- AI Script Generator | Wondershare UniConverter for Mac
- AI Thumbnail Maker | Wondershare UniConverter for Mac
- AI Video Enhancer | Wondershare UniConverter for Mac
- Auto Highlight | Wondershare UniConverter for Mac
- Remove Watermark | Wondershare UniConverter for Mac
- AI Subtitle Translator | Wondershare UniConverter for Mac
- Text To Speech | Wondershare UniConverter for Mac
- AI Voice Changer | Wondershare UniConverter for Mac
- How to Upscale Image | Wondershare UniConverter for Mac
- How to Crop Image | Wondershare UniConverter for Mac
- How to Rotate Image | Wondershare UniConverter for Mac
- How to Resize Image | Wondershare UniConverter for Mac
- Anime Enhancement | Wondershare UniConverter for Mac
- Face Enhancement | Wondershare UniConverter for Mac
- Adjust Speed of TTS Audio | Wondershare UniConverter for Mac
- Voice Clone | Wondershare UniConverter for Mac
- Smart Summarizer on Mac| Wondershare UniConverter for Windows
FAQs
Video/Audio Solutions
How to Add Subtitle to Videos on Mac
Wondershare UniConverter for Mac allows you to add subtitles to videos on Mac. You can also edit the subtitle by changing font, color, size, width, transparency, position, and others. The subtitles can also be added to DVDs, music videos, TV series, and other digital movies. You can add .srt, .ass, or .ssa subtitles files to the video and output as Hardcodec Subtitles or Soft Subtitle (only for MP4 and MOV) for playback. Read the steps list below to learn more.
Note: Hardcodec subtitle is a part of the video files that can not be removed or changed. Soft Subtitle is independent of the video and can be turned on and off during your playback.
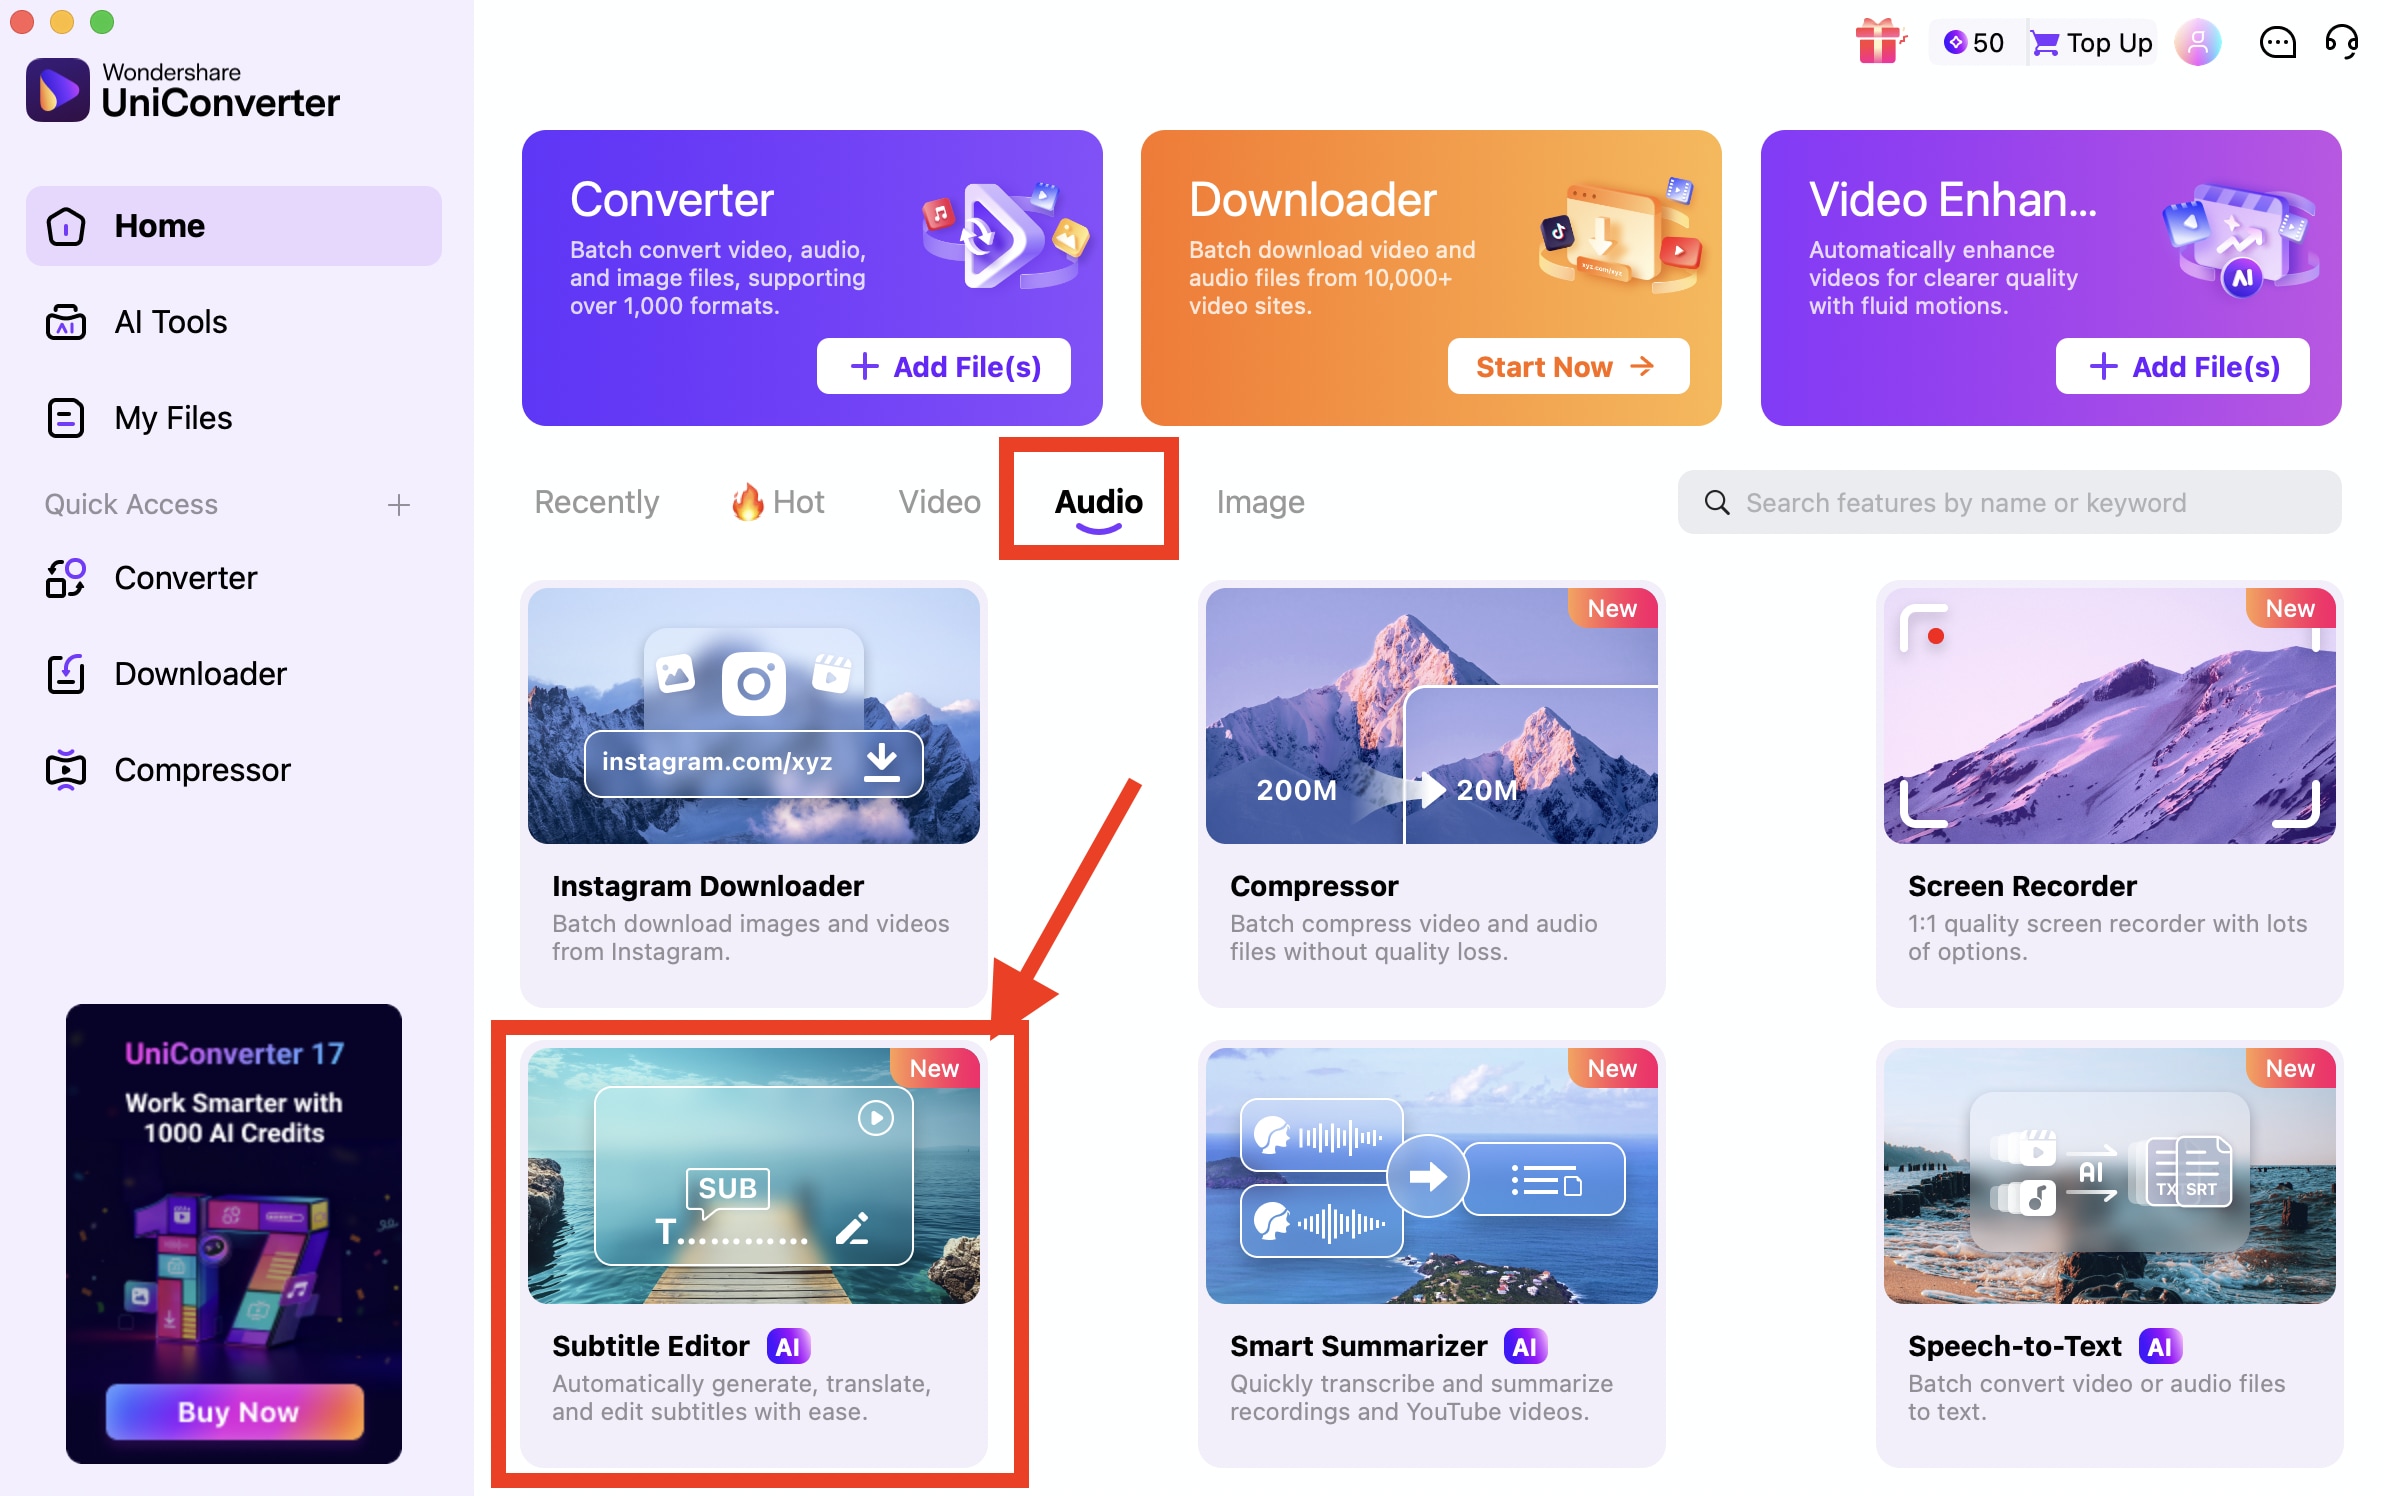
Step 1 Lauch UniConverter and Start Subtitle Editor.
Launch Wondershare UniConverter for Mac after download and installation successfully.
Step 2 Load Videos to Add Subtitles on Mac.
Click to upload your local videos.
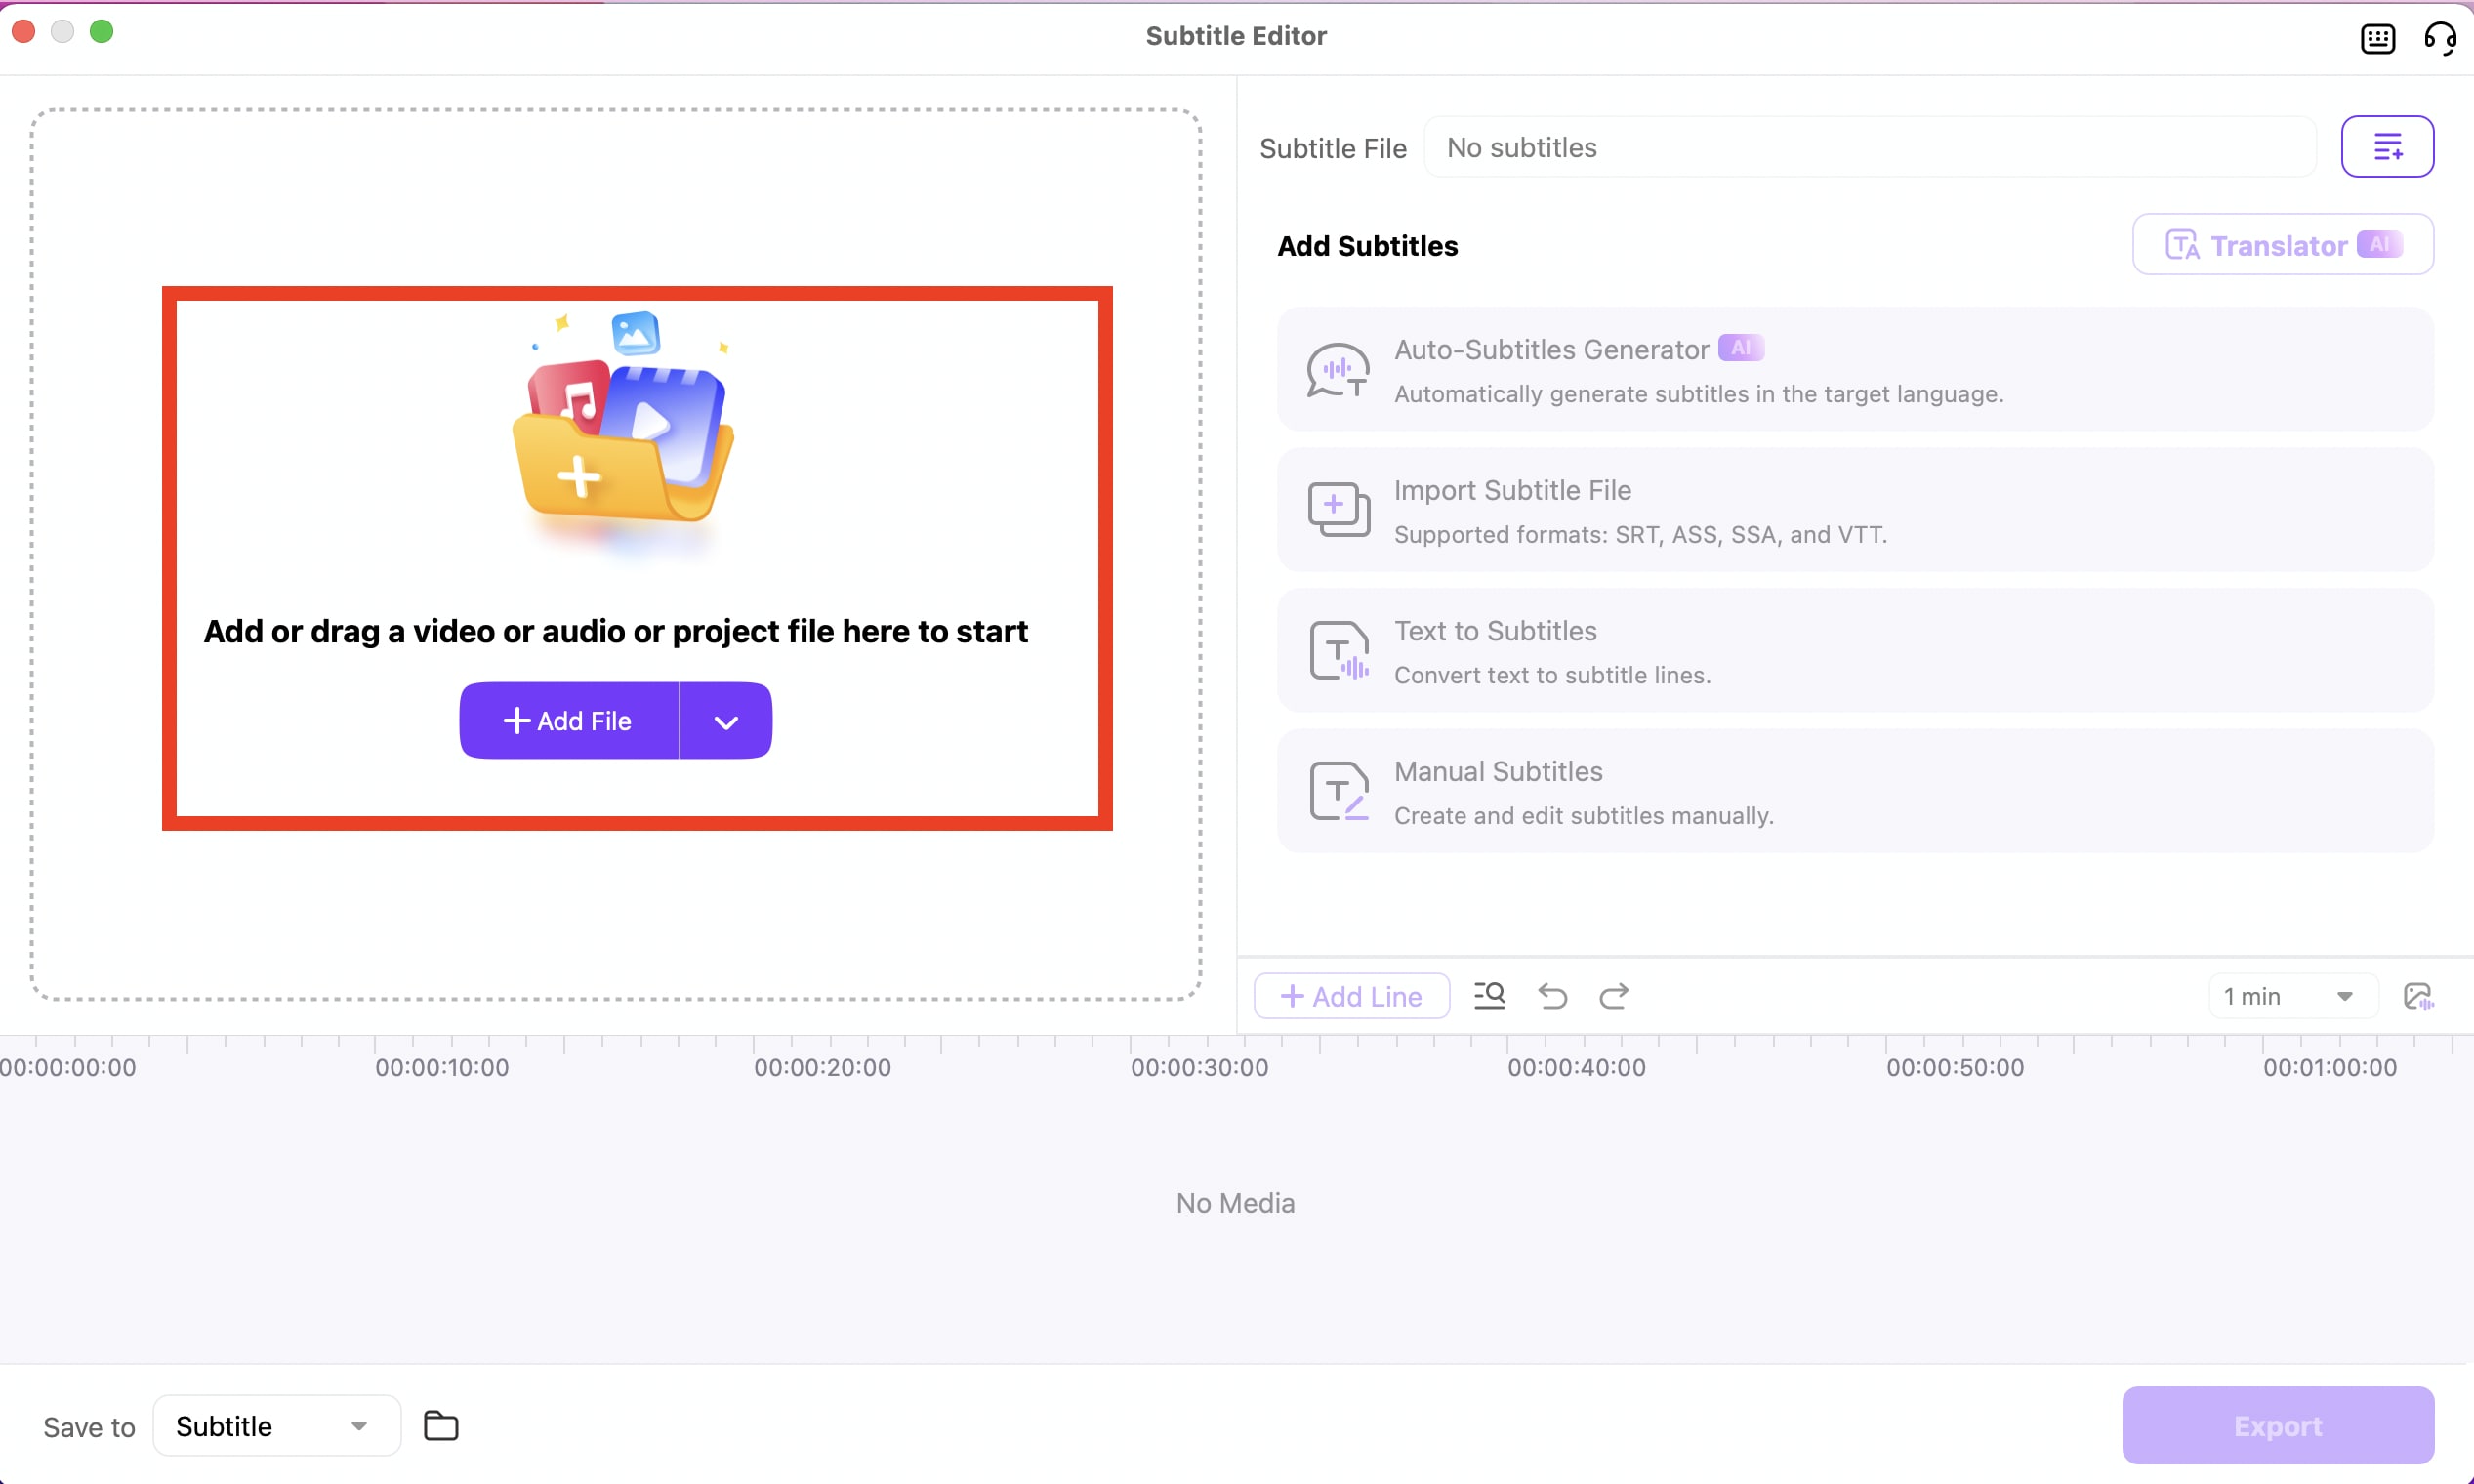
Step 3 Generate or Add Subtitles.
If you don't have any original subtitle for this video, you can click the button on the top right corner to generate or import subtitle file.

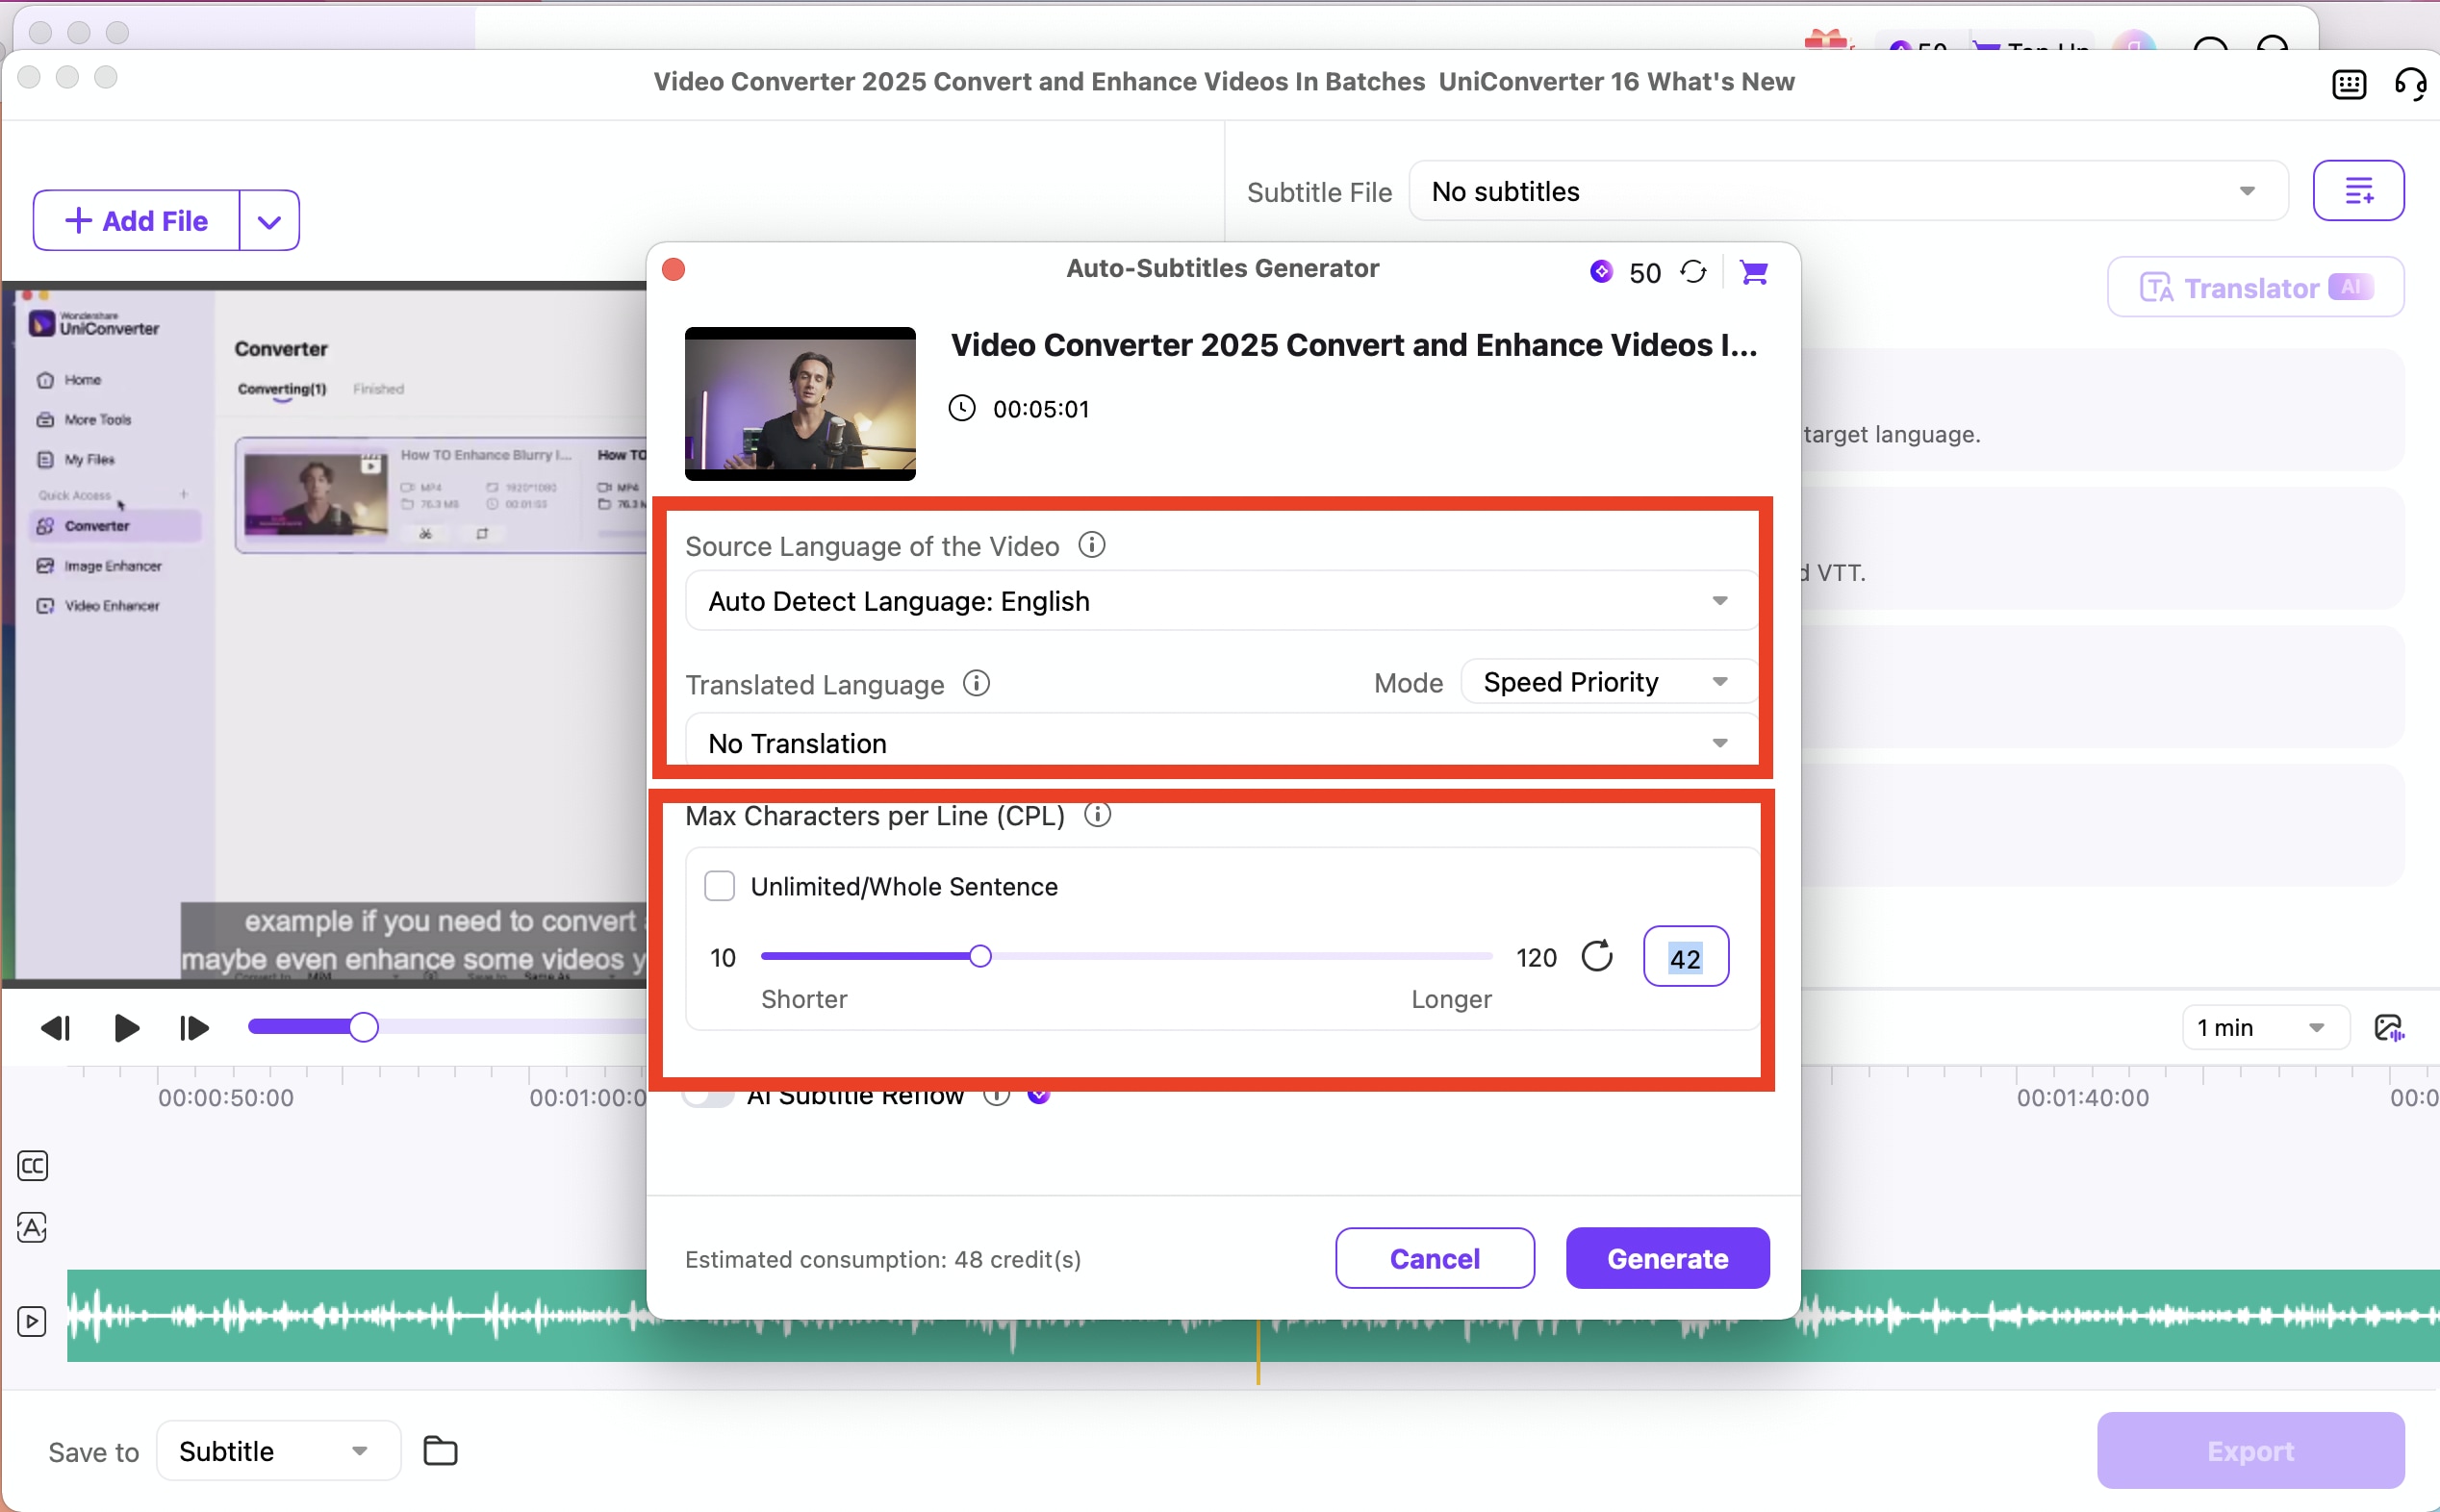
Step 4 Generate Subtitle Based on Your Need (Optional).
If you don't have existed subtitle file at hand, you can choose following settings to generate subtitle you need: you can set source language and translation based on video language and your actual demand, and then click 'Generate'.
Step 5 Check Subtitle
After subtitle imported or generated, you can check your subtitle under the 'subtitle' pannel on the right side.
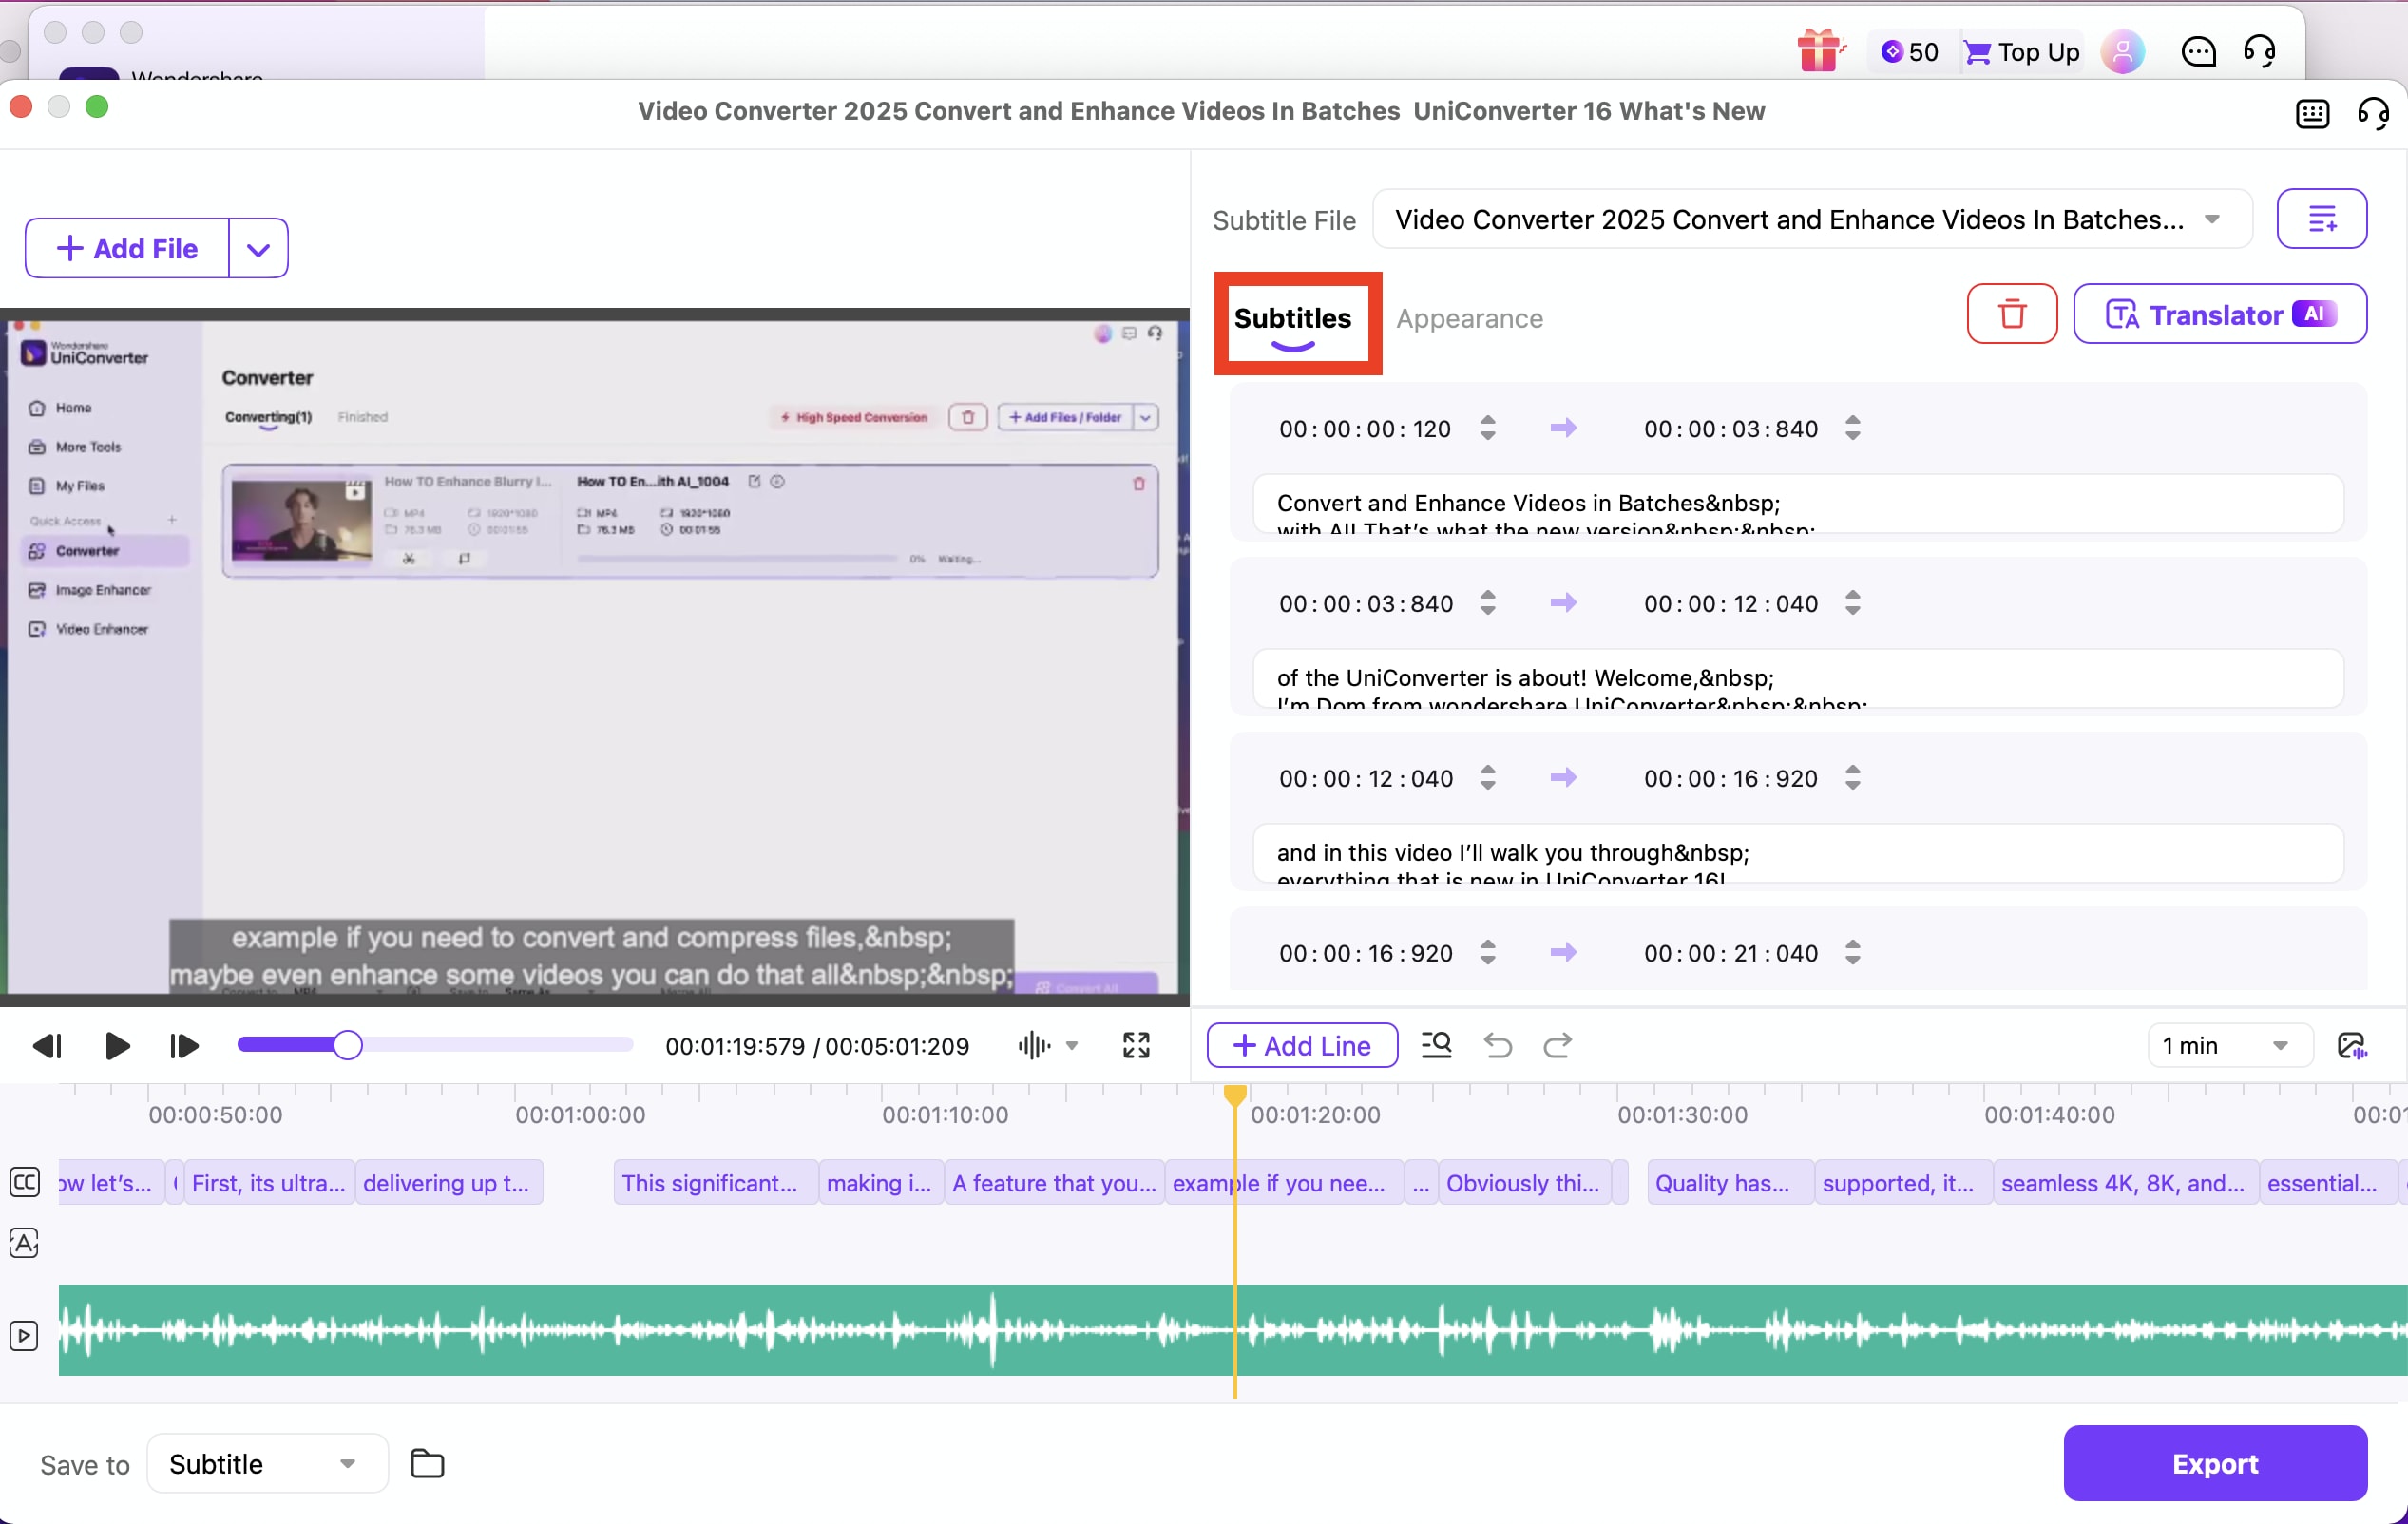
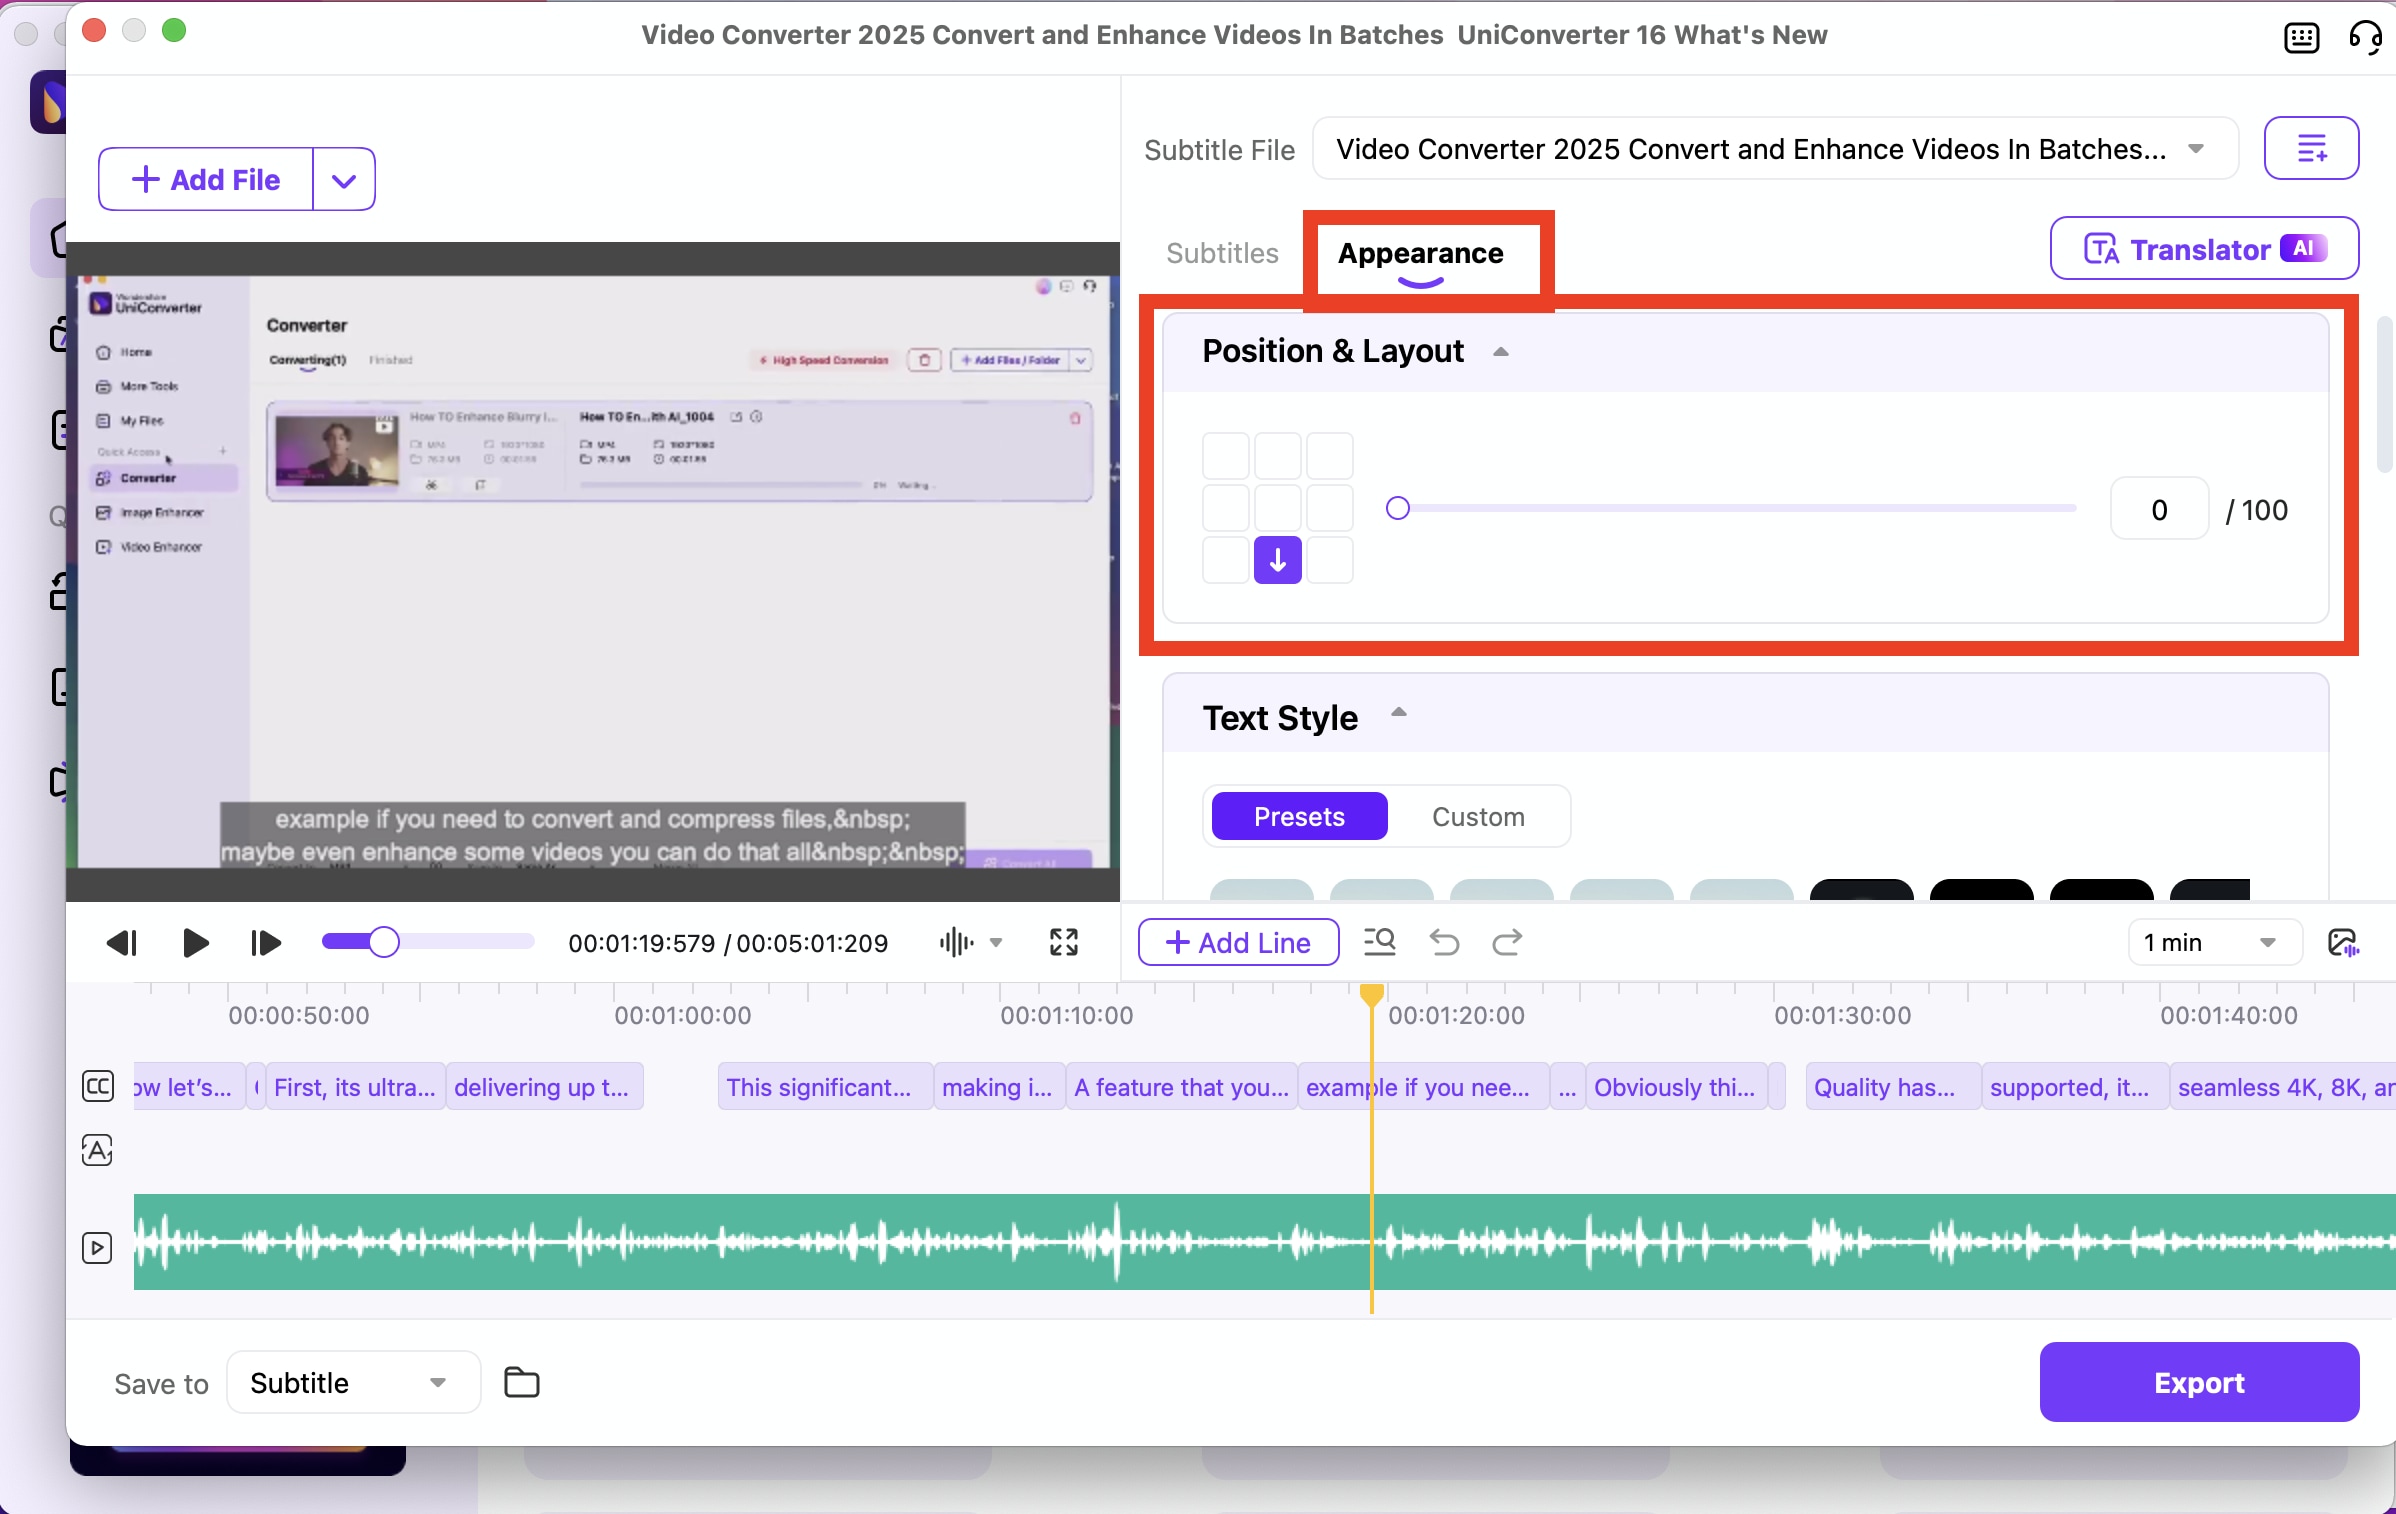
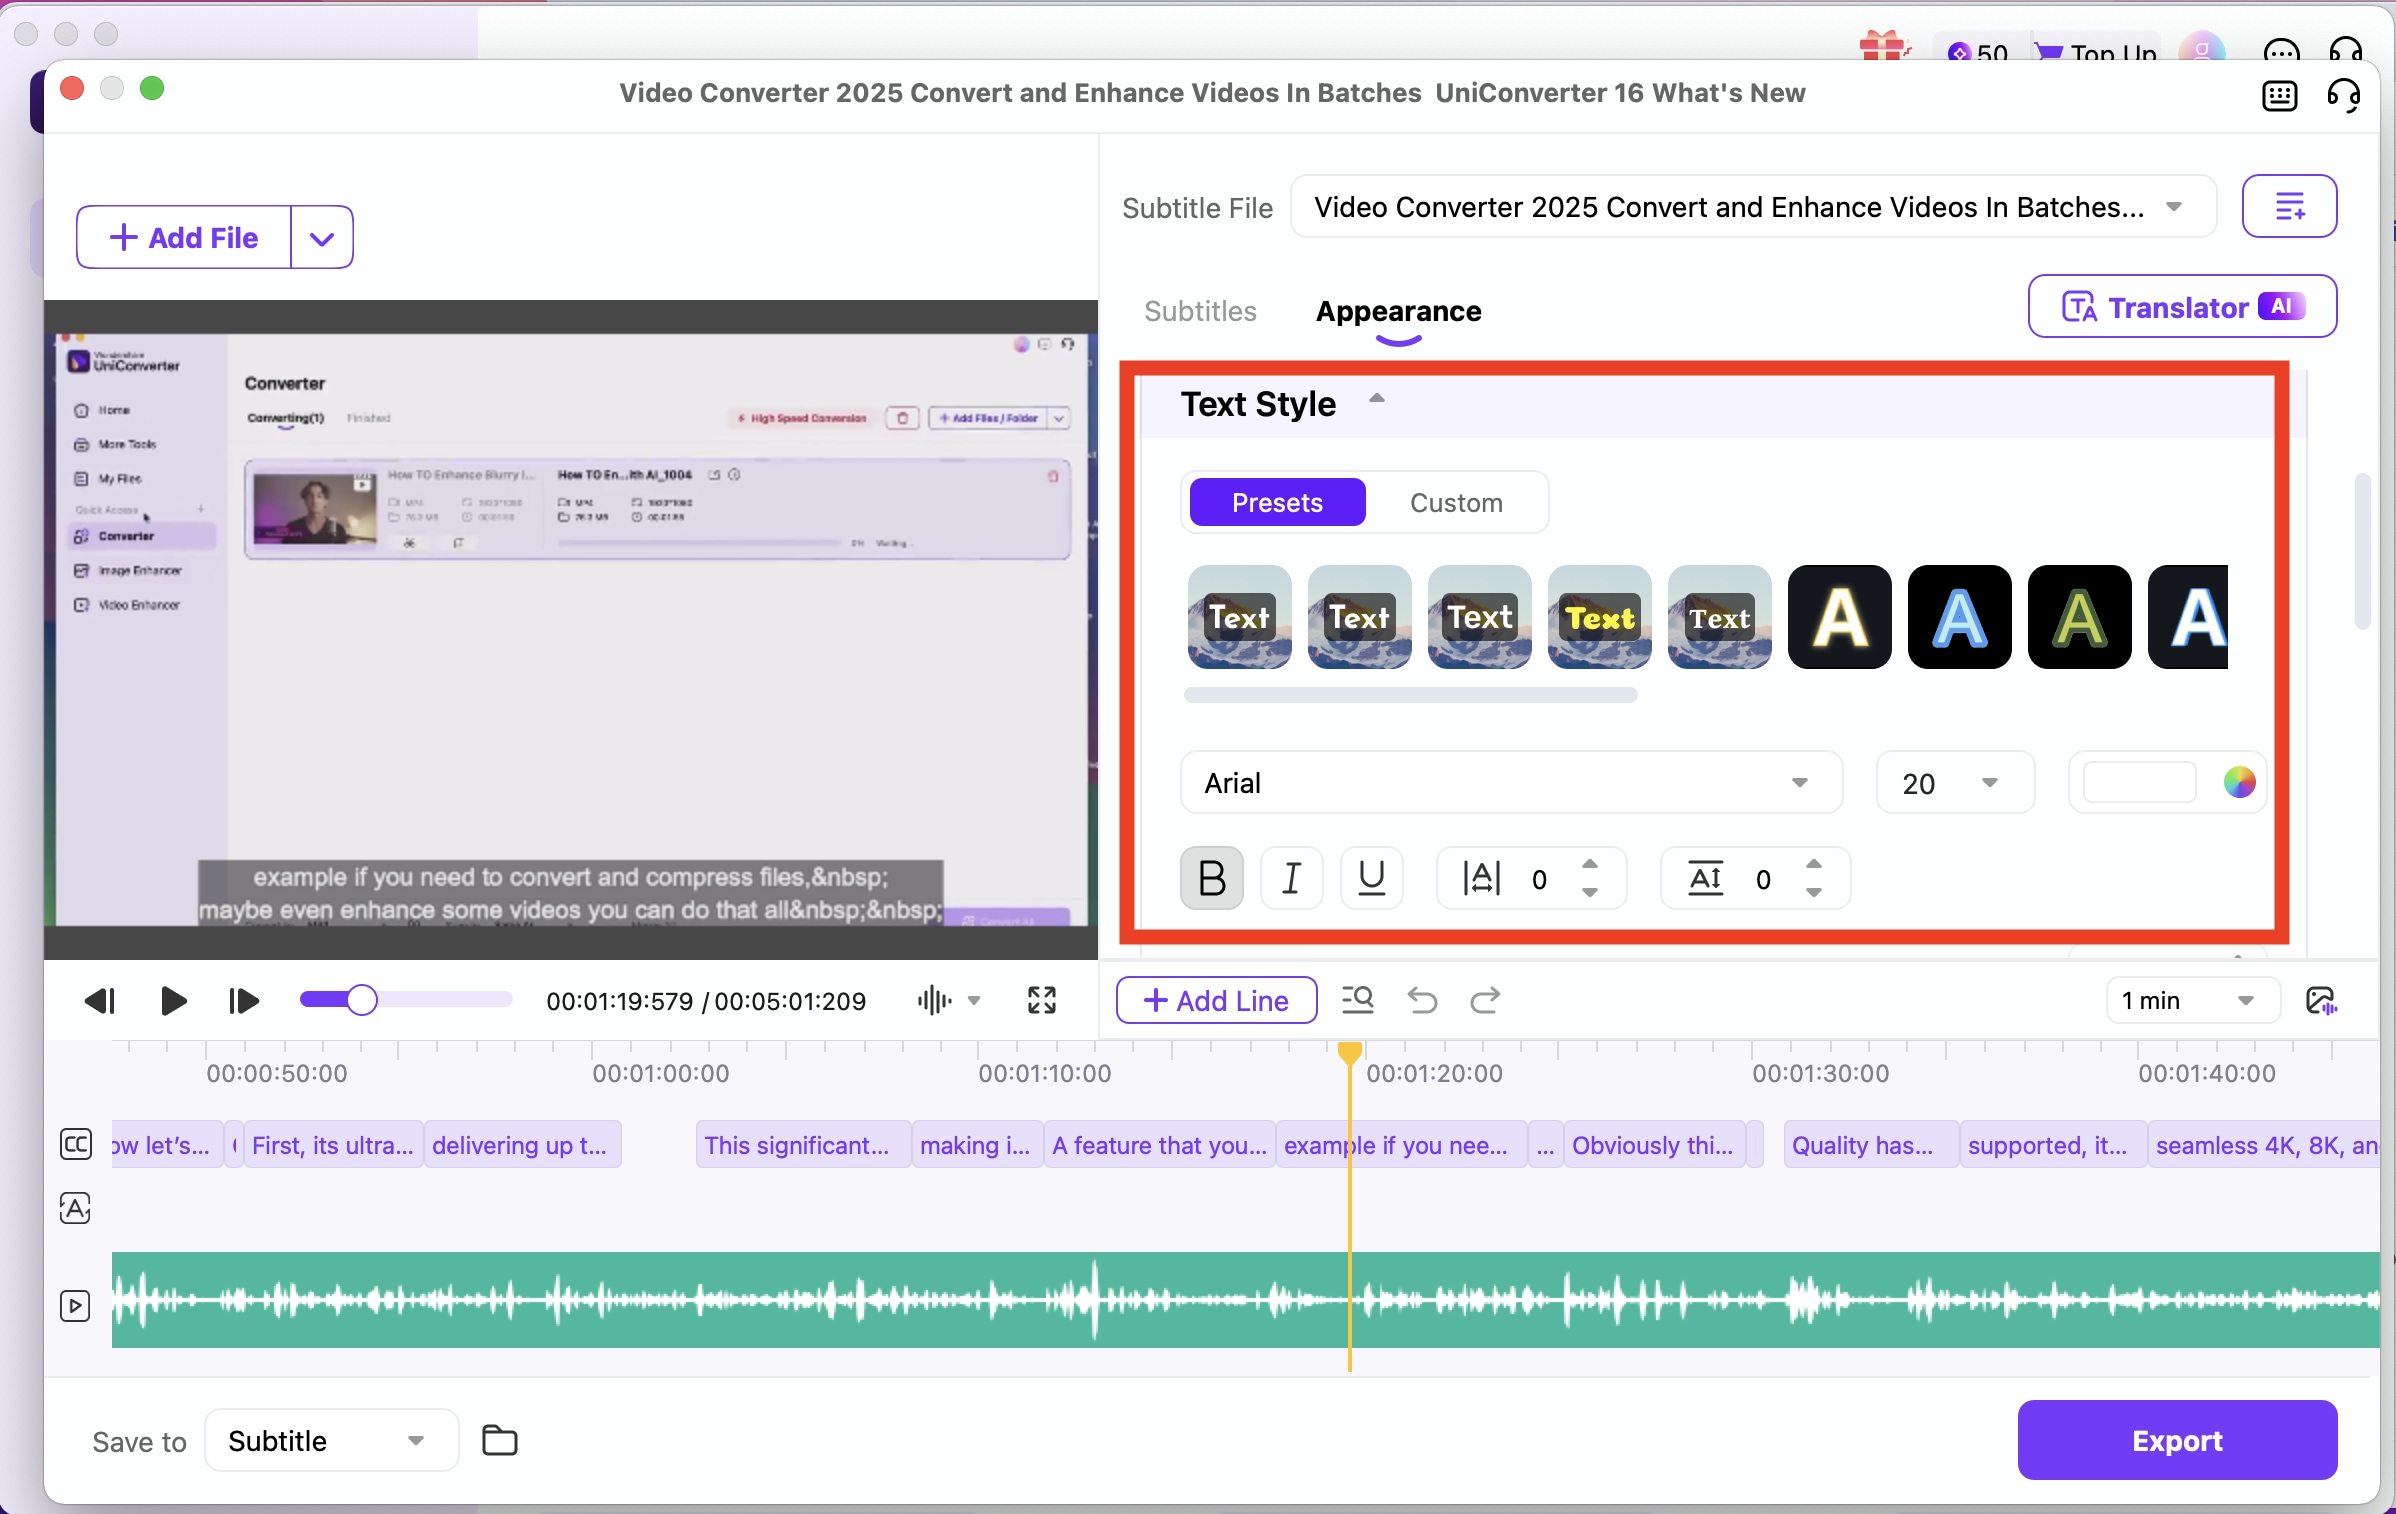
Step 6 Edit Subtitle Style & Format.
Click the 'Appearance' tab to make following settings including subtitle position, font style, font size, shadow, transparency, etc.You can also set your edited subtitle style as a custom template for future use.
Step 6 Edit Subtitle Style & Format.
Confirm visual effect of the subtitle in your video in the preview windows.
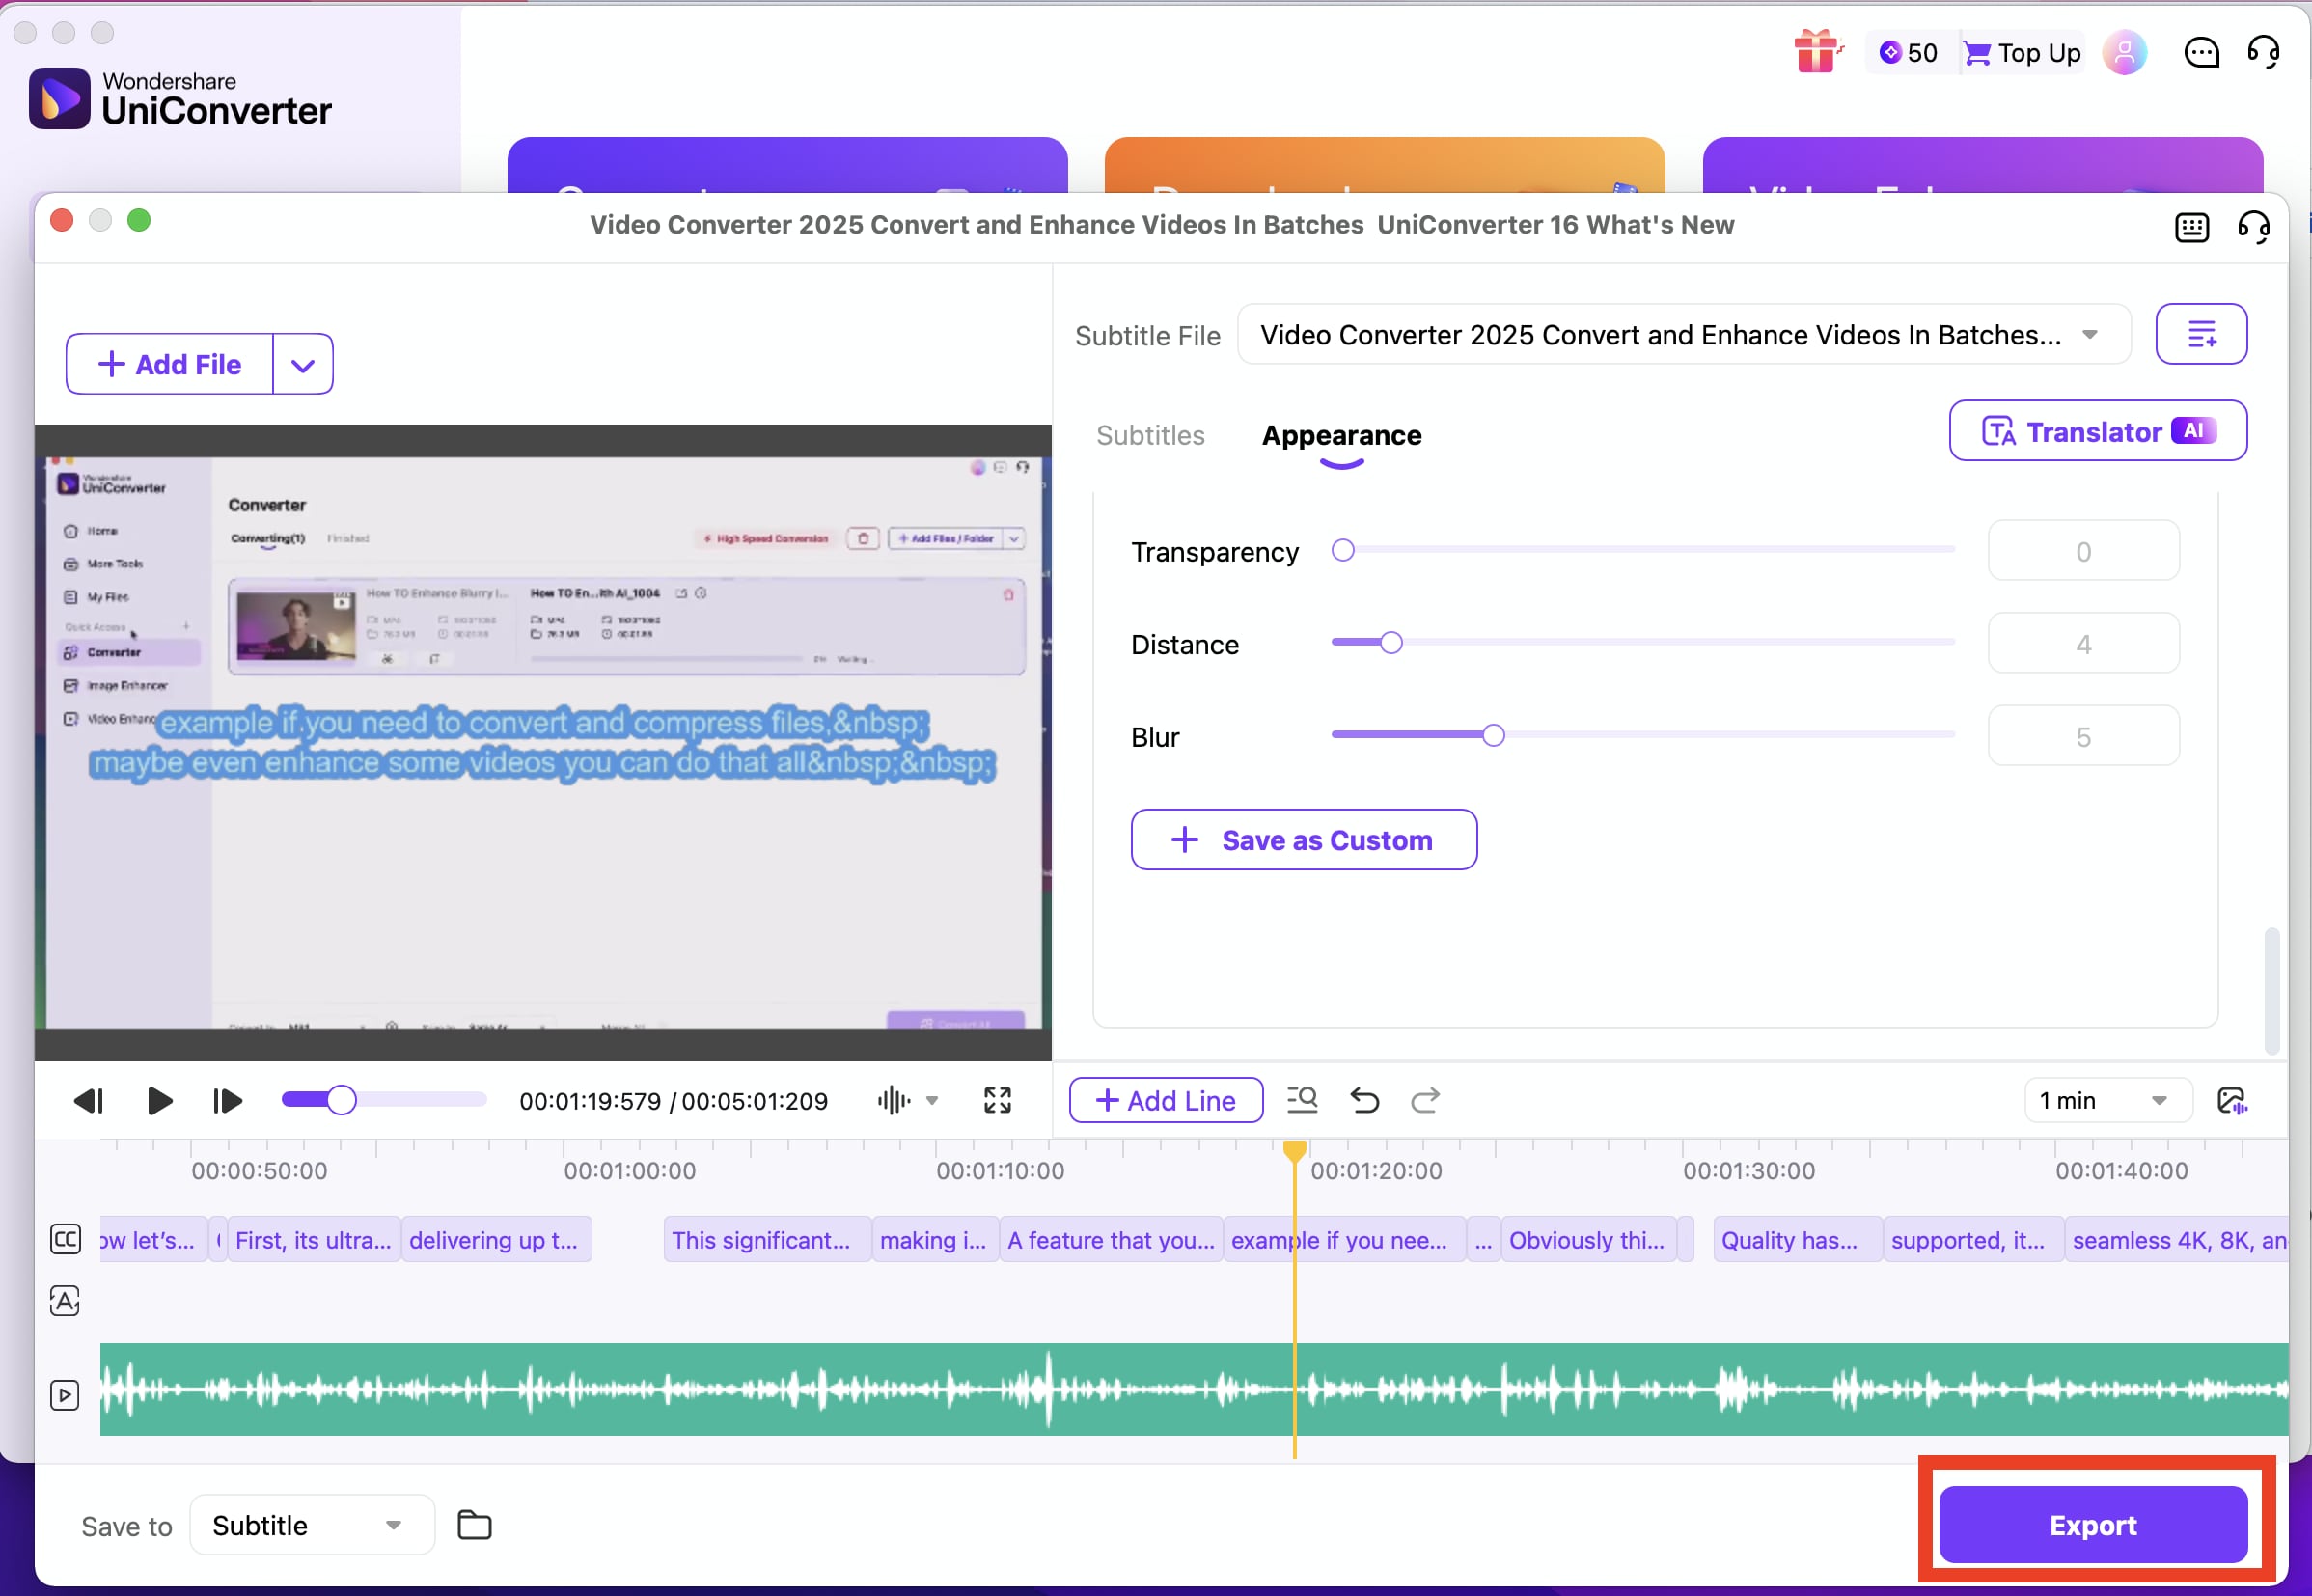
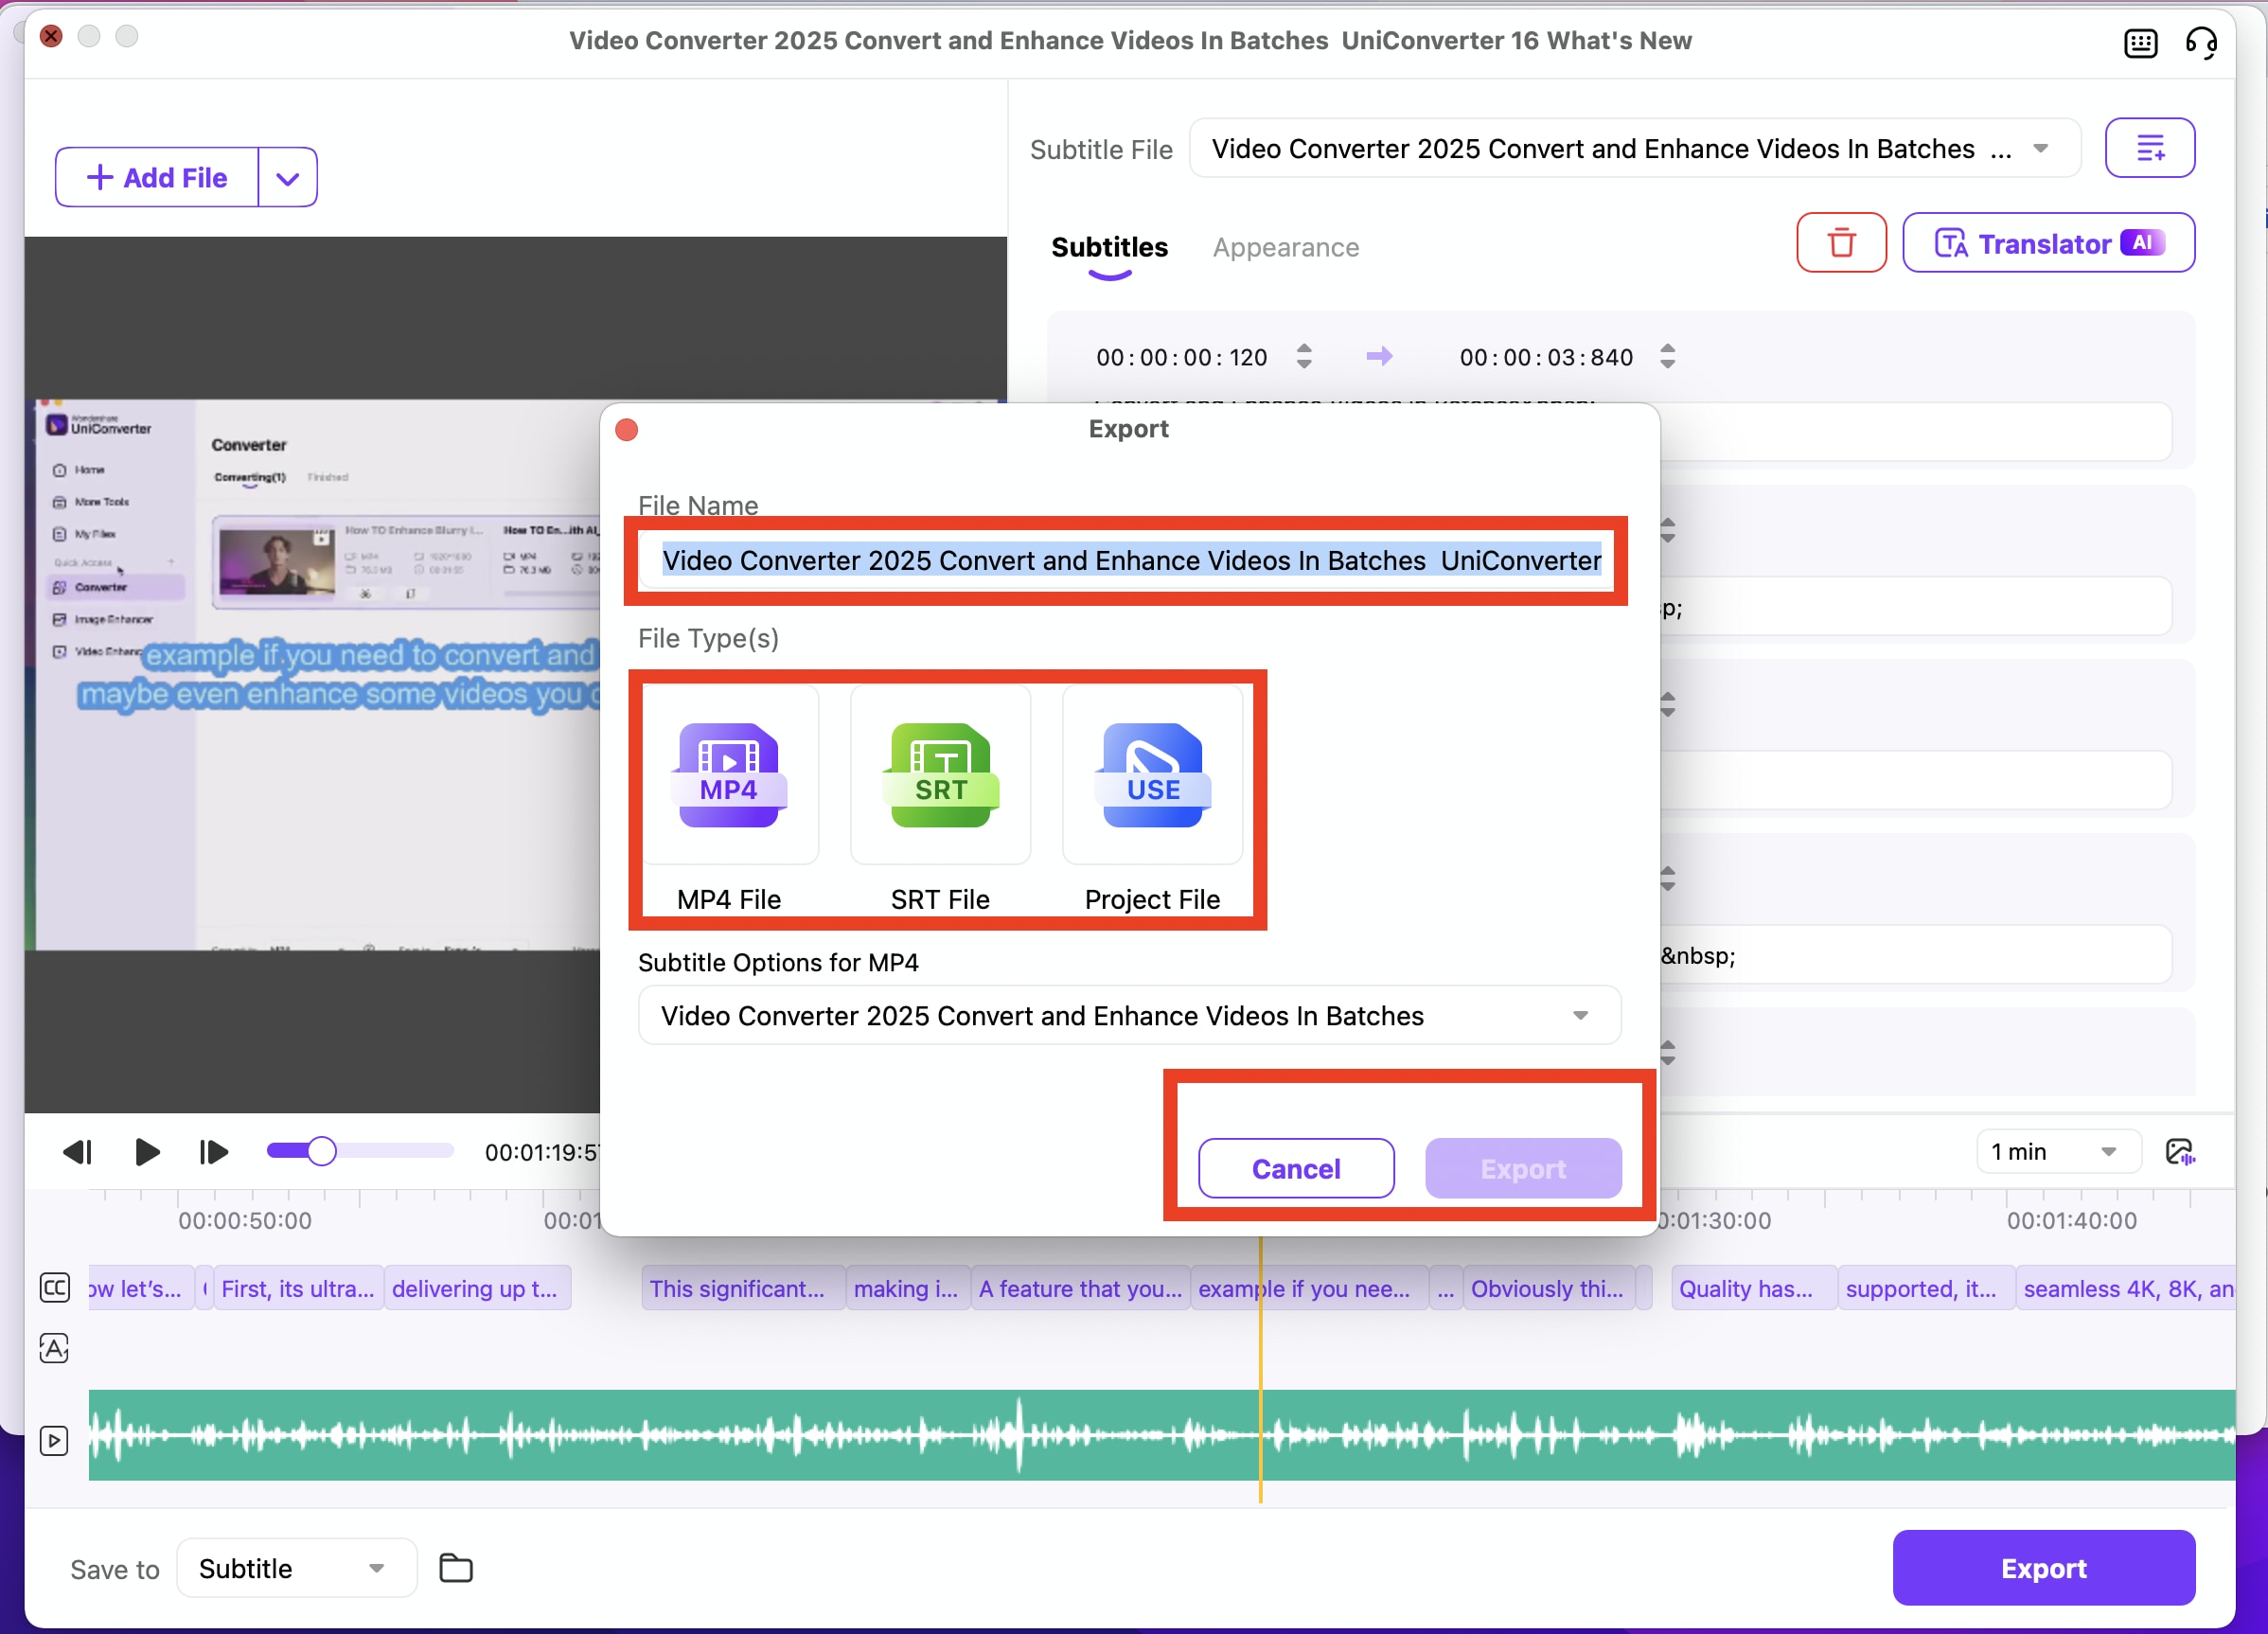
Step 7 Export Your Subtitle.
After confirming every setting and visual effect of the whole video is fine, you can set the export subtitle file name, format and finally export your subtitle.
 print
print
