
Resizing images to passport size is essential for official documents, visa applications, and travel. However, achieving the right dimensions while preserving the image's quality can be tricky. Many tools offer passport photo resizing capabilities, but using the correct size and ensuring high resolution is crucial for a valid photo.
In this guide, we’ll explore how to resize an image to passport size, including tools like UniConverter, which makes the process fast and efficient. We will also discuss some tips on improving the quality and appearance of your passport photos to meet official requirements.
In this article
Part 1: Common Requirement Passport Sizes of Different Countries
When it comes to passport photos, each country has specific size and format requirements. Below is a table of common passport photo size requirements for various countries, with the most widely used sizes.
|
Country |
Passport Photo Size |
Dimensions |
Aspect Ratio |
File Format |
|
India |
Passport Size |
2" x 2" |
1:1 |
JPG, PNG |
|
USA |
Passport Size |
2" x 2" |
1:1 |
JPG, PNG |
|
China |
Passport Size |
2" x 2" |
1:1 |
JPG, PNG |
|
UK |
Passport Size |
35mm x 45mm |
3:4 |
JPG, PNG |
|
Pakistan |
Passport Size |
1.5" x 2" |
1:1 |
JPG, PNG |
|
Canada |
Passport Size |
50mm x 70mm |
5:7 |
JPG, PNG |
|
Bangladesh |
Passport Size |
2" x 2" |
1:1 |
JPG, PNG |
|
Philippines |
Passport Size |
2" x 2" |
1:1 |
JPG, PNG |
|
Nigeria |
Passport Size |
35mm x 45mm |
3:4 |
JPG, PNG |
|
Australia |
Passport Size |
35mm x 45mm |
3:4 |
JPG, PNG |
|
South Africa |
Passport Size |
35mm x 45mm |
3:4 |
JPG, PNG |
Note:
Make sure you refer to the specific country’s guidelines when resizing passport photos to avoid issues during application submissions. Knowing the exact size required ensures your image is correctly processed and accepted.

Versatile Passport Photo Resizer
Part 2: How to Resize Passport Size At Lossless Quality
When it comes to resizing your passport photo, maintaining high-quality output is crucial. Whether you're resizing for personal use, an official document, or visa purposes, you want to ensure that the details remain crisp and clear.UniConverter is one of the most reliable tools that allows you to resize a picture for passport size without compromising quality.
Key Features of UniConverter:
- Batch Resizing: Resize multiple images at once for faster processing.
- Customizable Dimensions: You can adjust the image to the exact passport size required by your country’s standards.
- Lossless Quality: Maintains the sharpness and clarity of the image during resizing.
- Supports Multiple Formats: Works with various formats like JPG, PNG, and GIF.
- Simple User Interface: Even beginners can easily use UniConverter for resizing images.
Steps to Resize Passport Image Using UniConverter:
If you need to resize your passport photo to meet specific size requirements, UniConverter offers a simple and efficient solution. Follow these easy steps to resize your passport image:
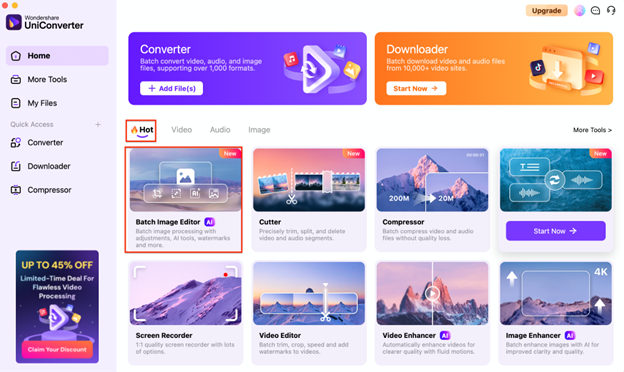
Step 1:
Open UniConverter on your computer and navigate to the "Toolbox" section. Select the "Batch Image Editor" option to start the resizing process.
Step 2: Upload Your Passport Image
Click the "Add Files" button to upload your passport photo from your computer. Once the image is added, it will appear in the editing window for further adjustments.
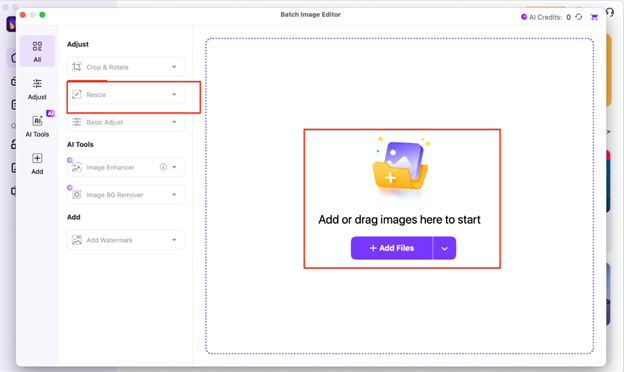
Step 3: Set the Desired Dimensions
Use the resizing options to enter the required dimensions for your passport photo. You can either manually input the width and height or select from preset aspect ratios tailored for photos.
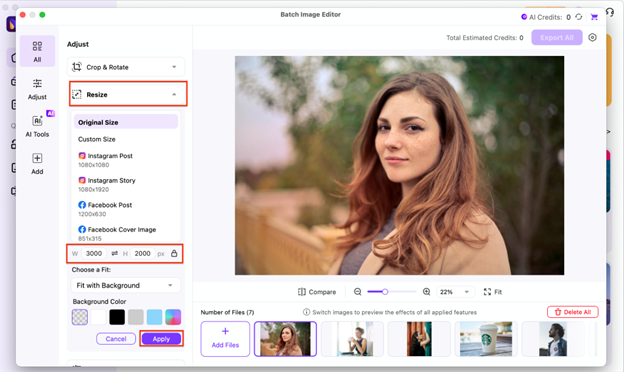
Step 4: Export and Save the Resized Image
Once you've previewed the resized passport photo and are satisfied with the adjustments, click the "Export All" button. You can then save the resized image to your preferred location on your computer.

UniConverter ensures that your resized photo meets the standards of any passport, visa, or ID photo requirements while keeping the image quality intact. With this tool, you can easily resize your picture for passport purposes without worrying about distortion or pixelation.
Versatile Passport Photo Resizer
Part 3: How to Improve Facial Appearance for Passport Image
When resizing your passport photo, it’s not just about adjusting the dimensions but also ensuring that the facial appearance is clear and professional. UniConverter's Image Enhancer feature can help improve the facial details in your passport image, making it look sharp and clear while maintaining the required size.
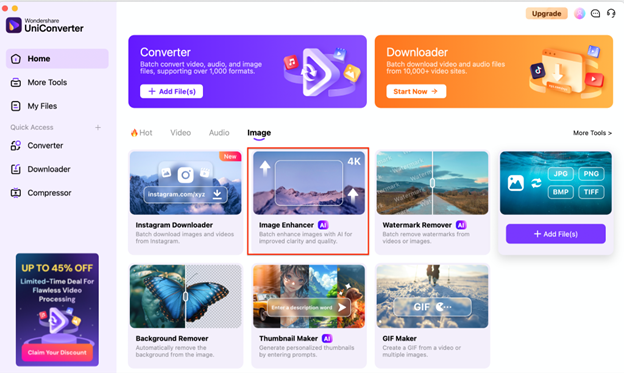
Step 1: Upload Your Passport Image
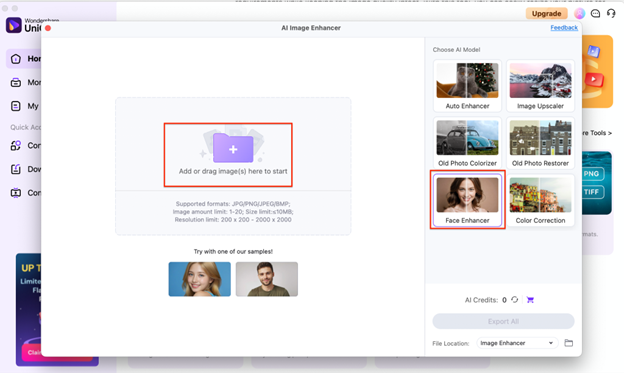
Open UniConverter and go to the Image Enhancer section. Click the “Add Image” button to upload your passport photo. Make sure the image format is JPG, PNG, or any supported format.
Step 2: Apply Face Enhancer
Choose the Face Enhancer model from the available AI options. The tool will automatically detect and enhance the face by adjusting brightness, contrast, and sharpness, improving the overall appearance for passport photo requirements.
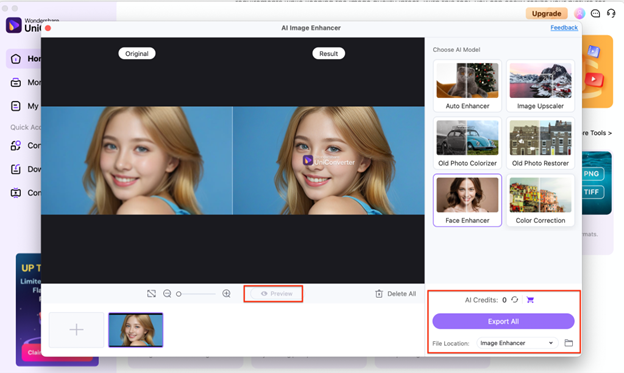
Step 3: Preview and Export
After processing, you can preview the enhanced image. If satisfied, click on the "Export All" button to save the enhanced passport photo. Download the image in your preferred format, ready for uploading or printing.
This process helps ensure your passport photo maintains the necessary clarity and facial appearance for official use.
Part 4: Tips for Getting Better Result For Passport Photo
When preparing your passport photo, it’s essential to follow specific guidelines to ensure the best quality for official use. Below are some tips that can help you achieve a professional passport photo and maintain the required standards:
1. Maintain the Correct Aspect Ratio
Ensure that your passport photo follows the required aspect ratio (usually 4:3 or square) to avoid any distortion when uploading. Many online tools, including those for resize passport photo online free, provide automatic aspect ratio adjustments to ensure your photo meets the official specifications.
2. Ensure Proper Lighting
Good lighting is crucial for clear facial features. Avoid harsh shadows or bright spots that could obscure details. A well-lit environment will help the resize passport photo tools maintain facial clarity and enhance image quality.
3. Use a High-Resolution Image
Start with a high-resolution image to prevent pixelation when resizing. Tools like UniConverter’s Image Enhancer can sharpen facial features and improve clarity while preserving the resolution, especially important for official documents like passport photos.
4. Check for Background Clarity
The background of your passport photo should be plain and neutral, ideally white or light gray. A cluttered or colored background can interfere with the focus on your face. Using online tools can also help ensure the background remains consistent and uniform after resizing.
5. Ensure Face Occupation
your face should be fully visible and occupy most of the image, with the eyes positioned in the correct area. Ensure the photo does not crop out any critical parts of the face, especially the top of the head, eyes, and chin.
By following these tips, you can ensure that your passport photo not only fits the official guidelines but also looks sharp and professional when resized for official use. Tools like UniConverter can assist in the resizing process while retaining the necessary quality for passport photos.
Conclusion
In conclusion, resizing your image to passport size photo is a crucial step to ensure your photo meets the official requirements while maintaining the quality and clarity needed for identification purposes. With the help of tools like UniConverter, you can easily resize your photo without losing details, ensuring that your face is properly centered and sharp. Whether you are working with a single image or resizing multiple photos, UniConverter provides an efficient and hassle-free solution. By following the tips and utilizing the right tools, you can confidently prepare your passport photo for submission, knowing it meets all necessary guidelines.
Versatile Passport Photo Resizer
FAQs
-
1. What is the best resolution for a passport photo?
It’s best to use a high-resolution image with at least 300 DPI to ensure your photo remains clear when printed. -
2. Can I resize my passport photo on my phone?
Yes, there are mobile apps available, like UniConverter, that let you resize your passport photo on both Android and iOS devices. -
3. Can I resize my photo for passport use without affecting the background?
Yes, tools like UniConverter allow you to resize without distorting or changing the background of the image. -
4. What should I avoid when resizing a passport photo?
Avoid stretching or distorting the image, and ensure the background remains neutral. Always double-check the image quality before submission.

