
Screenshot capturing has become part and parcel of lives. We capture an image, chat, snapshot, and even a relevant post from Instagram. It is important to crop the screenshot and eliminate unnecessary image parts. The article targets how to crop a screenshot on Mac and introduces five recommended workable software.
Follow the article below to find out how to screenshot on Mac and crop. So, let us begin!
Part 1. The quickest way to crop a screenshot on Mac
Follow the steps below to know how to crop a screenshot on a Mac using Preview.
Step 1: Launching markup toolbar in Preview.
Open the targeted screenshot in Preview and click on Show Markup Toolbar in the top panel. Resize the image by clicking on the blue dots.
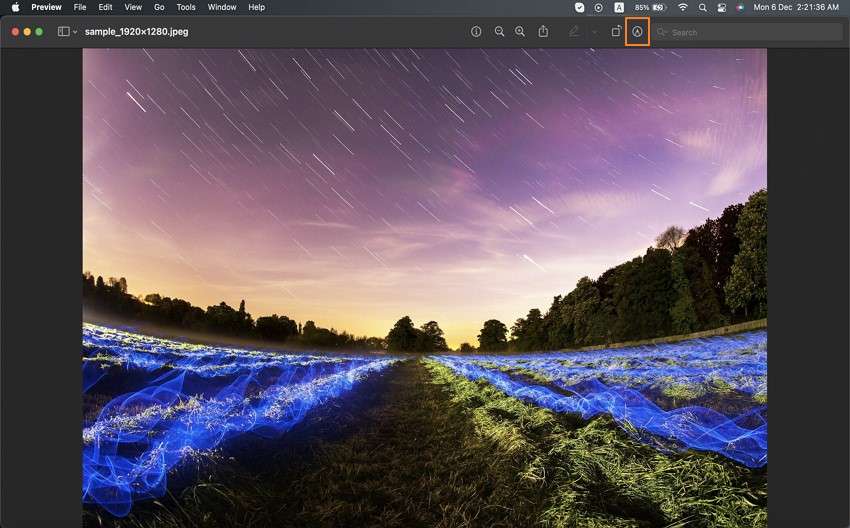
Step 2: Cropping process.
Additionally, drag on the screenshot to create the cropping selection. After that, navigate to Tools and click on the Crop tab from the context menu that appears. The screenshot is cropped successfully.
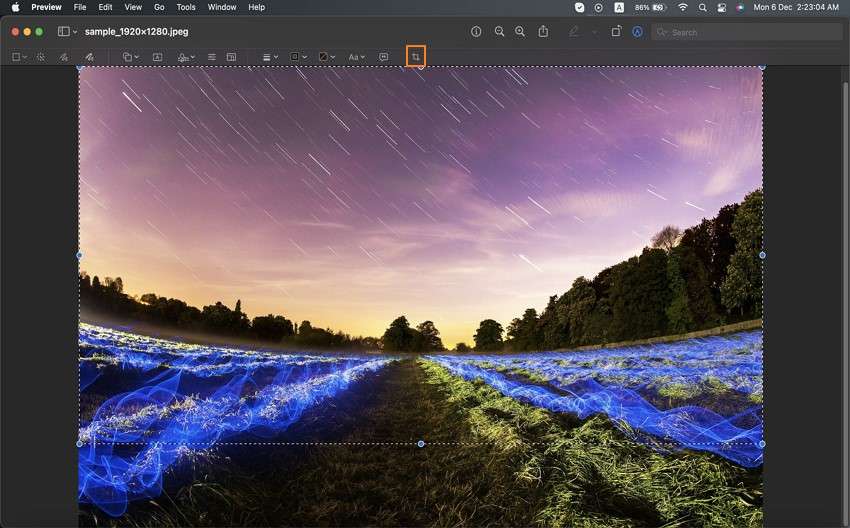
Part 2. Another helpful way to crop a screenshot on Mac with personalized features
The market teams up with applications that crop screenshot Mac easily. Wondershare UniConverter is recommended that offers personalized features making the cropping process effortless. UniConverter is your all-in-one toolbox with every function connected with video and image. From video compression to conversion and editing, you can find this tool at your beck and call.
Wondershare UniConverter — Best Image Editor for Mac and Windows.
Edit images on Mac by cropping, adding effects, and watermark.
Converter videos or images to any format at 90X faster speed.
Compress your image files in batch without quality loss.
Excellent smart trimmer for cutting and splitting videos automatically.
Nice AI-enabled subtitle editor for adding subtitles to your tutorial videos automatically.
Save any online video for teaching from more than 10,000 platforms and sites.
As far as screenshot Mac crop is concerned, UniConverter doesn't stay behind. It offers a fair share of workability in cropping the unnecessary parts. The platform allows the user to use a GIF Maker to change an image into a GIF. It also adds a watermark into a screenshot or changes its file format with its exceptional features. UniConverter also allows users to add effects to the image. It wouldn't be wrong to claim that Wondershare UniConverter is fair to play with the screenshot.
Follow these three simple steps to crop a screenshot on Mac.
Step 1 Launch Wondershare UniConverter on Mac.
Download and install Wondershare UniConverter on Mac and access Image Converter by clicking the Toolbox tab from the left panel.
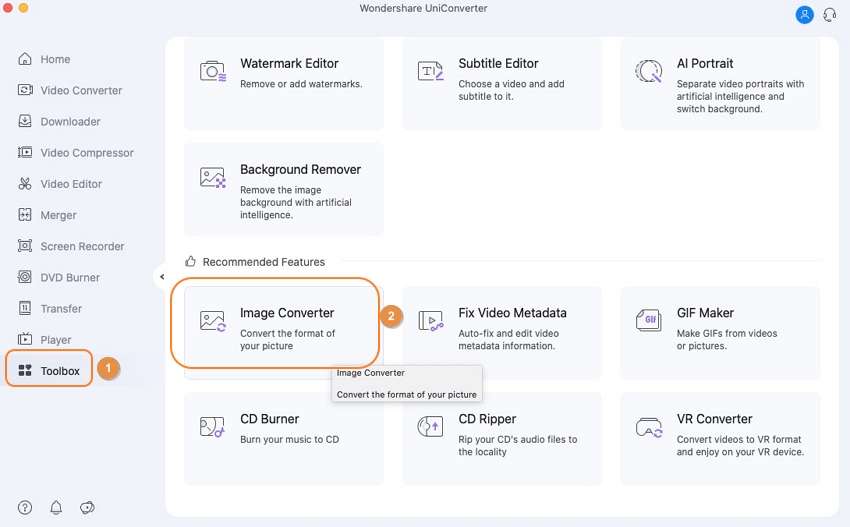
Step 2 Import the screenshot file.
Import the screenshot file. Click the Add Images
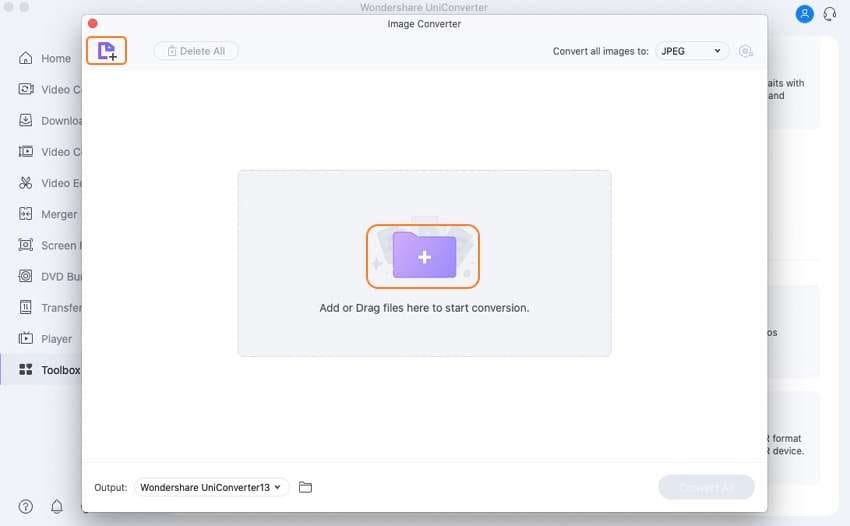
Step 3 Crop and save the screenshot on Mac.
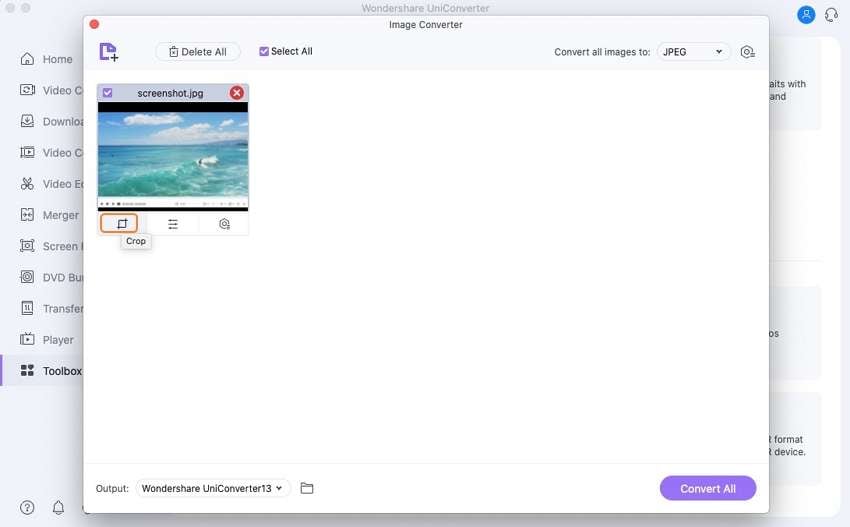
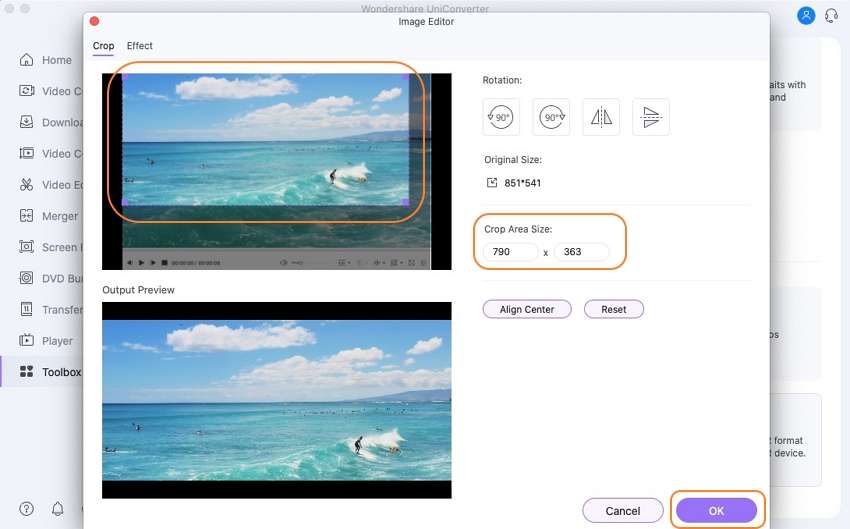
After uploading the image file, click the Crop tab in the thumbnail to start the cropping. You can easily set the crop area size or drag the mouse to crop it. After cropping, click the OK tab.
Try Wondershare UniConverter for free now!
Over 3,591,664 people have downloaded it to try the advanced features.
Part 3. Other 5 useful software for Mac to crop a screenshot recommended
The process to crop Mac screenshots is not complicated. Software that provides advanced features is considered effective. Before getting into how you crop a screenshot on a Mac, let us look at five useful software of Mac to crop a screenshot. The sub-section shall also reflect upon its pros and cons. Let us initiate this!
1. Grab
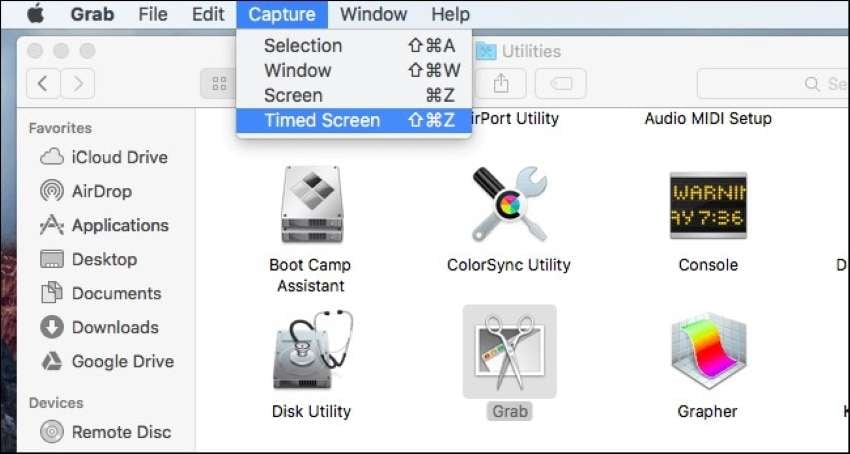
The process to crop screenshot Mac has become flawless with the Grab tool. The application is in-built in Mac that handles the screenshot cropping problem like a pro.
Key features
- You can even decide if you wish to display the pointer on the screen within the screenshot.
- The tool offers four Capture options to its users such as Selection, Window, Screen, and Timed.
- You can also make GIF screenshots using this tool.
- Use Grab to save the screenshot in multiple formats such as JPG, PNG, PDF, GIF, or TIFF.
- Provides an easy-to-use interface.
Pros
The tool is in-built and requires no technical knowledge beforehand.
The app offers shortcut keys to make the process quicker.
It also offers a timer function to take a screenshot with efficiency.
Cons
The screenshot taken by Grab is limited to the system resolution.
The app is no longer available and is replaced by a utility Screenshot in macOS Mojave.
2. Photos App
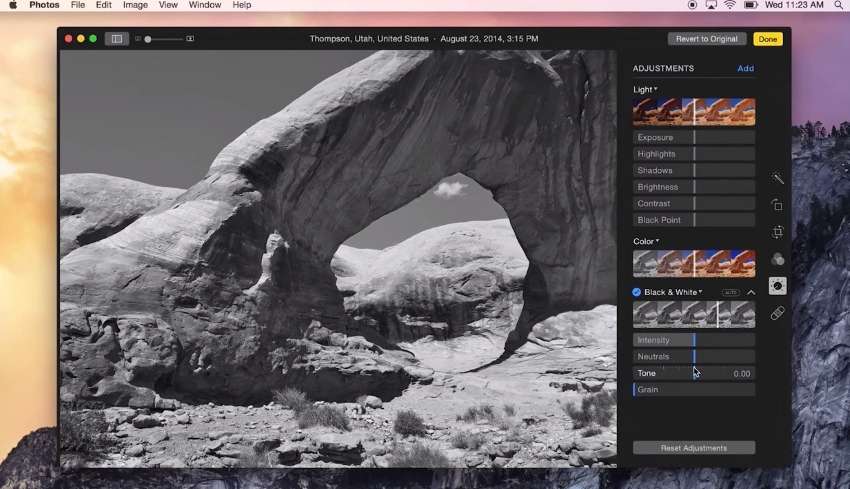
The Photos app is also a built-in tool in the Mac operating system.
Key features
- The user has the power to resize and crop the screenshot as he likes.
- The platform offers a range of effects that can be implemented into the picture.
- The built-in editing tools offer an organized system.
- The intuitive interface makes the process flawless, even for a beginner.
- Faster image processing is possible with Photos App.
Pros
The area to be edited can be chosen in multiple formats such as rectangular selection, elliptical selection, and smart lasso.
You can draw, sketch, and add shapes to the screenshot.
The user is free to highlight a particular area in a screenshot.
Cons
The sharing of the imagery is limited to the Apple ecosystem.
It lacks undo steps during editing.
3. Vidmore Screen Recorder

Vidmore Screen Recorder is an offline tool changing the narrative of image editors in the business.
Key features
- The user can decide if he wants to screenshot the complete screen or a window.
- Users are provided the offer to add text to screenshots effortlessly.
- Add arrows to the screenshot image to clarify a message easily.
- It also provides the option to add shapes.
- It is very easy to carry out tasks across the platform due to its impressive interface.
Pros
The real-time drawing tools allow the user to customize the screenshot.
Keeps your added content safe from theft.
Vidmore screen recorder performs different recording activities effectively.
Cons
It doesn’t offer any Android and iOS applications to work with.
There is no free trial for this platform.
4. Skitch
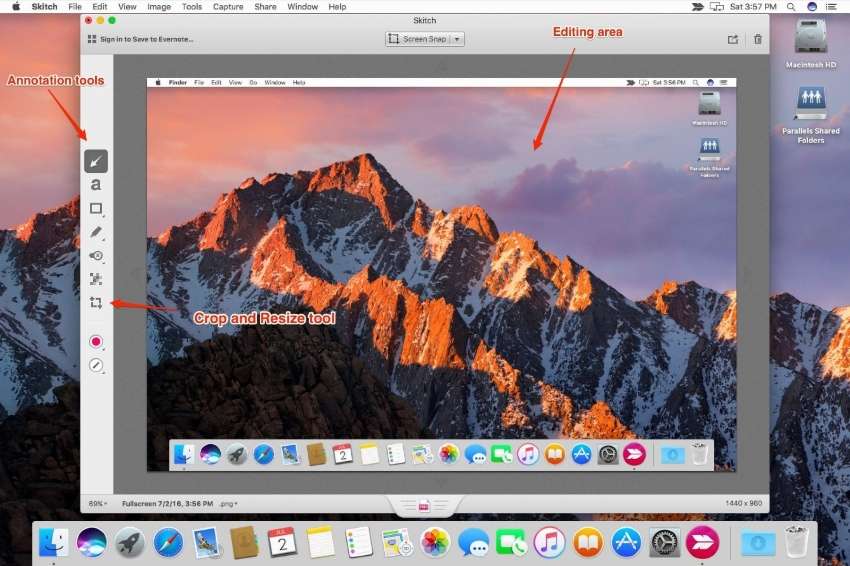
Skitch is another handy tool recommended to crop Mac screenshot.
Key features
- You can take timed screenshots to reveal a particular screen.
- You can add shapes to the screenshot to make your message clearer and clearer.
- It allows adding text and arrows.
- It offers easy and intuitive screen capturing.
- It helps highlight the screenshots.
Pros
Annotation and sketches can be accessed in a series of easy steps.
It is a user-friendly tool.
It is an offline tool, so access is easy.
Cons
The exporting feature is not intuitive.
It lacks advanced editing abilities.
5. Img2Go
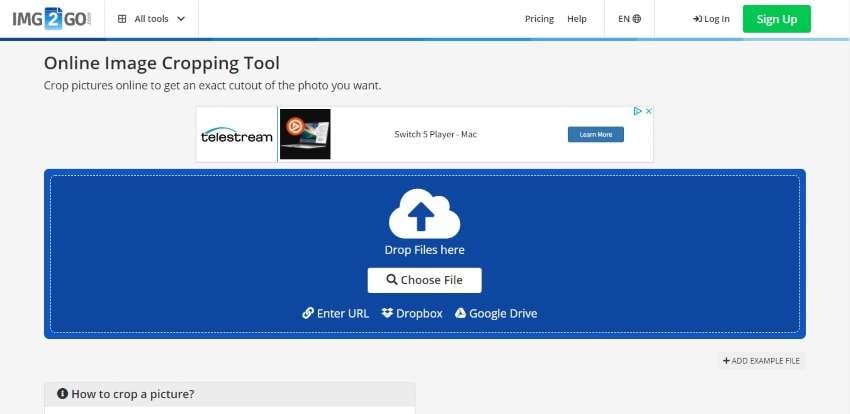
Img2Go can be relied upon to screenshot Mac crop.
Key features
- You can even add watermarks to the screenshot.
- Online editing is extremely easy.
- Add text into the images with ease.
- The effects and filters can be inserted flawlessly.
- It contains a very proficient import and export functionality.
Pros
You can resize and crop the screenshot.
Images can be easily converted into other existing file formats.
There is no effect on quality via editing.
Cons
The aspect ratio cannot be contained while making edits.
The tool is quite unstable in its online form.
Part 4. Crop Mac screenshot FAQs
How do I copy and paste a screenshot on a Mac?
You can copy and paste a screenshot on a Mac by highlighting the content. Press ‘Command+C’ for copying and ‘Command+V’ to paste the copied content at the appropriate place. To your surprise, there are other options to perform a similar task. You can use the contextual menu by using “CONTROL+Right-Click” and hitting "Copy" on the content to be copied. You can find the option of “Paste” across the same menu.
How do you take a lasso screenshot on a Mac?
You can take a lasso screenshot by pressing “Command+Shift+4” from your keyboard. An icon is displayed across the screen. You can drag and drop the icon to take the screenshot successfully.
Where are my screenshot images on Mac computers located?
The screen taken from Mac is saved to the desktop with a specified name. It starts with a name “Screenshot [date] at [time].png.” However, in macOS Mojave or later, the default location of the screenshot can be changed. You can look for the “Options” menu in the Screenshot app. Conversely, you can drag the thumbnail across any folder, as desired.
How do you take a long screenshot on a Mac?
The long screenshot on Mac can be taken for Firefox, which allows the user to pick the “Full Screen” option. Moreover, the Parallels Toolbox in Safari comes up with a “Screenshot Page” that takes the long screen capture. The entire webpage can also be saved as a PDF by using Chrome.
Concluding remarks
The article conveyed the key features, pros, and cons of Mac's five useful tools to crop screenshots, Mac. Preview for Mac is considered the quickest way to crop a screenshot. Its workability was also part of the article. The users are recommended to use UniConverter to handle the concerns related to screenshots and for advanced image editing features.
