OBS is a free, open-source app that’s available for Windows, macOS, and Linux. It’s powerful and lets you overlay artwork on top of your screen so your viewers can understand what’s happening more quickly. However, the platform shares videos in the MKV, which isn’t compatible with most media players. In that case, you still need to convert media files before transferring them to the player which supports file formats, such as MP4. This post will discuss how to convert OBS MKV to MP4.
Part 1. Should I Record in MKV or MP4 On OBS?
While recording live videos, MP4 is not a recommended format. It is because, if for some reason, OBS crashes, the MP4 recording can not be recovered, and you will end up losing every frame. In addition, this format is not so suitable for direct recording since the data will need to be finalized before it’s usable. It means you have to add info, such as metadata, timestamps, frame rate, and more.
Moreover, direct recording is preferred in professional situations such as film and video, especially when working where access to a computer with the appropriate software to finish files is unavailable or impractical.
However, it isn’t the case with the MKV format. Not only does OBS recommends the said file type, but the MKV video quality is pretty similar to MP4. Furthermore, MKV is a container format capable of managing different audio files.
Finally, the most important feature is that MKV does not require a process to finish the file as MP4 does, so if OBS fails for whatever reason (power outage/BSOD), your entire recording is secure.
Comparing the factors mentioned in this section, you should record a video in MKV on OBS.
Part 2. How to Remux MKV to MP4 in OBS?
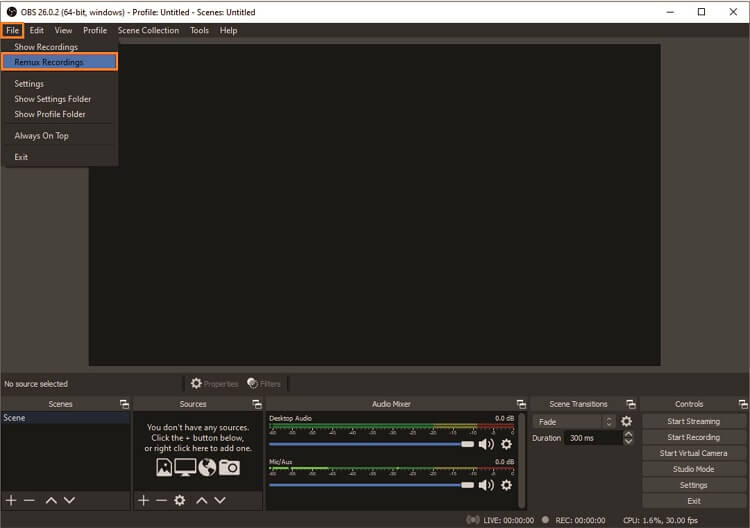
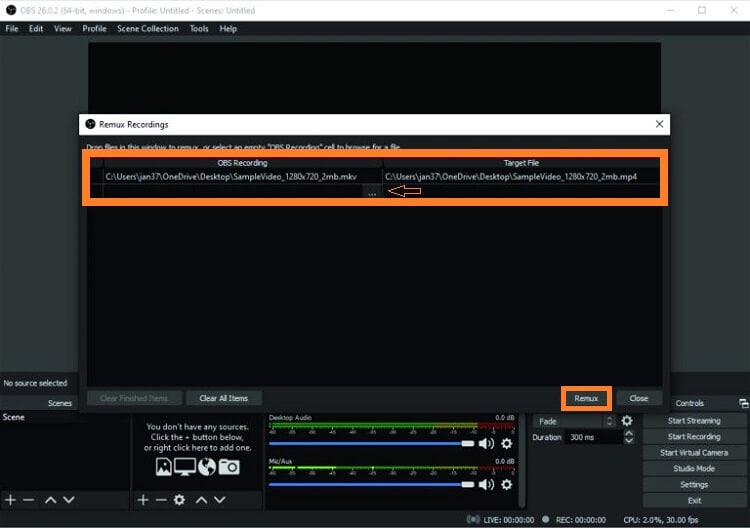
If you are recording a live stream in MKV, then naturally, you would want to store a local file in a compatible format, such as MP4, which allows you the chance to upload the content on different websites, such as YouTube. To make such a thing possible, you can remux the MKV file to MP4 in OBS. The steps are listed below:
- Run OBS on your desktop.
- On the Menu Bar, click on the File button, and select the Remux Recording option.

- Add the MKV recording to the interface once you see the new Remux Recording window popping up.
- Click the Dotted button, which will expand the window. There, click on Remux to start the process.

Part 3. How to Convert Recorded OBS MKV to MP4 Quickly?
It doesn’t matter if you have an OBS file in the MKV format. As long as you have a reliable file converter like the Wondershare UniConverter at your disposal, you can convert to MP4 while maintaining the original file quality. In addition, it will allow you to upload the MP4 file to websites that do not support MKV.
Not only that, if you have more than one OBS MKV recording, then with Wondershare UniConverter, you can perform batch conversion at 90x speed, saving an ample amount of valuable time. Besides MKV and MP4, this tool supports over 1000 different file types that run on Windows and macOS.
In case you are wondering what more Wondershare UniConverter has to offer, then check out the list below, as it is an excellent video editor:
Wondershare UniConverter — All-in-one Video Toolbox for Windows and Mac.
It can compress OBS MKV videos without quality loss.
You can trim, crop, cut, and add effects to MKV files.
The tool lets you add an image or text-based watermark to the OBS recording.
Convert videos/images from/to 1000+ formats at 90X faster.
Free video player to open videos up to 4K.
Complete Toolbox, including Subtitle Editor, Smart Trim, Auto Reframe, Video Background Remover, and more.
Follow the step-by-step guide to convert recorded OBS MKV to MP4 with the UniConverter quickly:
Step 1 Run the Program
Launch Wondershare UniConverter on your system. On the left of the UI, click Converter, and add the OBS MKV recording by pressing the Add+ button.
Step 2 Select MP4 as Output Format
Click the Settings button to select the new file format. There, hit the Video tab, and choose MP4. Next, pick the video quality, and move to the next step.
Step 3 Convert MKV to MP4
Click the File Location section to select a new destination for the MP4 file. Finally, click Convert to start the file conversion. You will find the video in the chosen folder.
Part 4. People Frequently Asked about OBS Recording
Here is some more valuable information on the OBS recording topic that might occur in the average user’s mind.
1. How to save OBS recordings as MP4?
From the OBS interface, click on the File tab and select Settings from the list. Next, click on Advanced, and enable the “Automatically remux to MP4” option.
2. What are the best OBS recording settings?
If you are recording a gaming stream, we recommend setting the format to MP4. You can also set the keyframe interval as 2, which will make the video smooth. Moreover, choose x264 in the encoder settings.
If you are recording an online lecture or conference, select the Output Mode as Simple and Video Bitrate as 2500Kbps. Furthermore, choose MKV as the output format.
3. Why is OBS recording in FLV?
FLV is the default recording format in OBS. It is because the file type is quite impervious to crashes. Therefore, it means that your video will remain unharmed in case OBS stops working. On the other hand, if you save the OBS recording in MP4, the video will be lost if OBS or your PC stops working.

