Removing unwanted parts from your MP4 videos will not only help in reducing their size but will also enhance the video-watching experience. To get this task done in a simple yet effective manner and that too without burdening your pockets, online tools work as the best choice. If you too are searching for such tools to trim MP4 online our article below will be of great help. Keep reading to know the best online MP4 trimming tools and alternatives as well.
Part 1. Best 6 Ways to Trim MP4 Video Online for Free
Confused with the myriad of online options available for trimming MP4 videos? No worries as we have shortlisted the top tools as below.
1. Online Video Cutter
Using this free online tool, your videos in MP4, as well as other key formats, can be trimmed simply. Local, online, as well as files from Google Drive and Dropbox, can be added. The files can be trimmed by simply selecting the parts that are required. The option to change the target file format is also there. The tool also supports additional features like cropping, rotating, and more.

Steps to trim MP4 video online using Online Video Cutter
Step 1: Open Online Video Cutterand click on the Open file button to browse and add the MP4 file.
Step 2: After the video is added, move the slider to select the part of the video that you need. Alternatively, you can also add the start and the end time of the video.
Step 3: Clicking on the settings gear icon will let you choose the target format. Finally, click on the Save button to start the trimming process.
2. Kapwing
Kapwing is a popular and reliable online tool supporting an array of functions including video trimming. Simple to use, MP4 and other formats can be trimmed by selecting the desired video part. In addition to trimming several other functions can also be performed like adjusting, cropping, cutting, volume adjustment, and more.
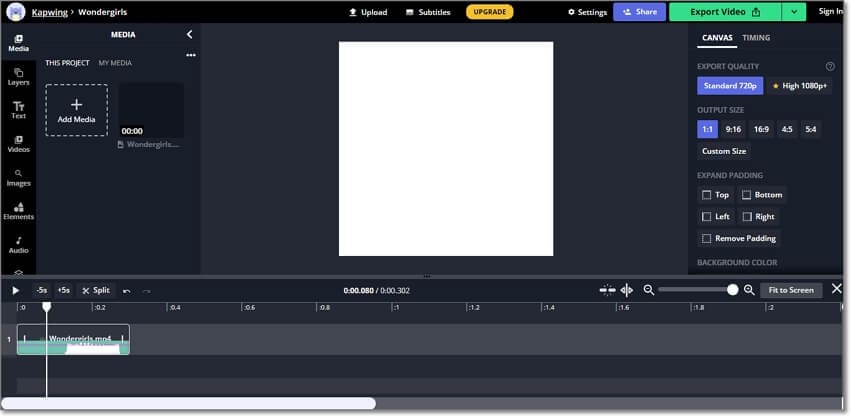
Steps to trim MP4 online free using Kapwing
Step 1: Run Kapwing and click on the Upload file button to browse and add the MP4 video.
Step 2: At the bottom of the interface, move the slider to adjust the video length required.
Step 3: Next, click on the Export Video button in the upper-right corner.
3. FreeConvert
MP4 and other videos up to 1GB can be added to this online tool for trimming. Videos on the computer, Google Drive, Dropbox, and URL can be added. The trimming process is done by selecting the start and the end time to trim the videos.
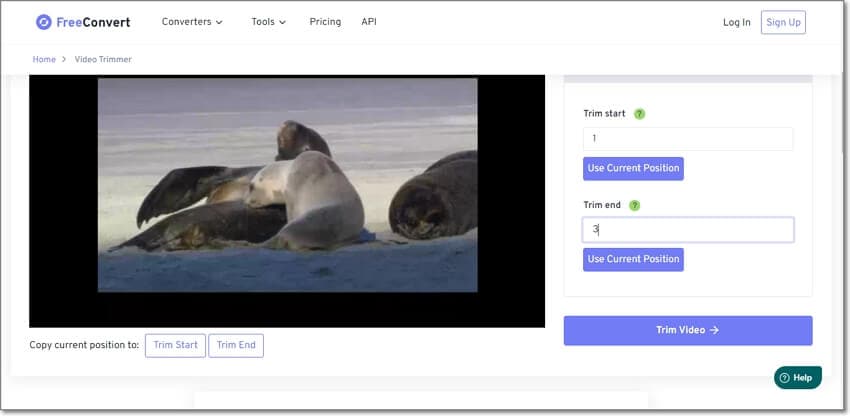
Steps to use FreeConvert online trimmer MP4
Steps 1. Open FreeConvert and click on Choose Files button to add MP4 videos.
Step 2: After the video is added, choose the Trim start time and Trim end time. You can even play the video and use the current position for selecting the times.
Step 3: Click on the Trim Video button to start the processing.
4. Adobe Creative Cloud Express
Adobe needs no introduction when it comes to video editing and the online version of the program is quite good at supporting multiple tasks including video trimming. Videos on your system can be browsed or added or can also be simply dragged and dropped. Using the tool, you can also choose the aspect ratio and mute the video. To download the processed video, you need to free sign-up.
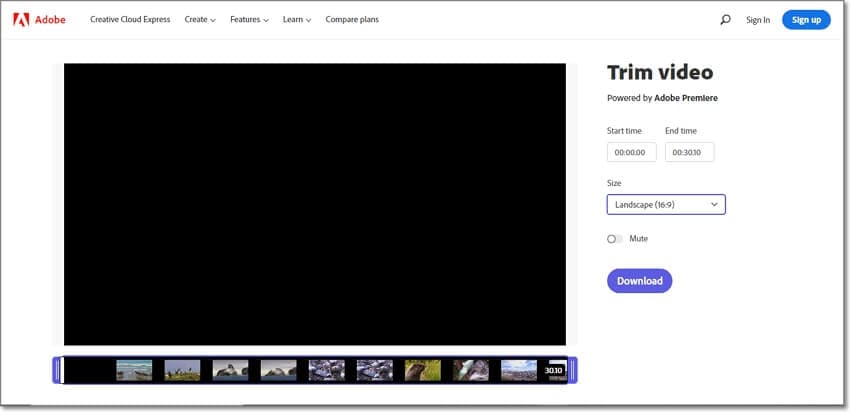
Steps to online trim MP4 using Adobe
Step 1: Open Adobe Creative Cloud Express and add MP4 videos by clicking on Upload your video button. You can also drag and drop the video to the interface.
Step 2: Next, when the video is added to the interface, choose the desired Start Time and the End time from the right-hand side. Alternatively, you can also move the slider under the added video to select the desired video part.
Step 3: Choose the aspect ratio from the drop-down menu and if required, enable the mute option. Finally, click on the Download button.
5. Flixier
This is a feature-rich online tool that allows performing a wide range of tasks like trimming, cutting, adding text, adding overlays, and more. The tool allows importing and adding files from multiple sources like devices, Google Drive, Google Photos, OneDrive, WebX, SoundCloud, and more. Multiple files at a time can be added.
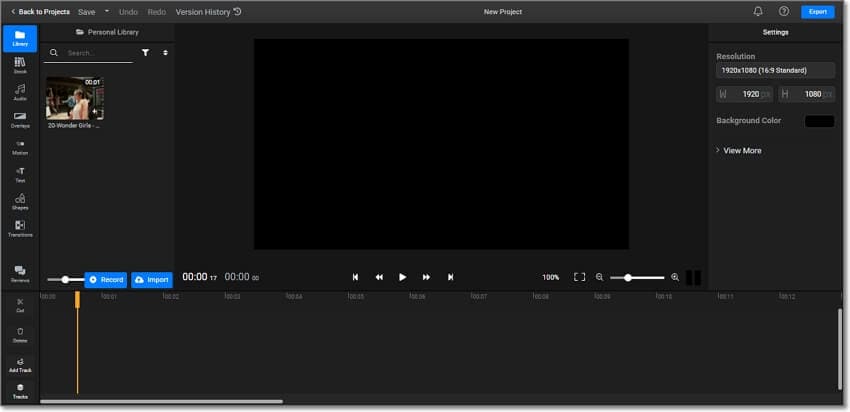
Steps to trim MP4 video using Flixier:
Step 1: Launch Flixier and click on Choose Video button. A new pop-up window will open asking you to browse or import MP4 files from different sources.
Step 2: After the video is added, choose the Cut option from the left-side menu panel and then move the slider to trim the file.
Step 3: The resolution, background color, and other changes can also be done as needed. Finally, click on the Export button at the top-right corner to start processing.
6. Fastreel
Add videos from your device, Google Drive, and Dropbox to this online tool for processing. The interface is simple and the process of trimming includes you marking multiple segments and then removing the parts not needed.
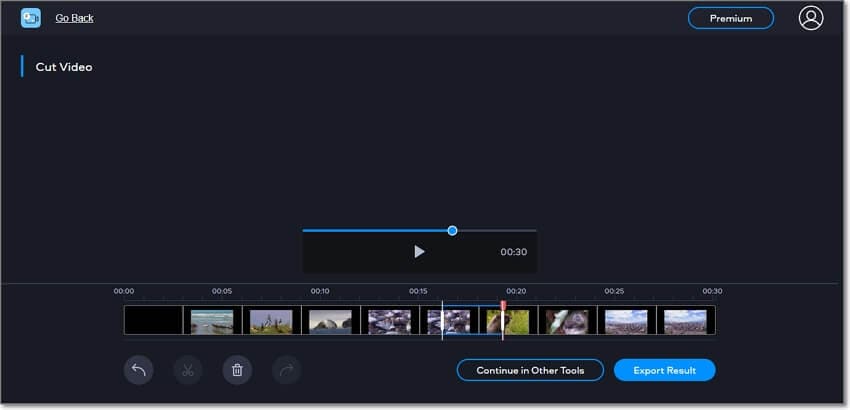
Steps to trim MP4 file with Fastreel:
Step 1: Run Fastreel and click on Add your file button to add the MP4 video.
Step 2: After the file is uploaded, move the slider to select the video part and then click on the scissors icon to cut the selected portion. Multiple segments can be created similarly. Next, choose the marked segment which is not needed and click on the delete icon and the portion will be removed from the video.
Step 3: Tap on the Export Result button to start and process video trimming.
Part 2. More to Know: How to Trim MP4 Video in Windows 10/8/7 / Mac?
1. Best Video Tool to Trim MP4 Video Automatically or Manually on Windows/Mac
To help you get rid of the unwanted MP4 video parts automatically as well as manually on Windows and Mac, Wondershare UniConverter is the best tool. This versatile and feature-rich program takes care of all your video editing requirement like a pro and that too in a few simple and quick steps.
The built-in editor of the software allows you to trim the desired video parts into segments and then keep the ones required and delete the remaining.
When you have a bulk of videos to be trimmed that manually will take a lot of time, the Smart Trimmer function in the latest version of the software will be just apt. Using this amazing feature, you can automatically trim the videos based on several pre-set audio adjustments.
Wondershare UniConverter — All-in-one Video Toolbox for Windows and Mac.
Support to over 1000 formats for processing.
Trim your MP4 and other videos manually or automatically as needed.
Batch processing supported to trim multiple videos at a time.
Lossless quality video processing.
Wide range of additional features supported like video conversion, download, recording, DVD burning, GIF making, and more.
Compatible with all latest Windows and Mac systems.
Steps to manually trim videos using Wondershare UniConverter
Step 1 Add MP4 videos to Wondershare UniConverter
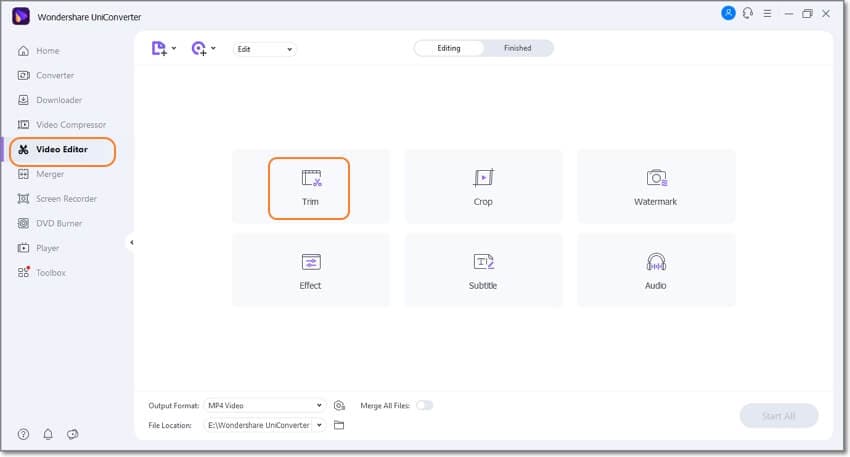
Launch the software and click on the Video Editor tab on the left-hand side menu bar. Tap on the Trim button from the available options and then browse and add the MP4 video from your system.
Step 2 Create video segments
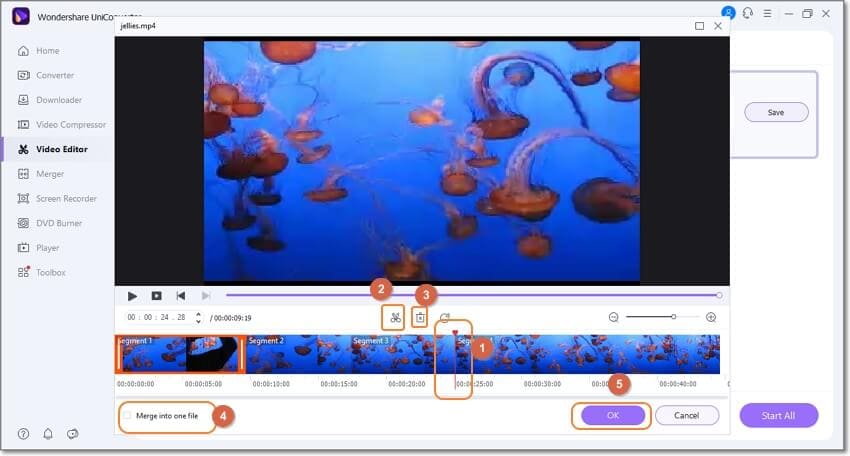
Next, when the video is added, move the slider to the progress bar under the video. Stop the slider at the desired point and click on the scissor’s icon and the selected video part will be marked as Segment 1.
Similarly, multiple segments can be created. When the entire video is divided into multiple segments, choose the one that you do not want and click on the delete icon.
After removing all the unwanted video parts, you save the remaining ones as a single video by clicking on the checkbox next to the Merge into one file option.
Click on the OK button to confirm all the selected settings.
Step 3 Process MP4 video
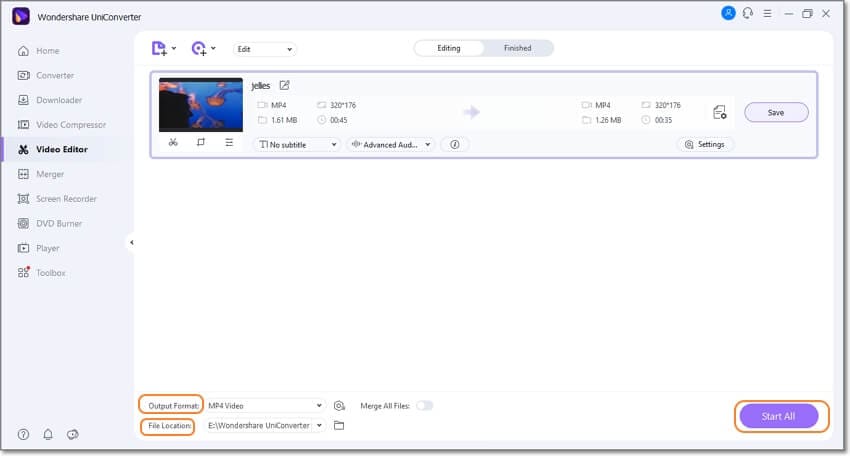
At the main trim window of the software, choose the desired target format and the destination folder from Output Format and File Location tabs respectively. Finally, click on the Start All button to start file processing.
Steps to automatically trim videos using Wondershare UniConverter
Step 1 Launch Wondershare Smart Trimmer
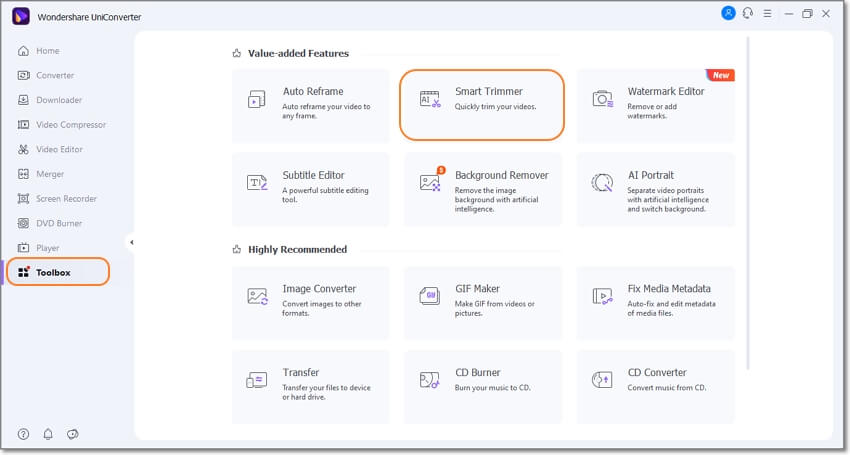
Open the installed software on your system and from the Toolbox tab on the main interface choose the Smart Trimmer option.
Step 2 Add MP4 videos
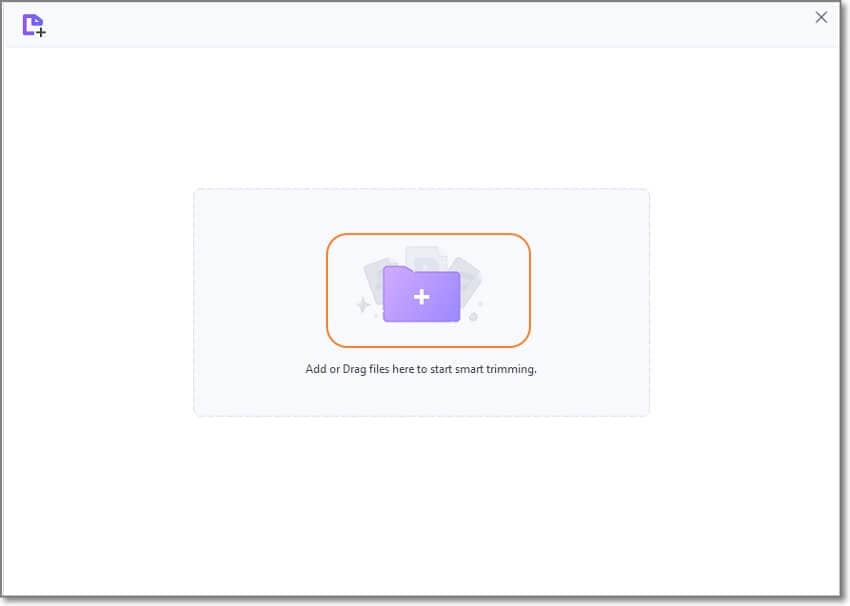
Click on the + sign or the Add Files icon to browse and import the videos to be trimmed.
Step 3 Set trimming recognition options
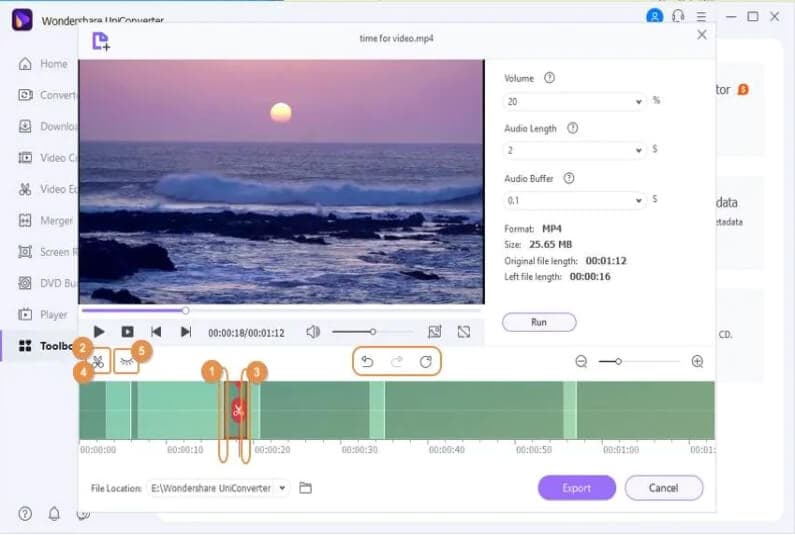
To automatically trim the added videos, you first need to set the conditions for trimming that are based on irregular video parts. You can trim your videos based on Audio volume, length, and buffer. Options to set them are as follows:
1. At the Volume tab on the left-hand side choose the desired percentage from the drop-down menu. You can choose between 0-30%. The video parts having a volume lower than the selected percentage in comparison to the original video will be deleted.

2. At the Audio Length tab on the right-hand side, you can choose between 1-20 seconds from the drop-down menu. The video parts where there is no sound over the selected seconds will be deleted.

3. Setting the Audio Buffer between 1 to 5 seconds will help you identify the video parts that meet the above 2 conditions but are not suitable for trimming for smooth video playback. For instance, speaker breathing and similar others.

Step 4 Manually adjust the clip
When all the above settings are done, click on the Run button. The software will smart trim your videos based on your selected settings. If you are still required to delete more parts, select the desired part using the mark bar, then cut them using the scissors icon, and finally click on the Closed eye icon to hide them.
If there are parts that you do not want to delete, select them and click on the Closed eye icon again to make them visible.
Step 5 Export the video
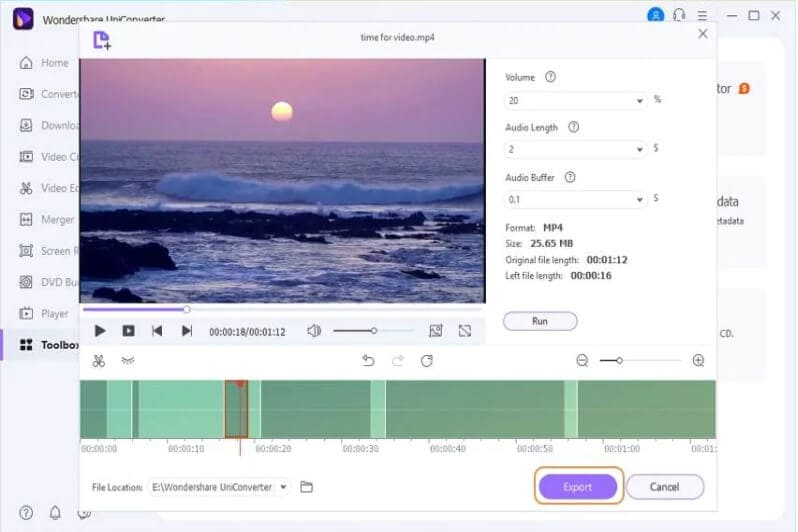
Choose the destination folder at the File Location tab and then click on the Export button to finally process and save the video.
2. How to Trim MP4 Video in Windows 10 for Free?
If you want to trim MP4 videos on your Windows 10 for free, the in-built Photos App is a decent tool. The app is simple to use and supports basic trimming features.
Steps to trim videos using Photos App
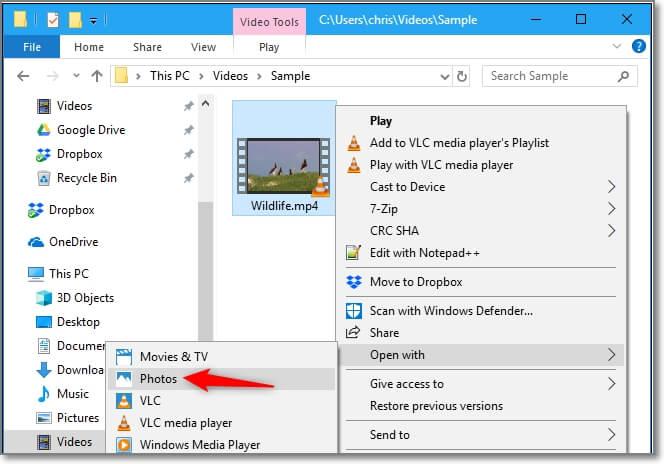
Step 1: Open the MP4 video in the Photos app and click on the Edit & Create option on the toolbar.
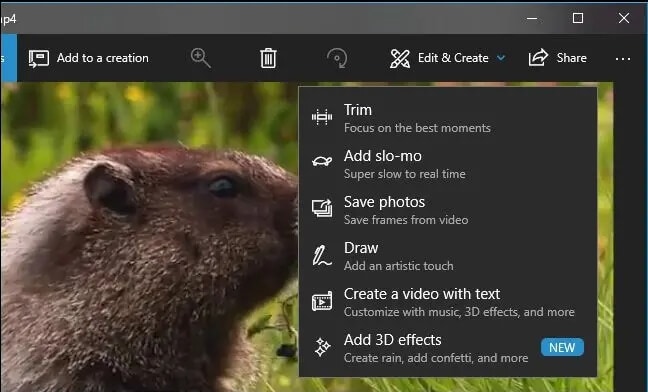
Step 2: A pop-up window showing multiple options will appear from which choose Trim.
Step 3: Next, to choose the video segment, drag the left or the right circular buttons at the progress bar.
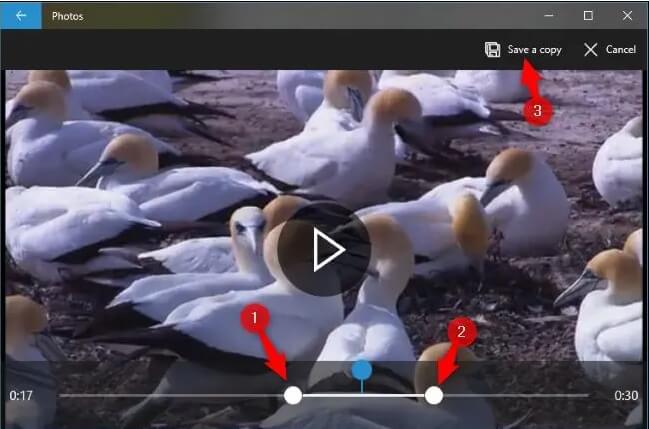
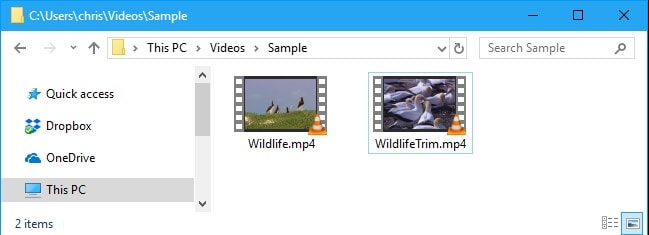
Step 4: Choose to Save a copy option at the upper-right side and this new video with trimmed parts will be saved to the same location as the original file with _Trim in its name.
The above steps are for trimming the start and the end of the video. The Photos app can also be used to trim multiple segments in the video using the Split option from the Storyboard section.
3. Can I Trim an MP4 Video with VLC?
Yes, you can trim MP4 videos using VLC. Though VLC is majorly used for playing videos in almost all formats and from all sources, it also supports basic editing tasks including video trimming, cutting, and more. Using this free and open-source media player you can simply choose to keep the desired video parts and the rest will be deleted. The process is simple and quick.
Summary
Multiple tools and programs for trimming MP4 videos on your Windows 10 are available. The online tools and free programs are suitable when basic video trimming of a few video files has to be done. To process files with advanced features professional software like Wondershare UniConverter works best. The software besides video editing supports several other tasks like video download, conversion, recording, DVD burning, and many more.


