Video Converter Alternatives
- 1. Video Converter Alternatives+
-
- 1.1 AVS Video Converter Alternatives
- 1.2 AnyMP4 Video Converter Alternatives
- 1.3 VideoSolo Video Converter Alternatives
- 1.4 VSDC Free Video Converter Alternatives
- 1.5 VideoProc Alternatives
- 1.6 Xilisoft Video Converter Alternatives
- 1.8 DivX Converter Alternatives Alternatives
- 1.8 Any Video Converter Alternatives Alternatives
- 1.9 iDealshare VideoGo Alternatives Alternatives
- 1.10 Bigasoft Total Video Converter Alternatives
- 1.11 MacX Video Converter Pro Alternatives
- 1.12 Imtoo Video Converter Alternatives
- 1.13 Cisdem Video Converter Alternatives
- 1.14 WonderFox HD Video Converter Factory Pro Alternatives
- 1.15 Tipard Video Converter Alternatives
- 1.16 Easefab Video Converter Alternatives
- 1.17 Leawo Video Converter Alternatives
- 1.18 Aiseesoft Video Converter Alternatives
- 1.19 Pavtube Video Converter Alternatives
- 1.20 Winavi Video Converter Alternatives
- 1.21 Prism Video Converter Alternatives
- 1.22 Total Video Converter Alternatives
- 2. Audio Converter Alternatives+
- 3. DVD Converter Alternatives+
Best 6 Free Alternatives to Any Audio Converter You Should Know
by Christine Smith • 2026-01-21 18:54:02 • Proven solutions
The Basic YouTube clip editor is already present in YouTube Studio, and it allows you to trim off the unwanted sections from the video clips with merely a few mouse clicks. However, the editor only works with the videos that you uploaded to your YouTube channel. Considering these limitations, here, you will learn about an efficient tool that enables you to edit video clips with precision and perfection in offline mode. As a bonus, one of the following sections also explains how you can use the YouTube clip editor to trim off the unwanted parts from any video that your YouTube channel has.
- Part 1. Edit YouTube Videos with Best YouTube Clip Editor
- Part 2. How to Cut a Clip from YouTube Videos with Youtube Studio
- Part 3. Make YouTube Clips/Intro/Outro Easily Online
Part 1. Edit YouTube Videos with Best YouTube Clip Editor
One of the best tools to trim and crop any footage efficiently in offline mode is Wondershare UniConverter (originally Wondershare Video Converter Ultimate). In addition to editing the videos, UniConverter can also convert them to YouTube compatible format and resolution. This makes it easy to upload the modified clips to your channel without any further alterations in the YouTube clip editor.
 Wondershare UniConverter - Best Video Converter and Editor for Windows / Mac (Catalina Included)

- Edit videos with advanced video editing functions, like trimming, cropping, adding watermark, subtitles, etc.
- Cut the unwanted segments of videos by even frames.
- Merge and join videos together with one click.
- Directly convert videos to VOB (DVD-Video ), AVI, MKV, MOV, and other 1000 formats.
- Burn videos to DVD or Blu-ray disc to play with your DVD player.
- Download videos from YouTube and other 10,000+ video sharing sites.
- Supported OS: Windows 10/8/7/XP/Vista, macOS 11 Big Sur, 10.15 (Catalina), 10.14, 10.13, 10.12, 10.11, 10.10, 10.9, 10.8, 10.7, 10.6
The simple steps that follow explain how you can use Wondershare UniConverter to edit the video clips and export them in YouTube supported format:
Step 1 Click Add Files and Import the Video to Edit.
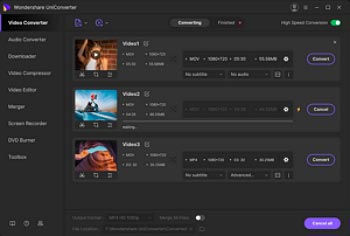
Launch Wondershare UniConverter on your Windows or Mac computer, ensure that the Converter tile is selected from the top, click the Add Files icon from the center, and use the Open box to select and import the video clip you want to trim and crop.

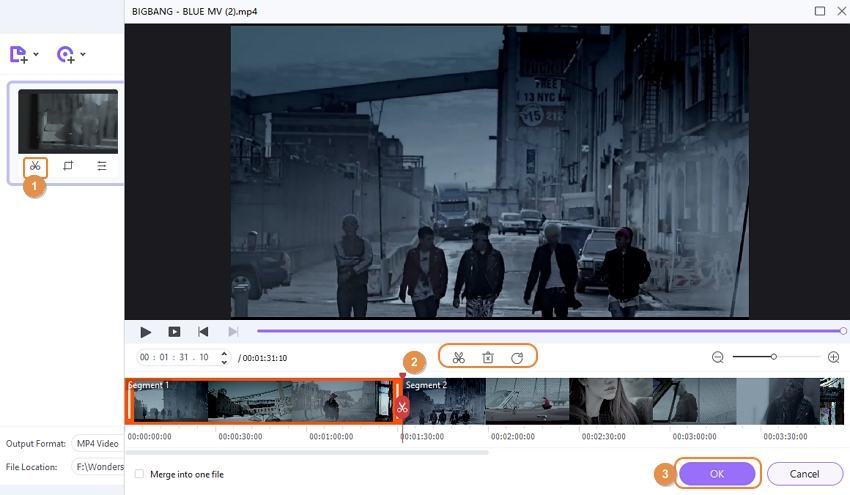
Step 2 Click the Trim Icon to Trim the Clip.
Click the Trim (Scissors) icon from below the thumbnail of the clip you imported, use the left and right handles on the clip in the Timeline, and the Cut and Delete buttons above it to select, split, and delete the unwanted portions respectively. Click OK to save the modifications and to get back to the Convert window.

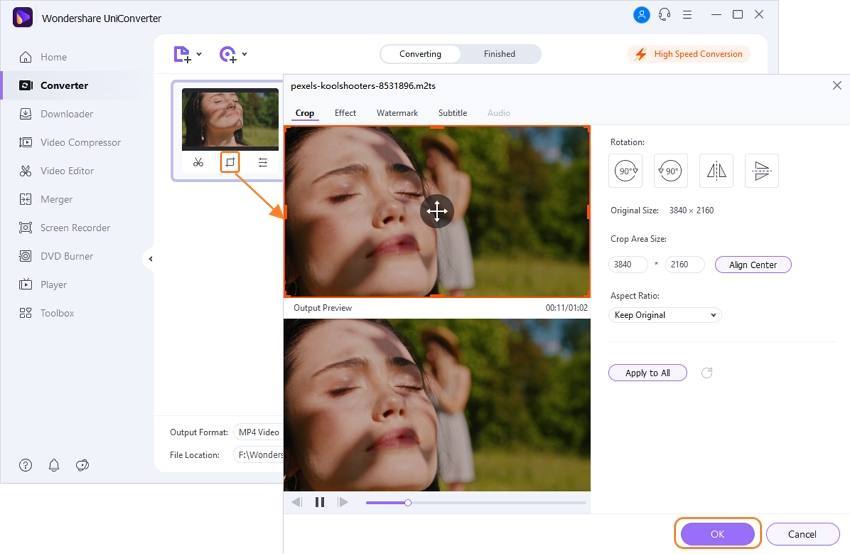
Step 3 Click the Crop Icon to Crop the Clip.
Click the Crop icon from under the thumbnail, ensure that the Crop tab is selected from the top of the box that opens up next, drag the handles in the Original Preview window to crop off the unwanted areas of the clip, leave all other settings to their defaults, and click OK to save the changes, and get back to the main (Convert) window.

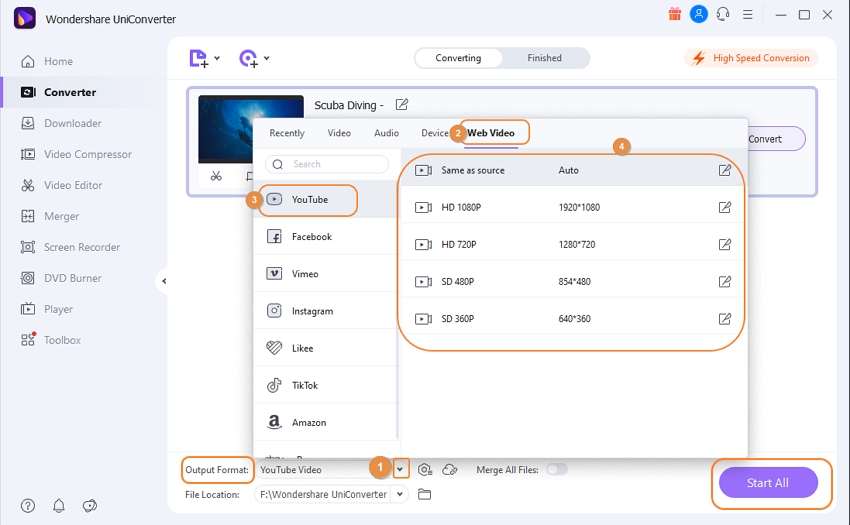
Step 4 Select YouTube as Output Format and Convert.
Click and open the Output Format (Convert all tasks to in Mac version of Wondershare UniConverter) menu from the top-right corner, go to the Web Video tab from the top, scroll down the left pane and select YouTube, and choose your preferred resolution from the right (Same as the source is selected for this example). Once you are back on the main window, from the Output field at the bottom, select a destination folder you want to save the converted file to, and click Convert to export the modified video. Next, you can sign in to your YouTube account, click the Create a video or post (Camera) icon from the top-right corner, and follow the on-screen instructions to upload it to YouTube normally.

Part 2. How to Cut a Clip from YouTube Videos with Youtube Studio
If you don’t want to have a dedicated program like Wondershare UniConverter installed on your PC merely to edit the videos that you wish to upload, you can, by all means, use YouTube clip editor, a built-in tool that YouTube offers from within its Studio section. Because Google assumes that you are the owner of the footage that you upload to your YouTube channel, and you have all the rights to make any adjustments to them, the “Editor” tool within YouTube Studio is available for all your uploaded clips.
The steps given below explain how you can use the “Editor” tool to trim the videos your YouTube channel has:
Note: The process of uploading video footage to YouTube is beyond the scope of these instructions. Therefore, make sure that your channel has at least one clip available before proceeding any further.
Step 1: Click YOUTUBE STUDIO and Open YouTube Editor.
Sign in to your YouTube account, click your profile picture from the top-right corner, click Your channel, click YOUTUBE STUDIO from the upper-right section, click Videos from the left pane, from the Channel videos window in the right, click the thumbnail of the video you want to edit, click Editor from the left dashboard, and click the GET STARTED button (appears only once, i.e., when you access the Editor window for the first time) from the center of the right pane.

Step 2: Move the Handles and Click PREVIEW.
Click Trim from the left section above the Timeline, drag the left trimming handle to the right and the right one to the left to keep the important segment of the clip selected, and click PREVIEW. (Note: Sometime, you may need to drag the Playhead (Skimmer) away from the corners to access the trimming handles.)

Step 3: Click SAVE to Save the Changes.
Click SAVE from the top-right section of the Preview window and click SAVE again on the Save changes? Confirmation box that appears next to commit the changes to the clip. Note: The modifications that you make to the videos might not be visible to the viewers instantaneously. It may take approximately 24 hours to 48 hours for YouTube to propagate the changes globally.

Part 3. Make YouTube Clips/Intro/Outro Easily Online
If you want to make an intro, outro, or ad clip videos for your YouTube channel video, then Wondershare VidAir is the right choice. It's an online video maker which provides templates and allows making videos with free video/image resource, text effect, sticker, and background music. With it, you can create attractive YouTube clips to make your channel or products stand out.
Step 1: Open VidAir online YouTube video maker and choose a template.
Open VidAir templates page from your browser. Choose an intro or other style templates to begin. Click it to preview and hit on the Use This Template button to open the editor page.
Step 2: Customize YouTube clips with text effects, stickers, background music.
Edit scenes by changing the videos or photos from the resource provided or uploading. Choose your desired text effects, stickers, and background music from the left panel. You can make more changes as you like.
Step 3: Export edited video.
Finally, click on the Preview button to confirm all changes. And click on the Export button to generate the video and download it.

Conclusion
Even though YouTube clip editor is available for all the videos you upload to your YouTube channel and is good enough to make basic modifications to the footage, it still has certain restrictions. For instance, it can only edit the videos that your channel has, and it cannot convert the videos to any other format so they can be published to some other streaming site, etc. This is where an efficient program like Wondershare UniConverter comes into the picture that not only offers advanced editing options, and it also lets you export the modified clips to YouTube (or other streaming sites like Vimeo, Facebook, Instagram, etc.) compatible format with ease.

Christine Smith
chief Editor