

Finding it difficult to make a video smaller and leave the quality intact? The same challenge is encountered by many content creators and ordinary users who aim to share and upload large files online. But the good news is you do not have to compromise on quality.
In the following guide, we will take you through everything you should know about using a video downscaler. We are also going to discuss offline and online tools you can use to ensure your video is compressed without compromising its quality.
In this article
- How to Choose a Video Downscaler?
- Video Downscaler: Comparison of Top Downscaler Tools (Offline and Online Tools)
- Online Video Downscaler: Best MP4 Downscaler Tools You Can Use Today
- How to Downscale 4K Video to 1080p - 4 Desktop Based Options
- Tips for Efficient Video Downscaling While Using Video Downscaler
- Conclusion
- Frequently Asked Questions
Key Takeaways
[File Size Challenges] Large videos are hard to upload, share, or store, making downscaling essential for better compatibility.
[Quality Concerns] Poor compression settings can cause blur, artifacts, or color loss during resolution reduction.
[Tool Options] Tools like HandBrake, FFmpeg, VLC, FreeConvert, and VEED offer resizing but vary in complexity and control.
[Efficient Solution] Wondershare UniConverter enables high-quality batch downscaling with AI tools and precise resolution control.
Part 1. How to Choose a Video Downscaler?
This tool diminishes the size or pixel number of a video to a smaller size yet preserves the quality. Basically, it helps streamline video uploads, run without interruption, and improve compatibility with devices. It offers visual clarity and effectively reduces resolution to be useful across different platforms.
How Video Downscaling Works?
Here, we have mentioned a general procedure how to downscale video:
Import your video file into the downscaler tool
Choose an output format, the quality, resolution, or bitrate level.
Preview and then confirm to start video downscaling or conversion.
Once the process is complete, save or export the new video to your device.
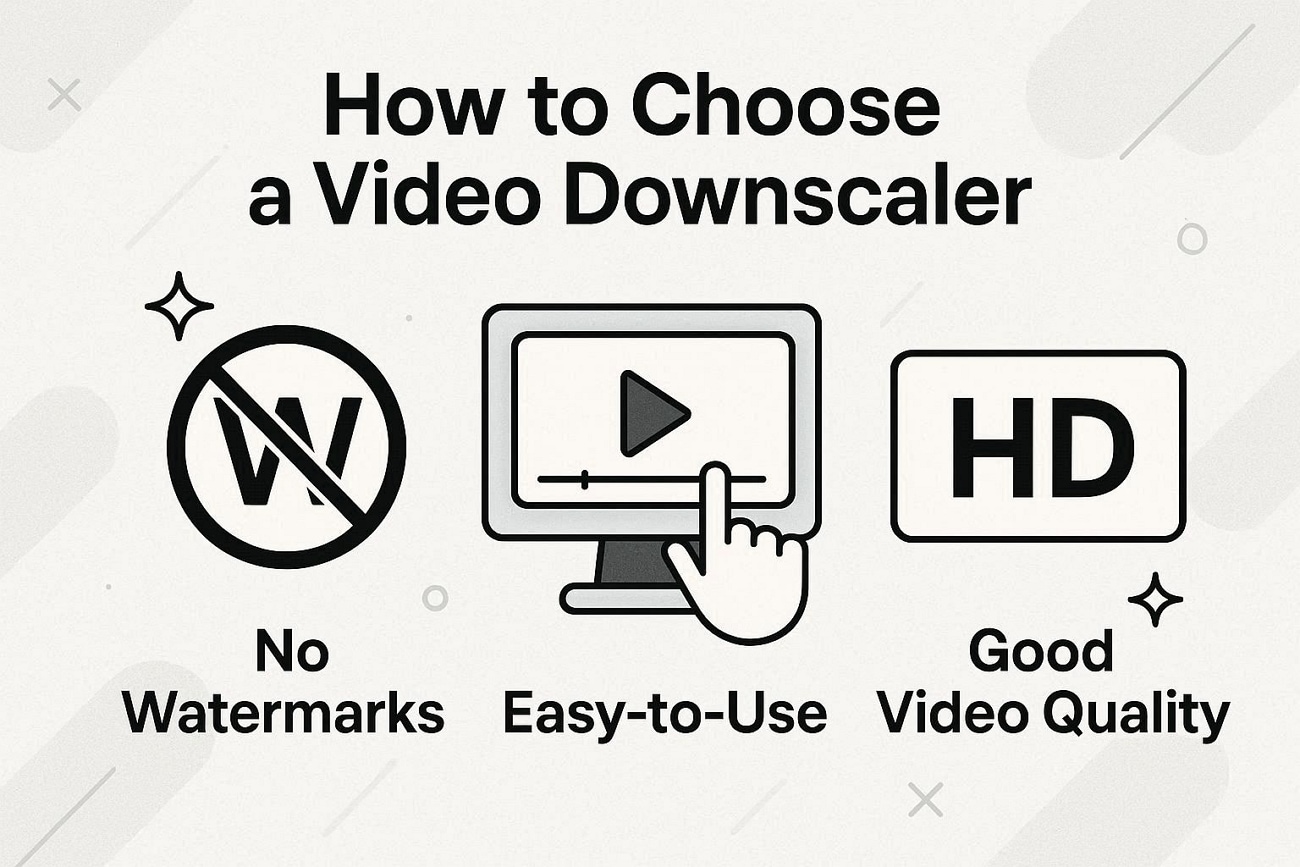
How to Choose a Proper Video Downscaler?
For anyone confused regarding how to choose a proper video downscaling application, a list of compiled necessities is discussed next:
- Preferred Format: Make sure your preferred tool supports the source and output formats, such as MP4, AVI, or MOV.
- Custom Resolution: Find the tools that enable you to customize your resolution (1080p, 720p) so you can do so.
- No Watermarks: Do not use tools that add watermarks and monitor the daily use limit in free versions.
- Maintenance of Quality: Choose the software that is renowned for retaining colour, sharpness, and audio quality after downscaling.
- Easy to Use: Any tool with a clean, user-friendly interface, even for beginners, is ideal.
Part 2. How to Downscale 4K Video to 1080p - 4 Desktop Based Options
In the previous part, we covered the best ways to compress videos online. In this section, we will look at more robust desktop solutions. These tools offer greater control over resolution, quality, and export settings. Let us now discuss 4 reliable options to downscale 4K video to 1080p:
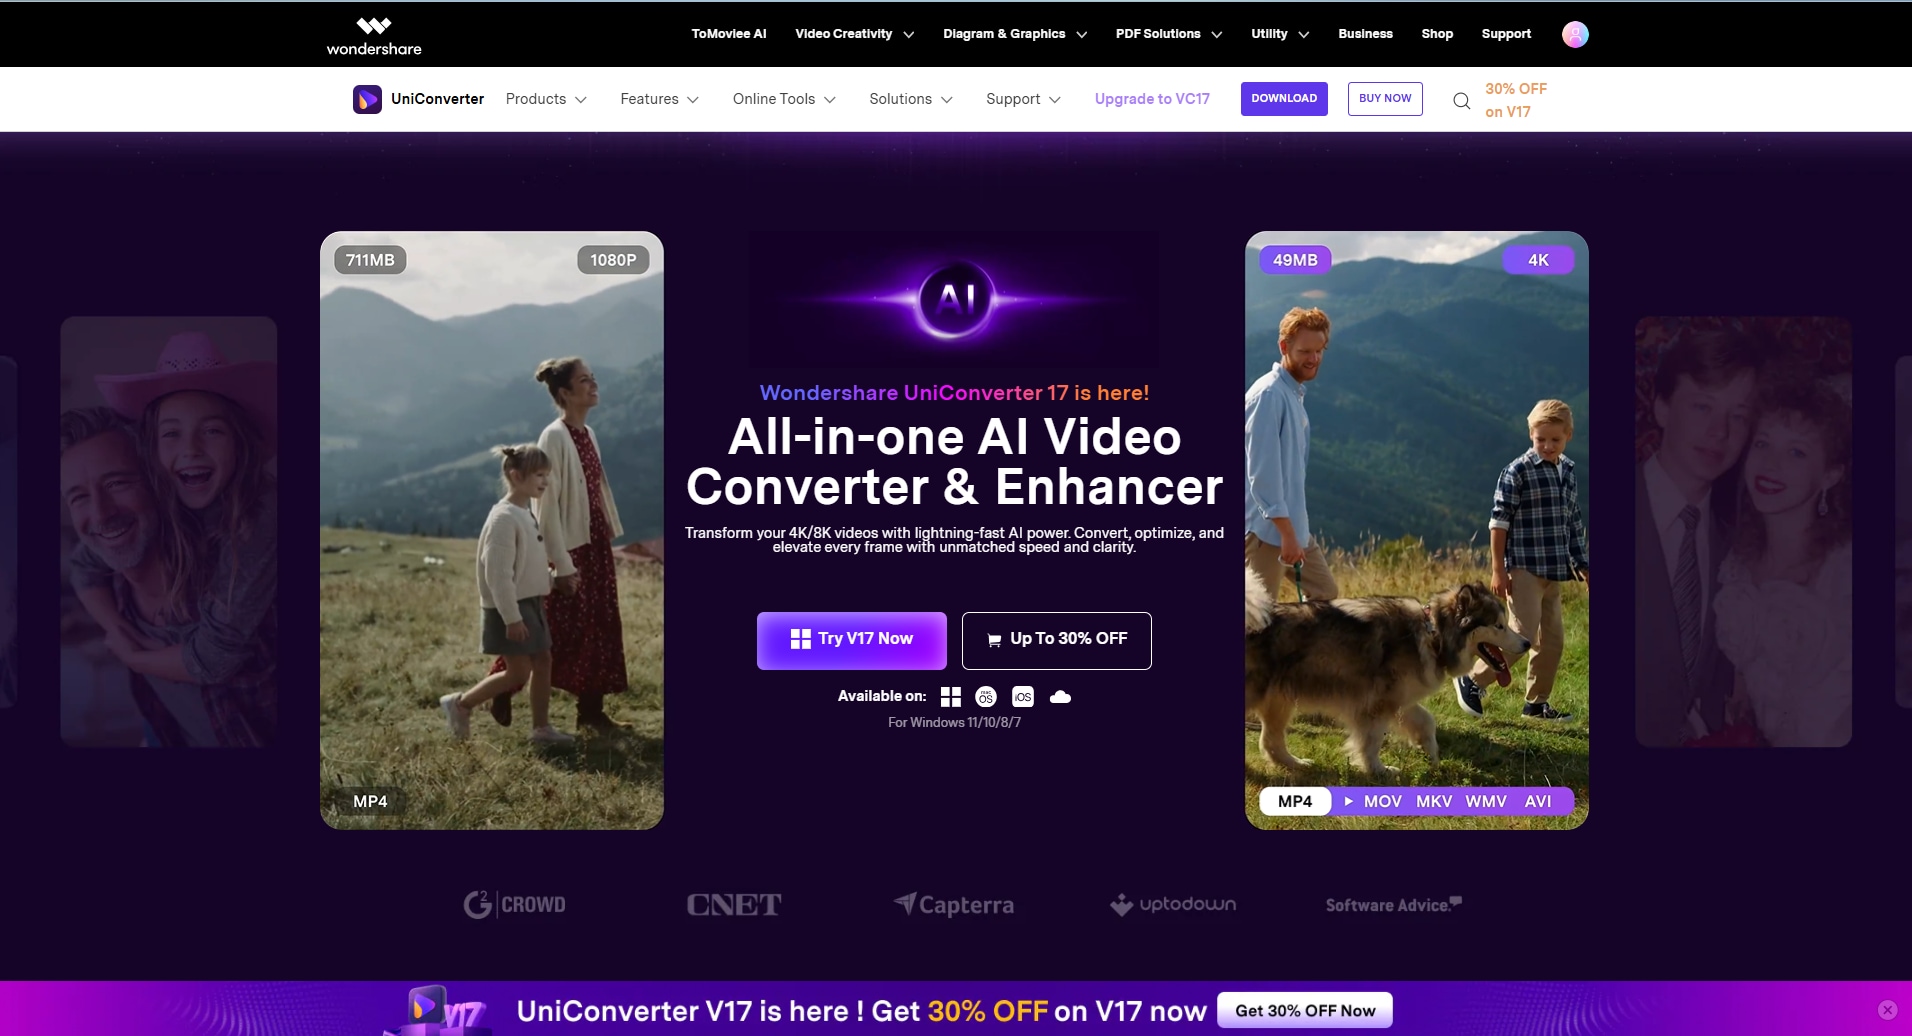
1. UniConverter
UniConverter is a powerful video downscaler designed to reduce file size and resolution without compromising quality. It allows users to easily downscale videos from 4K to 1080p or lower while maintaining sharpness and color accuracy. With advanced compression settings and AI-powered optimization, UniConverter ensures smooth playback and smaller file sizes for easy sharing and storage, enabling you to convert 1GB video files to 10 MB. It also offers free online video compressor without logging in. Its batch processing feature saves time by handling multiple videos at once, making it ideal for both professionals and beginners. Supporting a wide range of formats, UniConverter provides a fast, reliable, and user-friendly solution for efficient video downscaling across different devices and platforms.
Key Features
- Batch Conversion: With its “Batch Processing” feature, multiple videos can be compressed simultaneously, ensuring a smooth workflow and saving time.
- Multiple AI tools: This is a one-stop software that allows users to access various AI tools, such as video enhancer, noise remover, face enhancement, and stabilization.
- Easy File Transfer: Users can easily transfer their newly created video files to Android and iOS devices.
- Hardware Support: To ensure faster encoding and decoding, hardware acceleration support, e.g., NVIDIA, is offered.
Detailed Guide on How to Use UniConverter to Compress 4K to 1080p
To ensure that video quality does not get disturbed, you can follow the next steps for using UniConverter for 4K downscale to 1080p:
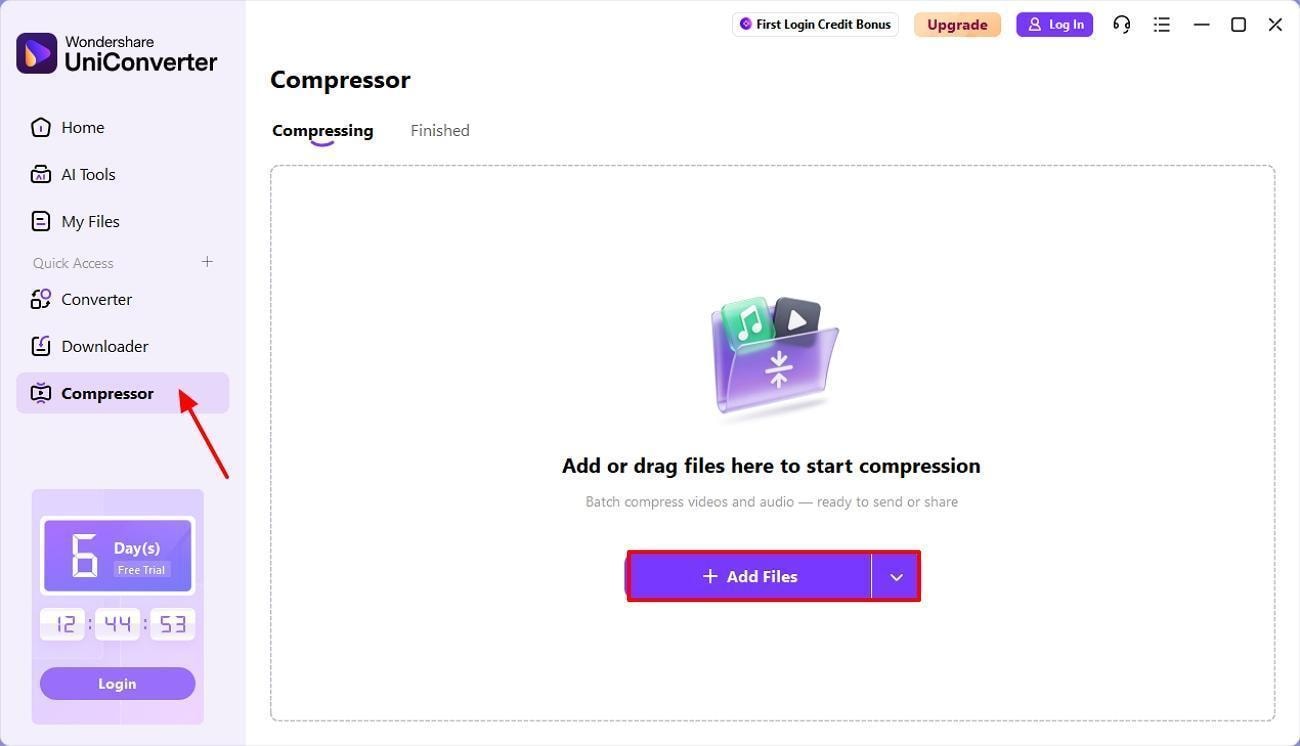
Step 1. Navigate to Compressor Tool and Adjust File Settings
To begin, open UniConverter, select the “Compressor” tool, and import your files by pressing the “Add Files” button.
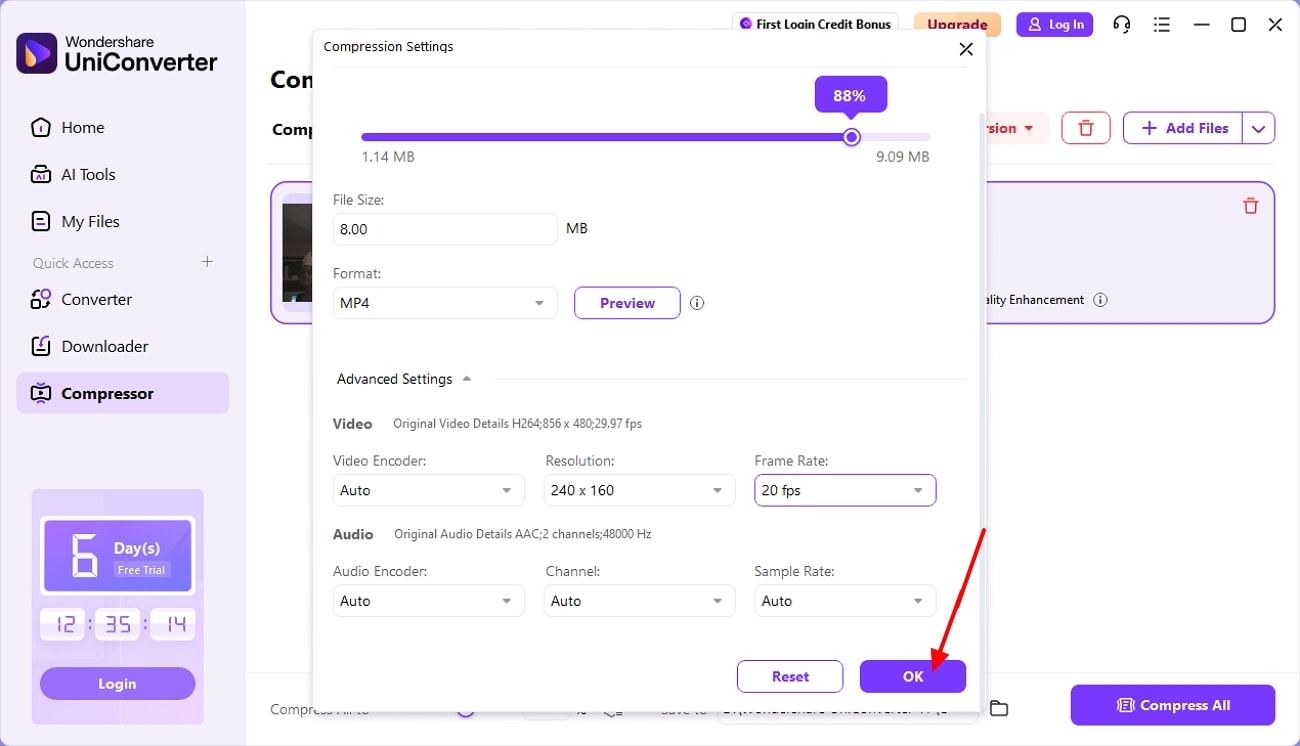
Step 2. Use Advanced Settings for Further Customization
Next, click on the “Advanced Settings” button at the bottom. You can change the resolution, frame rate, and more. Next, click on the “OK” button.
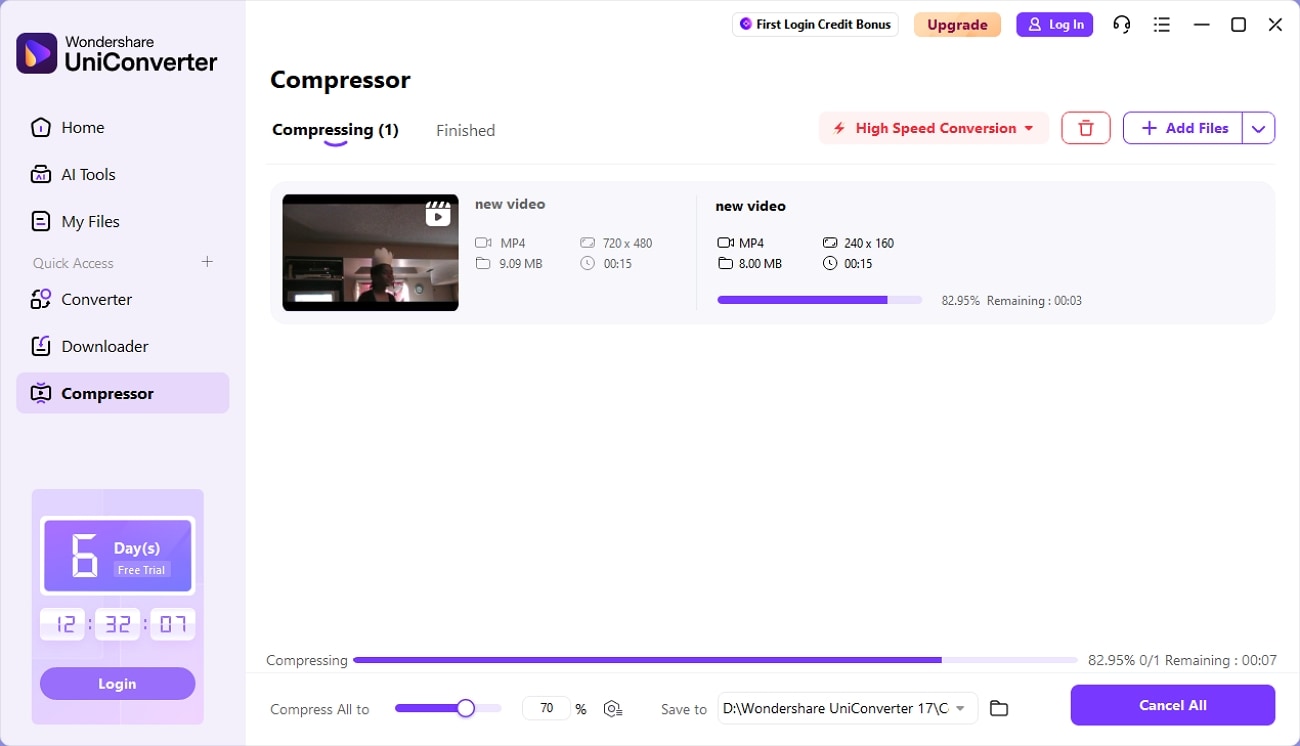
Step 3. Compress and Transfer to Finished Tab
Now, your file will be shifted from the “Compressing” tab to the “Finished” tab.
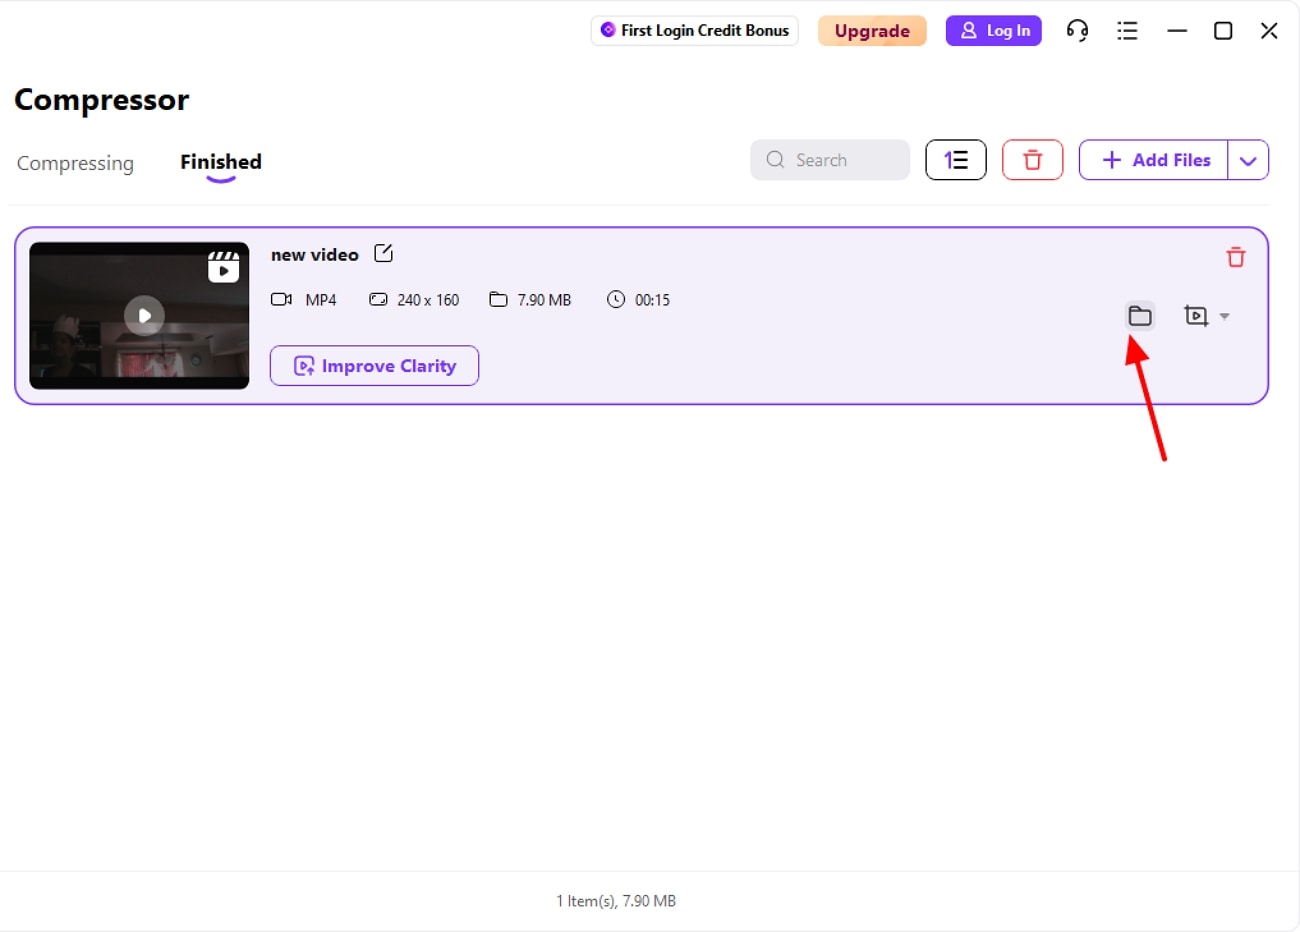
Step 4. Locate Your Completed Video File
Finally, once the process is complete, click the “File” icon to see where your new video file is stored.

Video Downscaler for Smaller Size & Faster Sharing
2. Handbrake
It is a free, open-source video quality downscaler and transcoder that is available on Windows, macOS, and Linux. This software is primarily used to compress large videos, change formats, and reduce resolution while maintaining quality. Handbrake is a good choice for both casual users and advanced video editors.
Key Features
- It supports many input formats and outputs to MP4/MKV/M4V.
- Offers control over bitrate, resolution, and codecs like H.264/H.265.
- This software provides quick exports and powerful presets, e.g., Fast 1080p30.
Procedural Guide on How to Downscale Video With Handbrake
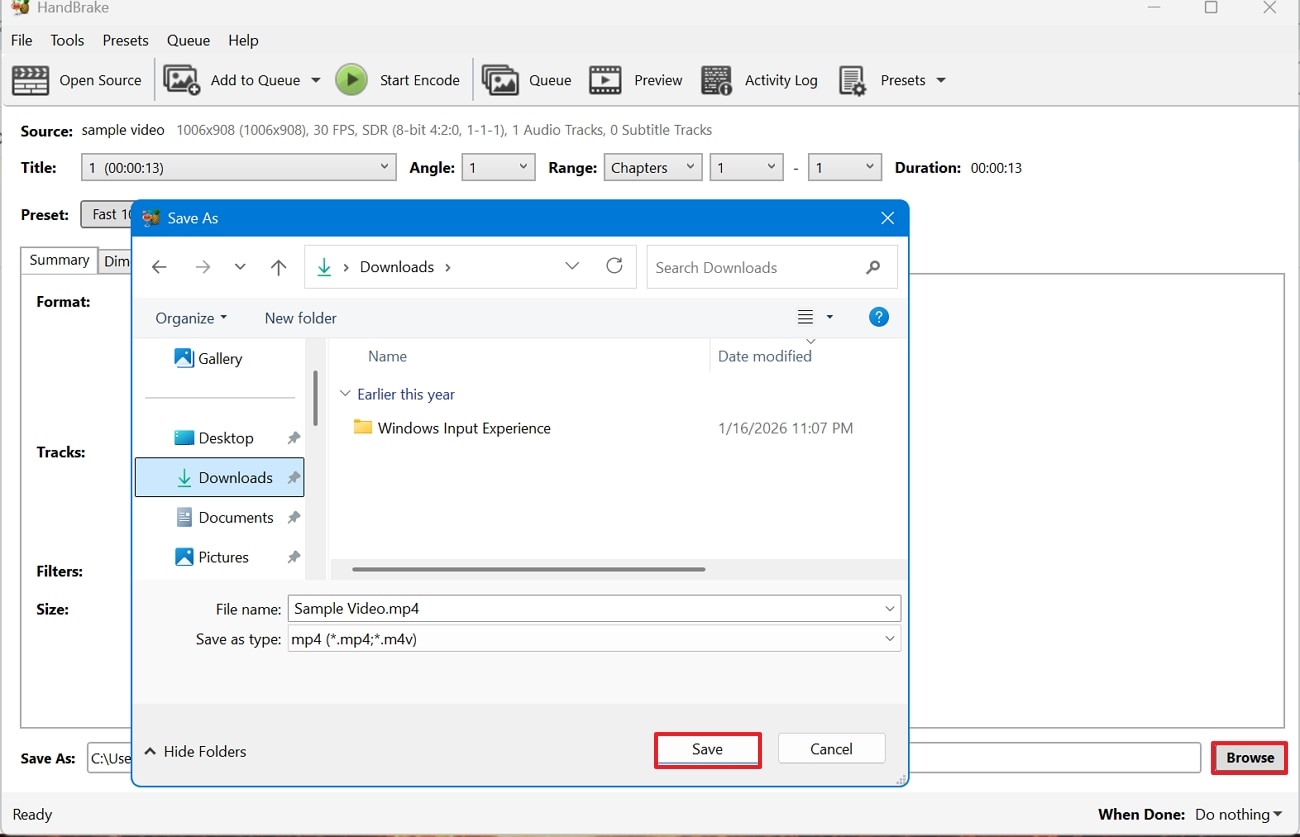
Step 1. First, open Handbrake and upload your file. In the next interface, you can adjust the dimensions, format, and add subtitles by clicking the buttons in the main section.
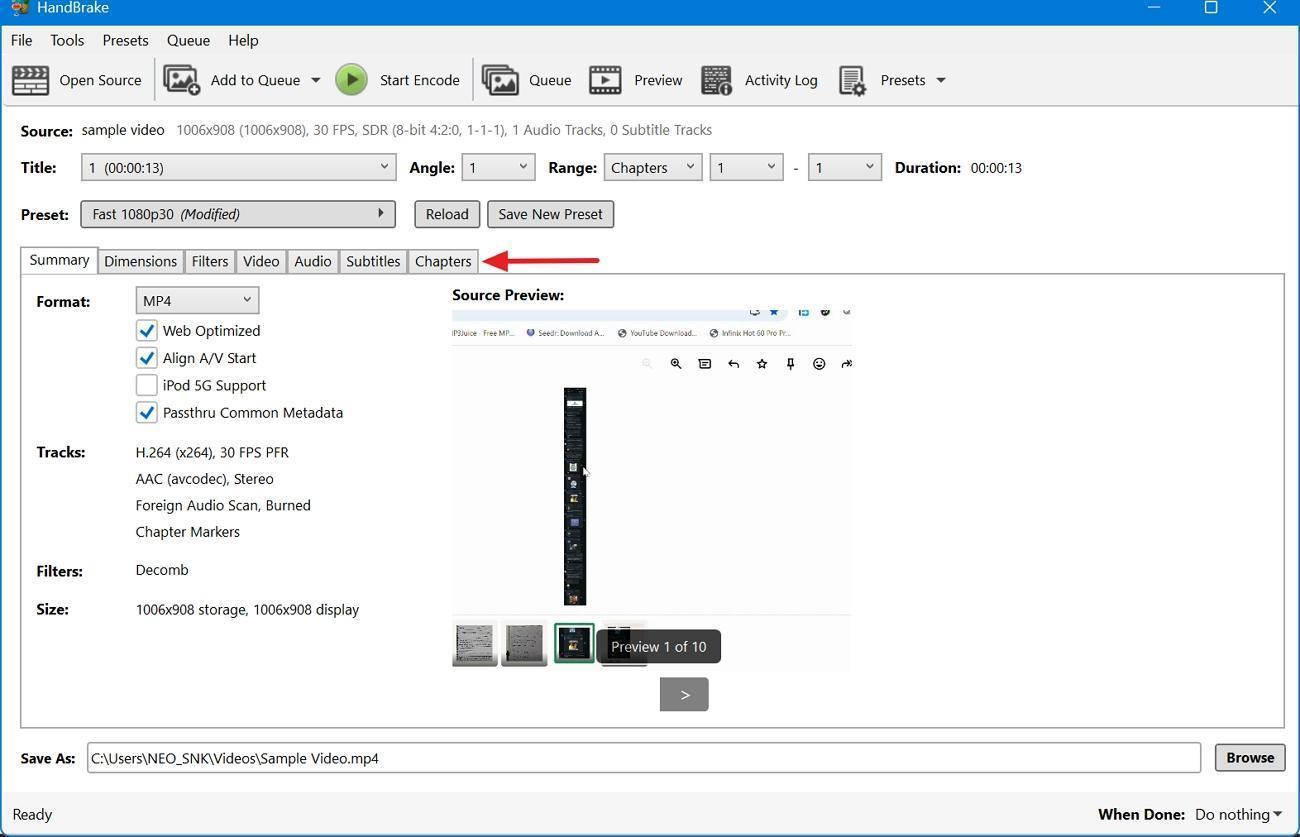
Step 2. Preview the file, then click the “Browse” option at the bottom to save it to a designated location. Finally, click “Save” to compress and save your video.
3. ffmpeg
This program is a powerful command-line video resolution downscaler and transcoder. It is used mainly by developers, editors, and advanced users to convert, compress, and resize videos. FFmpeg supports almost every media format and can automate workflows through batch commands.
Key Features
Option of scale filter for flexible resolution changes while maintaining aspect ratio.
Offers advanced control over codecs, frame rate, audio settings, and bitrate.
It supports wide-format video files for both input and output.
Guide to Resize Videos Using FFmpeg
Step 1. Initially, open the command prompt and use the “cd” command to go to your folder. Next, type the following command to compress the video: “ffmpeg -i input.mp4 -vcodec libx264 -crf 28 output.mp4.”
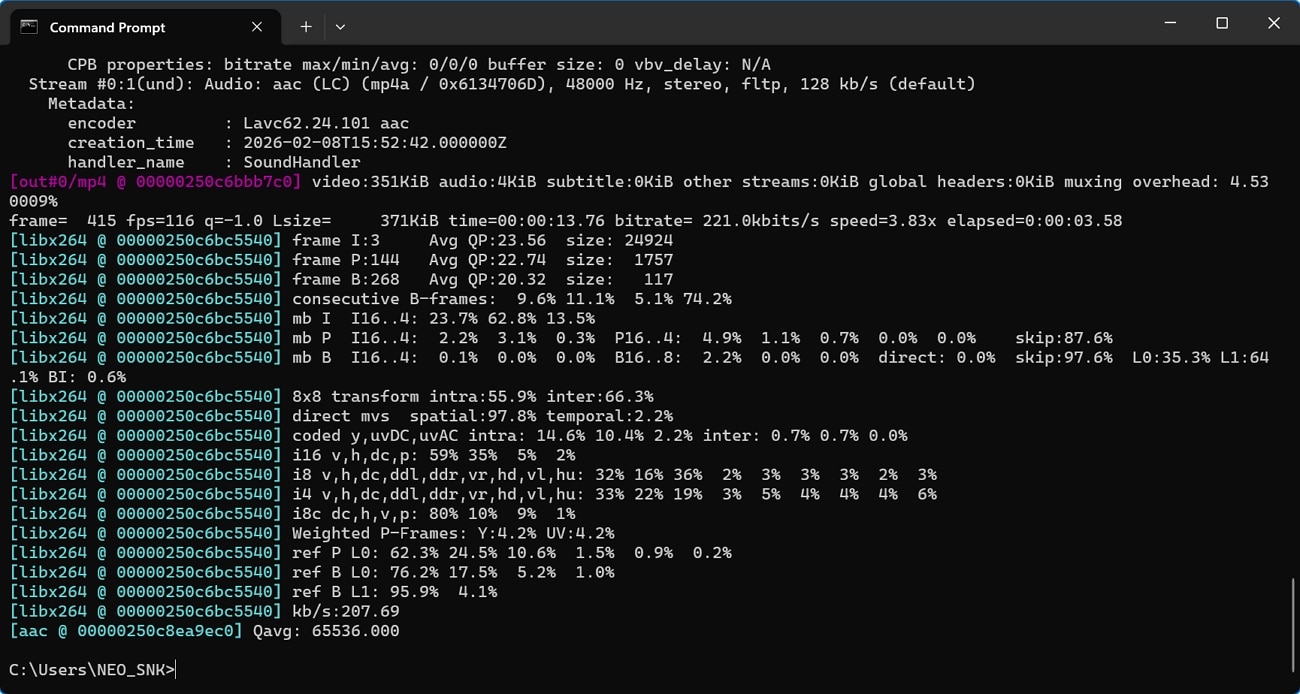
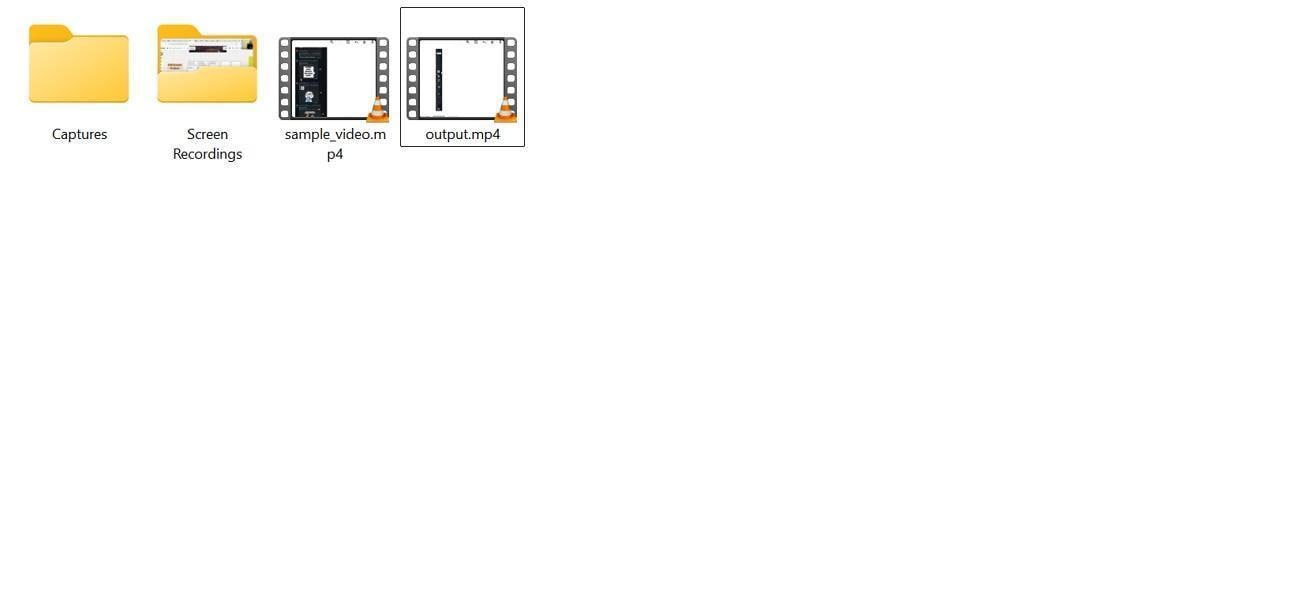
Step 2. After the process is complete, check the video quality and compare it with the original from the output location.
4. Videolan
With VLC Media Player, users can easily convert 4K or HD clips to lower-resolution formats. This is a free, open-source application best known for playing any audio and video format. However, it can also down scale video to reduce resolution and file size.
Key Features
Allows users to easily change frame rate, codec, and bitrate without exporting.
There is a built-in “Convert/Save” function for re-encoding and resizing videos.
Offers cross-platform support on macOS, Windows, Linux, and more.
How to Use VLC Media Player To Downscale Video?
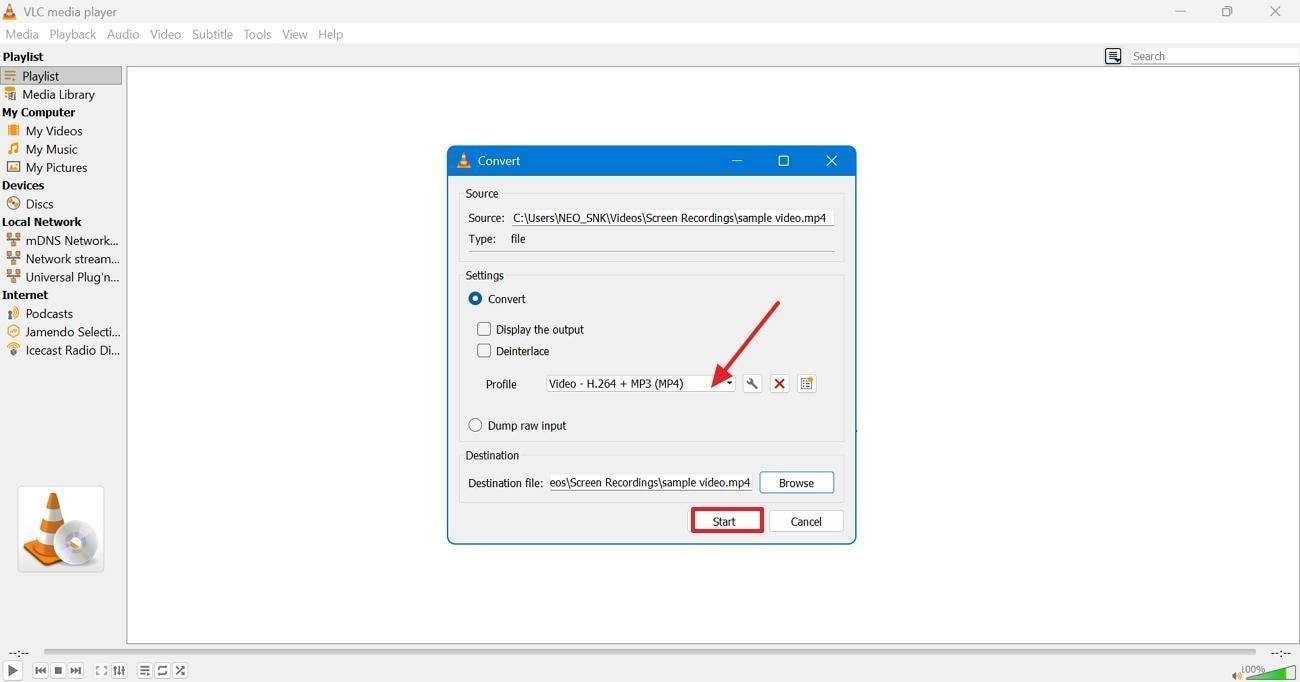
Step 1. Begin by launching the application and then clicking on “Media” from the top menu. Then, click on the “Convert/Save” option.
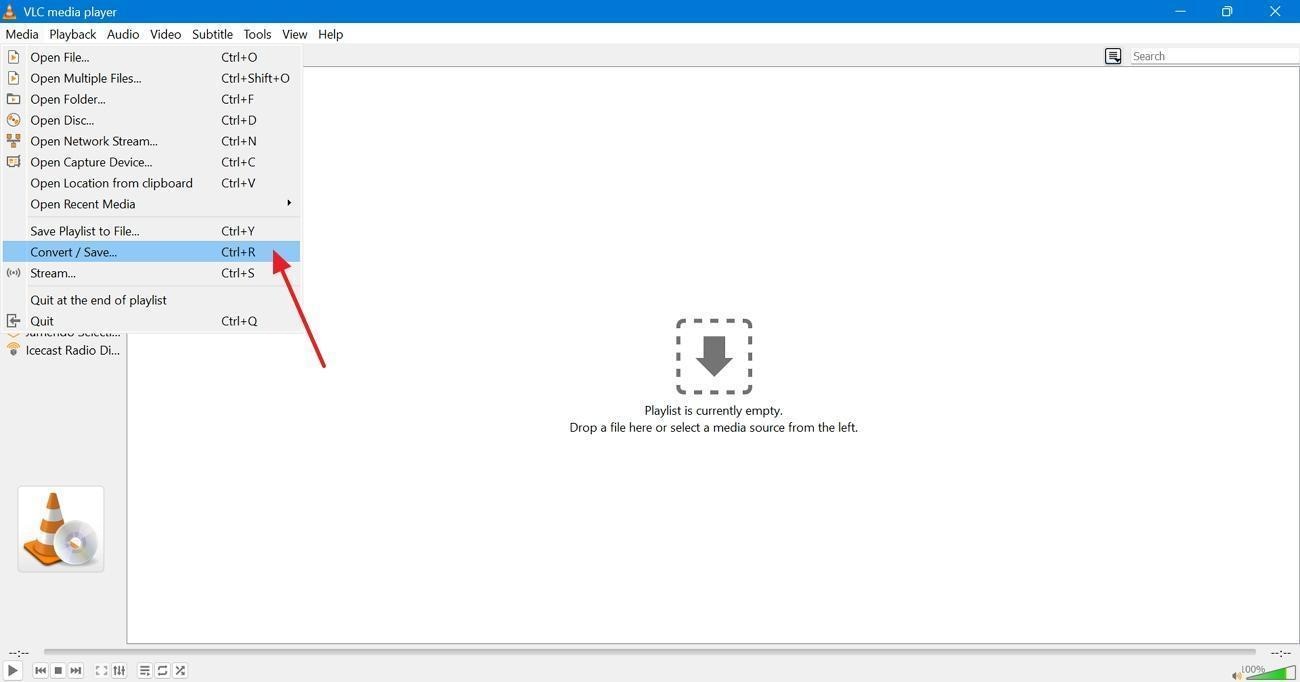
Step 2. Next, add your file, then in the “Convert” window, click the “Profile” drop-down menu. Select “Video -H. 264 +MP3 (MP4).” Finally, click the “Start” button to compress the video.
Part 3. Online Video Downscaler: Best MP4 Downscaler Tools You Can Use Today
Modern technology offers a wide variety of MP4 downscaler tools that are easily available online. In this section, we will discuss five tools you can use today to start video downscaling.
1. Adobe
This is a free utility that allows you to resize videos for social media or messaging apps. Clips can be uploaded by users, up to about 1GB or 1 hour long. Then, they can quickly remaster it by resizing, trimming, or reframing the video clips. This is a good software for both professional content creators and basic users.
Key Features
It has built-in trim and framing features to adjust length and composition.
Works on both mobile and web, with a drag-and-drop uploading feature available.
There are preset sizes for social media websites, as well as custom dimensions.
Steps To Resize Videos With Adobe Express
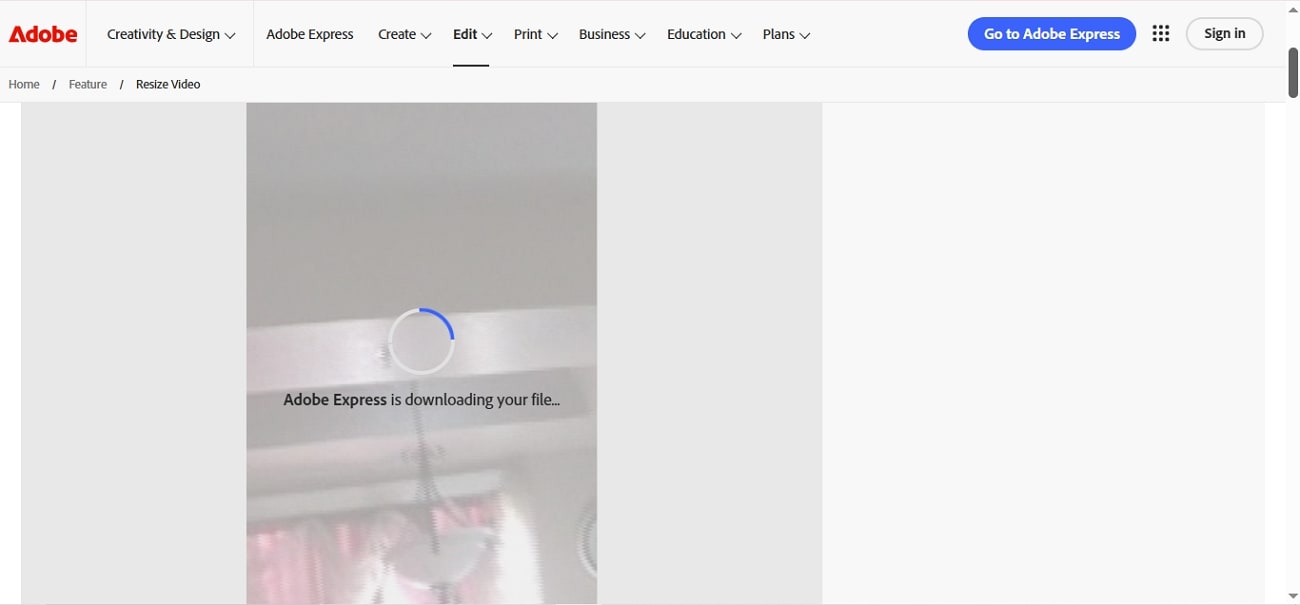
Step 1. First, open your browser and access Adobe Express Video Resizer. Then, upload the video that you want to downscale by pressing the “Upload Your Video” option.

Step 2. Next, select a preset size or enter a custom one from the right section of the interface. Then adjust the framing to your preference.

Step 3. Finally, trim and download the clip by pressing the “Download” button to save it onto your device.
2. FreeConvert
A user can quickly convert AVI, MKV, and MP4 to a smaller size without installing any software using FreeConvert Video Compressor. Moreover, it offers a multitude of compression methods, including bitrate control, resizing, and target percentage. These features allow users to balance both size and quality for sharing, storing, and even streaming.
Key Features
It supports multiple video formats and files up to 1GB for free.
Uses H.264 and H.265 codecs for efficient, high-quality compression.
Offers multiple compression modes, including percentage, CRF quality, bitrate, and resize.
How to Downscale Video With FreeConvert?
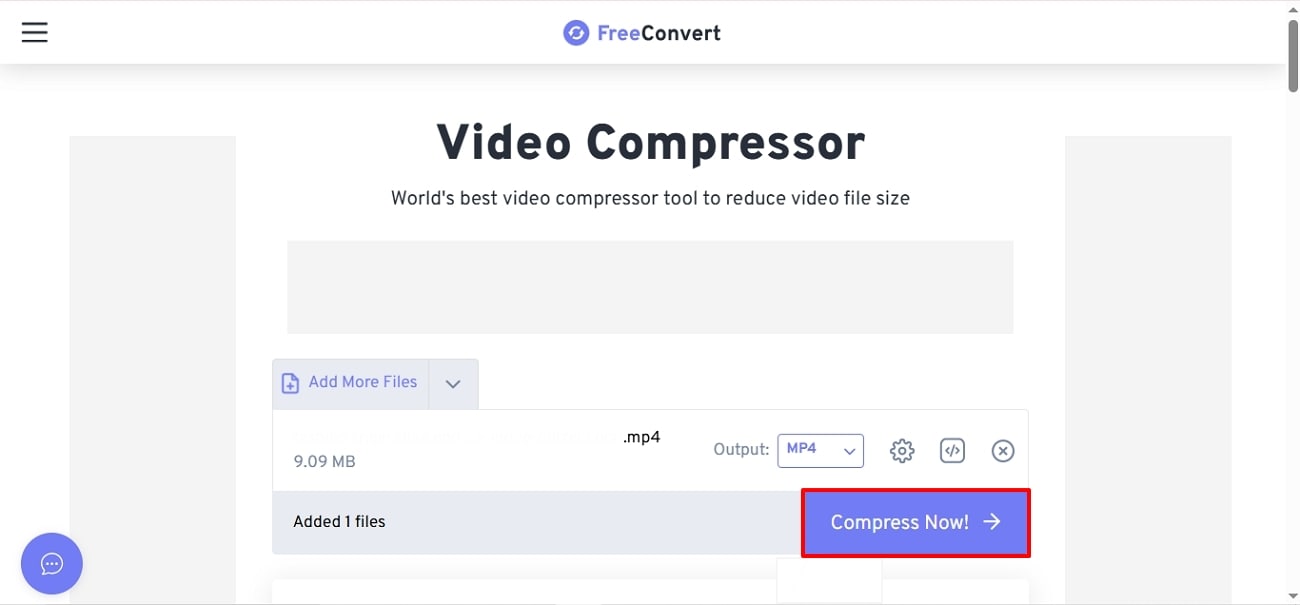
Step 1. Initially, click the “Choose Video” option after opening the MP4 downscaler on your browser. This will allow you to upload from a device, cloud, or even a URL.
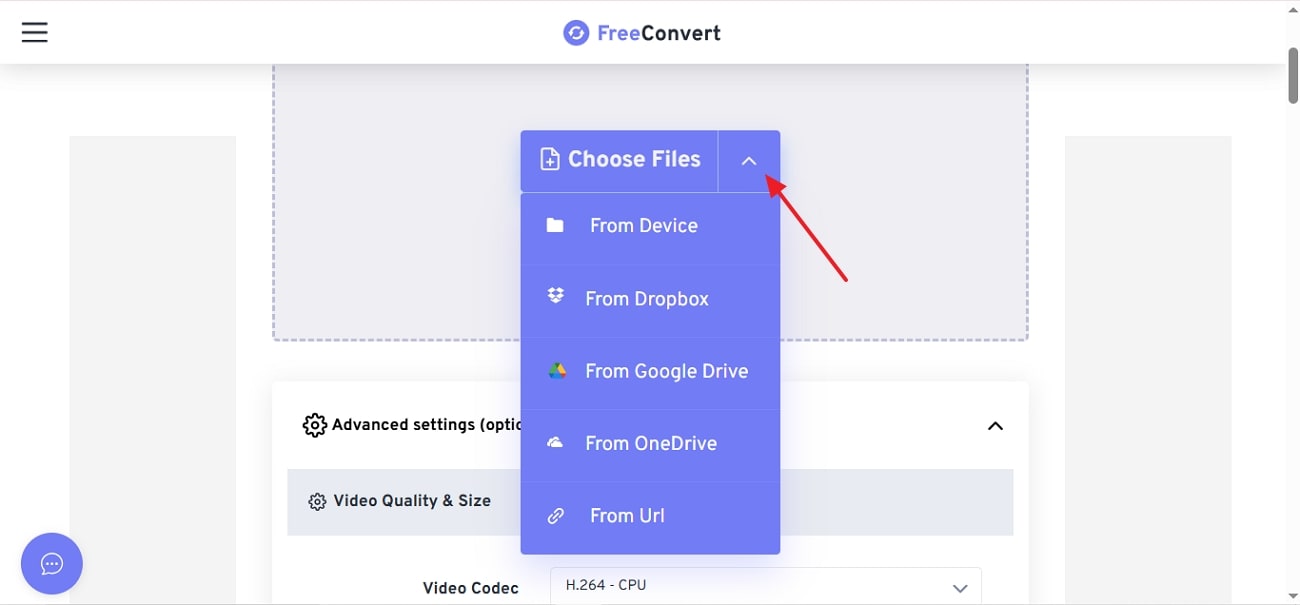
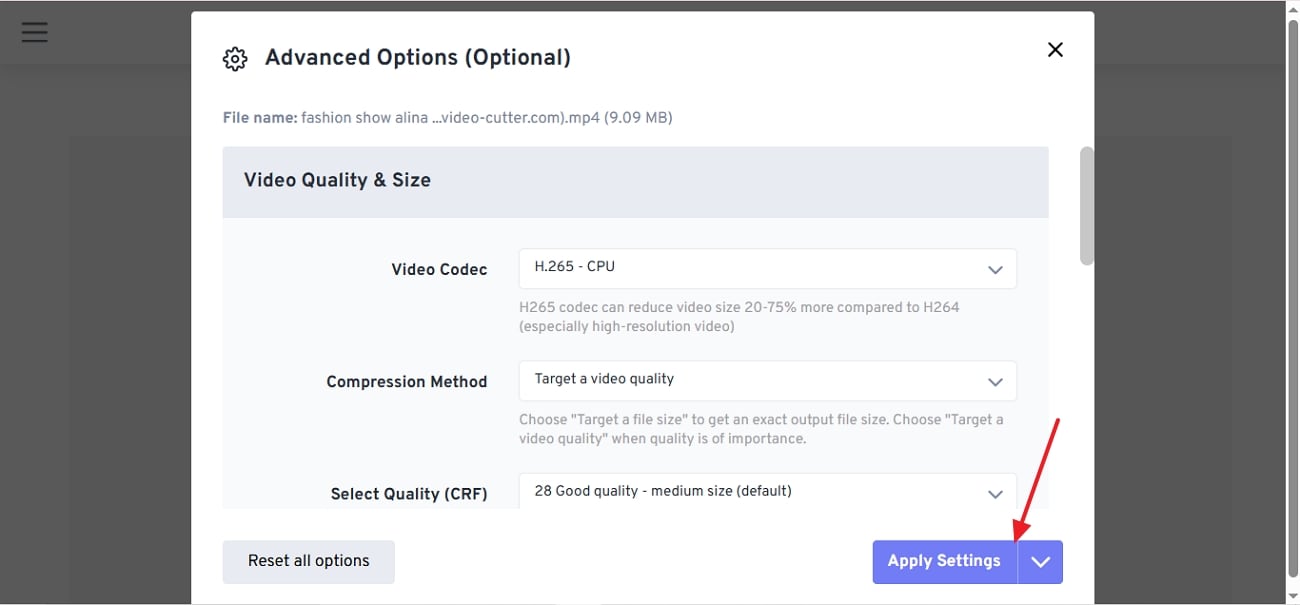
Step 2. Open “Advanced Settings” to change quality, size, or bitrate. In case you want simple compression, there is an option for “Default Compression.” After you are done, hit the “Apply settings” button.
Step 3. Lastly, click the “Compress Video” option, and when it is complete, click “Download” to save the file.
3. Veed.io
Another way to downscale video online is to use VEED video compressor, which also keeps good visual quality. It works on a browser and supports popular formats such as MP4 and MOV. This tool offers both professionals and beginners a range of options so you can adjust accordingly.
Key Features
A simple slider allows both quality and real-time size adjustments easily.
An integrated online editor for trimming, cropping, and other edits is available.
Advanced controls for resolution, bitrate, CRF, and frame rate are accessible.
Using VEED to Resize Videos Easily
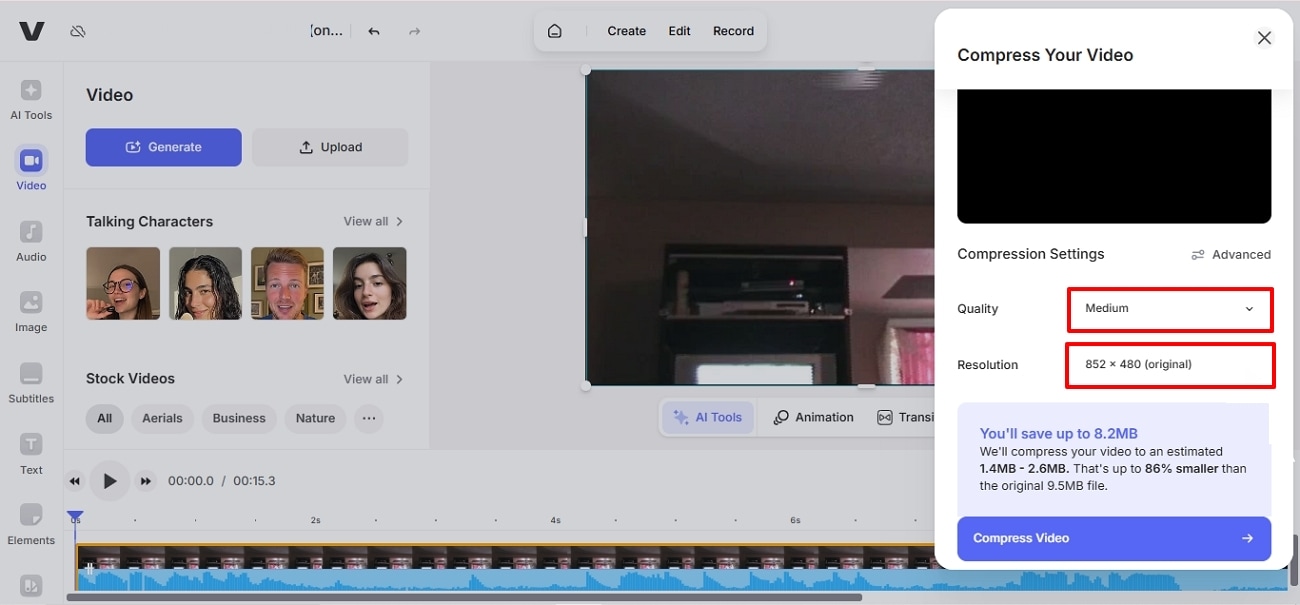
Step 1. To start, open VEED Video Compressor and click on the " Compress a Video " button. In the next interface, drag and drop your files.

Step 2. Next, you can choose a preset resolution and quality by opening the drop-down menus. Alternatively, press the “Advanced Settings” option to adjust mode or CRF.
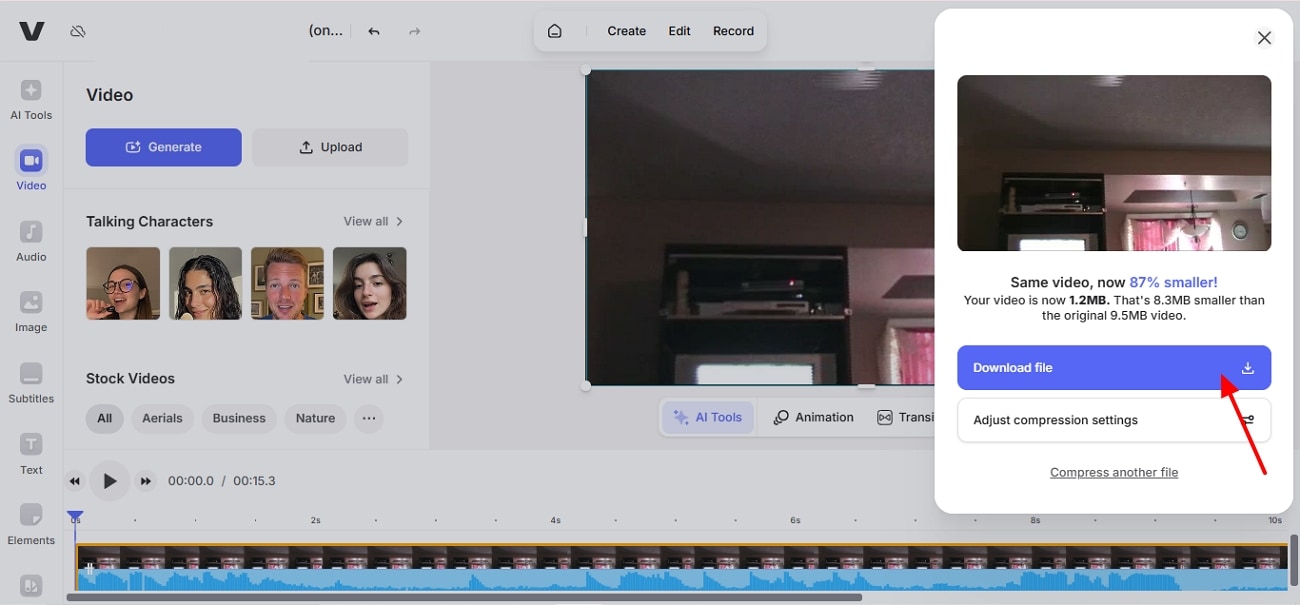
Step 3. After, click on the “Compress Video” button at the bottom and then hit “Download File” to save it.
4. Online Video Cutter
Another free web-based video quality downscaler users can use is Online Video Cutter’s Video Resizer. Users can easily change video resolution and aspect ratio in just a few clicks. Moreover, this tool works with the most common video formats, making it easy for beginners to resize. Also, other tools can be easily integrated, such as cropping, adding text, and subtitles.
Key Features
Opens up on any modern browser and runs on PC, phone, and tablet.
It is compatible with MKV, MP4, AVI, MOV, 3GP, WMV, and more.
There are both custom and preset resolutions and aspect ratios.
Guide to Downscale Video With Online Video Cutter
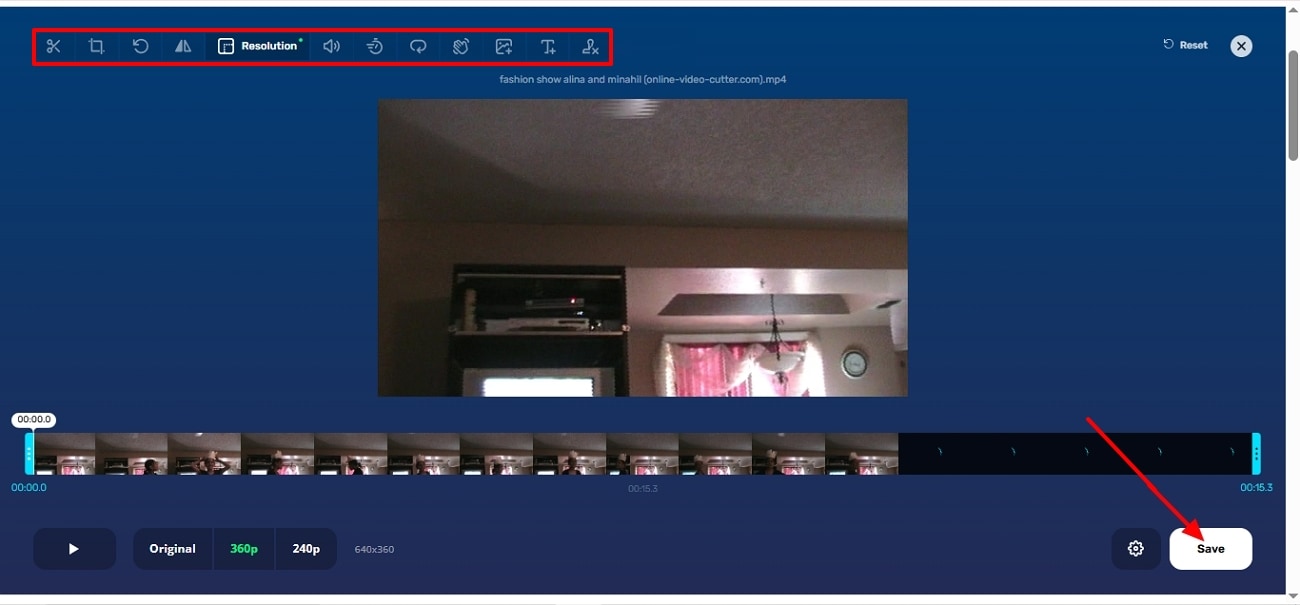
Step 1. To begin, click “Open file” or drag-and-drop your video into the interface. Next, select “Resize Video” and choose the desired resolution and dimensions.

Step 2. Afterwards, you can add text or remove the logo by selecting the options in the section above the video. Finally, after you have made all the required changes, hit the “Save” button to download.
5. Melobytes
A lightweight option to video downscale online is the Melobytes Video Resolution Downscaler. Rather than full editing, this tool is more focused solely on lowering resolution. This software allows users to quickly drop in a clip, choose a lower-resolution setting, and create a more compressed video without any hassle or installation.
Key Features
Easy options to help you select a lower resolution for file shrinkage.
Has a simple interface and a drop file option for quick uploads.
It is part of another set of video tools, e.g., crop, filters, etc.
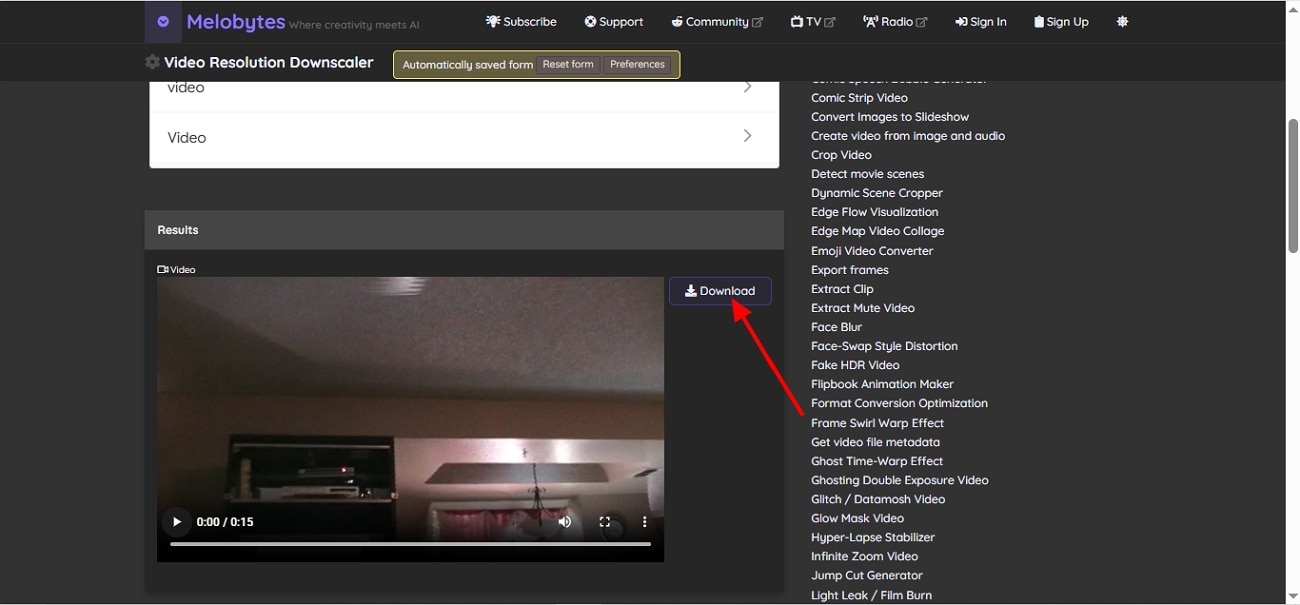
Steps to Decrease Video Size With Melobytes
Step 1. Drop your video file onto the main interface after opening the tool on your browser. Then, choose your desired resolution from the drop-down menu.
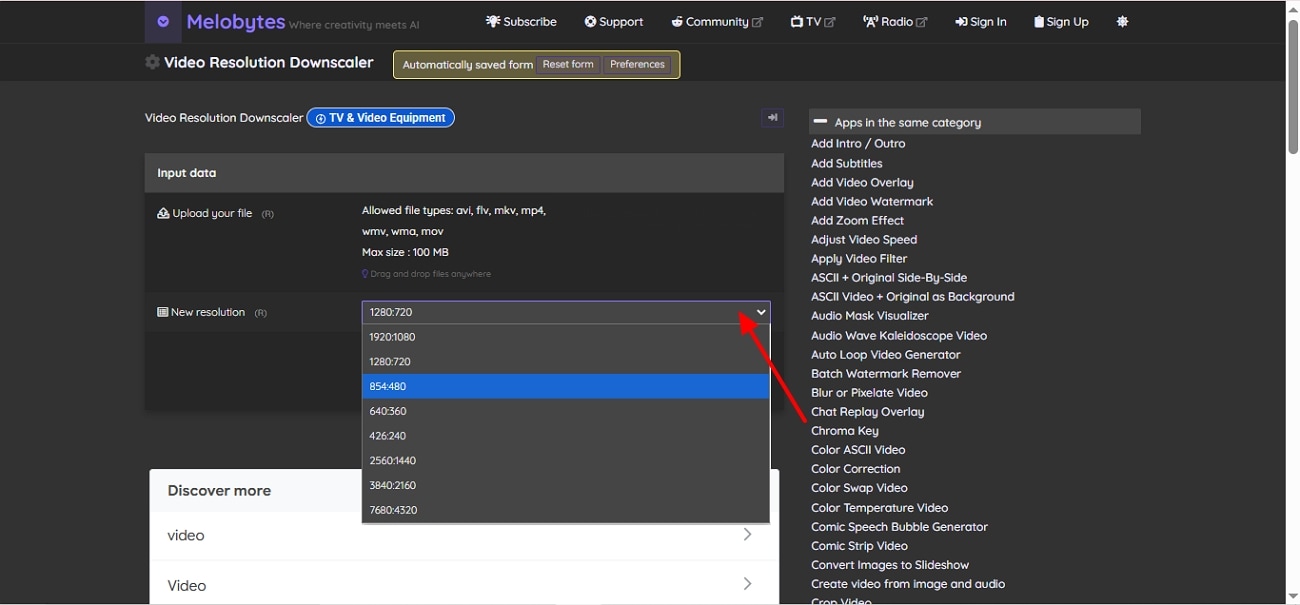
Step 2. Next, press the “Execute” button to start the compression of the file. Once it is completed, you can preview your file and then save it by clicking the “Download” button.
Are These Discord-Friendly Downscalers?
These 5 online tools serve as convenient video compressors, but none integrates directly with Discord. However, they are Discord-friendly options as each tool outputs common formats such as MP4 and reduces file size enough to meet Discord’s limits.
Part 4. Video Downscaler: Comparison of Top Downscaler Tools (Offline and Online Tools)
Here, we have created a table so that users can see which tools to use as a video resolution downscaler:
| Tool | Type | Supported Formats | File Size Limits | Output Options | User-Friendly Interface |
| UniConverter | Offline | MP4, MOV, MKV, AVI, FLV, WMV, WebM | No strict limit (depends on system storage) | Convert, compress, change resolution (4K/8K), batch processing | Yes, easy controls |
| Handbrake | Offline | MP4, MKV, WebM containers with common codecs | No practical limit | Resolution change, bitrate control, presets | Moderate (Simple UI with technical settings) |
| FFmpeg | Offline | Almost all video/audio formats | No practical limit | Full control over resolution, codecs, bitrate, and scripting | No (requires command line knowledge) |
| VLC Media Player | Offline | MP4, AVI, MKV, MOV, FLV | No practical limit | The Convert/Save tool allows resizing and format change | Yes |
| Adobe Express | Online | MP4 and common web video formats | Up to about 1GB or ~1-hour video | Resize for social media ratios and custom dimensions | Yes |
| FreeConvert | Online | MP4, AVI, MKV, MOV, WebM, and others | 1GB free limit | Resolution change, bitrate control, target file size | Yes |
| VEED | Online | MP4, MOV, AVI, MKV, WMV, WebM, GIF | 1GB free limit | Resolution reduction (4K → 1080p/720p), compression slider | Yes |
| Online Video Cutter | Online | MP4, MOV, AVI, and common formats | Typically, 500MB, depending on the browser | Resize resolution, crop, trim | Yes |
| Melobytes | Online | AVI, FLV, MKV, MP4, WMV, MOV | About 100MB upload | Manual width/height settings and frame-rate changes | Yes |
Part 5. Tips for Efficient Video Downscaling While Using Video Downscaler
Users should follow certain tips to ensure that their video is downscaled precisely and that they use the video downscaler effectively. Here, we have compiled a list of these effective tips:
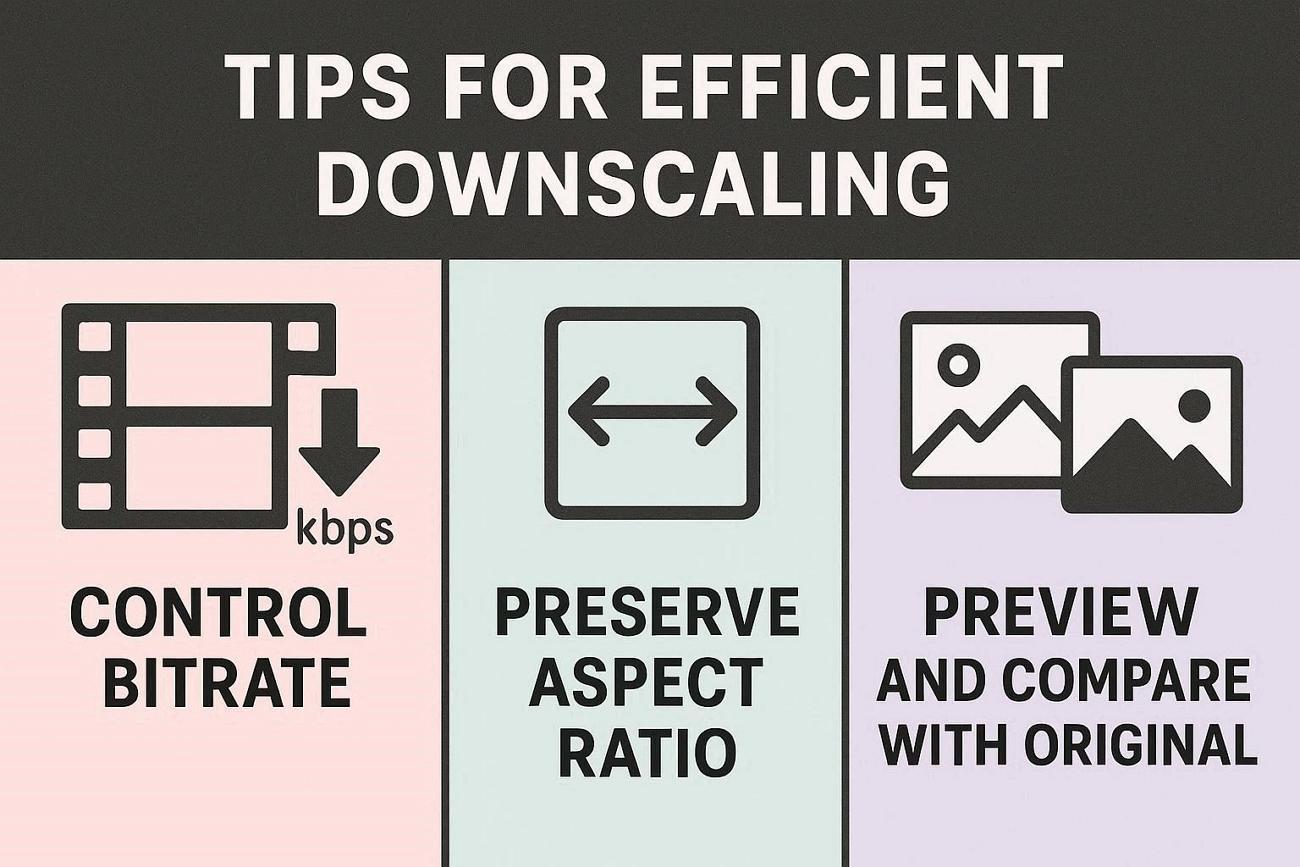
Start with the Right Resolution: Match your target resolution to the platform you will be uploading to. Also, avoid downscaling more than necessary to avoid losing any detail.
Control Bitrate: Lower the bitrate step by step and preview a clip before processing the whole video. When you video downscale online, see if the tool lets you pick the codec.
Preserve Aspect Ratio and Frame Rate: Maintain original aspect ratio to avoid stretching. Also, only reduce the frame rate if you do not require smooth motion.
Preview and Compare Before Export: Always preview a small segment of your clip to ensure motion, artifacts, and sharpness. Furthermore, compare the original and new videos to assess consistency in video quality.
Conclusion
We have explained in detail both simple browser-based tools and reliable desktop apps. Each video downscaler we covered helps in shrinking file size while maintaining video quality. Online tools are great for quick, occasional tasks, but for more professionals, having a powerful video downscaling program is recommended. For consistent, high-quality downscaling, UniConverter stands out as a good solution for any user.
FAQs
-
1. What is the best format for downscaled videos?
MP4 is generally the best format due to its wide compatibility, efficient compression, and ability to maintain good video quality across different devices and platforms. -
2. Can I use a video scaler for Discord?
Yes. You can use a video scaler to reduce resolution and file size so the video meets Discord’s upload limits. After exporting the optimized file, you can upload it manually. -
3. Is it better to downscale videos online or with desktop software?
Online tools are convenient for quick tasks and small files, while desktop software is better for large videos, batch processing, and more precise control over quality and settings. -
4. Does downscaling always reduce quality?
Not always. In many cases, downscaling can make video look cleaner by reducing noise and averaging out random detail, but poor settings can still create blur or artifacts. -
5. Can downscaling affect HDR or color?
Yes. Some workflows may lose HDR characteristics during scaling, which can reduce contrast, brightness, and color richness.

