User Guide
How to use Wondershare UniConverter (originally Wondershare Video Converter
Ultimate)?
Learn the step-by-step guide below.

UniConverter User Guide
-
Get Started
-
Video Converter
- Convert DVD to Any Format | Wondershare UniConverter for Windows
- Add Media Files | Wondershare UniConverter for Windows
- Convert Video from Camcorder | Wondershare UniConverter for Windows
- Convert Videos for iPhone/iPad/Android Devices | Wondershare UniConverter for Windows
- Convert Videos for Social Network | Wondershare UniConverter for Windows
- Convert Videos from iOS & Android Devices | Wondershare UniConverter for Windows
- Convert Videos to Any Format | Wondershare UniConverter for Windows
- Convert Video to Audio | Wondershare UniConverter for Windows
- Mute Video | Wondershare UniConverter for Windows
- Add Audio to Video | Wondershare UniConverter for Windows
- Convert Multiple Video In Batches | Wondershare UniConverter for Windows
- Easily Convert 4K and 8K Videos | Wondershare UniConverter for Windows
- Convert Video to MP3 | Wondershare UniConverter for Windows
- Convert Video to GIF | Wondershare UniConverter for Windows
- Convert SDR Video to HDR | Wondershare UniConverter for Windows
- Convert Video to Image Sequence | Wondershare UniConverter for Windows
-
Audio Converter
-
Video Compressor
-
Downloader
-
Screen Recorder
-
Merger
-
DVD Burner
-
Media Player
-
Video Editor
- Trim Video | Wondershare UniConverter for Windows
- Add Watermark | Wondershare UniConverter for Windows
- Crop Video | Wondershare UniConverter for Windows
- Apply Effect | Wondershare UniConverter for Windows
- Add Subtitle | Wondershare UniConverter for Windows
- Audio Track Volume | Wondershare UniConverter for Windows
- Auto Video Cutter | Wondershare UniConverter for Windows
-
Tools
- Image Converter | Wondershare UniConverter for Windows
- GIF Maker | Wondershare UniConverter for Windows
- Fix Video Metadata | Wondershare UniConverter for Windows
- CD Burner | Wondershare UniConverter for Windows
- Convert CD to MP3 | Wondershare UniConverter for Windows
- Convert Video to VR | Wondershare UniConverter for Windows
- Transfer Video/Audio Files to iOS Device | Wondershare UniConverter for Windows
- Transfer Video/Audio to Android Device | Wondershare UniConverter for Windows
- Subtitle Editor | Wondershare UniConverter for Windows
- Watermark Editor | Wondershare UniConverter for Windows
- Smart Trimmer | Wondershare UniConverter for Windows
- Background Remover | Wondershare UniConverter for Windows
- Auto Crop Video | Wondershare UniConverter
- AI Portrait | Wondershare UniConverter
- Intro & Outro | Wondershare UniConverter
- Vocal Remover | Wondershare UniConverter for Windows
- Noise Remover | Wondershare UniConverter for Windows
- Video Stabilization | Wondershare UniConverter for Windows
- AI Video Enhancer | Wondershare UniConverter for Windows
- AI Image Enhancer | Wondershare UniConverter for Windows
- AI Script Generator | Wondershare UniConverter for Windows
- Text To Speech | Wondershare UniConverter for Windows
- AI Subtitle Translator | Wondershare UniConverter for Windows
- AI Thumbnail Maker | Wondershare UniConverter for Windows
- Auto Highlight | Wondershare UniConverter for Windows
- Scene Detection | Wondershare UniConverter for Windows
- Remove Watermark | Wondershare UniConverter for Windows
- Voice Changer | Wondershare UniConverter for Windows
- AI Video Enhancer | Use AI Batch Image Enhancement
- Crop Image | Wondershare UniConverter for Windows
- Rotate Image | Wondershare UniConverter for Windows
- Resize Image | Wondershare UniConverter for Windows
- Image Edit | Wondershare UniConverter for Windows
- Anime Enhancement | Wondershare UniConverter for Windows
- Face Enhancement | Wondershare UniConverter for Windows
- Adjust Speed of TTS Audio | Wondershare UniConverter for Windows
- Voice Clone | Wondershare UniConverter for Windows
- Enable NVIDIA Acceleration | NVIDIA Graphics Driver Installation Tutorial on Win
- Smart Summarizer | Wondershare UniConverter for Windows
FAQs
Video/Audio Solutions
How to burn music to a CD
Wondershare UniConverter (originally Wondershare Video Converter Ultimate) can work as a CD burner, which allows you to burn music to CD without losing any quality. It supports the most common audio formats such as MP3/WAV/M4A/M4B/FLAC, etc. Follow the simple steps below to know how to burn a CD on Windows /Mac easily and quickly.
How to Burn Music to a CD - Wondershare UniConverter (Win) User Guide
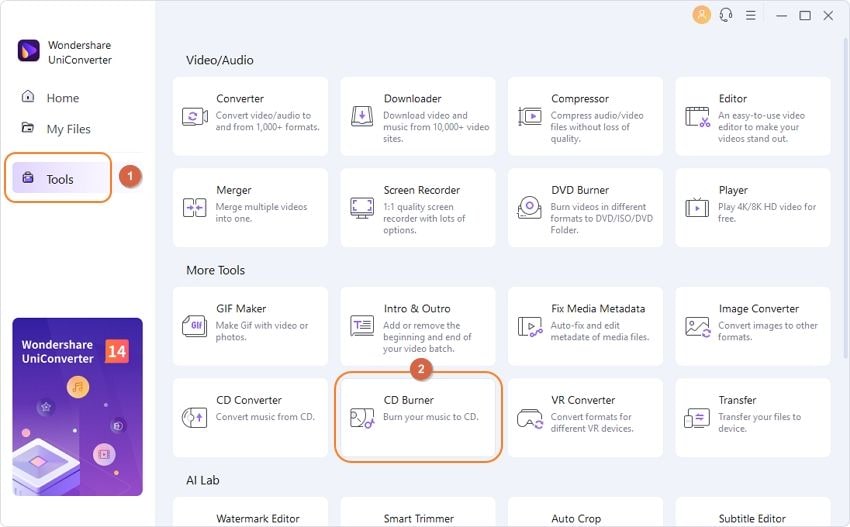
Step 1 Launch Wondershare UniConverter and choose the CD Burner option.
Run the installed Wondershare software on your system and from the list of main supported functions on the primary interface, select Tools > CD Burner.
Step 2 Add audio files to CD Burner.
A new window will open up, click on the + icon shown on the interface, and you'll open the file browser to select audio files on your computer. Multiple files can be added here.

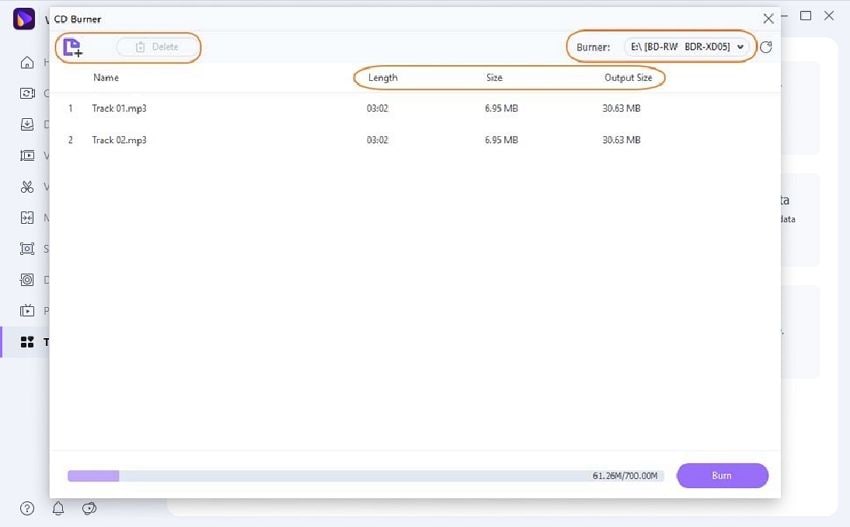
Step 3 Check music files and choose Burner.
All your added audio files will be displayed with Name, Length, Size, and Output Size, double-click to play it. You can delete or add more files by clicking the icons on the left-top corner. After all files are selected, insert a blank CD to your computer and choose the Burner from the right-top corner.
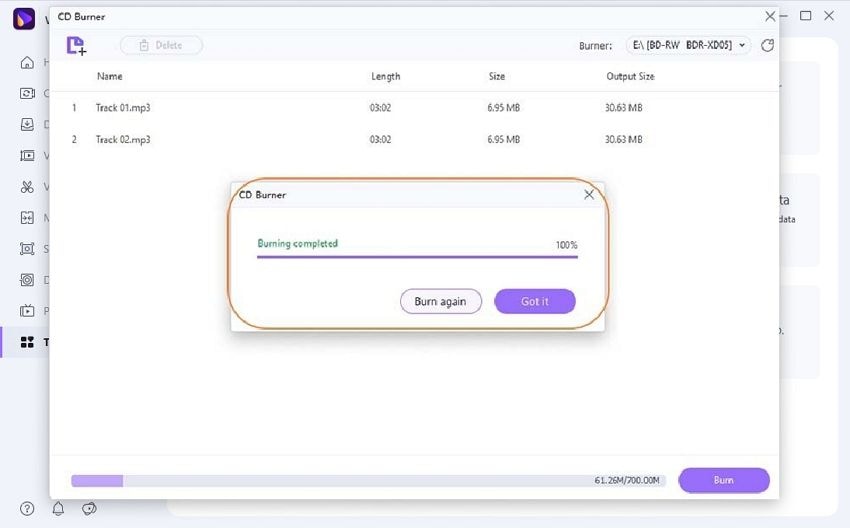
Step 4 Burn music to CD.
After all settings are completed, click on the Burn button to start burning songs to CD quickly. The storage of your disc will be shown on the bottom bar to remind you of the total file size you can add.

A message will appear on the interface once the process has finished.
 print
print
