
Anyone who works with audio, makes music, or produces audio content needs to edit audio. With the rise of tools like Audacity and others, you no longer need a professional setup to do that. Individuals and professionals can now easily create, refine, and share audio content. This tool is convenient, eliminating the need to invest thousands in professional studio tools and equipment. So, if you’re wondering how to cut, trim or edit music in Audacity, you’re at the right place.
Check out this step-by-step guide on using Audacity’s audio editing tool to achieve flawless edits in your audio projects. This guide also suggests an alternative tool you can try for better results.
In this article
- What Is Audacity and Why Use It for Audio Editing?
- How to Cut Music or Audio in Audacity (Step-by-Step)
- How to Trim Audio in Audacity (Keep Only What You Need)
- How to Split and Crop Audio in Audacity
- Keyboard Shortcuts for Faster Audio Editing in Audacity
- Best Alternative to Audacity to Cut/Trim Music
- FAQs About Audacity Cutting Audio
Part 1. What Is Audacity and Why Use It for Audio Editing?
Audacity is an open-source digital audio recorder and editor that allows you to record vocals, edit podcasts, and create music. Thanks to its cross-platform support, you can start one project on one computer and edit it on another. The best part about the tool is that it’s free to use and is suitable for someone who cannot afford premium sound editors.
Although the tool’s interface appears somewhat outdated, the program is customizable to fit your workflow. With some guidance on the menu and tools, you can edit projects such as music production, podcasts, and other audio types.
Now, the question is why Audacity is popularly used to cut or trim music? Despite being available for free, Audacity's functionalities are advanced. One of its fundamental tasks is trimming, which involves removing unwanted parts of an audio file to enhance its overall quality and flow. It’s handy to remove silence, mistakes, and other undesirable elements to create a more polished final product.
You also have the option to add effects such as amplify, fade in/fade out, normalize, reverb, EQ, noise reduction, and more. It allows users to improve the clarity, texture, and emotional impact of the audio. Additionally, it can import and export various audio formats, including WAV, MP3, FLAC, Ogg, Vorbis, and MP2, which further enhances convenience.
Part 2. How to Cut Music or Audio in Audacity (Step-by-Step)
Before you jump into the steps of how to cut music in Audacity, you’ll need to download it first. Make sure to get the latest version of the software to receive all its latest features. For this, access Audacity’s website on your Windows or Mac computer and click on your operating system to download and install the software. Now, proceed with the steps for how to cut music on Audacity:
Step 1: Launch the software on your computer. As it’s an open-source software, it doesn’t require a login, and you can upload the audio directly. For that, click the “File” option on the top menu bar, followed by “Open” from the dropdown menu. Then, select and upload the audio from your local storage.

Step 2: Each track appears as a waveform on the timeline. To preview the tracks, you can simply press the “Play” button at the top. You’ll find the option to rewind, pause, or fast forward the track.

Step 3: Select the “Selection tool” if you haven’t already. Its icon looks like a cursor from a word processor.

Step 4: Use the selection tool to select the part of the audio you want to cut. Then, click the “Edit” menu, and choose “Cut.” If you prefer using the keyboard, use the shortcut “Ctrl + X.” As you cut a portion of an audio, the other parts join automatically into one track.

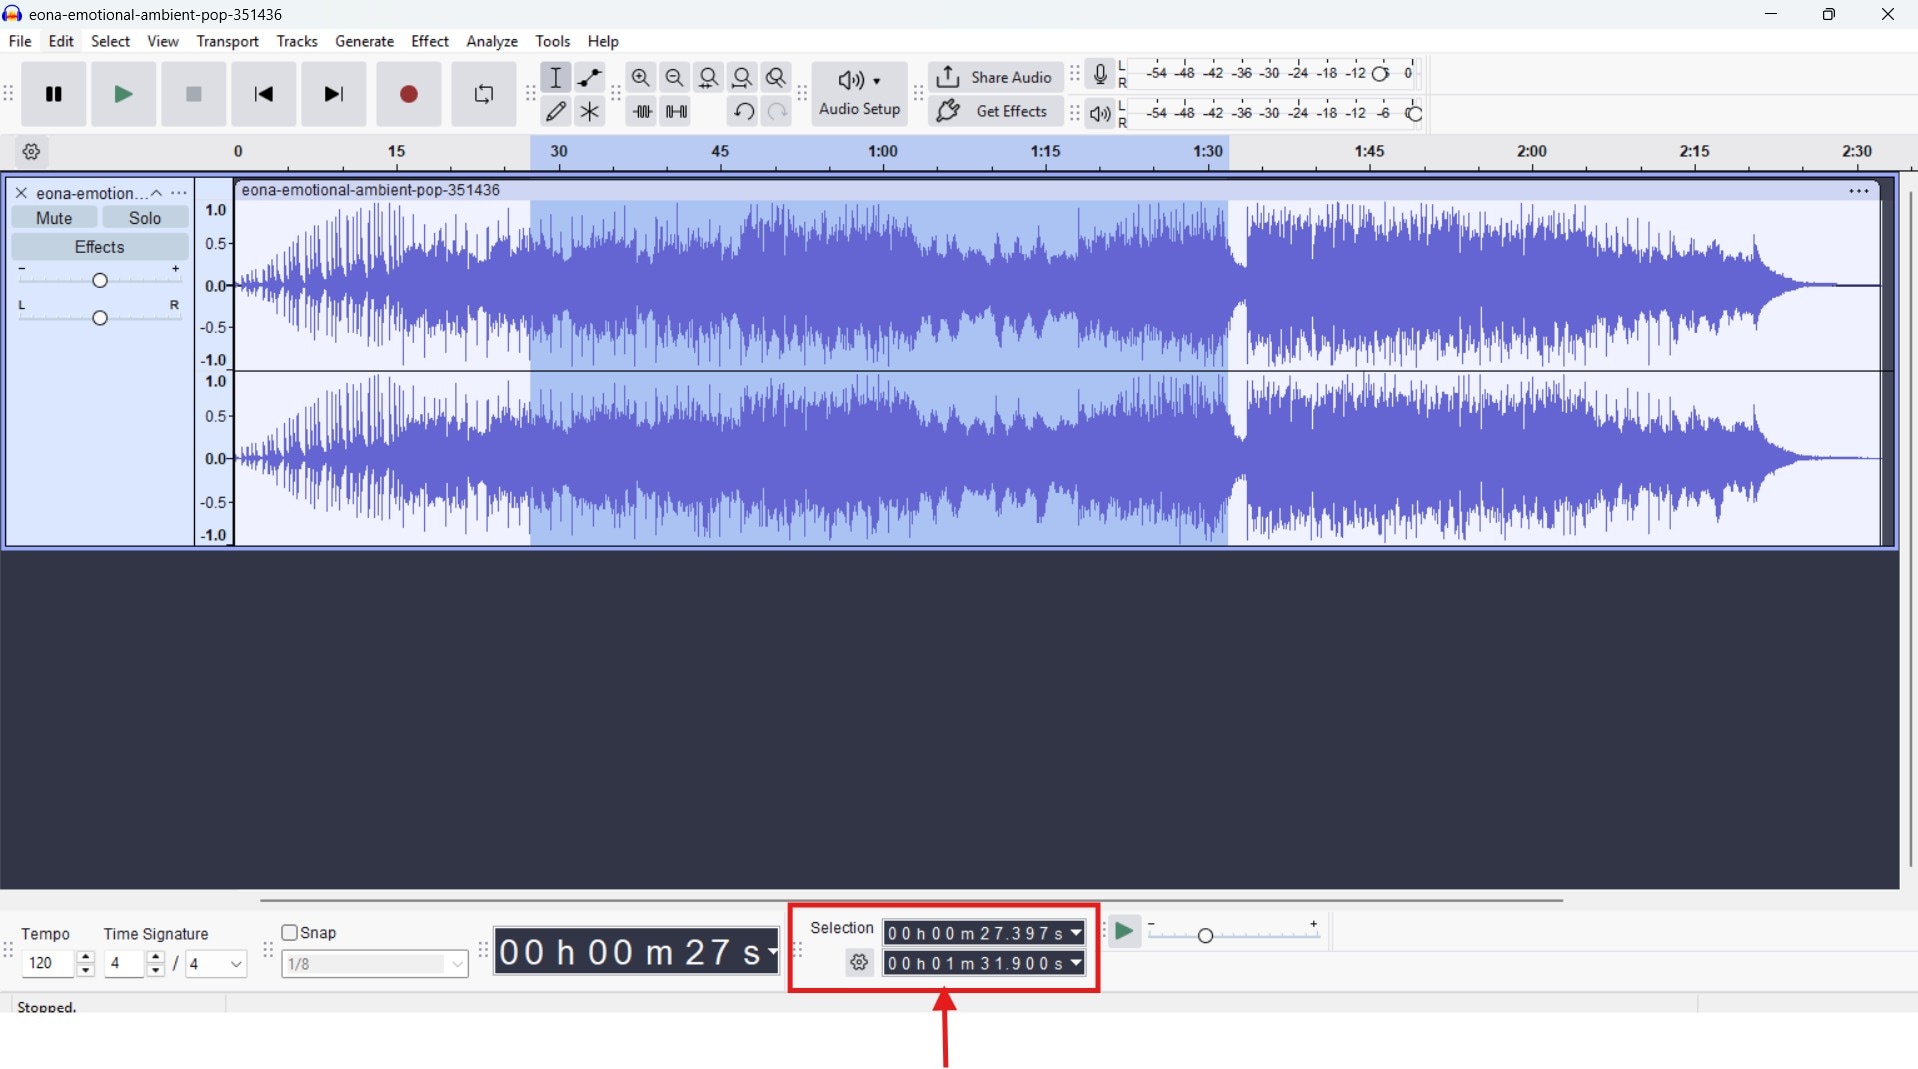
Alternatively, for precise audio cuts on Audacity, you can set the start and end times. This avoids the use of the selection tool, and you always cut the exact part of the unwanted clip from the audio.
Part 3. How to Trim Audio in Audacity (Keep Only What You Need)
Trimming audio on Audacity is the opposite of using the cut option. Here, you keep a part of the audio track and remove everything before and after the highlighted section. Here’s how to trim audio on Audacity:
Step 1: As in the previous section, upload the audio track you want to trim by clicking “File > Open.” Then, click the “Selection tool.”

Step 2: Now, use the selection tool to select the section you want to keep. Or, you can set the start and end time in the “Selection” tab at the bottom.
Step 3: Then, head over to the “Edit” menu, and click “Remove Special > Trim Audio.” Alternatively, you can use the keyboard shortcut “Ctrl + T” to trim the audio clip.

Step 4: You can add Effects (amplify, fade in/fade out, normalize, reverb, EQ, noise reduction, and more), increase or decrease the tempo, and others to fine-tune the audio. Once you’re satisfied with the audio, navigate to “File > Export Audio” to save the track to your computer.

Most of the time, intros and outros contain long silence, applause, fades, or trailing noise. Understanding how to trim tracks in Audacity is useful to remove unwanted parts at the intros and outros.
Part 4. How to Split and Crop Audio in Audacity
Now, it’s time to learn how to split audio in Audacity. This is useful when you want to isolate specific sections of an audio for individual manipulation without affecting the entire track. You can also use it to add an audio clip in between or rearrange the order of your audio. This potentially improves organization, collaboration, and targeted exporting of specific segments. Here’s how to crop an audio in Audacity:
Step 1: Use the selection tool to select a portion of the track where you want to split it. Use the playback buttons at the top to choose the right time. Then, “Zoom in and out” using the magnifying glass option at the top, or use “Ctrl + 1 and Ctrl +2” for Windows and “Cmd + 1 and Cmd + 2” for Mac to zoom in and out, respectively.

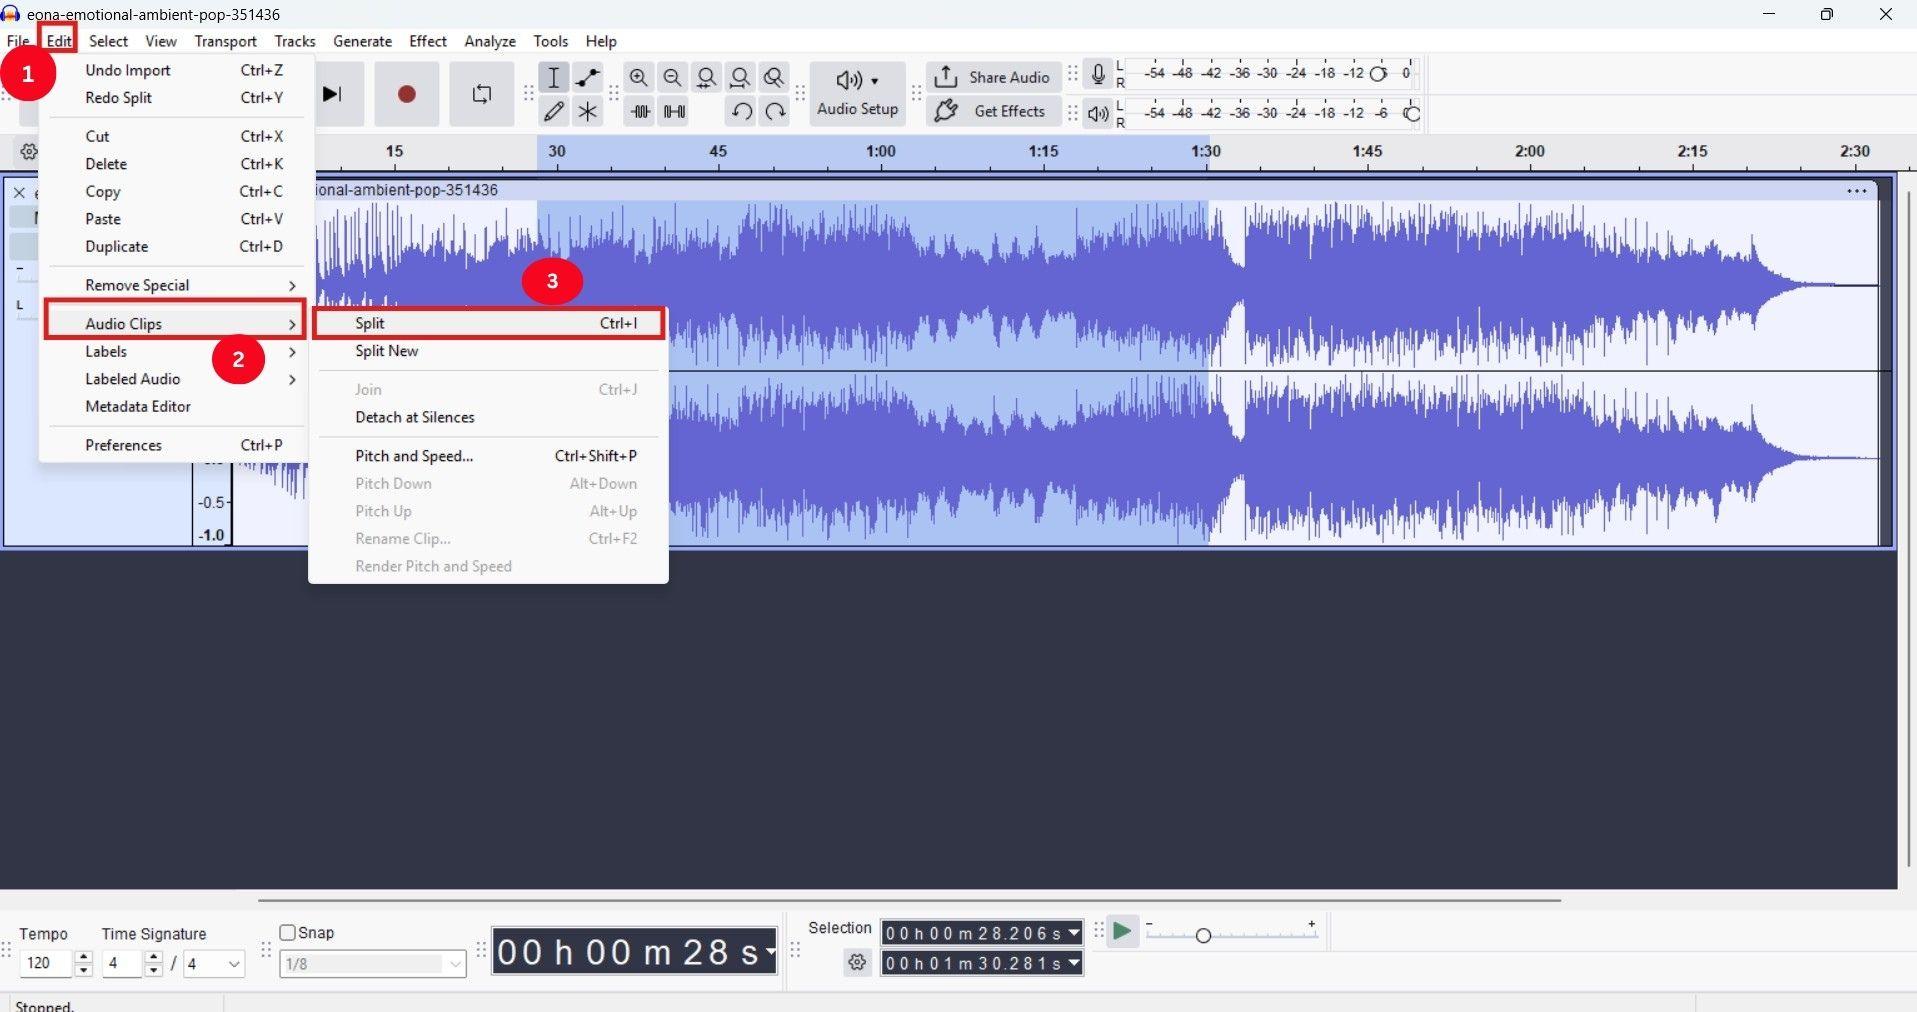
Step 2: As you find the right spot in your audio, head over to the “Edit” menu and select “Audio Clips > Split” to split the audio. Alternatively, you can just use “Ctrl + I.”
Step 3: Move or delete the segments as needed, make the necessary edits, and then merge them back in at the end.
Now, imagine you need to add a portion of another track into the existing one. For that, follow the steps in order:
Step 1: Adjust the split sections of your existing audio to make space for the new portion to be added. You can remove any clip if required.
Step 2: Head over to the “File” menu and select “Import > Audio” to upload the new audio from your computer.

Step 3: Use the selection tool to select the part of the new audio, then use “Ctrl + X” or right-click on it and select “Cut” from the menu.

Step 4: Right-click the empty portion of the existing audio, then select “Paste” to paste the portion. Then, play it to ensure the audio is in sync.

Part 5. Keyboard Shortcuts for Faster Audio Editing in Audacity
| Action | Windows Shortcut | Mac Shortcut |
| Cut selected audio | Ctrl + X | Cmd + X |
| Delete selected audio | Delete | Delete |
| Trim audio | Ctrl + T | Cmd + T |
| Split audio | Ctrl + I | Ctrl + I |
| Open a new audio | Ctrl + O | Cmd + O |
| Export Audio | Ctrl + Shift + E | Cmd + Shift + E |
| Zoom In | Ctrl + 1 | Cmd + 1 |
| Zoom out | Ctrl + 3 | Cmd + 3 |
| Copy an audio clip | Ctrl + C | Cmd + C |
| Paste an audio clip | Ctrl + V | Cmd + V |
| Play/Stop audio | Space bar | Space bar |
| Pause an audio | P | P |
Part 6. Best Alternative to Audacity to Cut/Trim Music
Although Audacity is a powerful tool to edit audio tracks, it has certain limitations. To start, it functions as a single-track editor, which limits its capabilities for multi-track recording or mixing projects. Additionally, the interface, although functional, may appear outdated to some users, while others may struggle to locate specific features.
To enhance your audio cutting or trimming experience, you can try out Wondershare UniConverter audio cutter. You can cut or trim multiple parts of a single audio file, and also batch process multiple audio files. Besides, this comprehensive tool allows you to remove vocals, change voice, fix metadata, and more.

Best Multimedia Processing Tool
Key Features:
- MP3 cutter helps make precise cuts or trims in an audio file.
- Its AI vocal remover can automatically remove vocals from any song.
- Use its Noise Remover feature to automatically denoise a video.
- Its Audio Converter can convert your music and audio files to over 50 formats, including MP3, AAC, M4A, OGG, FLAC, and WAV.
How to cut or trim your audio track using Wondershare UniConverter:
Step 1: Launch Wondershare UniConverter on your computer and head over to the “Audio” section. Then, from the available options, select “MP3 Cutter.”

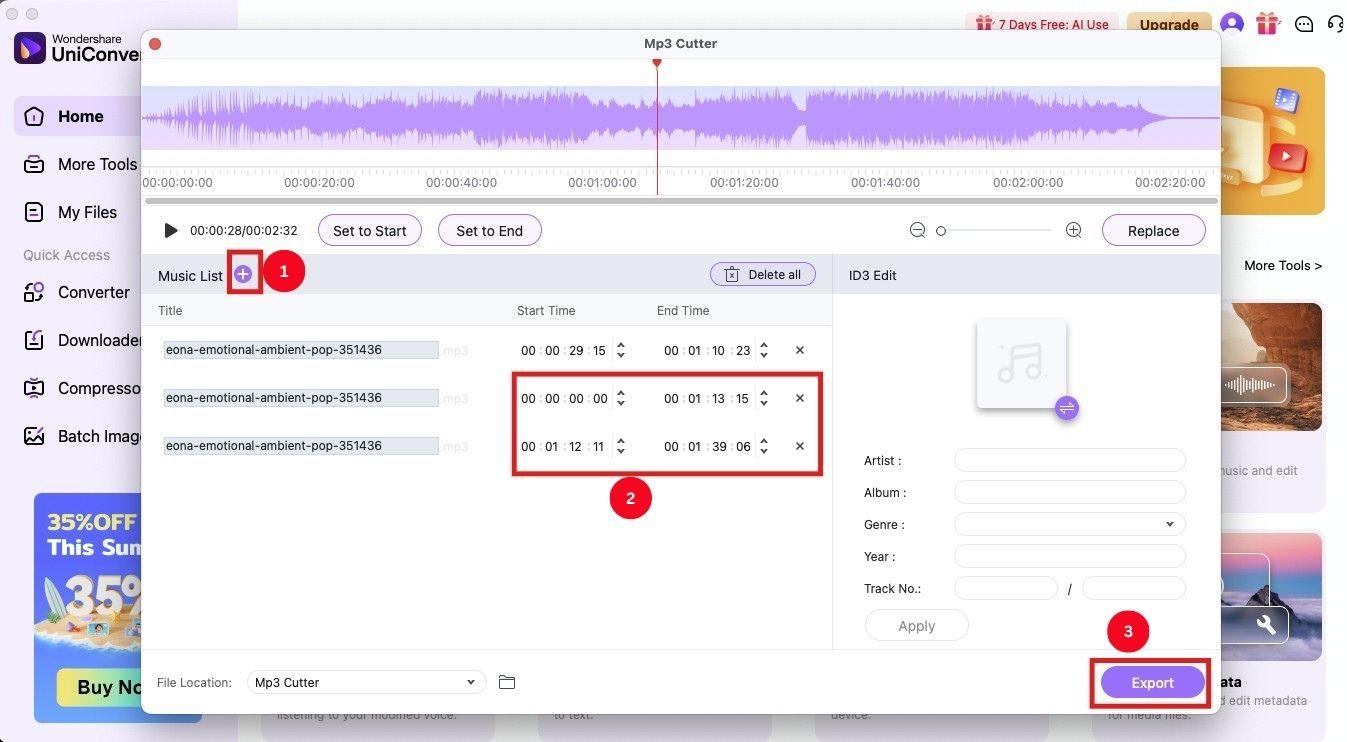
Step 2: Tap “+” to upload the audio track from your computer, or drag and drop one to start.

Step 3: Now, drag the cursor to the desired starting point and click “Set to Start.” Then, drag it to the time you want to cut, and click “Set to End.” Or, you can set the start time and end time for precise trimming.

Step 4: Click “+” beside the music list to crop or trim multiple portions in the audio. Once done, click “Export” to save the music clips in your local storage.
To Sum Up
Understanding how to cut, trim or edit audio in Audacity can help in creating professional-quality audio projects. Be it an individual or a professional, everyone can take advantage of the capabilities to create high-quality audio with their use. However, to overcome its shortcomings and access advanced audio editing features, consider using Wondershare UniConverter. Its intuitive interface makes it simple to trim an audio clip and create a clean and polished audio. You can also utilize its other features to breathe new life into your audio!

