Wondershare UniConverter
-
 Record PIP video with voice narrations, annotations, and system audio.
 - Apply voice narrations and annotations like stickers, symbols, lines, arrows, and more.
- Versatile toolbox combines screen recorder, GIF maker, fix video metadata, etc.


Screen Recorder
- 1. Top 7 Facecam Screen Recorders
- 2. How to Make a Picture-in-Picture Effect
- 3. Does Picture-in-Picture Work with Zoom
- 4. How to Record a Lecture or Game with Picture-in-Picture Effect
- 5. Record Yourself and Your Screen at the Same Time
- 6. Best and Easy Ways to Learn What is Picture-in-Picture
- 7. Make a Picture-in-Picture Video with Wondershare UniConverter
- 8. The Ultimate Guide to Create PIP Videos in Camtasia
- 9. Record Webcam and Screen at the Same Tim
- 10. How to Record Picture-in-Picture Video
All Topic
- AI Tools Tips
- DVD Users
- Social Media Users
- Camera Users
- Photography
- Creative Design
- Movie Users
- Travelling Fans
- Educational Users
- More Solutions
- Holidays
- Game Lovers
- Other Tips
The Ultimate Guide to Create PIP Videos in Camtasia
by Kayla Morrison • 2024-07-20 18:27:51 • Proven solutions
Including multiple videos within a single frame can give you a software tutorial to match. However, not all screen recorders can let you introduce a picture in picture effect displaying your gestures as you record desktop screen. Fortunately, Camtasia Picture in Picture function enables you to do that hassle-free. So, keep reading to learn how to add Picture in Picture on Camtasia and other excellent alternatives.
- Part 1. How to Create PIP Videos in Camtasia Easily
- Part 2. Best Alternative to Camtasia on Mac and Windows
- Part 3. 3 Other Common Camtasia Alternatives to Create PIP Videos
Part 1. How to Create PIP Videos in Camtasia Easily
First of all, Camtasia has PIP support for only one video. In other words, you can't record more than two videos on a single frame. Below is how to create a PIP video:
Step 1: Download, install and run Camtasia on your computer.
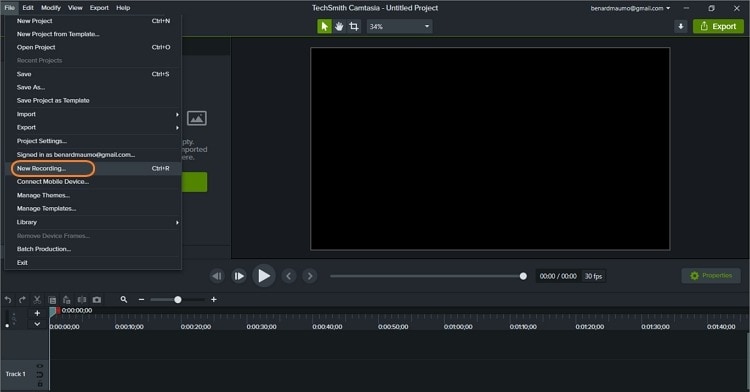
Step 2: Click the File, then select the New Recording to launch the screen capture tool.
Step 3: Now connect a webcam that you'll use to make a PIP video and choose it under the Camera section. You can also use your computer's inbuilt camera.
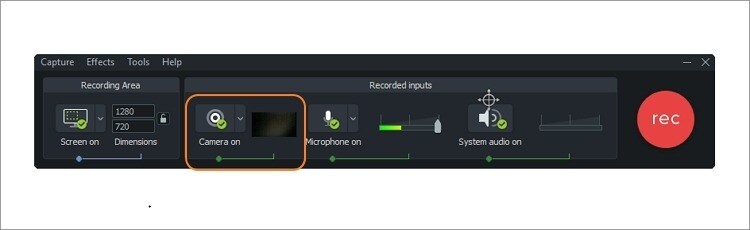
Step 4: Choose whether you want to record your desktop screen in fullscreen mode or select a custom area by entering the video dimension. Alternatively, drag the cropper to fit your recording area.

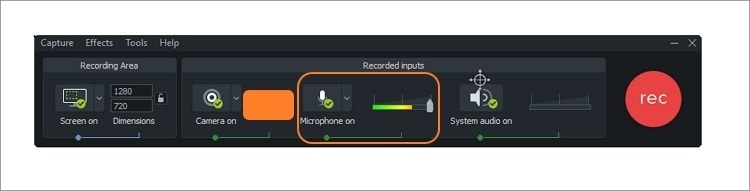
Step 5: Select a microphone that you'll use to add voice narration to your video. You can also mute or unmute the system audio.
Step 6: Click the red Rec button to begin recording a PIP video on your desktop.
Step 7: Tap the Stop button or F10 on your keyboard to finish recording. You'll be redirected back to the app, where you can preview your recorded video and edit it further. It's that easy!
Part 2. Best Alternative to Camtasia on Mac and Windows
Although Camtasia is an excellent app, the interface may feel intimidating to beginners. Also, the app has quite a significant installation size. Therefore, use Wondershare UniConverter if you want something lightweight but equally powerful. Like Camtasia, this tool lets users record videos with PIP effects, voice narrations, and system audio. It goes further by allowing users to add drawings, shapes, texts, lines, and other annotations. Plus, users can customize the output frame rate, format, and quality. Overall, it's an excellent Camtasia Picture in Picture alternative.
Wondershare UniConverter - Best Camtasia Picture in Picture Alternative
-
It lets users set the output frame rate, file format, recording duration, and quality.
-
Edit videos with features of cropping, trimming, rotating, adding watermarks, applying effects, and others.
-
Edit, enhance & personalize your video file.
-
Batch video/audio compression and conversion are allowed.
-
Toolbox with additional functions like Screen Recorder, VR Converter, GIF Maker, Fixing Media Metadata, and more.
-
Supported OS: Windows 10/8/7/XP/Vista, macOS 11 Big Sur, 10.15 (Catalina), 10.14, 10.13, 10.12, 10.11, 10.10, 10.9, 10.8, 10.7.
Below are the simple steps of how to add PIP on a video using Wondershare UniConverter:
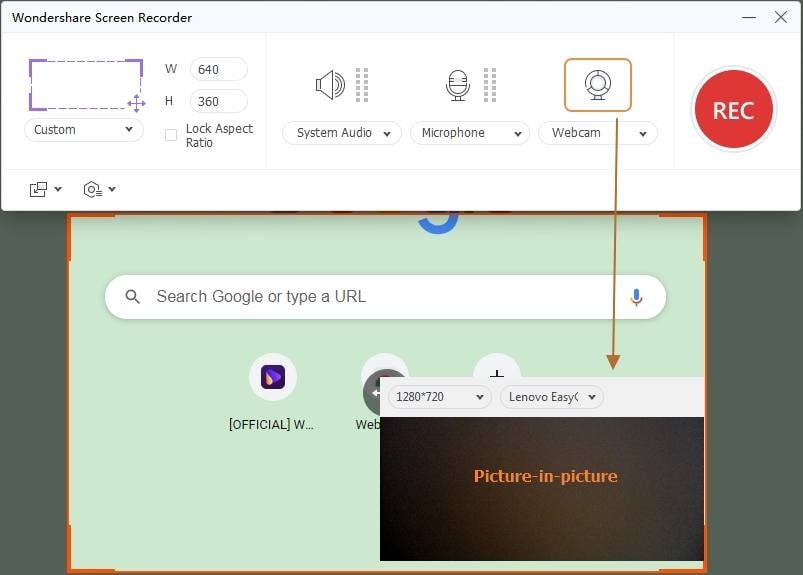
Step 1 Launch the Screen Recorder tool.
Open Wondershare UniConverter on your computer, then click the Screen Recorder tab. After that, click the Camcorder button to open the Screen Recorder function.

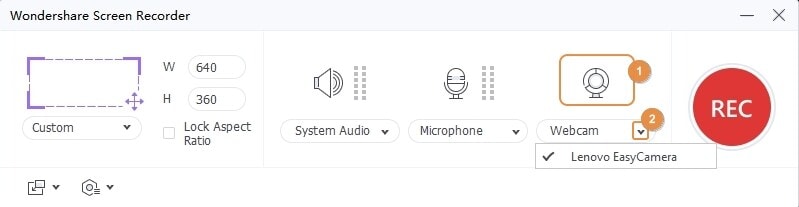
Step 2 Select an input webcam and microphone.
On the Screen Recorder tool, click the Webcam button to launch your computer camera. You can also choose an external webcam that you'll use to capture a video overlay. Next, click the Microphone button to select an external or internal mic for capturing voice narrations. You can also record system audio by choosing a device under the Speaker menu.
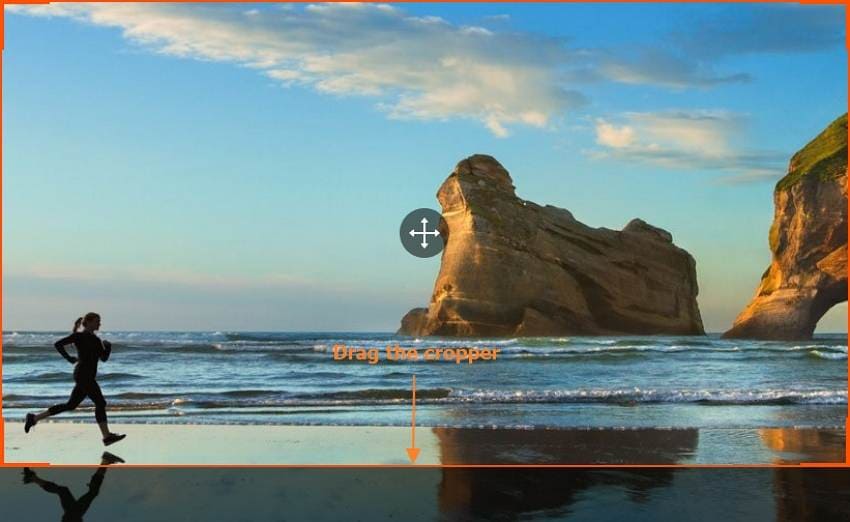
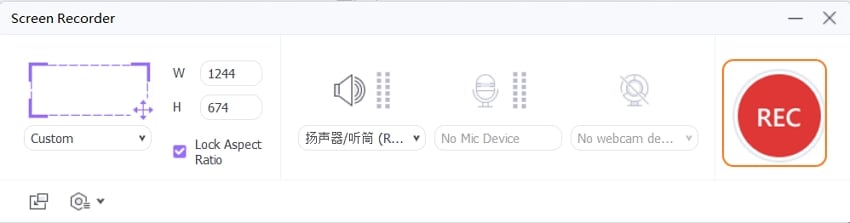
Step 3 Choose a recording area.
Launch the app you wish to record and select the capture region. You can set it as either Custom or Full Screen. With the Custom mode, you can enter the Height and Width or drag the cropper to capture a specific recording area. Interestingly, users can lock the aspect ratio to make the final recording look more professional.
Step 4 Preset Recording Settings.
Click the Settings button below the REC button to open additional recording settings. Set the following things:
- Format – Users can set the target format as either MP4, AVI, or FLV. For the best quality, choose MP4.
- Frame Rate – The frame rate will determine your recorded video's overall speed. For example, if you're recording a video game, set a higher frame rate.
- Quality – This app lets you set the target quality as high, medium, or low. However, the higher the quality, the more the file size.
- Record Timer – In this section, users can set the start and stop recording duration.

Step 5 Start and stop recording.
Finally, press the REC button to start capturing your desktop actions. Hit the arrow on your screen's right side to open the recording taskbar. Here, you can pause or stop recording and enable or disable your input microphone, speaker, and webcam. If you want to add characters like shapes, arrows, lines, drawings, and fonts, click the Annotation button. Once satisfied, click the Stop button. Preview your video and edit it using the app's Video Editor tool.

Part 3. 3 Other Common Camtasia Alternatives to Create PIP Videos
In addition to Wondershare UniConverter and Camtasia, let's discuss some other three desktop screen recording apps.
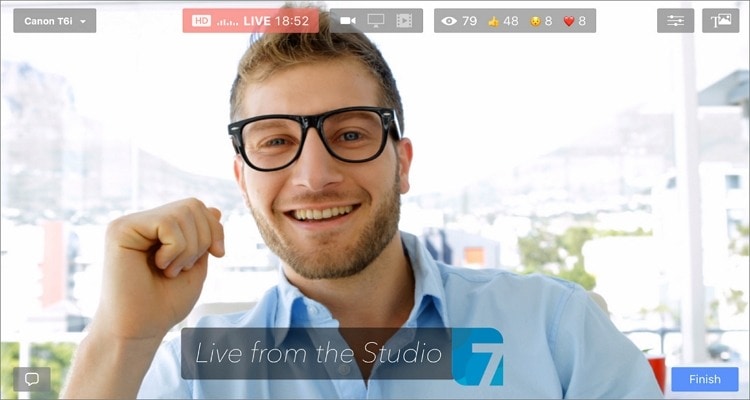
1. Ecamm Live
Ecamm Live is an all-in-one live streaming app that lets you create professional live streams in a heartbeat. During the recording session, users can add logos, graphics, texts, lines, arrows, and so much more. Further, it's easy to set up and connects to cameras and audio feeds seamlessly.
Pros:
- Simple to set up.
- Connects with cameras easily.
Cons:
- Lower priced plans are quite limited.
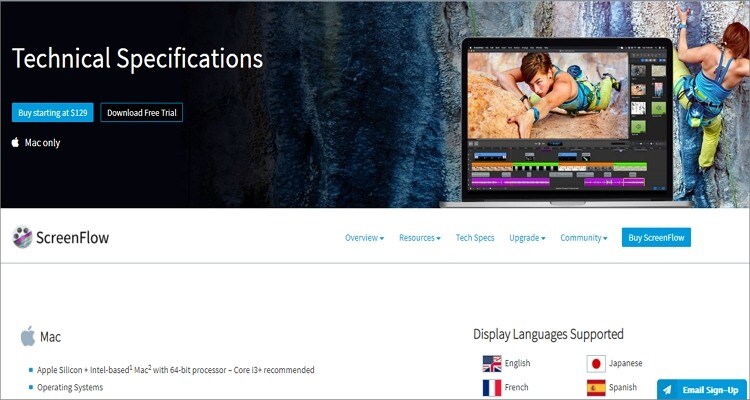
2. ScreenFlow
ScreenFlow is a simple screen recording, video editing, and video sharing app from Telestream. It's best for vloggers, trainers, marketers, students, and anybody else who wishes to make high-quality videos. Users can overlay music, annotations, zoom specific parts of their videos, etc.
Pros:
- It handles most video editing tasks.
- It supports YouTube uploading.
Cons:
- No backup and recovery.
3. Zoom
I'm sure you already know a few things about this virtual meeting app. The app is effortless to use and supports up to 100 attendees per session. Users can make HD video calls with crisp and clear audio, and there's responsive support to help with your queries. Moreover, Zoom quickly integrates with any third-party webcam.
Pros:
- It supports up to 100 meeting attendees.
- Excellent video and audio call quality.
Cons:
- Needs a fast internet connection.

Conclusion
With an excellent picture in picture video, you can make the perfect presentation for your online class or following. So, use Wondershare UniConverter if you want something simple, affordable, and powerful.
Your complete video toolbox

Other popular Articles From Wondershare

Kayla Morrison
staff Editor