

Finding a free, reliable screen recorder for PC that handles gameplay, tutorials, SaaS demos, and webinars without dropping quality is not easy. Most free apps limit resolution or add watermarks, while premium screen recording tools lock features behind subscriptions. OBS Studio screen recorder solves this by staying completely free and open source, which is why streamers, educators, and software teams rely on it for high-quality output.
The catch is its settings-heavy interface. Scenes, sources, and encoders in the OBS Studio screen recorder confuse first-time users fast. This guide covers OBS's how-to for capturing a screen step by step, then moves into settings, fixes, and a faster editing alternative.
Let's first take a quick look at what OBS can do now and what it can not:
| Can OBS record the screen? | Yes |
| Is OBS free? | Yes |
| Does OBS add a watermark? | No |
| What is OBS best for? | Gaming, tutorials, streaming |
| Does OBS require installation? | Yes (desktop app for PC/Mac) |
| Difficulty level | Medium |
In this Article
- Part 1: How We Tested OBS Studio Screen Recorder
- Part 2. How to Capture Screen in OBS Studio
- Part 3: What Are the Best OBS Studio Settings for Screen Recording
- Part 4: How Do You Optimize OBS Studio for Low CPU Usage
- Part 5: What Are the Most Common OBS Screen Recording Problems and Fixes
- Part 6: What Is OBS Studio Screen Recorder Best Used For
- Part 7: Why Use Wondershare UniConverter Instead of Editing OBS Recordings
- Conclusion
- FAQs
Part 1: How We Tested OBS Studio Screen Recorder
We tested OBS Studio beyond its feature list to see how it performs in real recording workflows. Instead of relying on vendor claims, we used it across common use cases and evaluated the settings and issues users are most likely to encounter.
During testing, we:
- Recorded full-screen videos, app windows, webinars, and tutorials.
- Tested the microphone, system audio, and webcam recording together.
- Compared different resolutions, frame rates, encoders, and recording formats.
- Verified fixes for common problems like black screens, missing audio, dropped frames, and high CPU usage.
- Evaluated recording quality, ease of setup, performance, and overall workflow.
Our recommendations throughout this guide are based on these hands-on tests.
Part 2. How to Capture Screen in OBS Studio
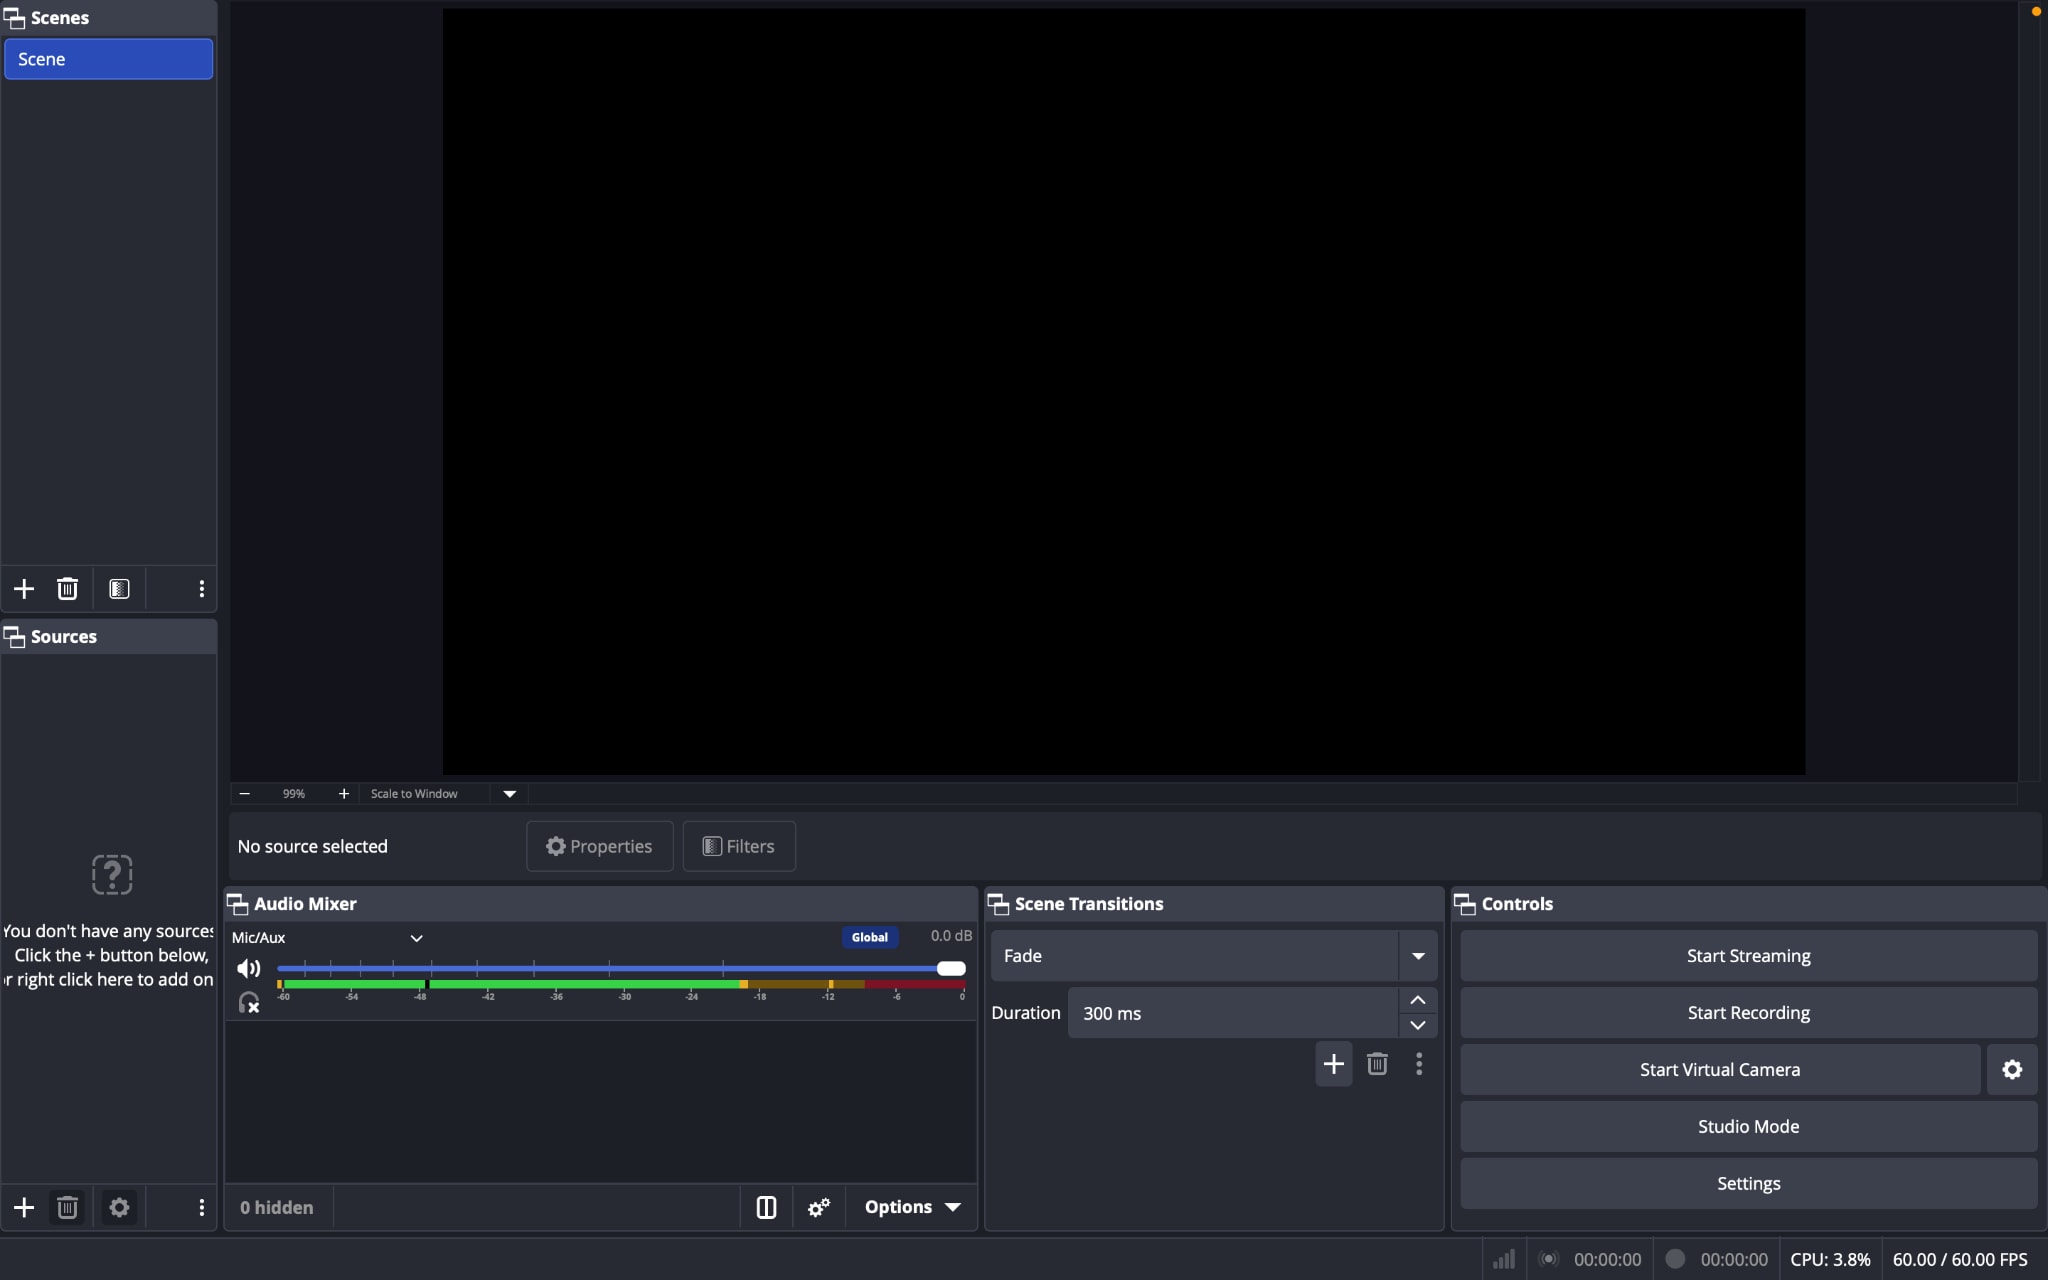
OBS Studio makes it easy to record your screen once you understand its basic workflow. Here is how you can capture screen in OBS studio:
How to Capture Screen on OBS Studio for PC (Windows & Mac)?
To record your entire desktop, OBS uses a Display Capture source. This is the best option for recording tutorials, presentations, webinars, or anything that appears on your screen.
Step 1: Download and install OBS Studio from the official website. Once installed, launch the application, and complete the Auto-Configuration Wizard.
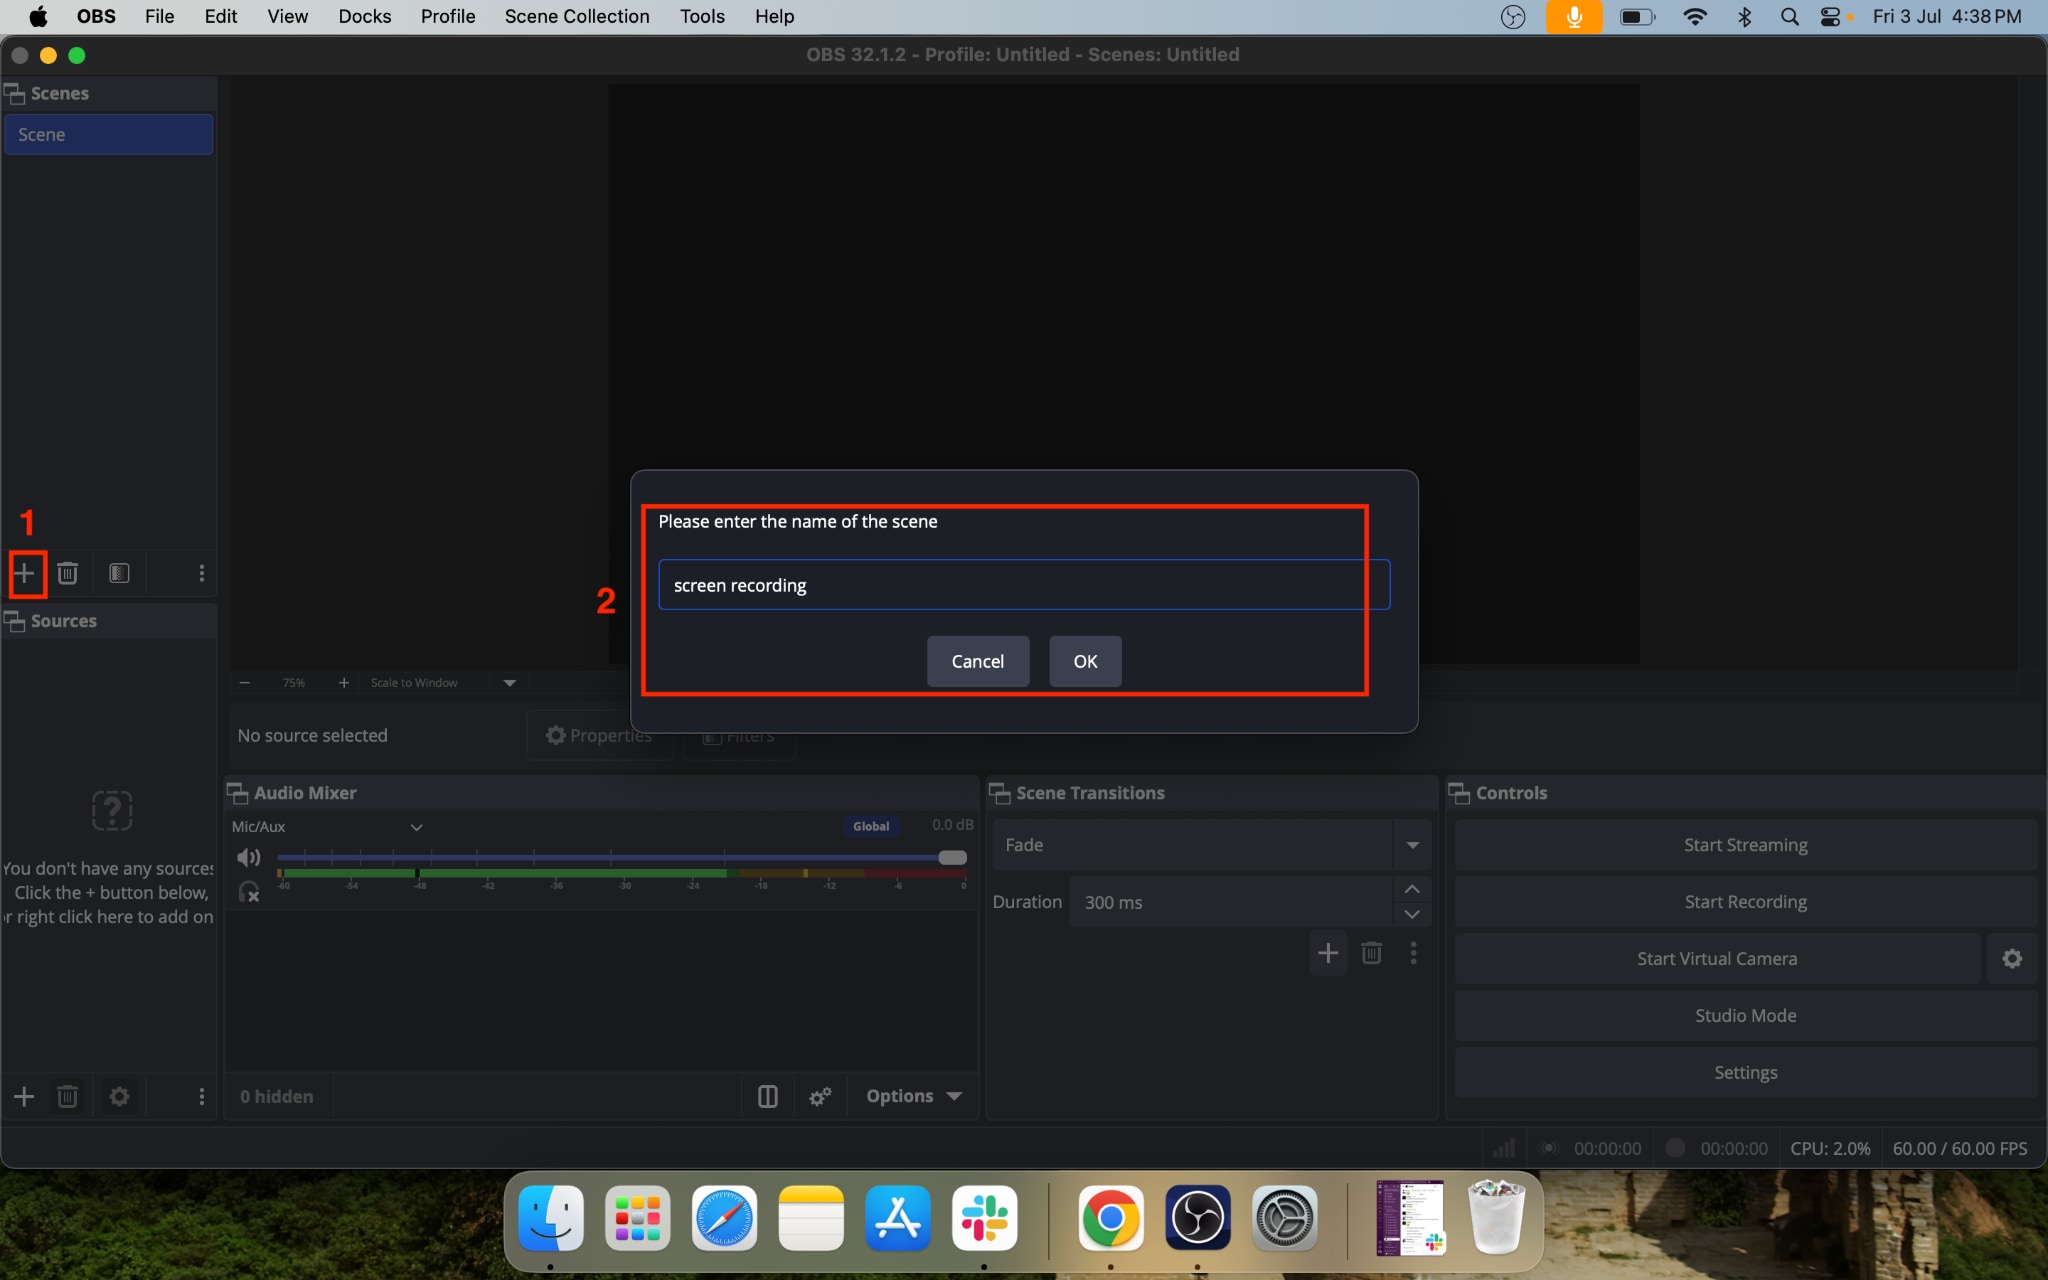
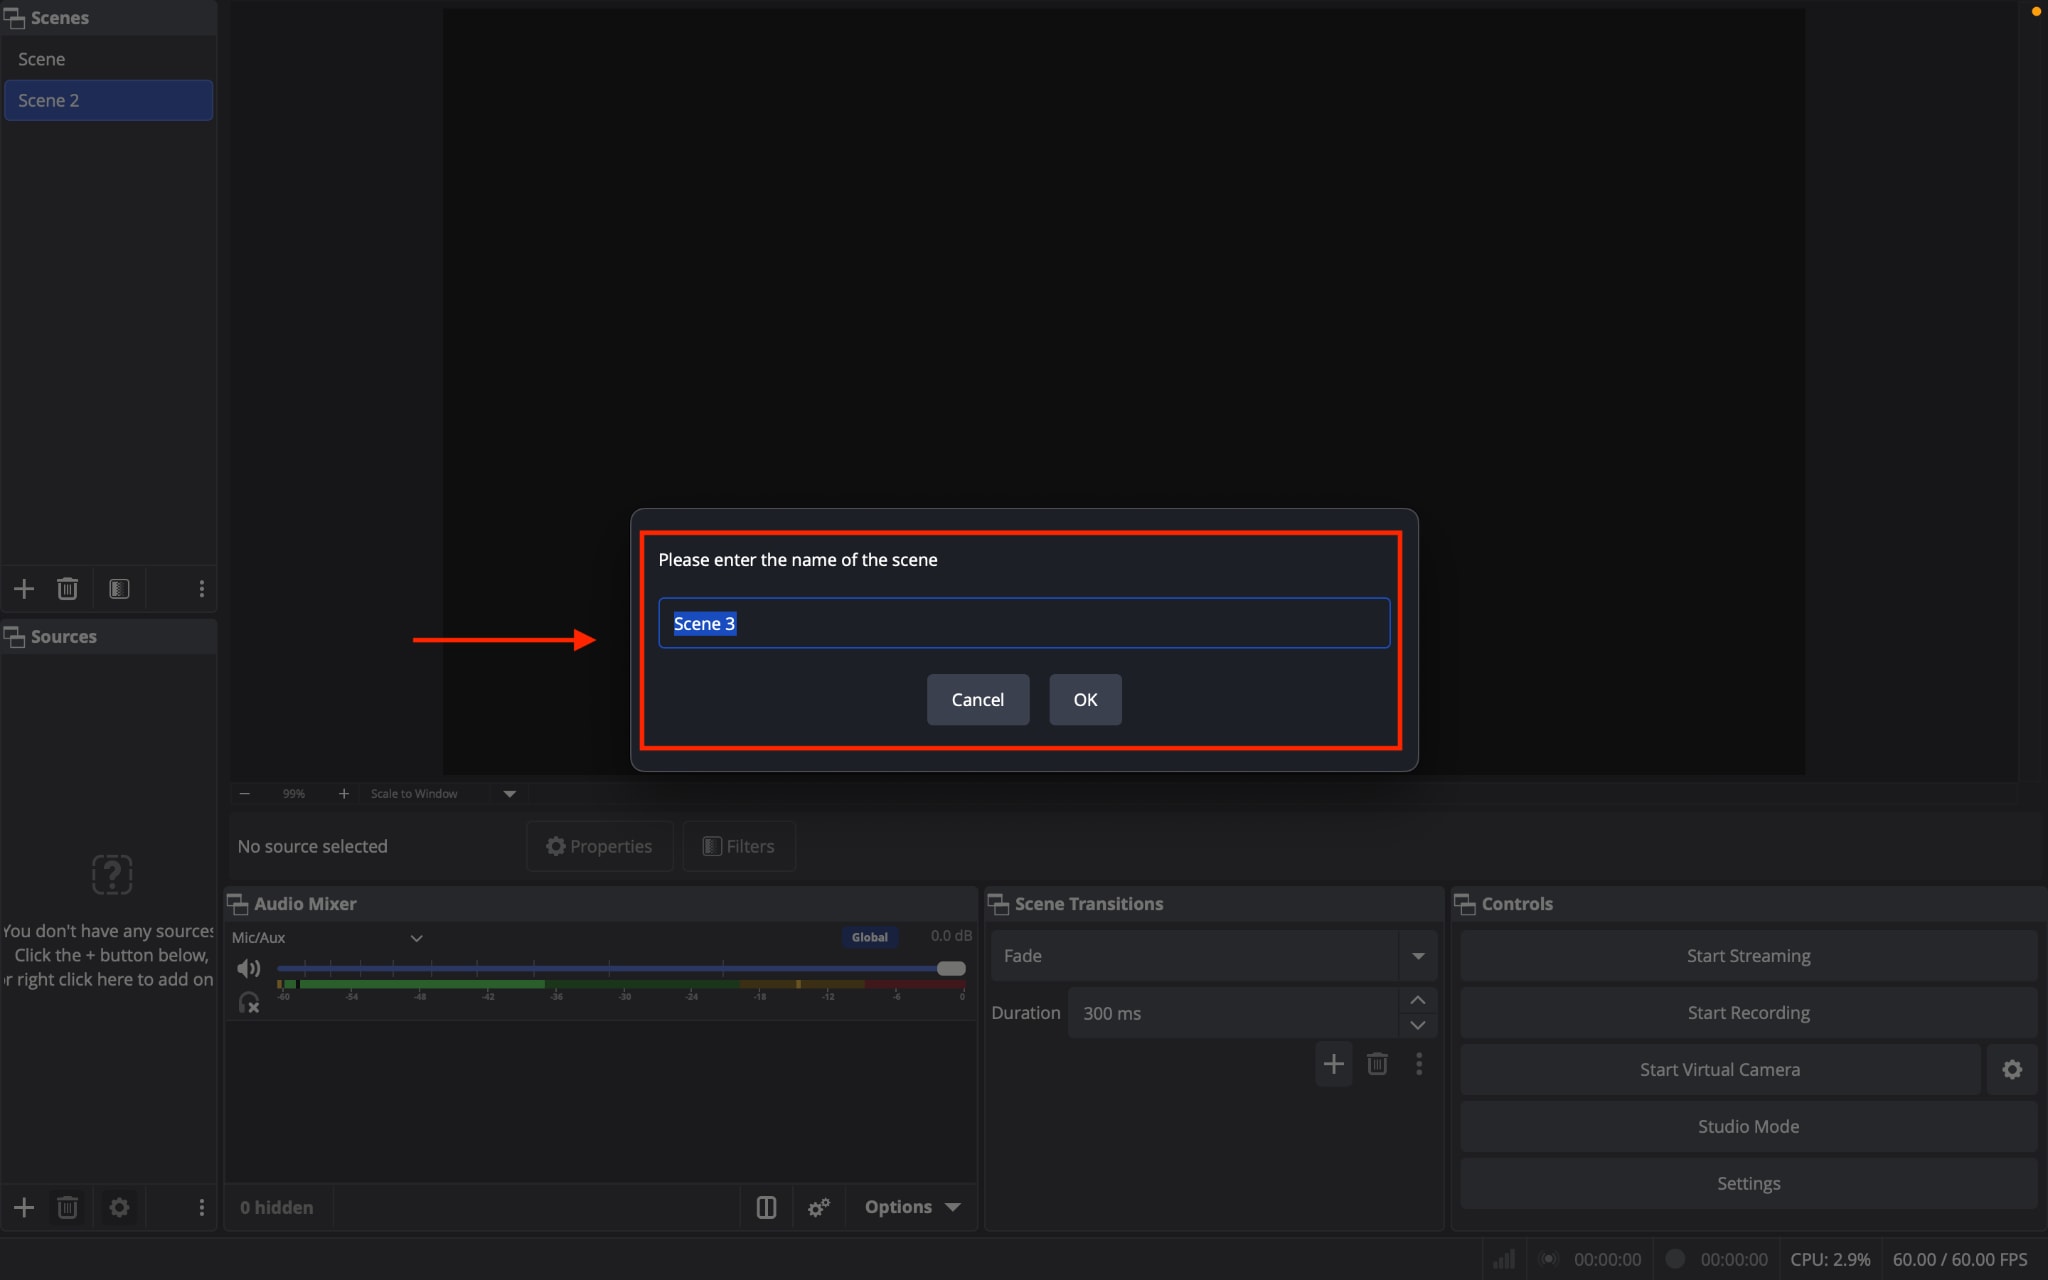
Step 2: In the Scenes panel, click the + button and create a new scene. Give it a name like Screen Recording so you can easily identify it later.
Step 3: In the Sources panel, click the + button and select Display Capture.
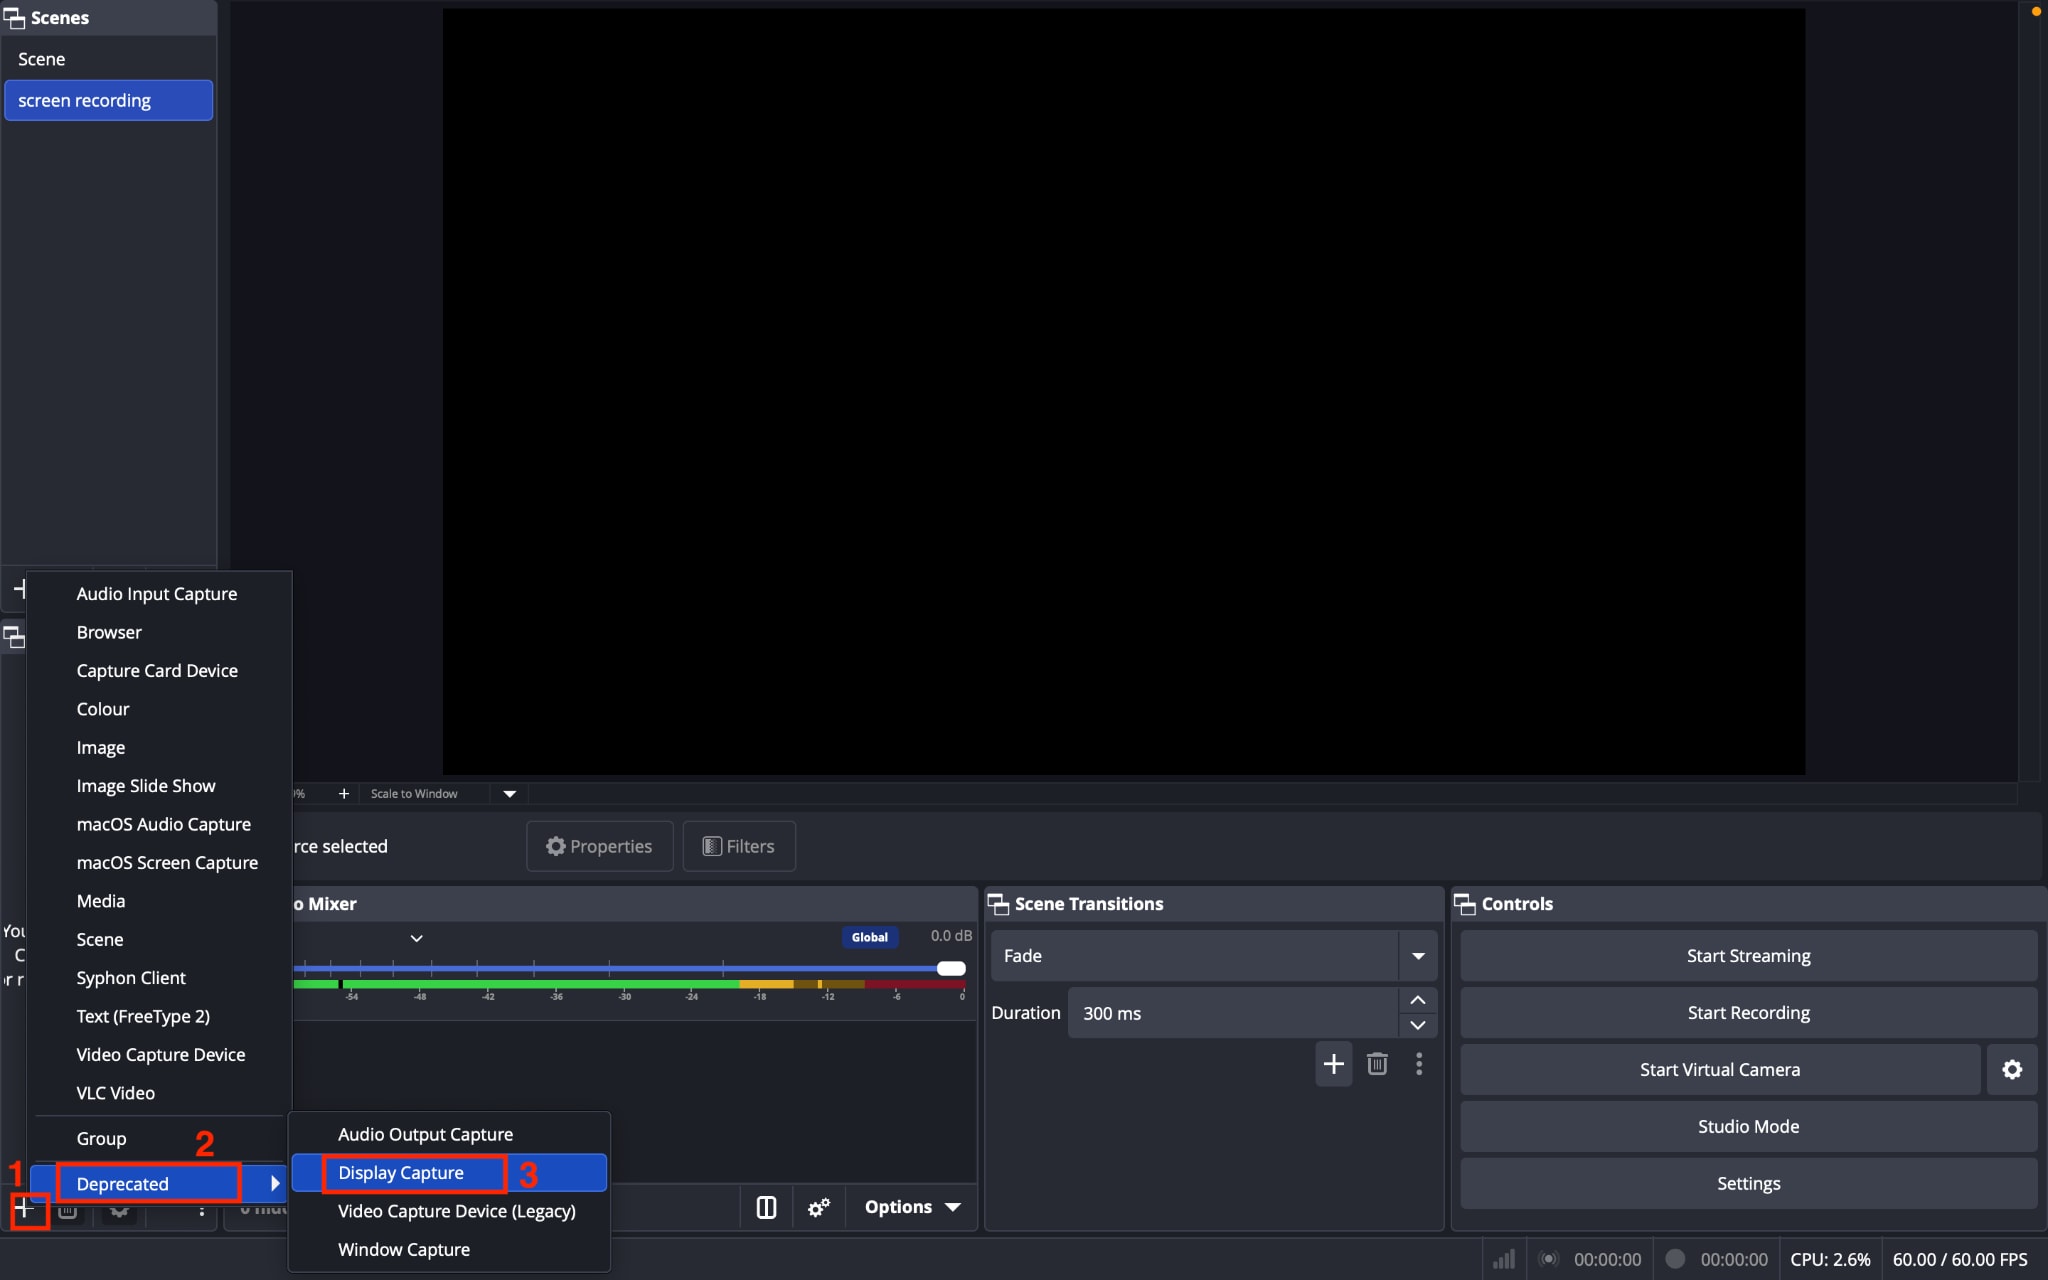
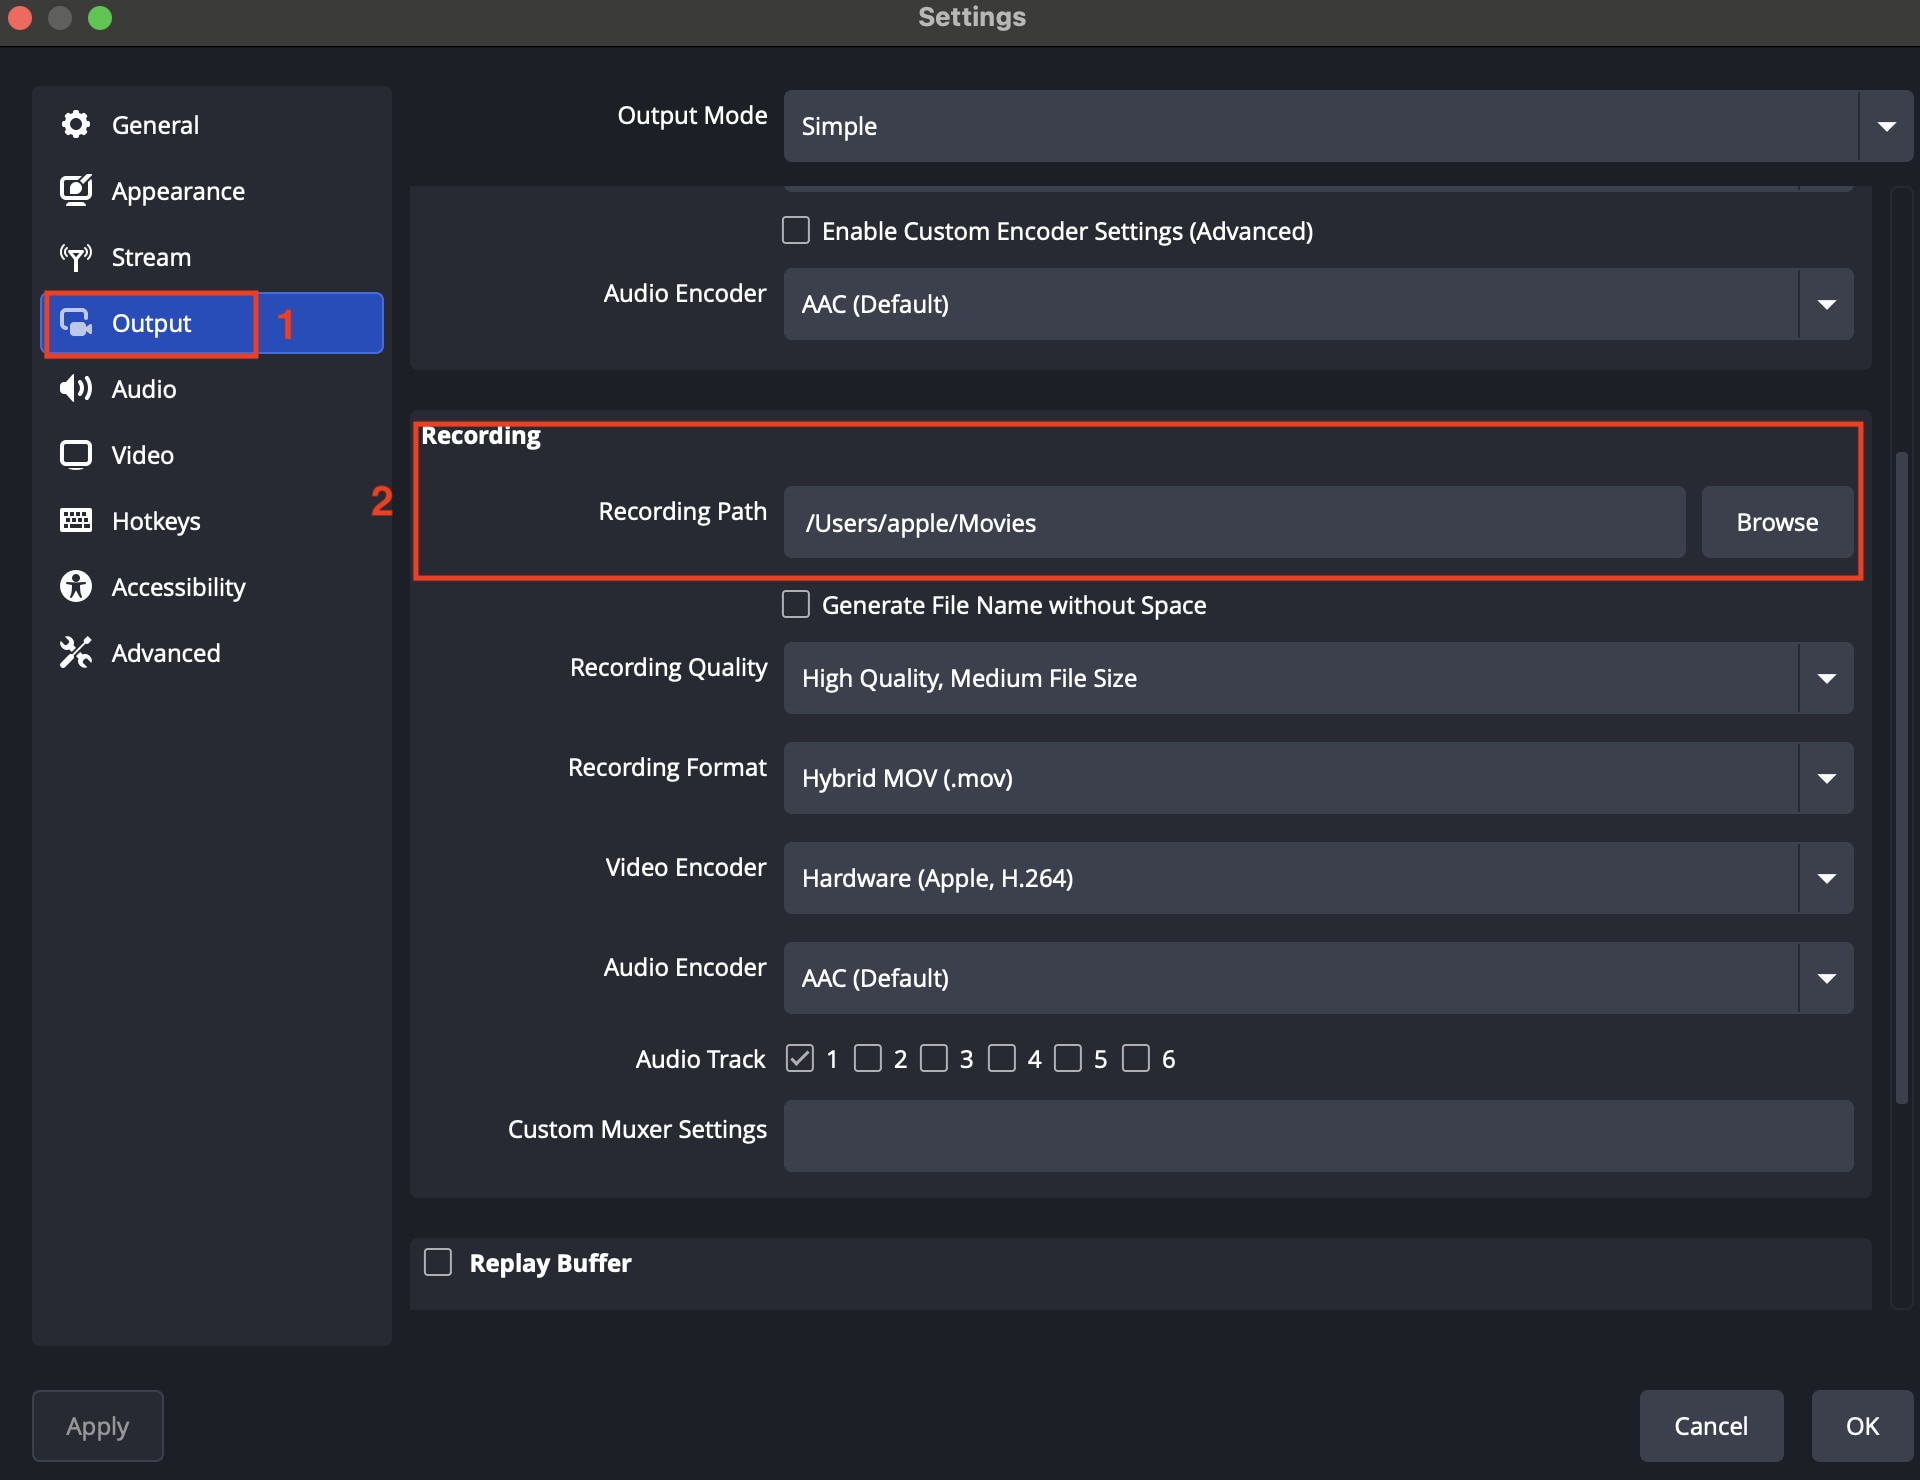
Step 4: Open Settings > Output and choose where you want OBS Studio to save your recordings. You can also select your preferred recording format and quality here.
Step 5: Click Start Recording in the Controls panel.
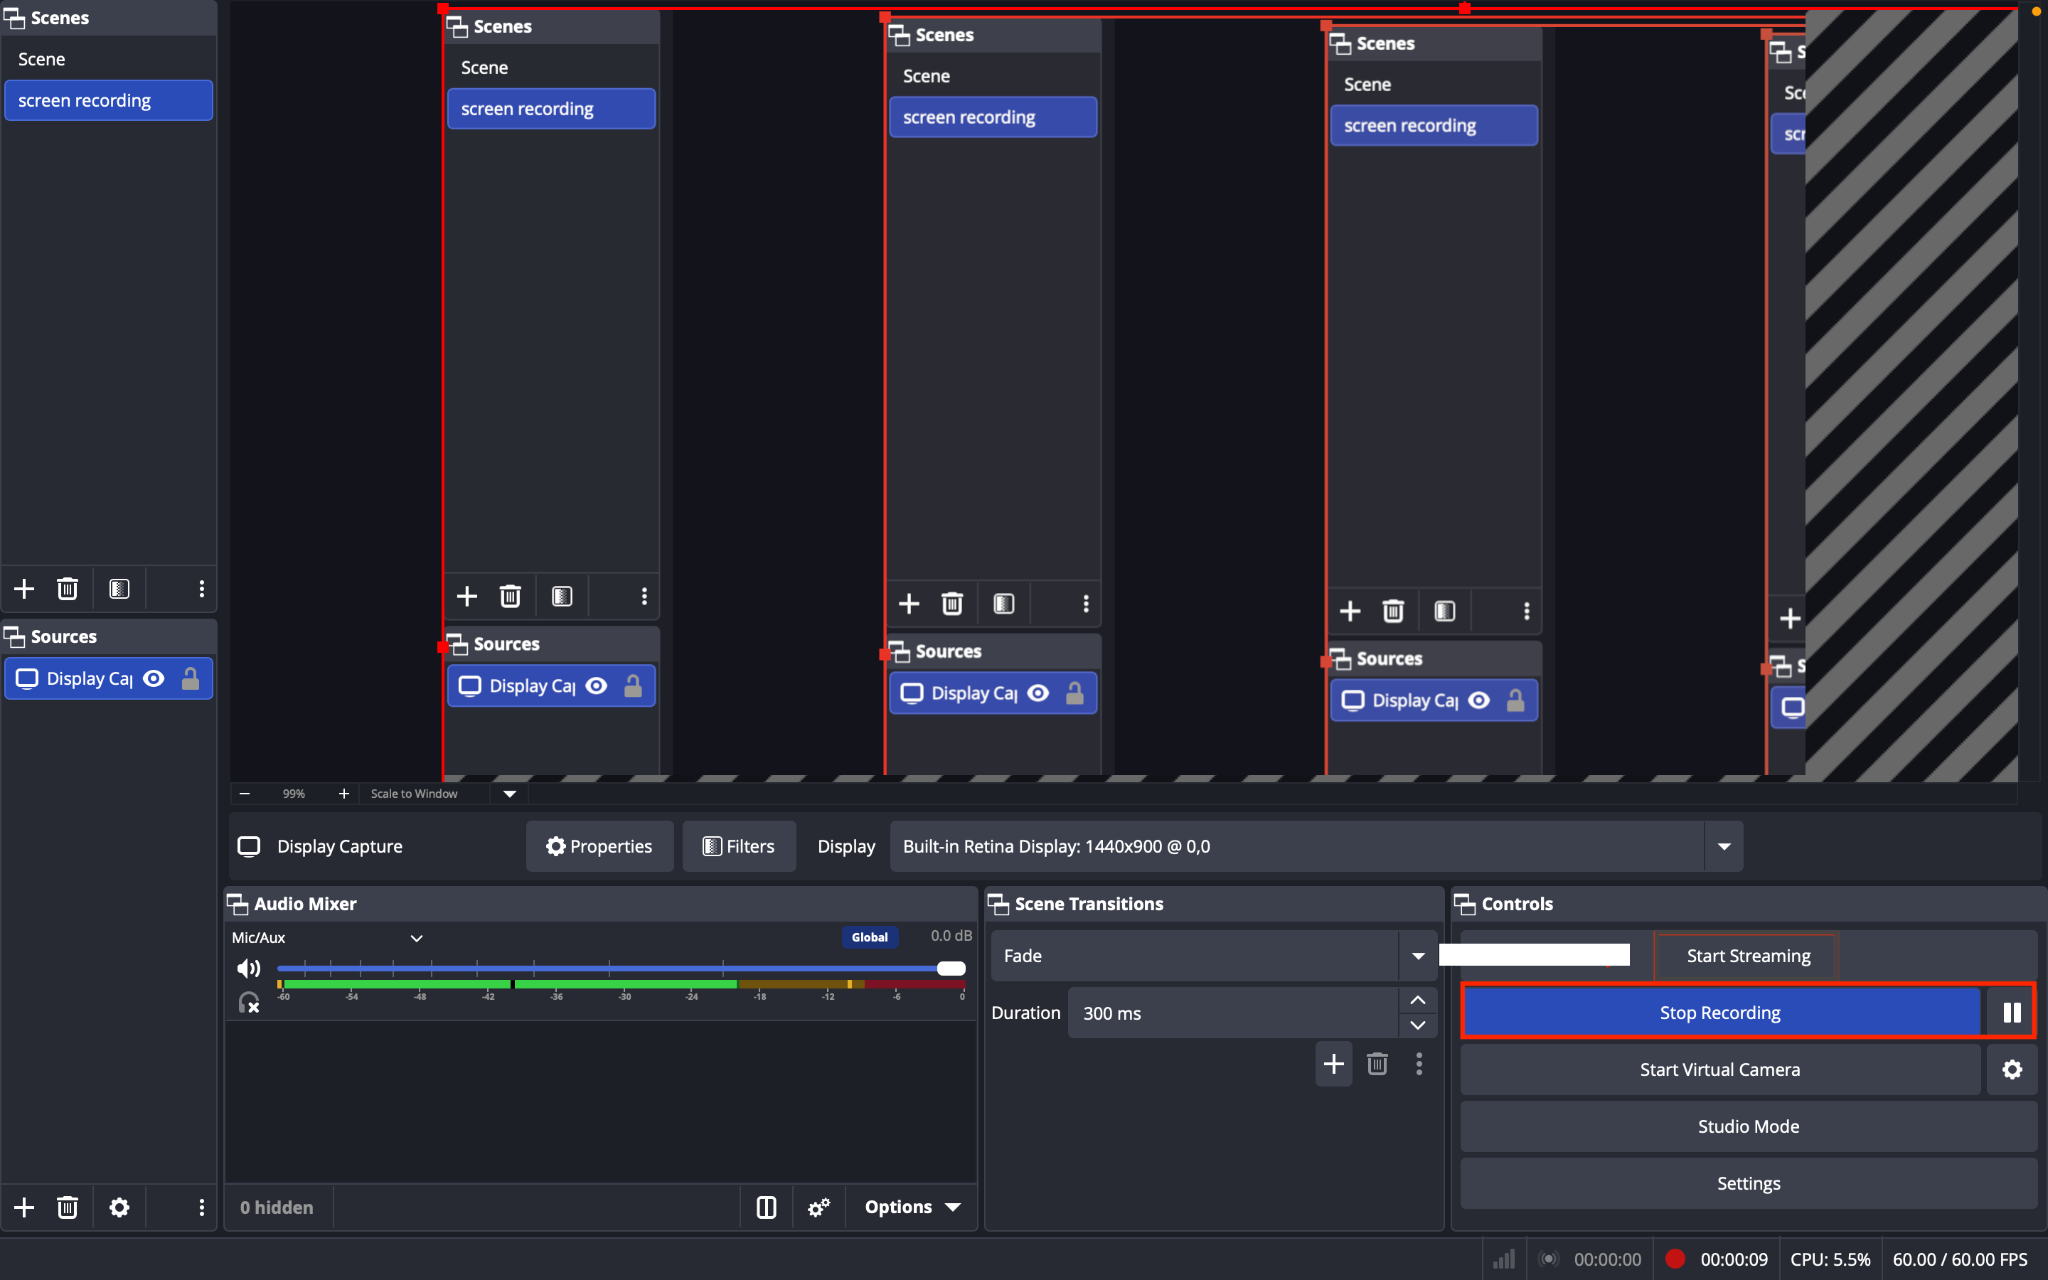
Step 6: When you've finished recording, return to OBS Studio and click Stop Recording.
Tip: If you want to use the same screen recording source across multiple scenes, reuse the existing Display Capture source rather than creating a new one. This helps reduce unnecessary system resource usage.
How to Capture a Game or App Window in OBS Studio?
If you only want to record a specific game or application instead of your entire screen, OBS Studio lets you use Game Capture or Window Capture.
Step 1: Open OBS Studio and create a new Scene, or select the scene where you want to add your game or application.
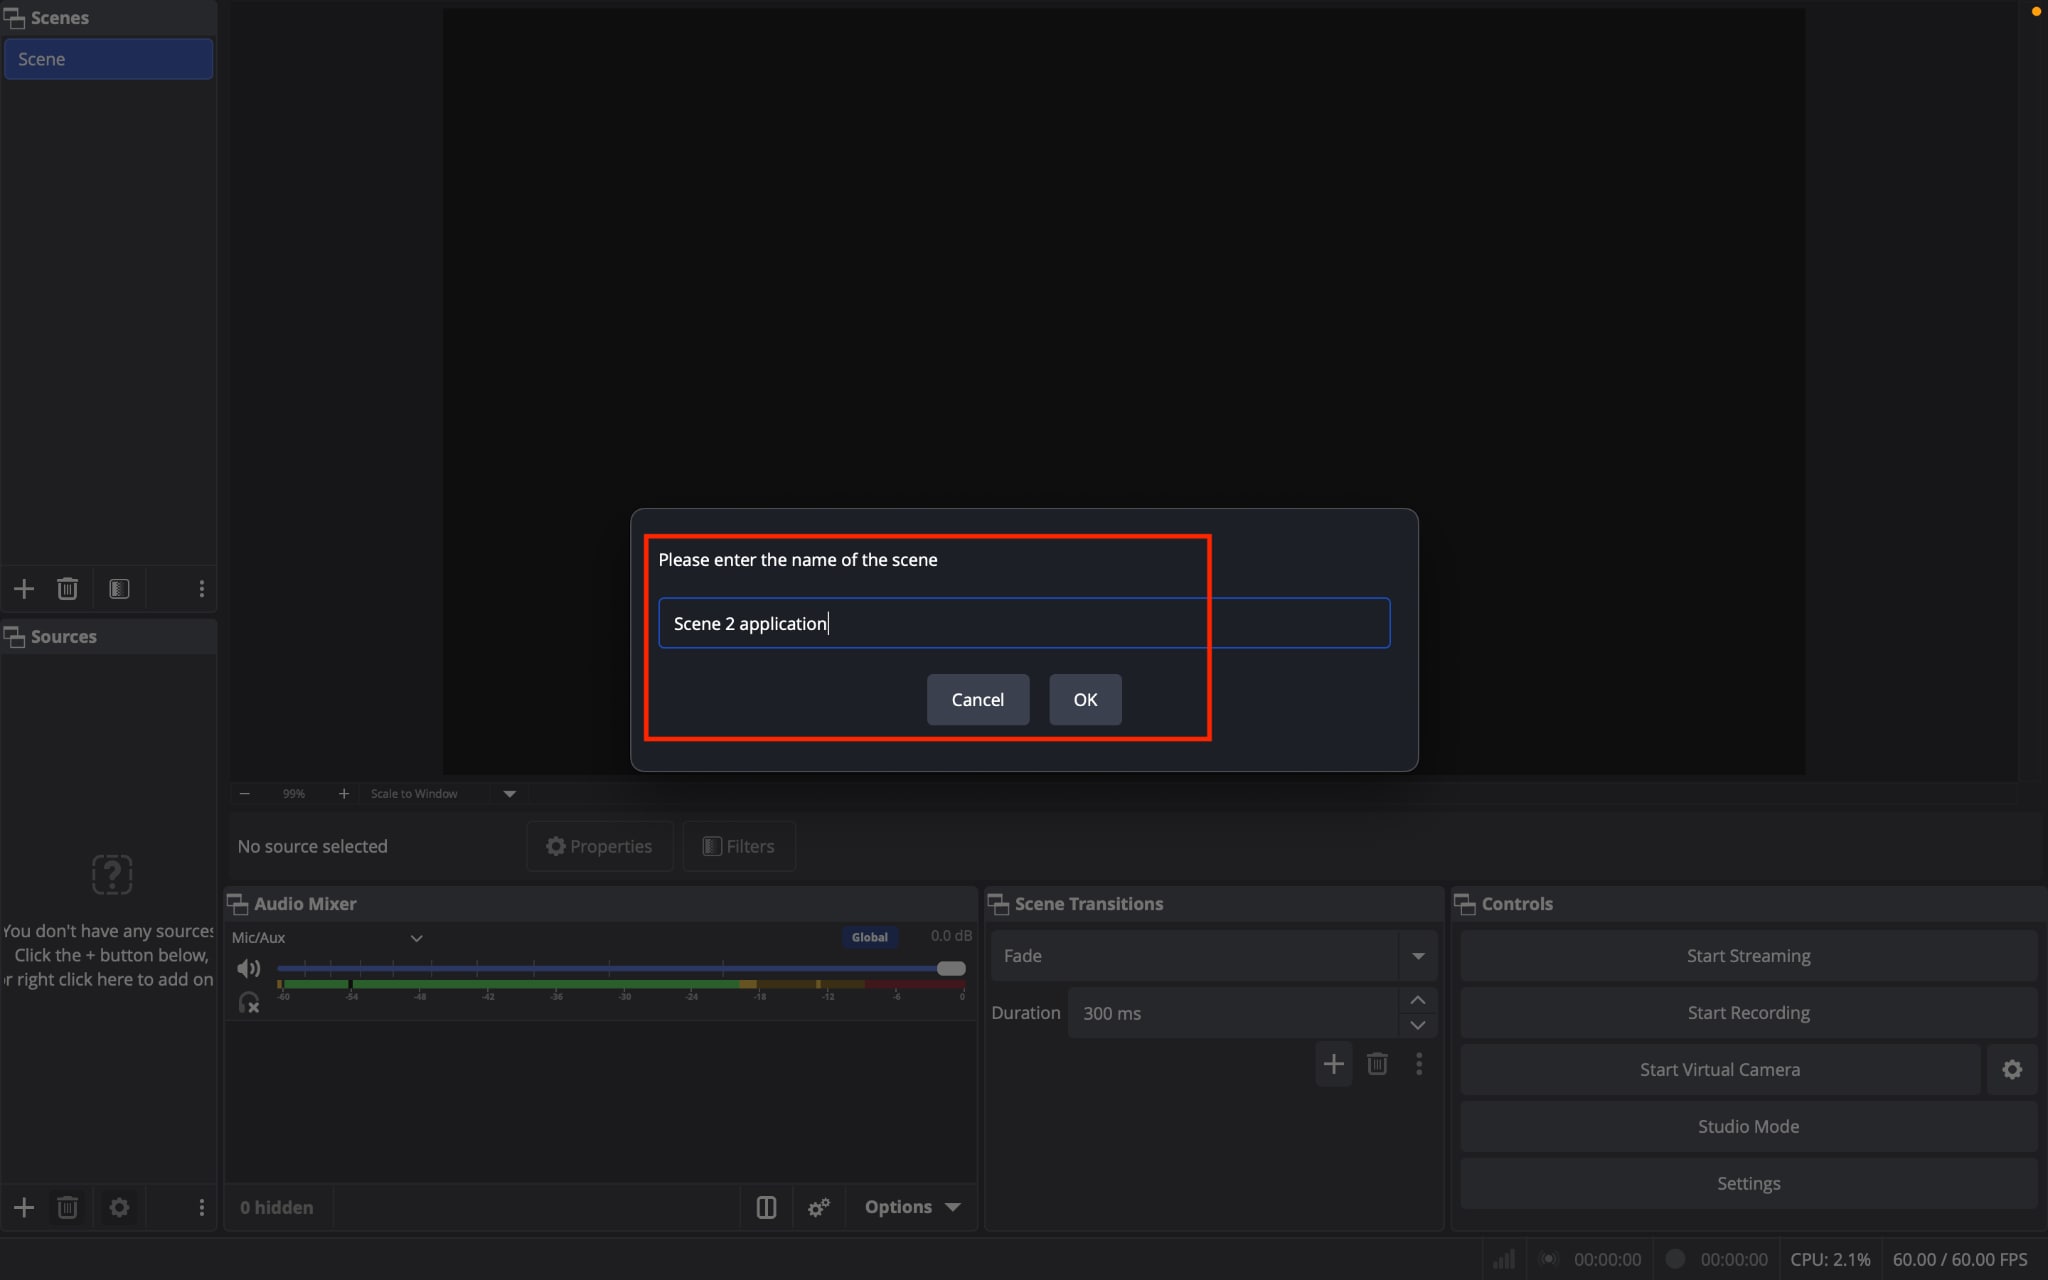
Step 2: In the Sources panel, click the + button to add a new source.
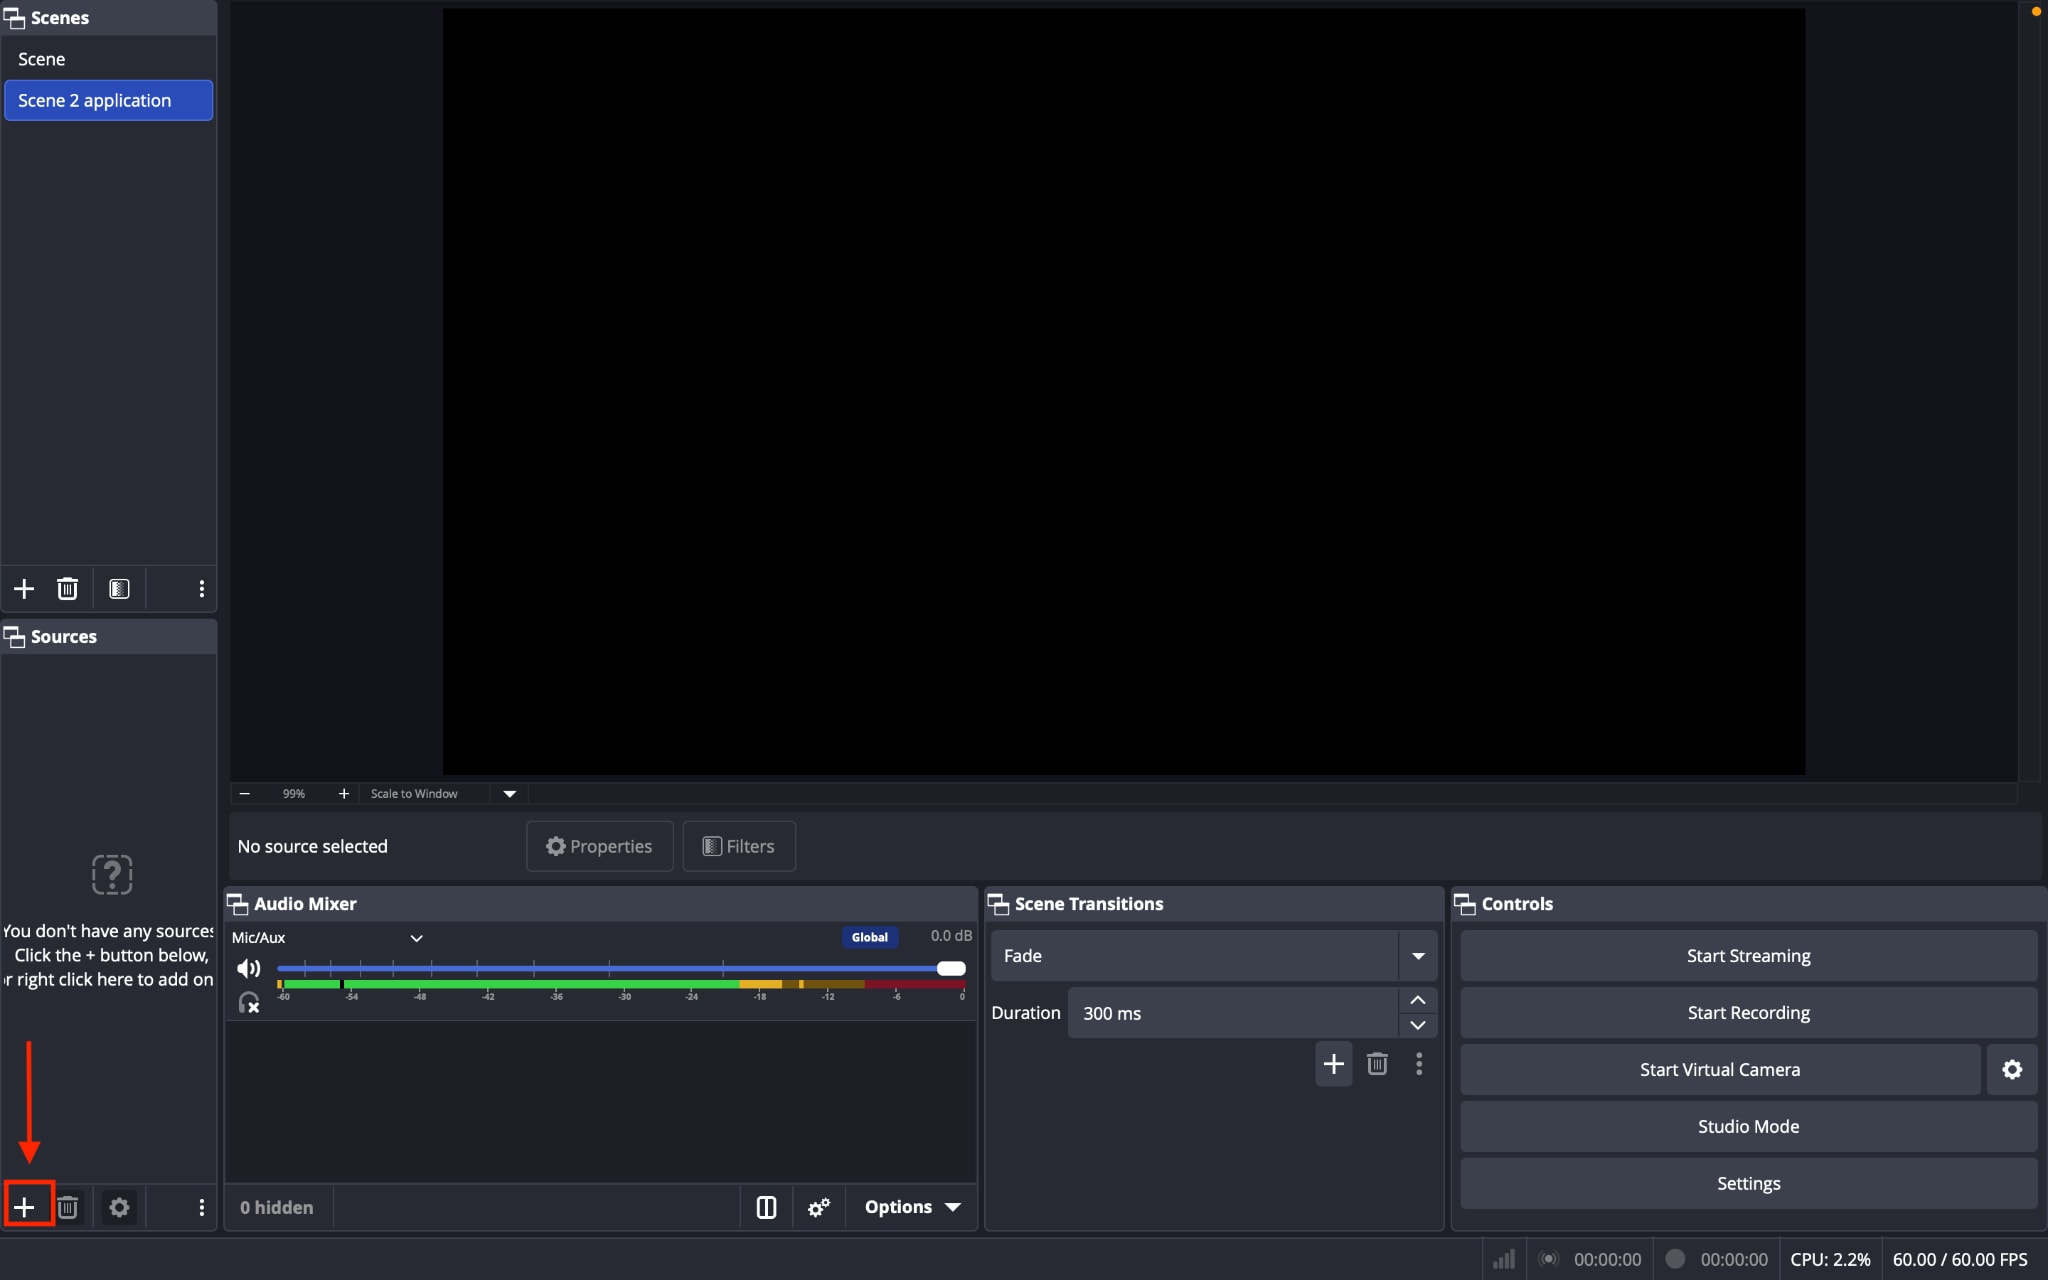
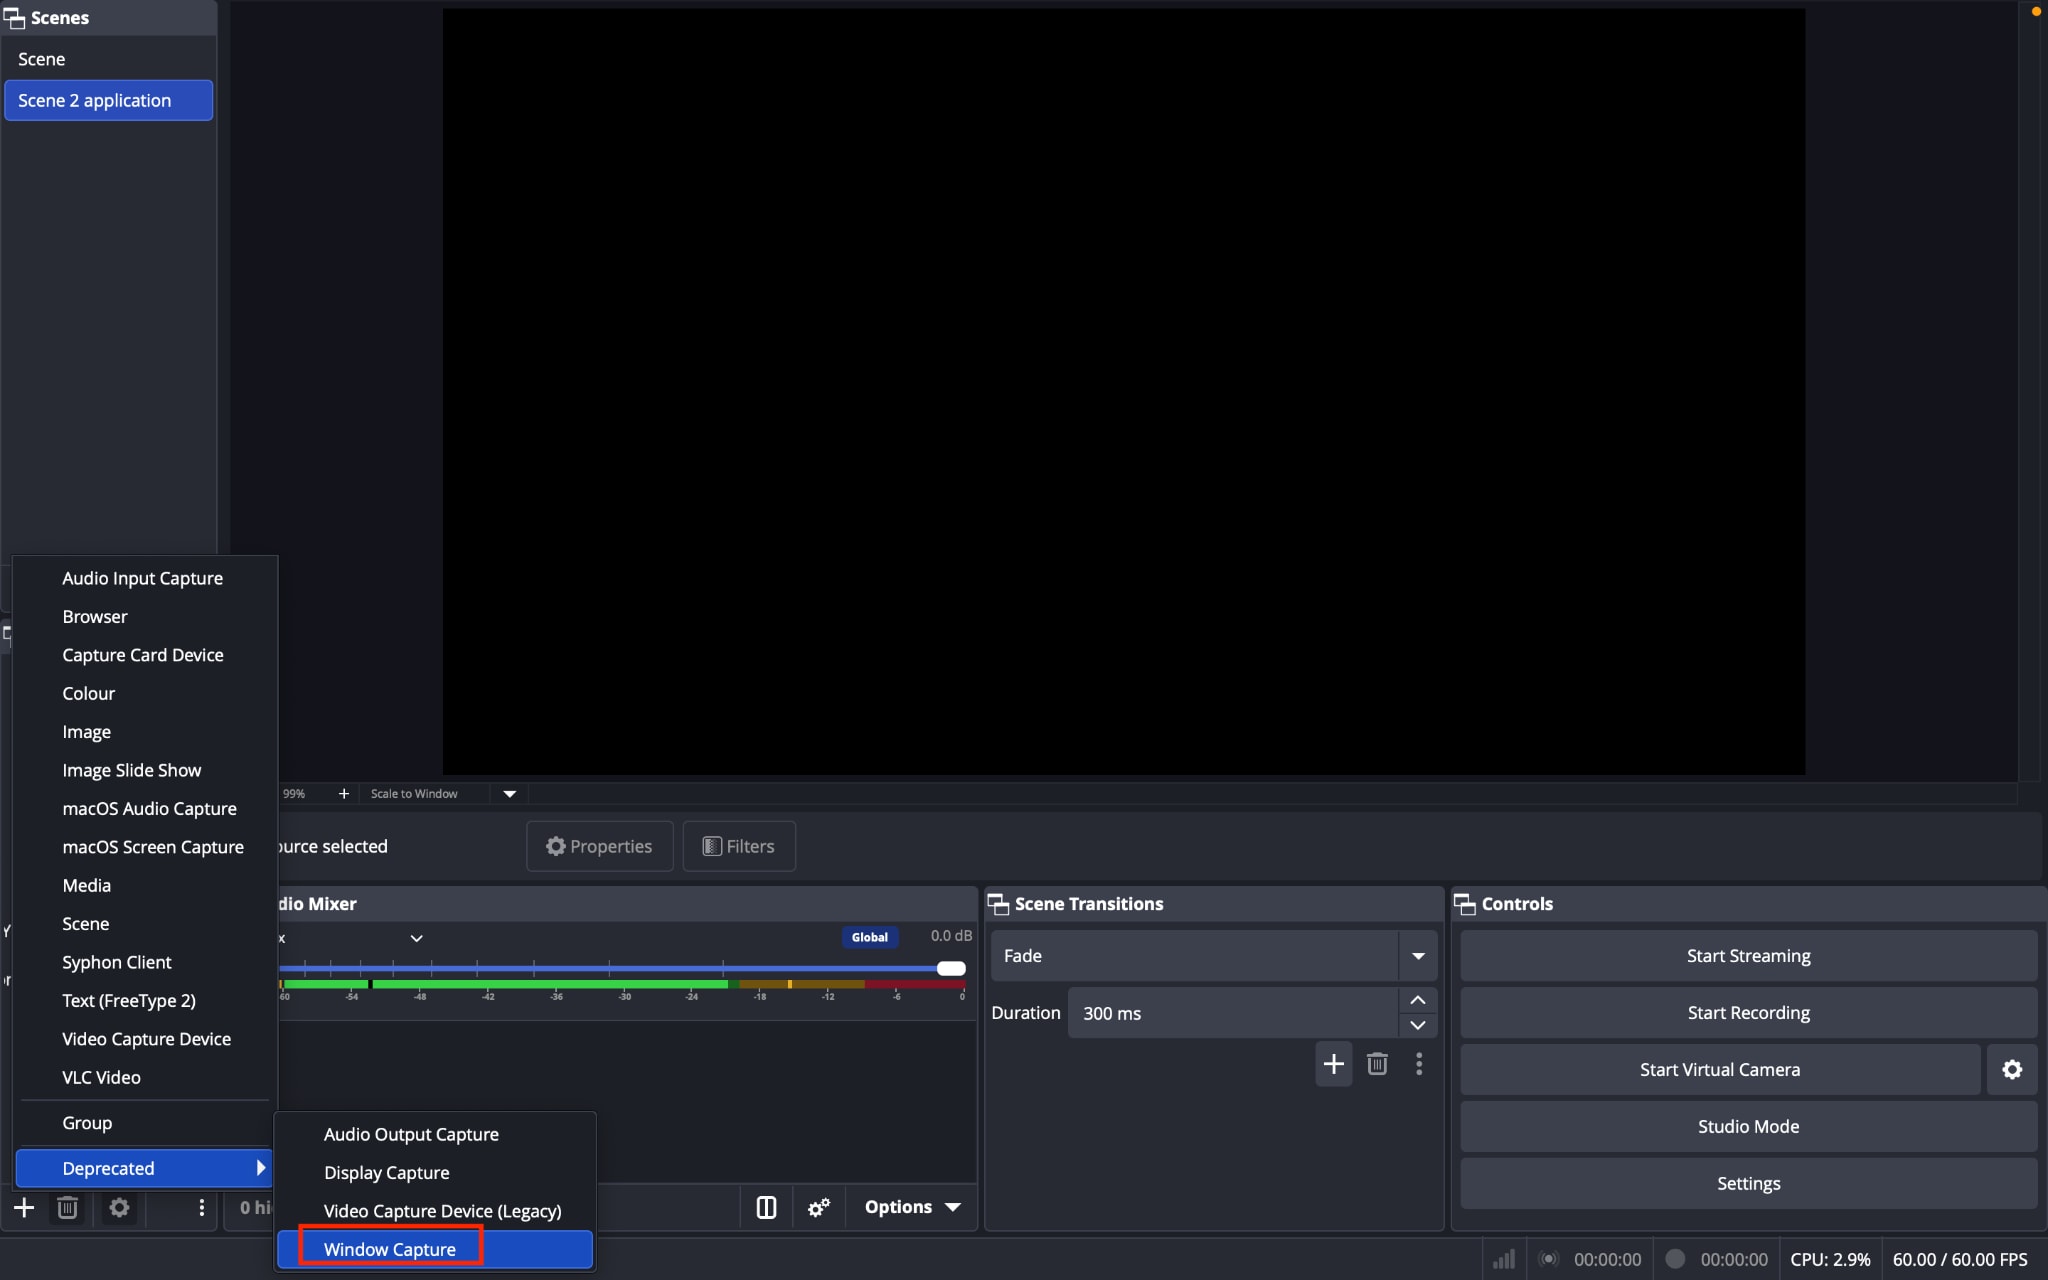
Step 3: Select Game Capture if you're recording a game, or choose Window Capture if you're recording an application such as a browser, or another desktop program.
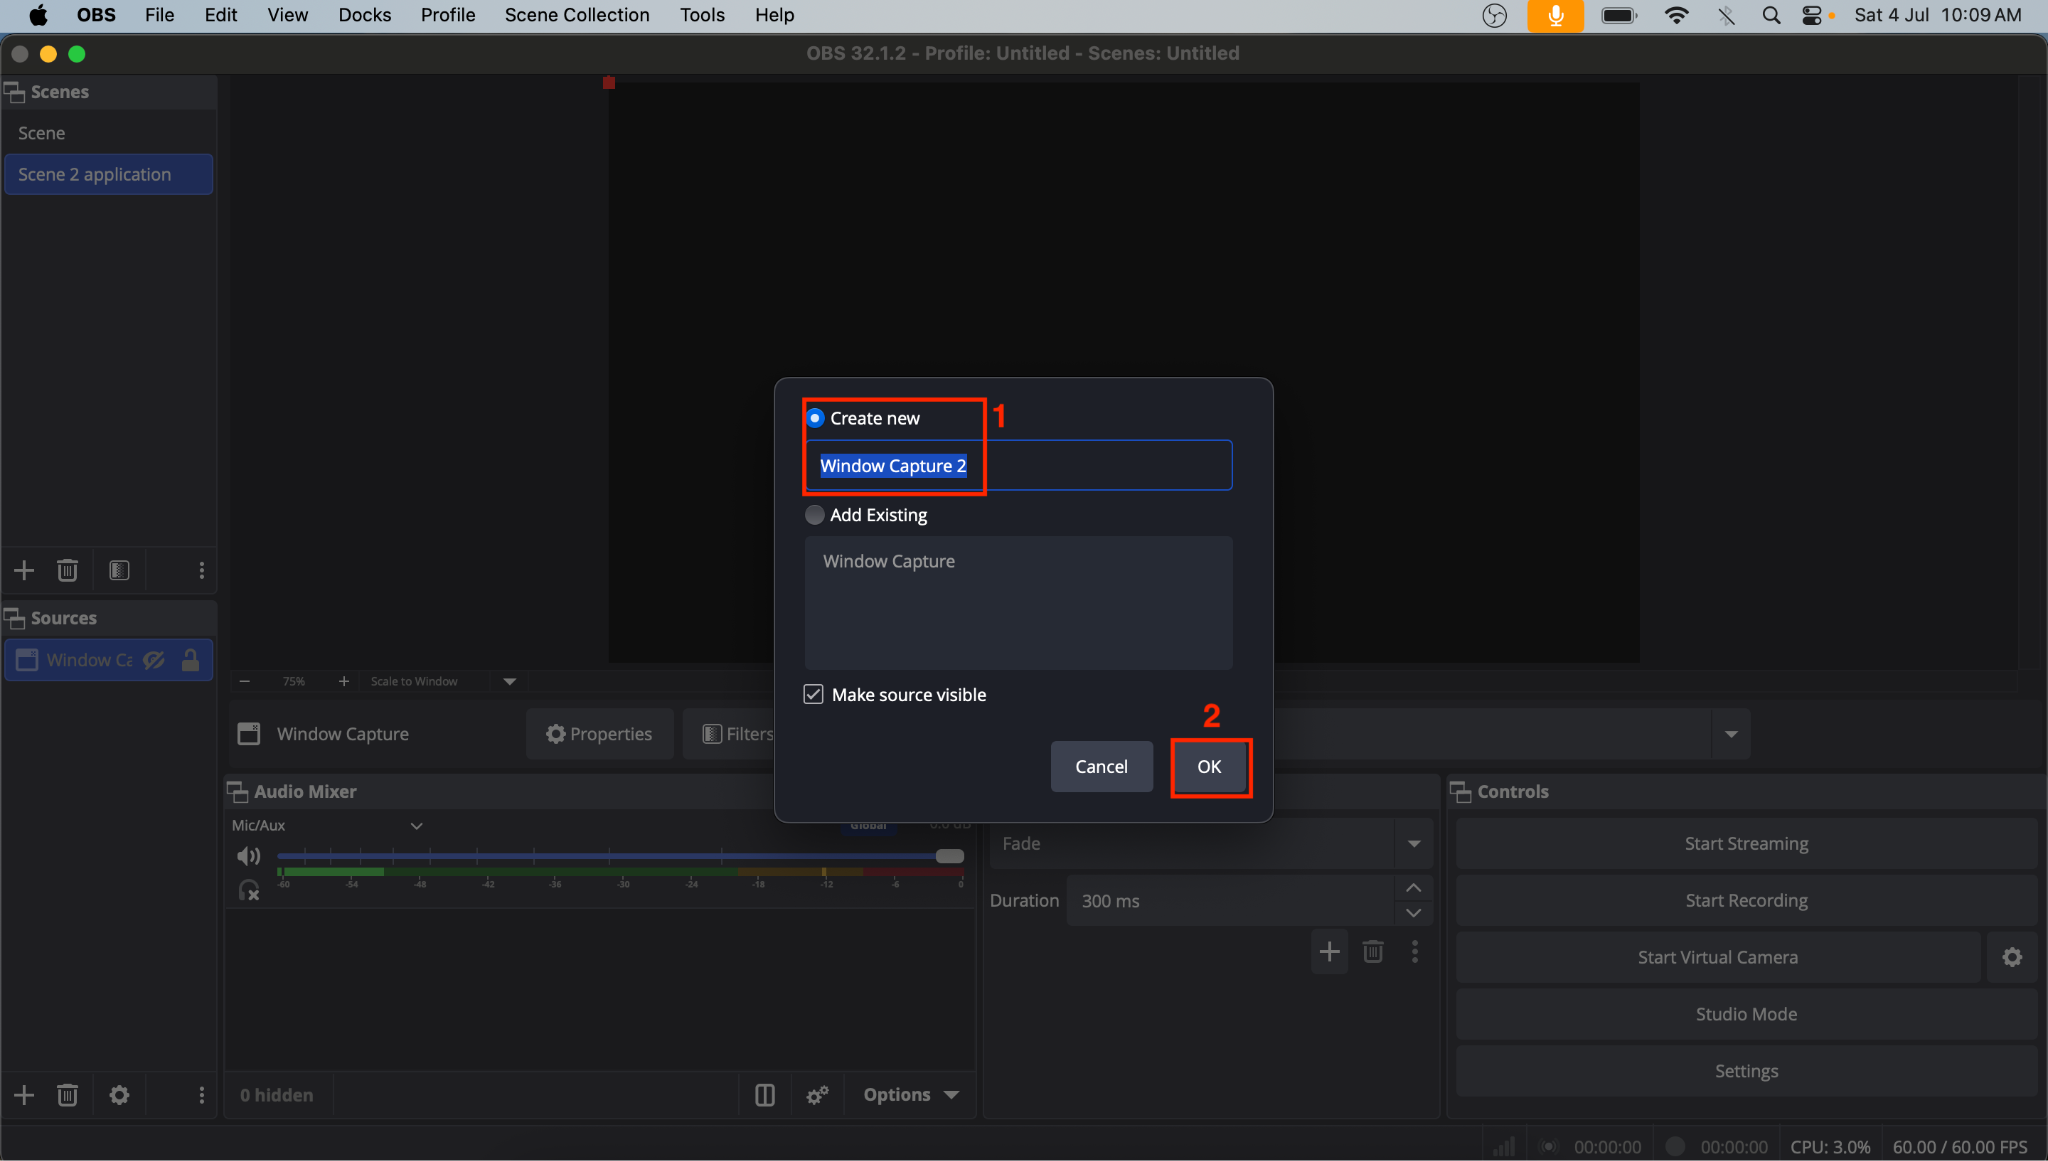
Step 4: Enter a name for the source and click OK.
Step 5: If you're using Game Capture, choose a capture mode:
Capture any full-screen application to automatically detect full-screen games.
Capture a specific window to record one selected game.
Hotkey capture to switch between games using a keyboard shortcut.
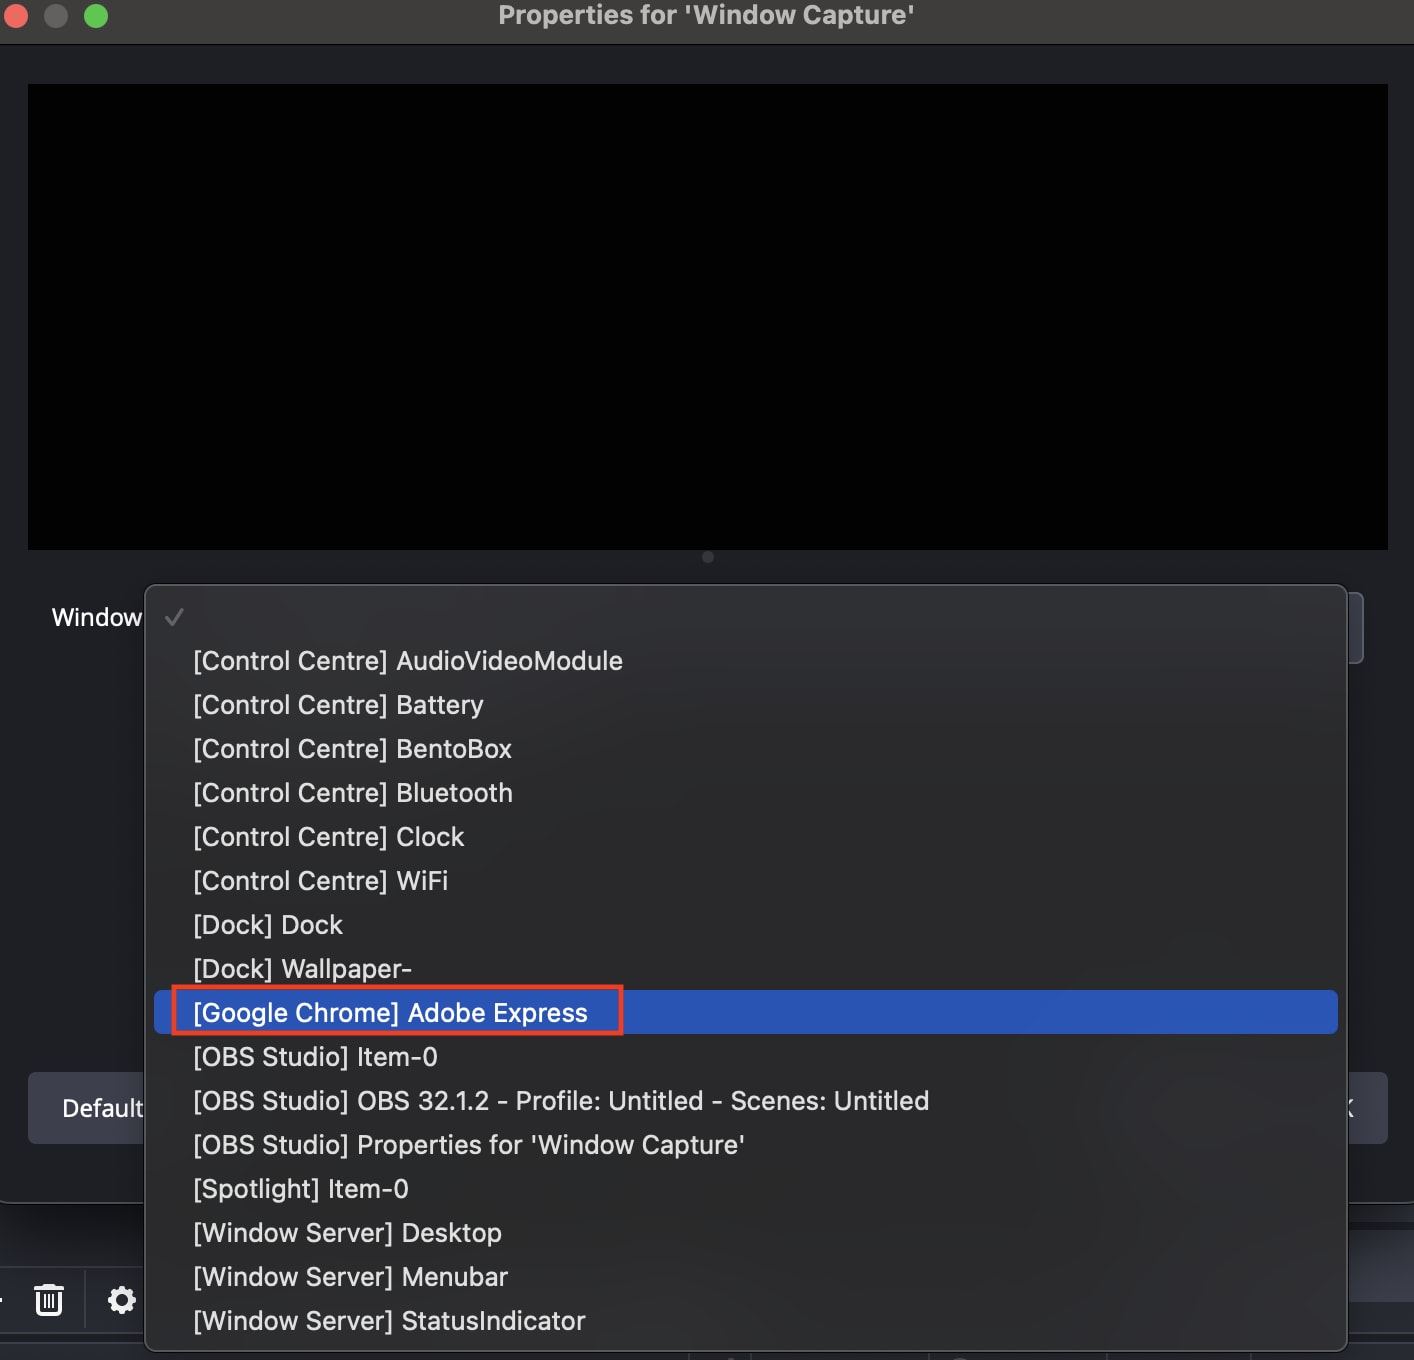
If you're using Window Capture, open the application or browser window you want to record first (for example, Adobe Express in Chrome), then select that window from the Window drop-down menu.
Step 6: Check the preview window to make sure the correct game or application appears.
Step 7: Click Start Recording in the Controls panel before you begin playing your game or demonstrating your application. Once done, click Stop Recording.
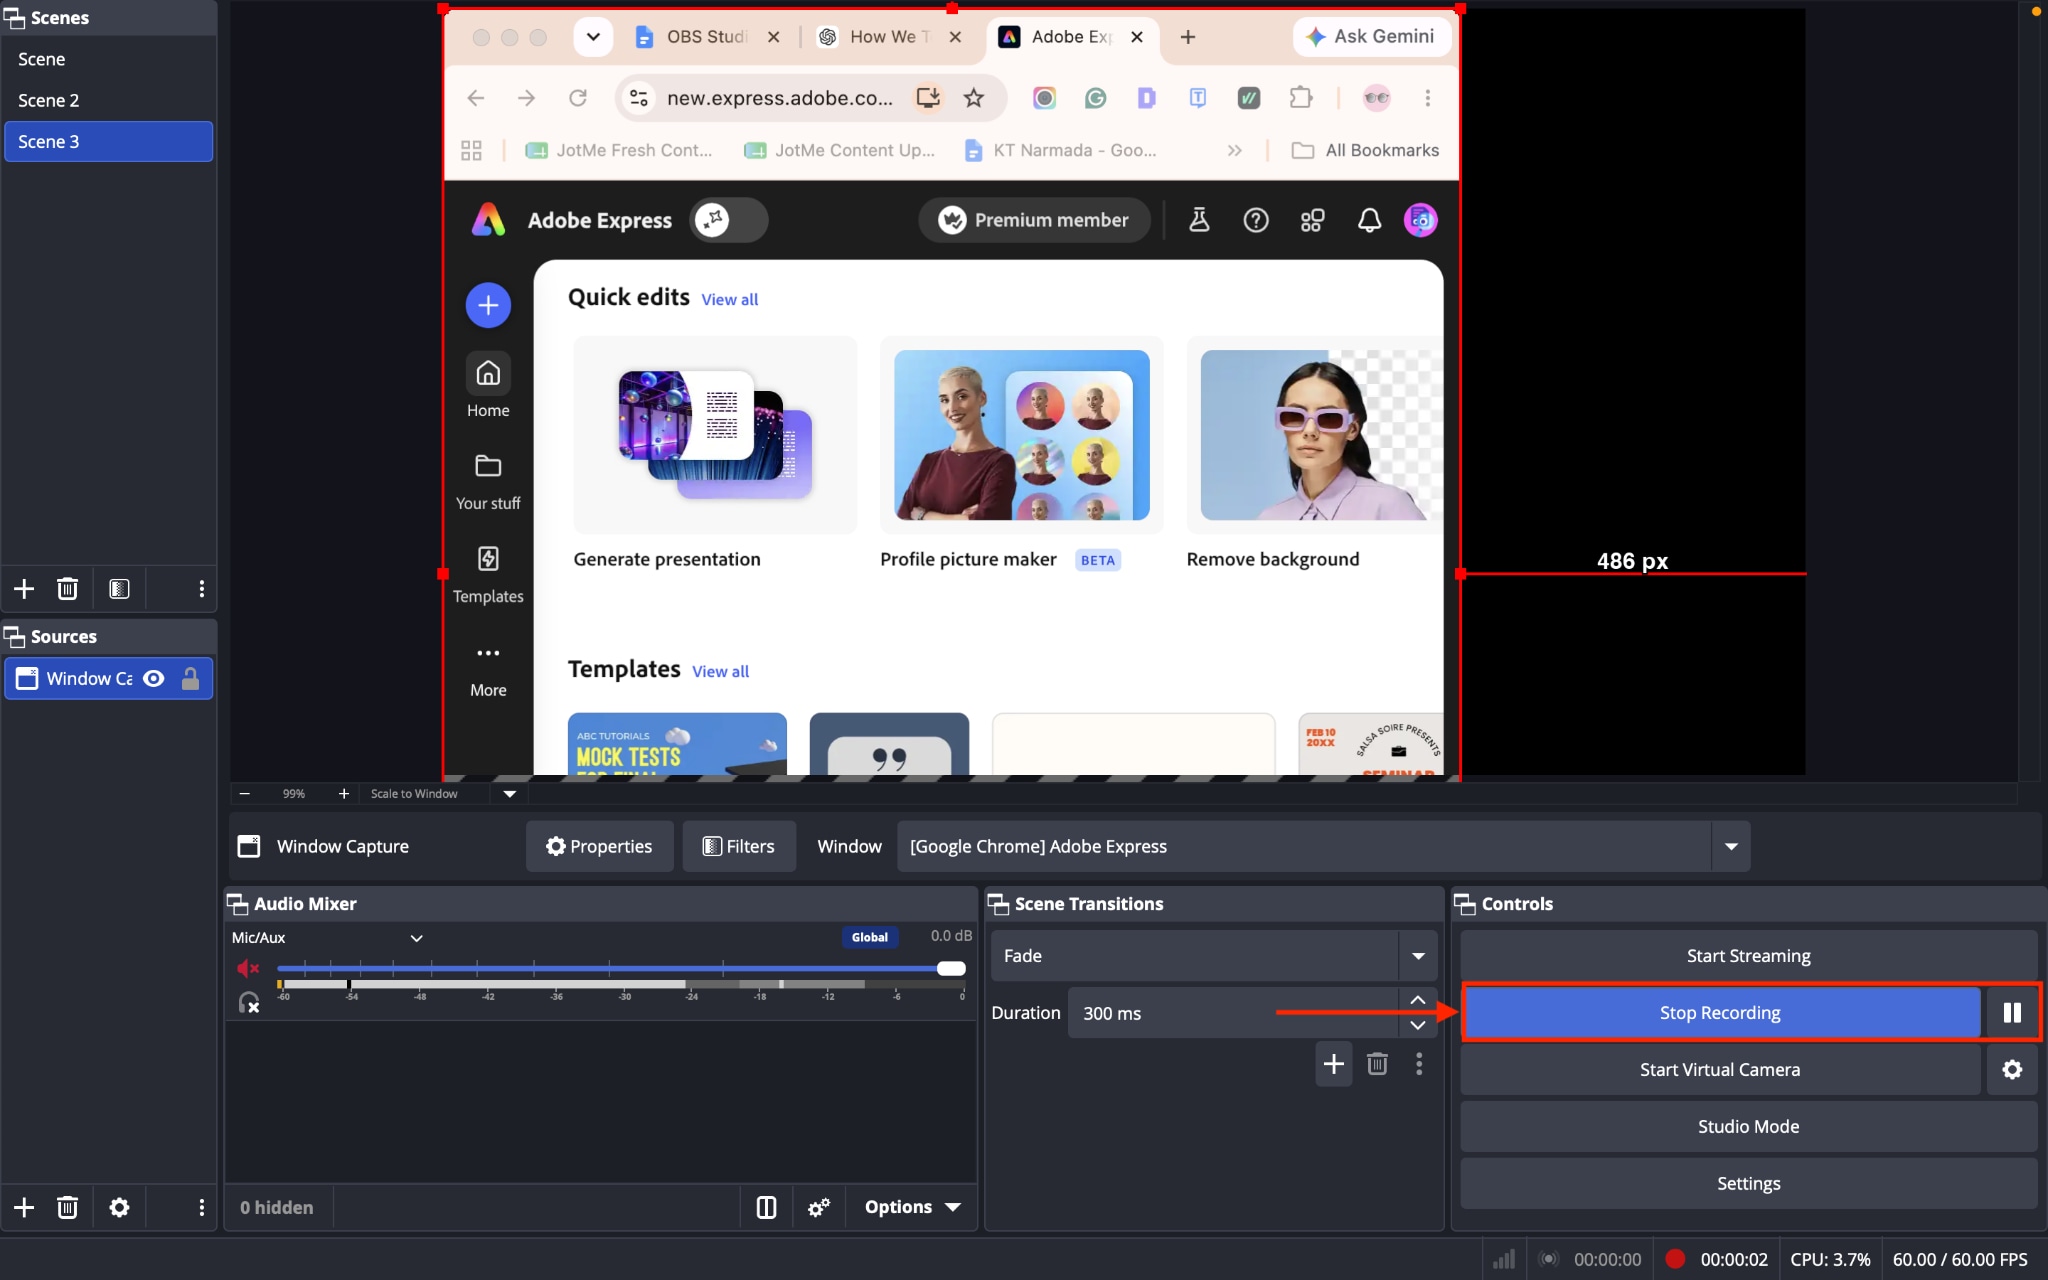
Tip: Use Game Capture whenever possible for better performance. For software tutorials, browser demonstrations, and business applications, Window Capture is usually the more reliable choice.
How to Record Audio While Capturing Screen in OBS?
OBS Studio can record your computer's system audio and your microphone simultaneously, allowing you to capture application sounds while adding your own voiceover.
Step 1: Open OBS Studio and create a new recording scene or select an existing one.
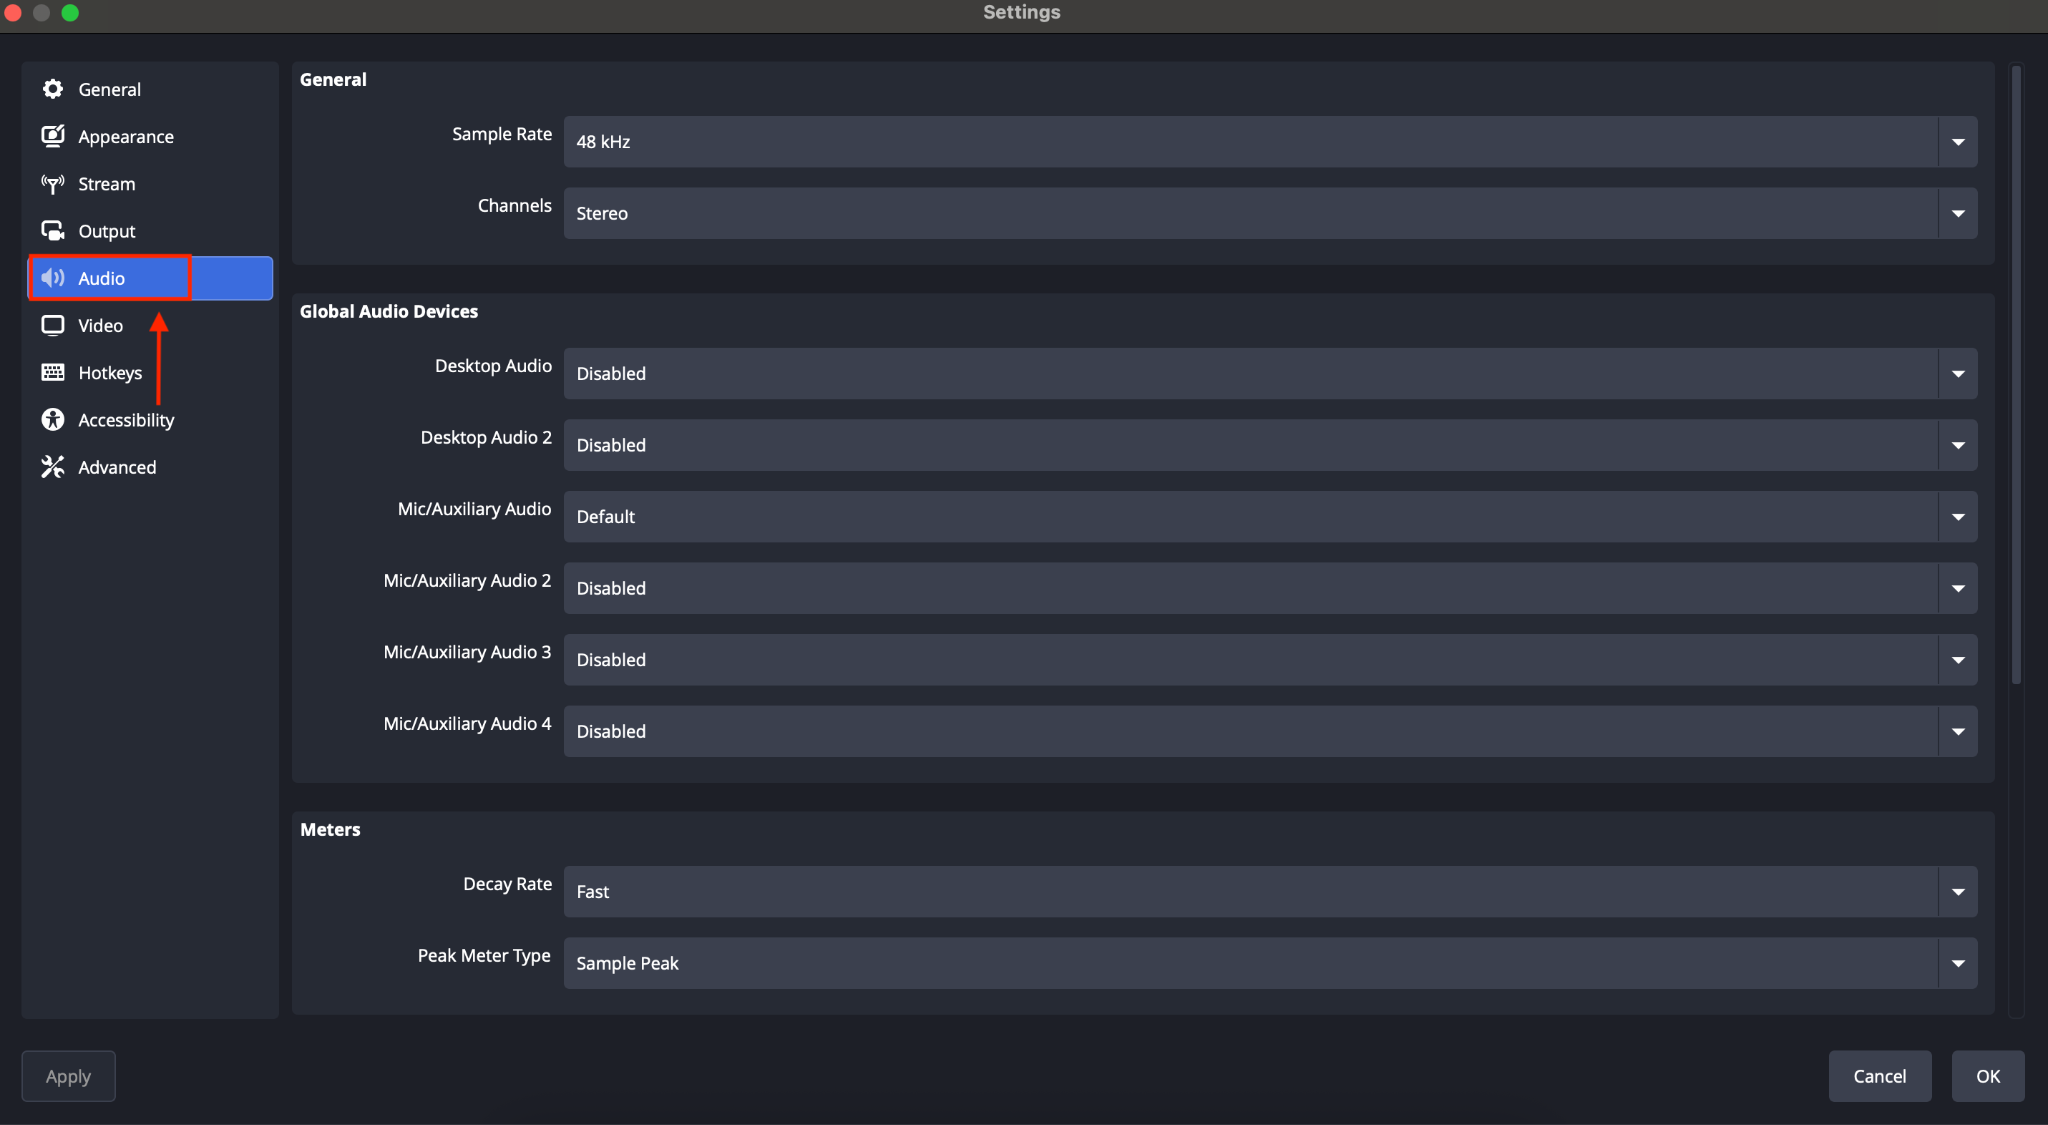
Step 2: Click Settings in the lower-right corner, then open the Audio tab.
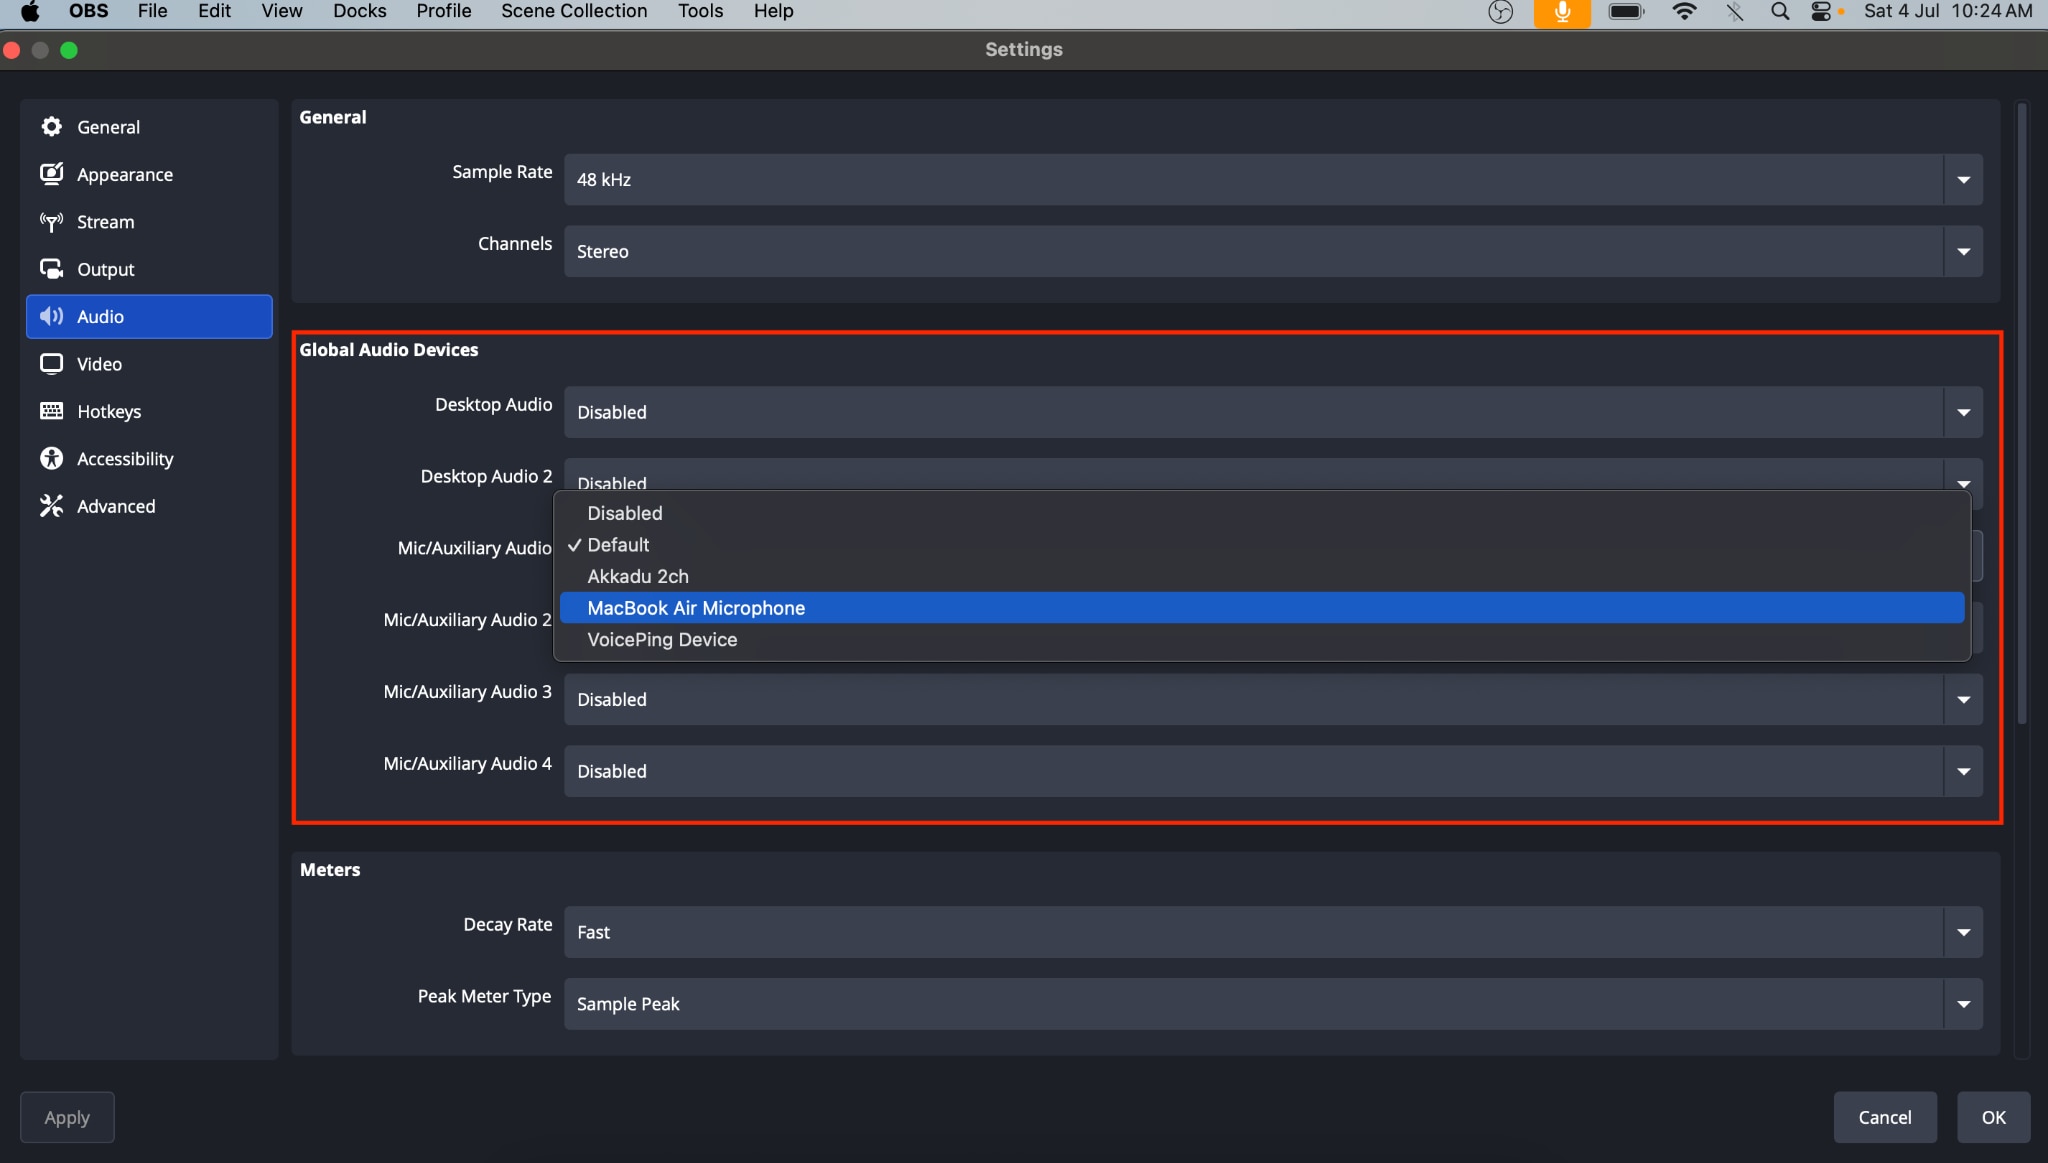
Step 3: Under Desktop Audio, choose the speakers or headphones your computer uses to play sound. Under Mic/Auxiliary Audio, select the microphone you want to use for narration or commentary. Click Apply, then OK to save your audio settings.
Step 5: Play a video or some music and speak into your microphone. Watch the Audio Mixer in the main OBS window.
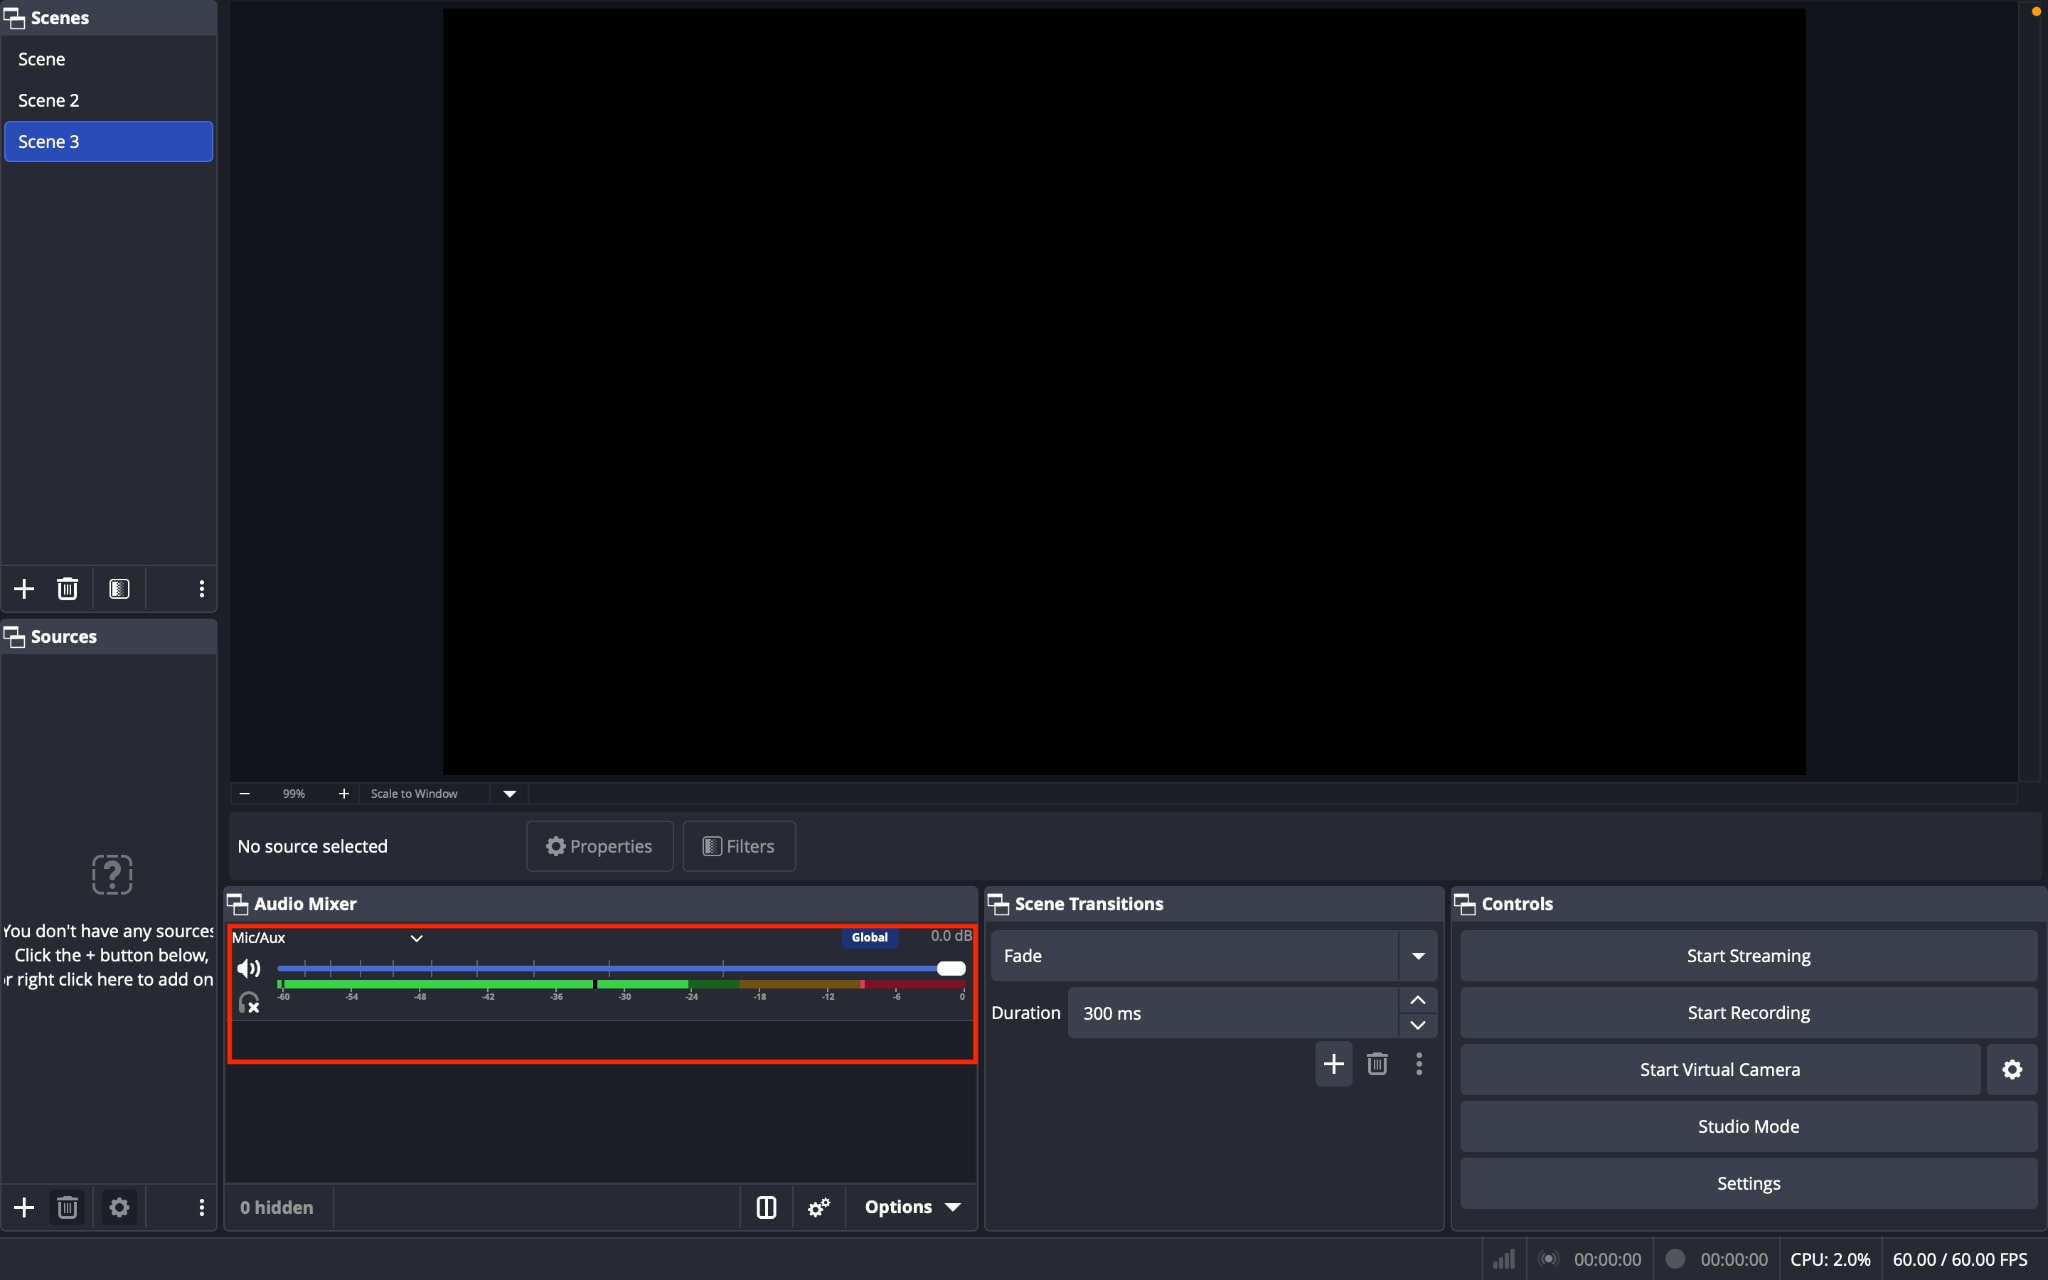
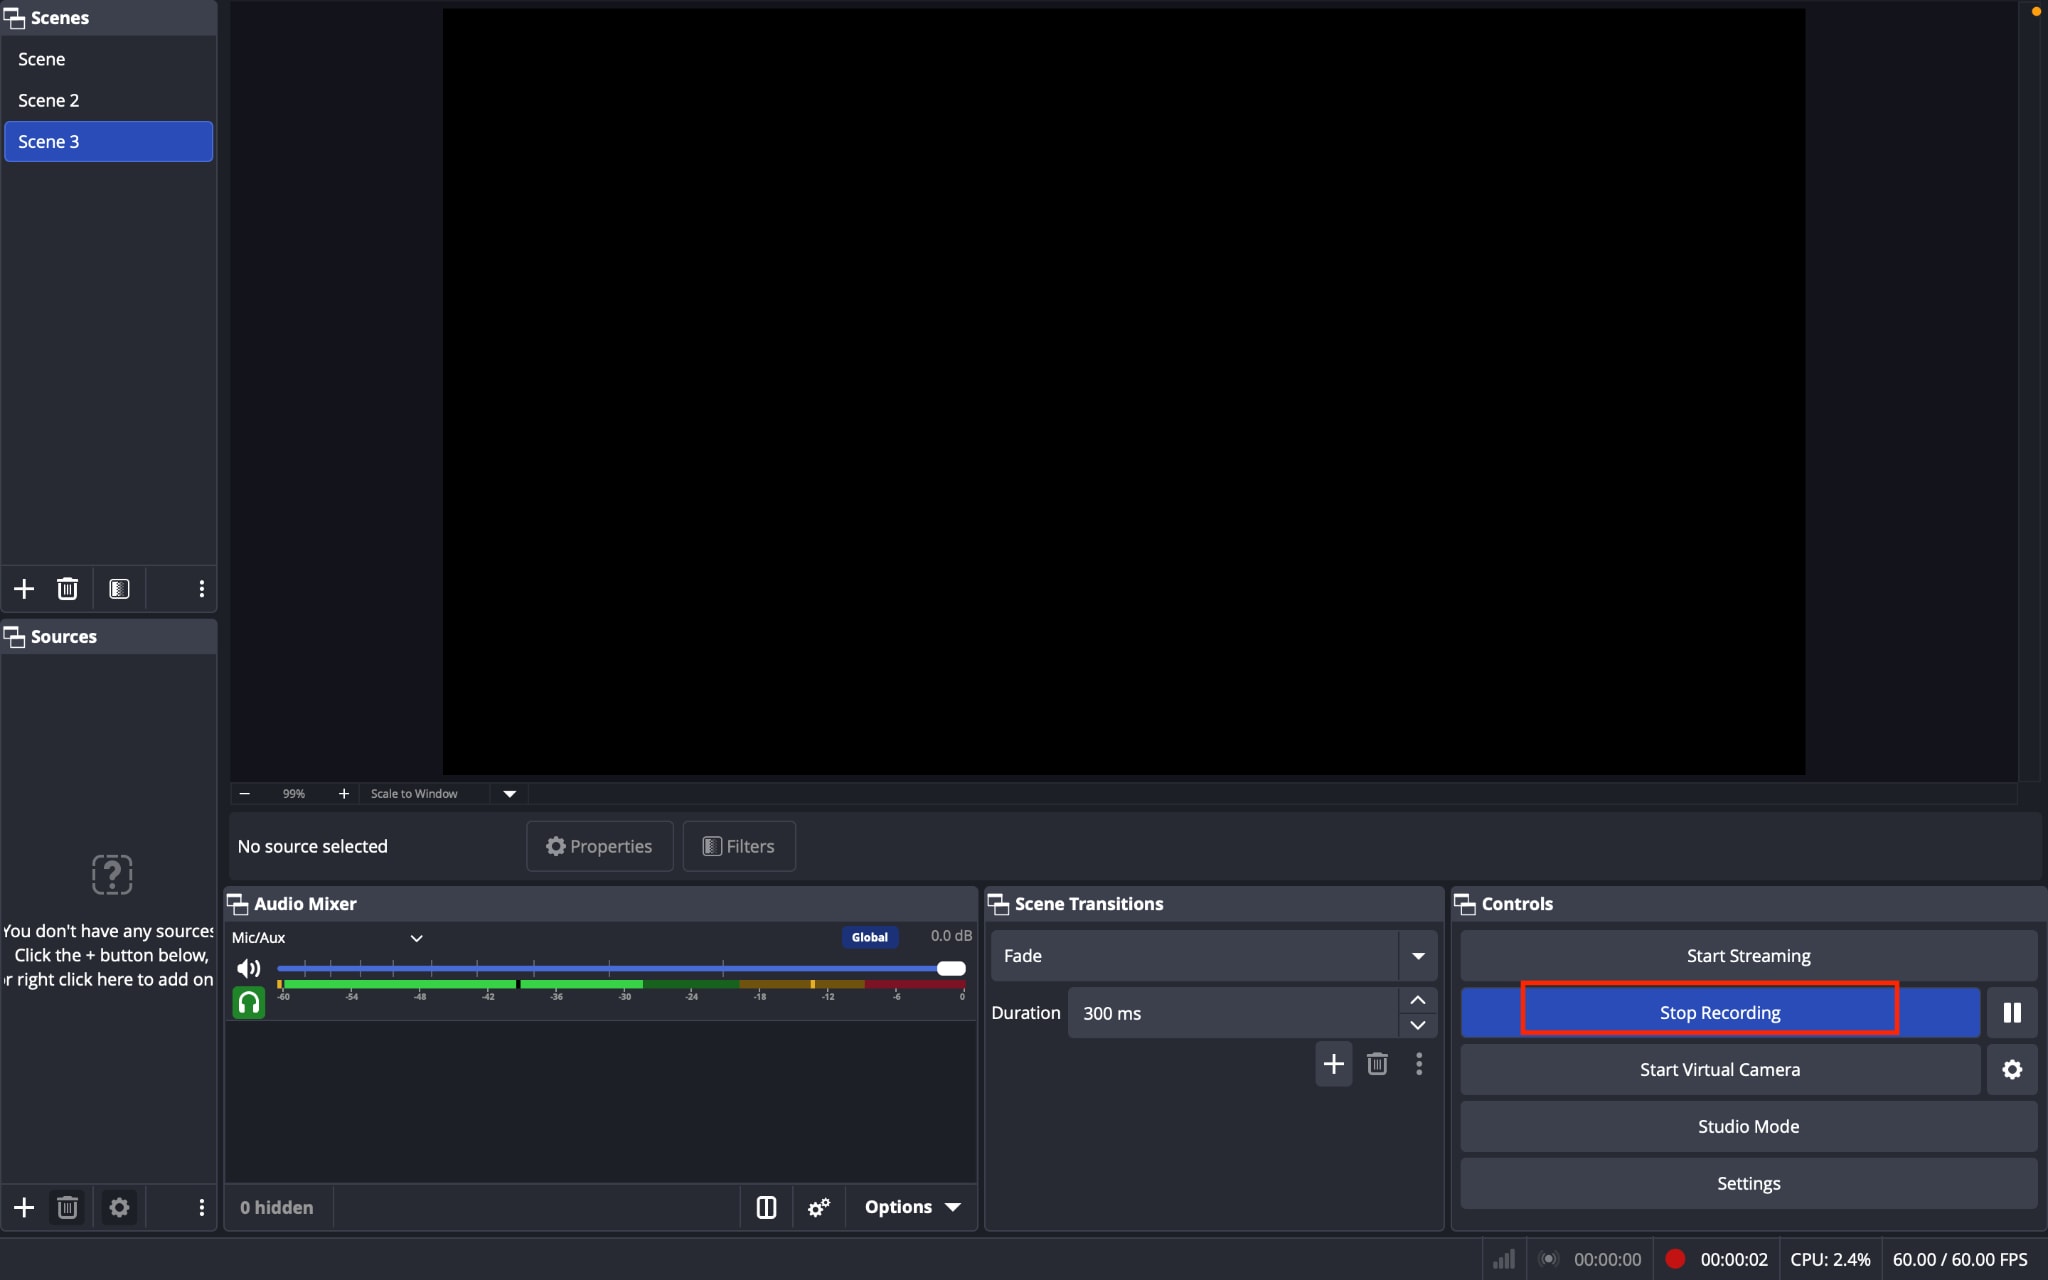
Step 7: Click Start Recording and begin your screen recording. When you're done, click Stop Recording.
Tip: If your voice contains background noise, click the gear icon next to your microphone in the Audio Mixer, select Filters, and add the Noise Suppression filter to improve audio quality.
Part 3: What Are the Best OBS Studio Settings for Screen Recording
The best OBS Studio settings depend on what you are recording. Gaming needs a higher frame rate and a hardware encoder, while tutorials and webinars need consistency over speed. Here is a working starting point for three common use cases:
| Use Case | Resolution | Frame Rate | Encoder | Format | Quality Setting |
| Tutorials & SaaS demos | 1920x1080 | 30 fps | Software (x264) or hardware if available | MKV | High Quality, Medium File Size |
| Gaming highlights & streaming | Native (1920x1080 or higher) | 60 fps | Hardware (NVENC, QSV, or AMF) | MKV | Indistinguishable Quality or High Quality |
| Webinars & meetings | 1280x720 to 1920x1080 | 30 fps | Software (x264) or hardware | MKV | Medium File Size |
Part 4: How Do You Optimize OBS Studio for Low CPU Usage
You optimize OBS Studio for low CPU usage by shifting encoding work to your GPU, capping frame rates, and trimming scene complexity, since CPU load in OBS Studio comes almost entirely from rendering and encoding, not from the recording action itself.
Apply these changes in order if you see "Encoding overloaded" warnings or dropped frames:
Switch to a hardware encoder: NVENC, Quick Sync, or AMF handles encoding on the GPU instead of the CPU, which is the single biggest CPU reduction available.
Cap frame rate to match your monitor: A game running uncapped at several hundred FPS forces your GPU to do unnecessary work that competes with OBS Studio for the same resources. Match the game's frame limiter to your monitor's refresh rate.
Lower resolution: Dropping from 60 fps to 30 fps, or from 1080p to 720p, immediately reduces both rendering and encoding load.
Keep scenes simple: Every source in a scene, visible or not, consumes some resources. Remove unused sources and avoid stacking Game Capture and Display Capture in the same scene.
Turn off heavy filters: Filters like advanced audio processing or complex color correction add CPU or GPU overhead per frame.
Run OBS Studio as administrator on Windows: Some games require this for stable capture, and it can also resolve performance-related capture issues.
Part 5: What Are the Most Common OBS Screen Recording Problems and Fixes
Most OBS Studio problems trace back to one of five causes: an overloaded encoder, a capture conflict, a missing audio device, an interrupted recording, or a CPU bottleneck. Here is how to diagnose and fix each one.
| Problem | Likely Cause | Fix |
| "Encoding overloaded" warning or dropped frames | GPU or CPU cannot keep up with rendering and encoding at the same time | Cap the game's frame rate to your monitor's refresh rate, or lower the resolution and FPS |
| Black screen with Game Capture | Game running in exclusive fullscreen, missing admin rights, or a laptop defaulting to the wrong GPU | Run OBS Studio as administrator, switch the game to borderless or windowed fullscreen, and set OBS Studio and the game to use the same high-performance GPU |
| No audio in the recording | Wrong audio device selected, or desktop audio routed incorrectly | Open Settings, then Audio, and manually select your microphone and desktop audio device, then confirm that the Audio Mixer meters move |
| Corrupted or unplayable file after a crash | Recording directly to MP4, which needs to finalize file metadata only at the very end | Record to MKV and either remux through File, Remux Recordings, or enable Automatically remux to MP4 under Advanced settings |
| High CPU usage while gaming and recording together | Software encoder (x264) competing with the game for the same CPU cores | Switch to a hardware encoder such as NVENC, Quick Sync, or AMF |
Part 6: What Is OBS Studio Screen Recorder Best Used For
OBS Studio is a powerful screen recorder for users who need high-quality recordings, multi-source capture, and live streaming. It works especially well for content creators, educators, gamers, and businesses that need flexible recording options.
| Use Case | Why OBS Studio Works Well |
| Gameplay Recording | Uses Game Capture for high-performance recording with support for 1080p and 4K gameplay. |
| Live Streaming | Streams directly to platforms like Twitch, YouTube, and Facebook Live with customizable scenes. |
| Tutorial Videos | Record your screen, webcam, microphone, and system audio simultaneously for instructional content. |
| Software & SaaS Demos | Window Capture records only the selected application, keeping your desktop private. |
| Webinars & Online Meetings | Captures presentations, meetings, and webinars with both a microphone and system audio. |
| Educational Content | Ideal for recording online classes, lectures, training videos, and presentations. |
| Product Reviews & YouTube Videos | Supports webcam overlays, transitions, and multiple scenes for professional-looking videos. |
Limitations of OBS Screen Recorder
| Limitation | What It Means |
| No built-in video editor | You'll need another application to trim, edit, or add subtitles after recording. |
| No advanced video conversion | OBS only remuxes recordings (such as MKV to MP4) and doesn't offer full format conversion. |
| Steeper learning curve | Scenes, sources, and encoder settings can be overwhelming for beginners. |
Part 7: Why Use Wondershare UniConverter Instead of Editing OBS Recordings
All-in-One Multimedia Processing Tool

You avoid an extra editing step by using Wondershare UniConverter instead of OBS Studio, because UniConverter combines screen recording, video editing, and format conversion in one application, while OBS Studio hands you a flattened recording and stops there.
The typical OBS Studio workflow looks like this: record in OBS Studio, close it, open a separate editor to trim and add subtitles, export, then convert formats again if your target platform needs something other than what you exported. UniConverter collapses that into a single app.
Here is how recording, trimming, and exporting work inside UniConverter:
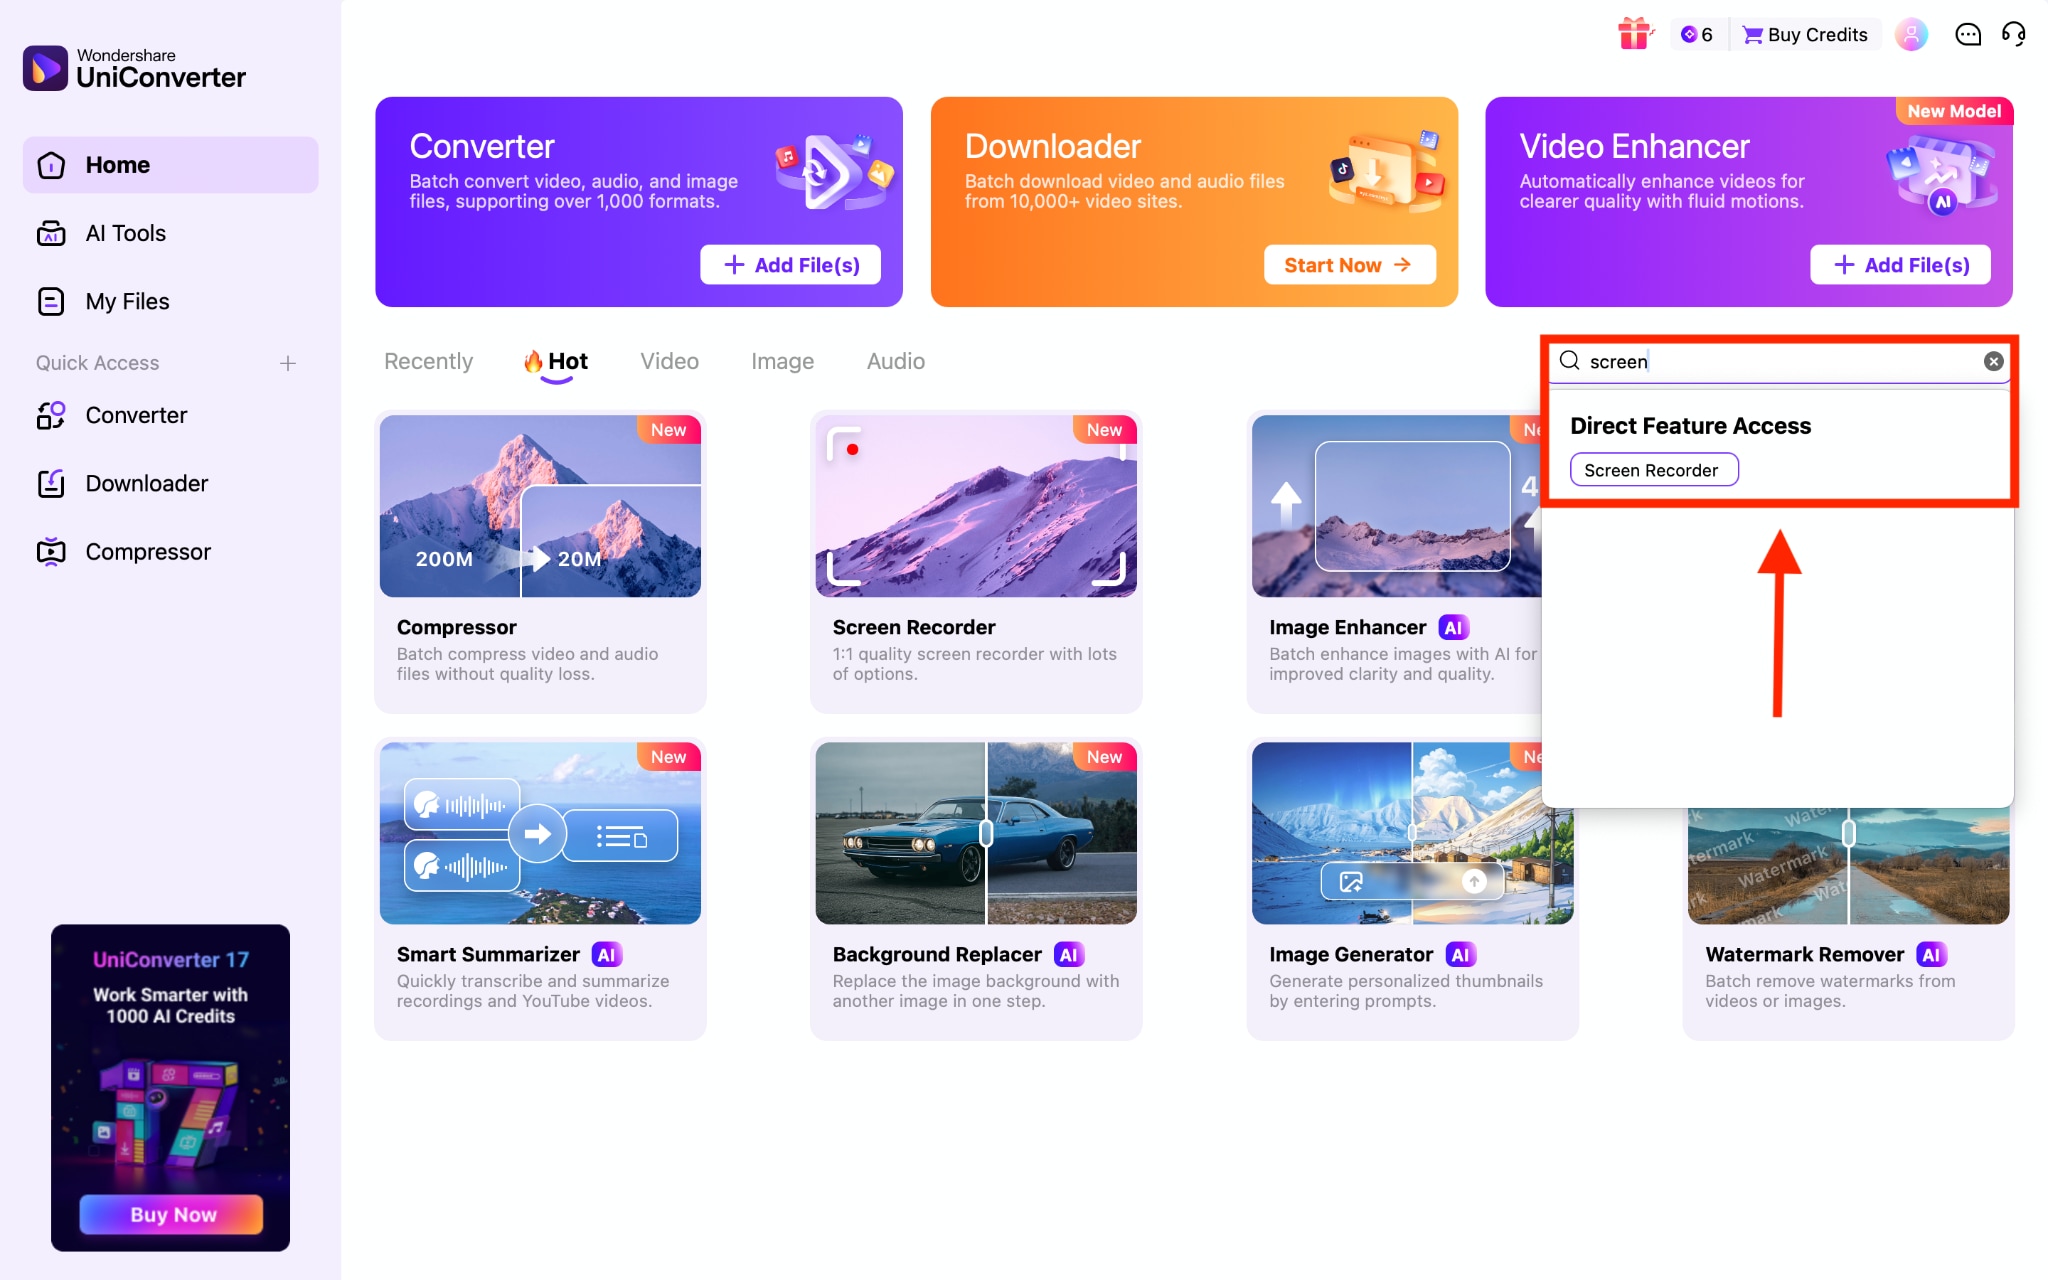
Step 1: On the Dashboard, open the search bar and type "screen recorder."
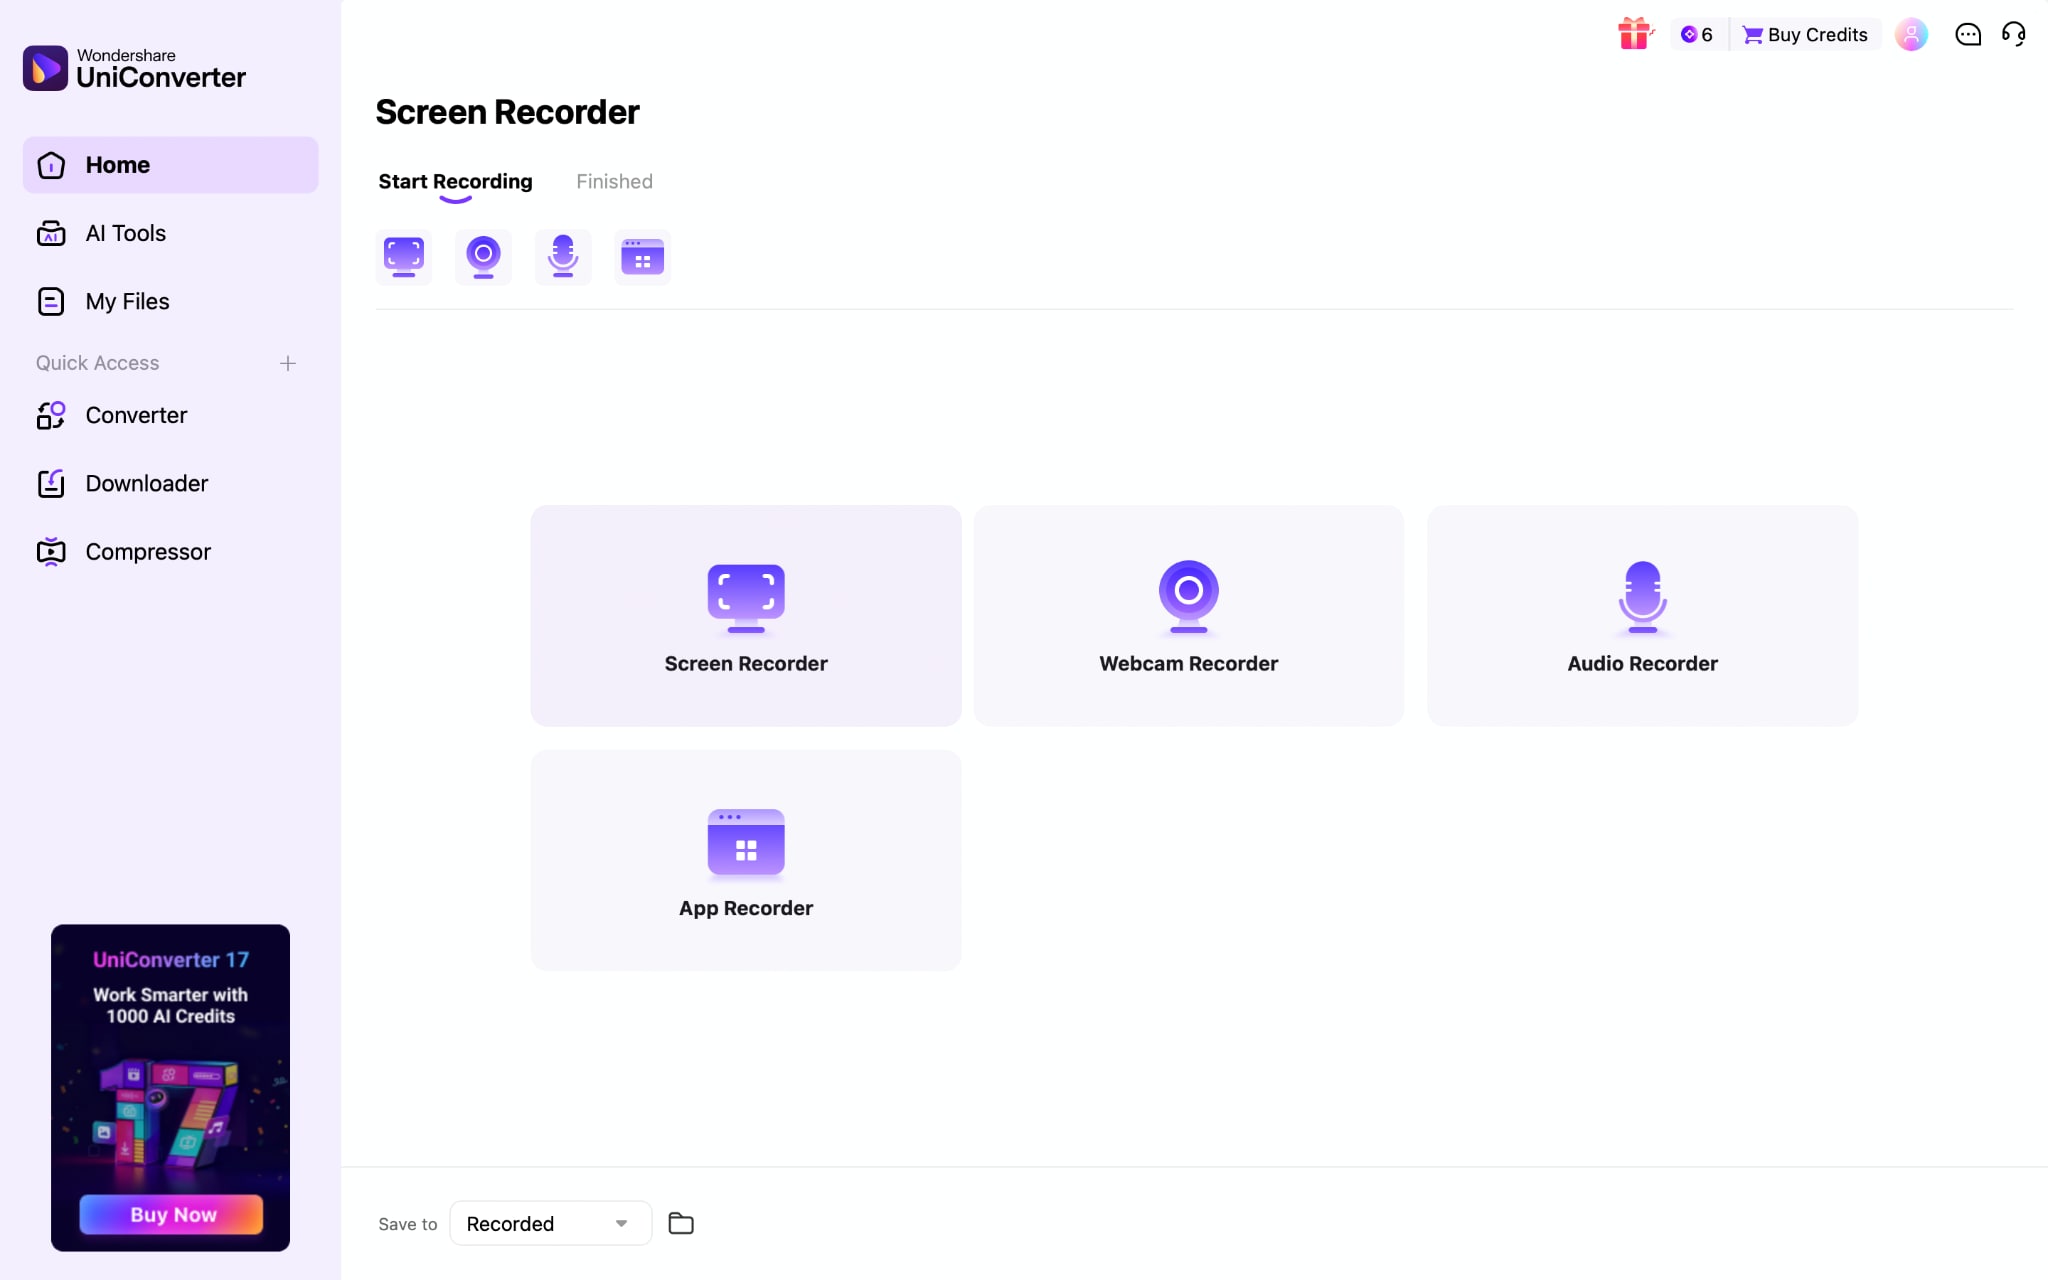
Step 2: Choose from screen recorder, webcam recorder, audio recorder, and app recorder.
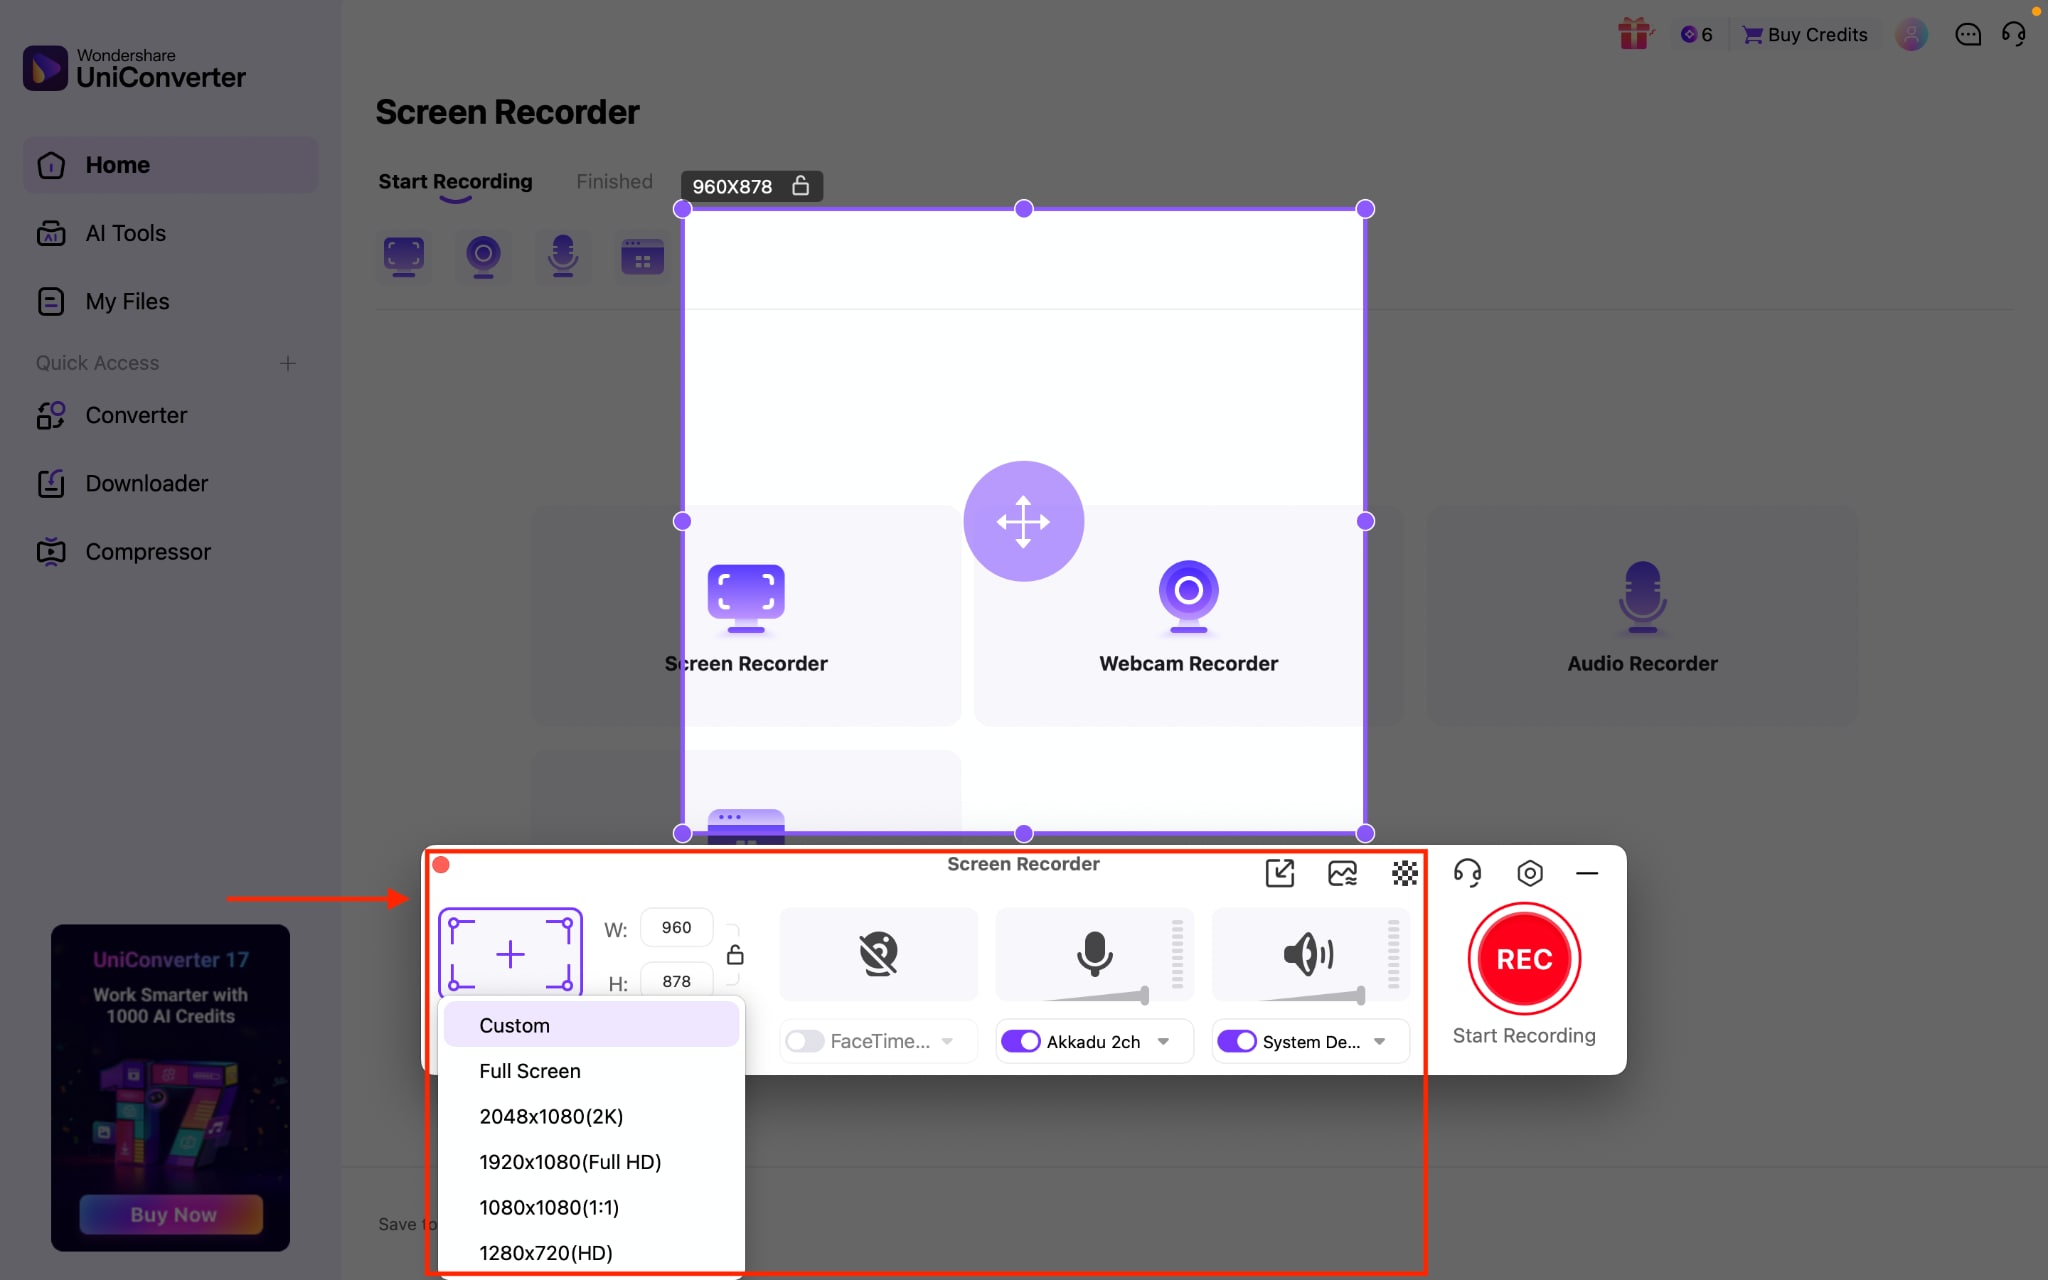
Step 3: Access the camera and adjust the recorder's width and height, or keep it in full-screen mode.
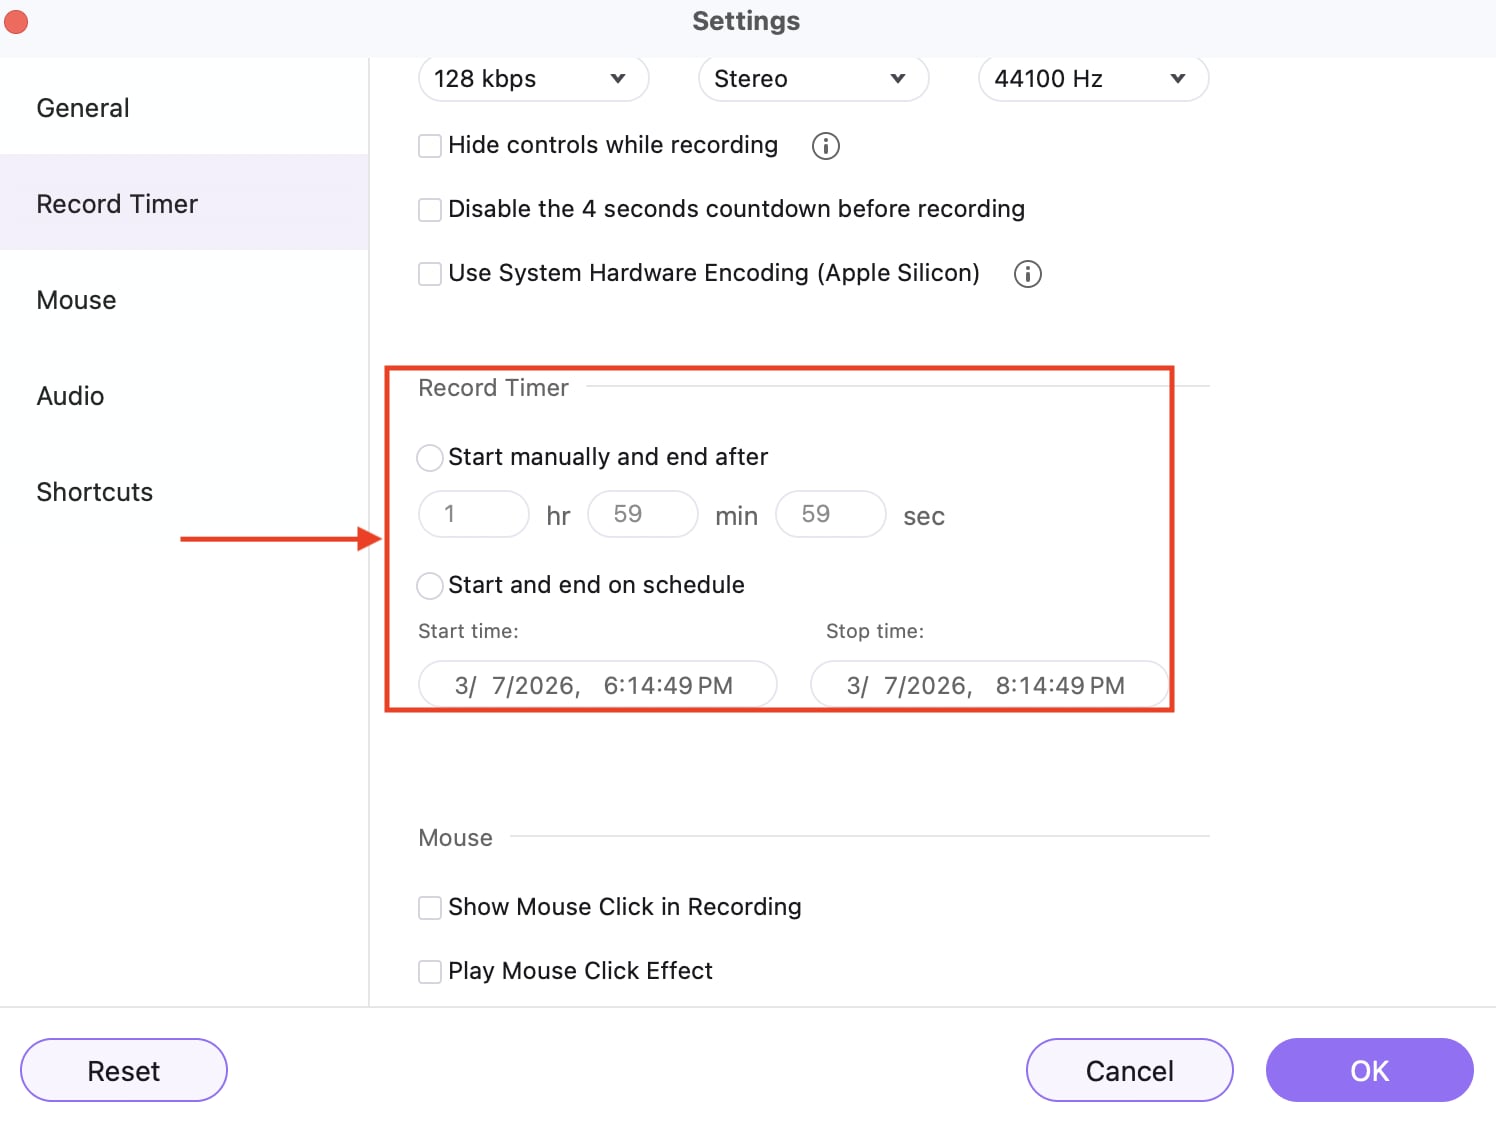
Step 4: Tap the Settings icon, then adjust the mouse, audio, shortcuts, and recorder time settings. If you want to record an upcoming meeting or class, you can set the record timer; the recording will start automatically at your time.
Step 5: Click the Rec button to start screen recording.
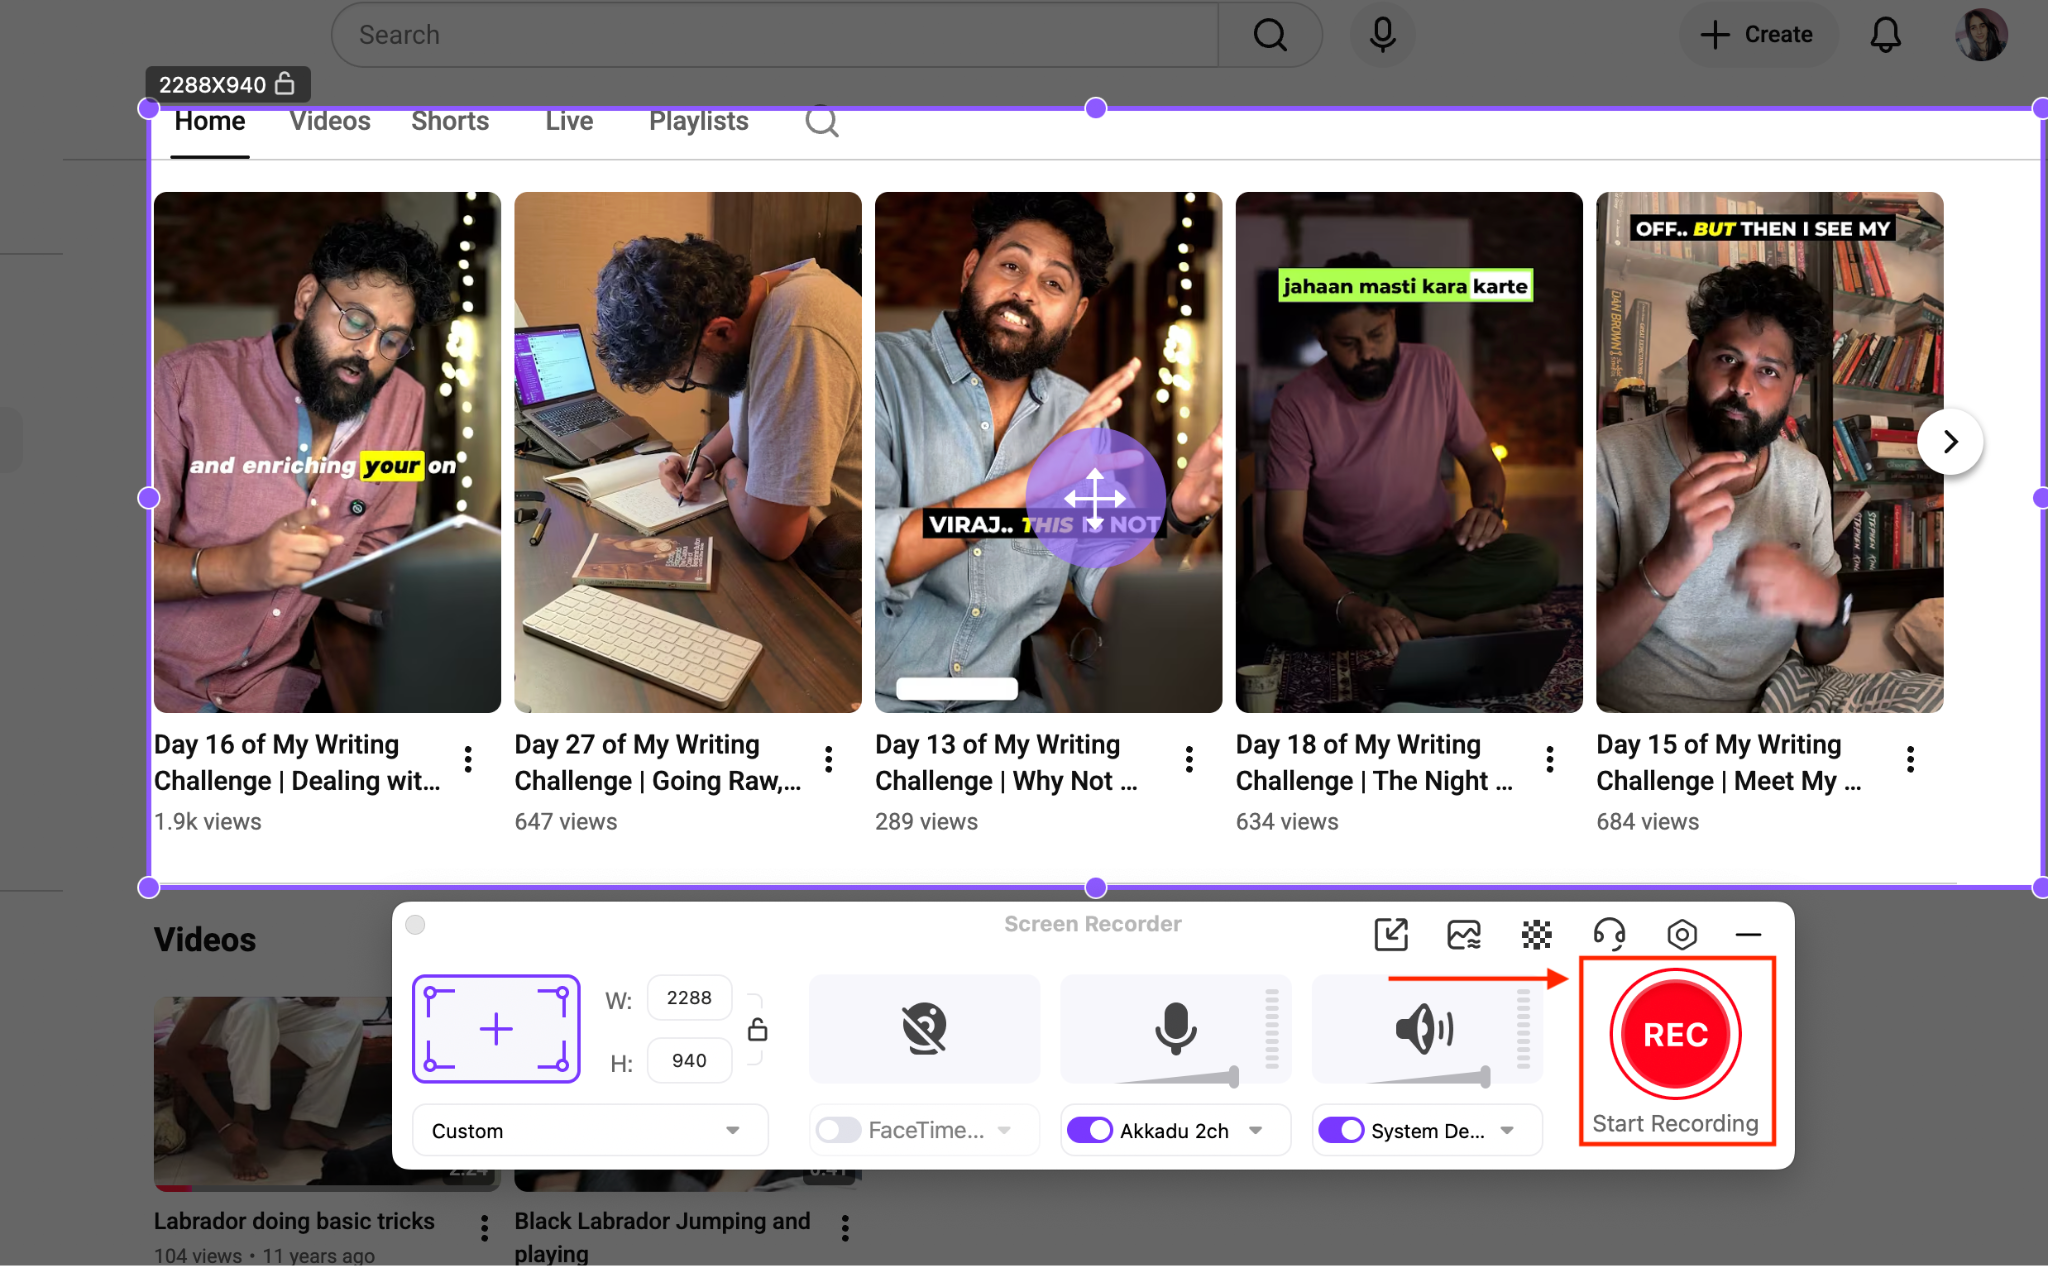
Step 6: You can stop recording manually by clicking the stop button or using Command+2 on Mac.
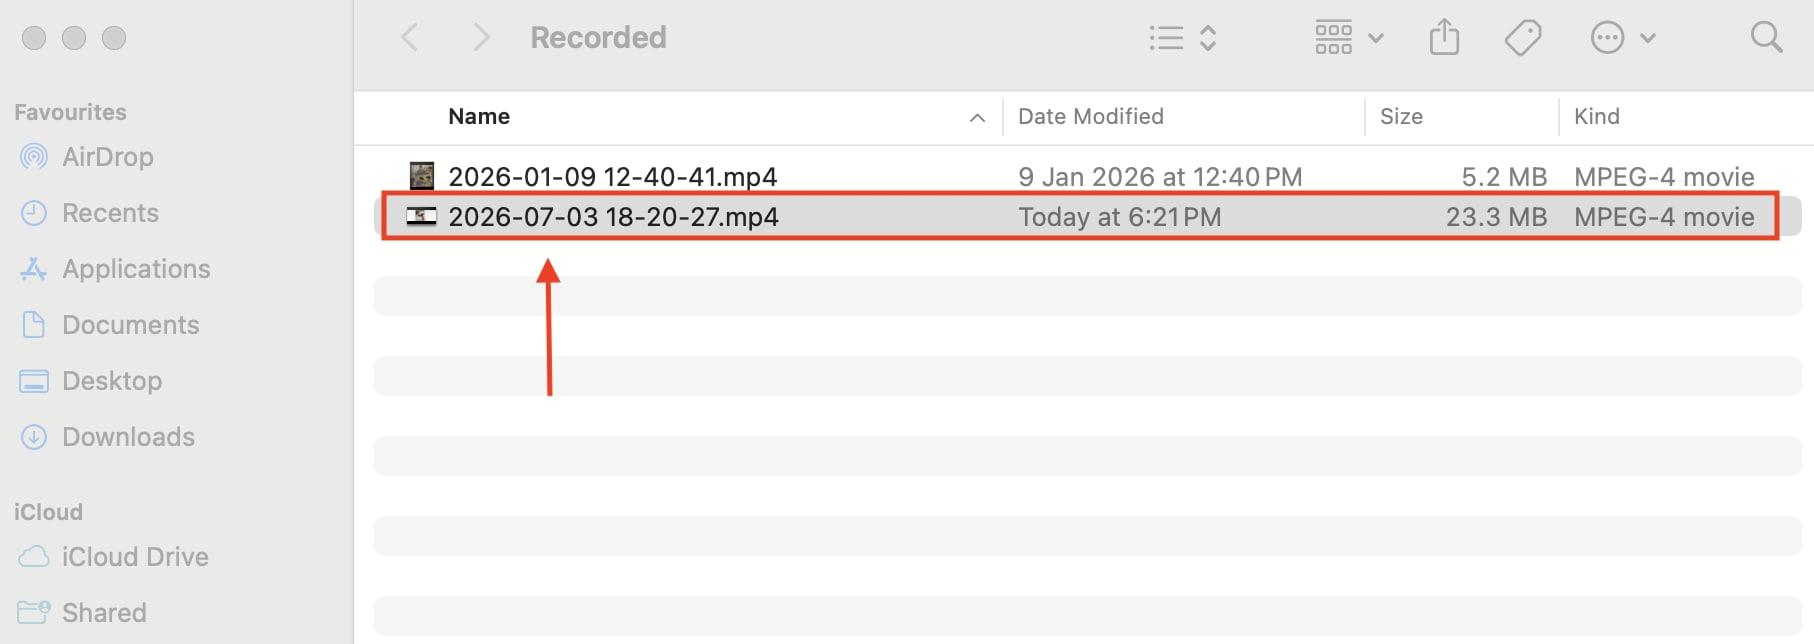
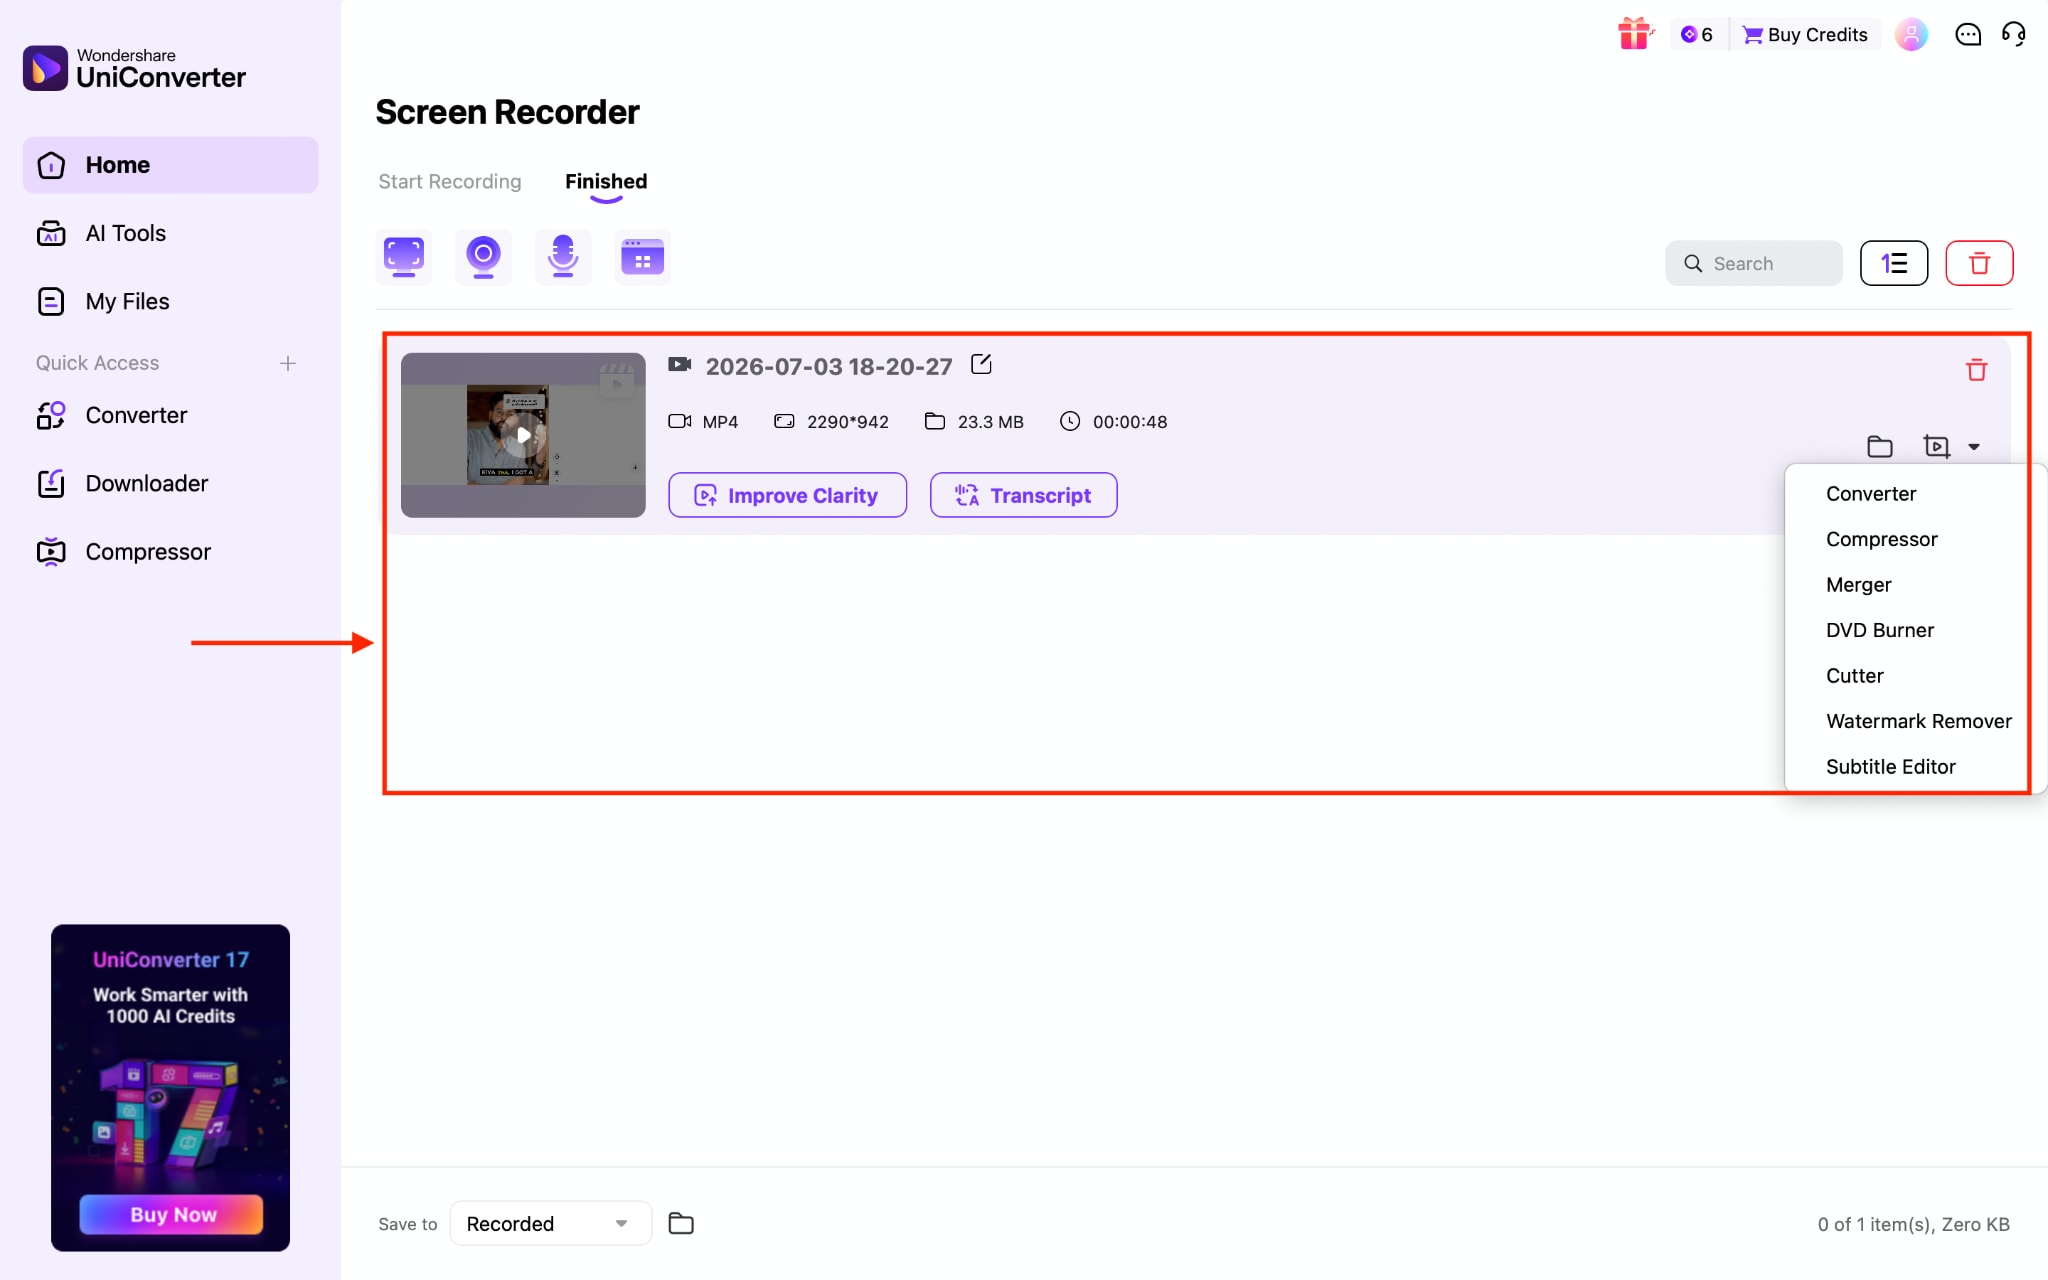
Step 7: Once the recording stops, it will appear on your download list.
Step 8: If you want to edit the screen recording, head to the Wondershare UniConverter dashboard > downloads, and choose from editing options, such as converter, compressor, merger, DVD burner, Cutter, and more.
A few features make this workflow faster for content creators who need a finished, publish-ready file rather than raw footage:
- AI Noise Reduction removes background noise, keyboard sounds, and echo from voiceovers in real time.
- Scheduled Recording starts and stops automatically at a set time, useful for capturing a webinar or meeting when you cannot be at your computer.
- Picture-in-Picture recording captures your screen and webcam with a movable, resizable overlay, making it ideal for tutorials that need a face cam.
- Cursor effects, including click ripples and spotlight highlighting, make click-heavy software demos easier to follow without requiring manual annotations.
Conclusion
OBS Studio screen recorder gives you free, high-quality screen capture for gaming, tutorials, and webinars, once you get past its settings-heavy setup. The steps, settings, and fixes above cover everything needed to record cleanly and troubleshoot common issues like dropped frames or black screens. If editing and exporting a polished video matters more to you than free multi-source recording, Wondershare UniConverter handles recording, trimming, and format conversion in one app, cutting out the extra editing step that OBS Studio leaves you with.