Tips&Tricks for Background Remover
-
- 1.1 Best Background Remover APP
- 1.2 Remove Image Background Mac
- 1.3 Remove Background
- 1.4 JPG Background Remover
- 1.5 Background Removal Software
- 1.6 Batch Background Removal
- 1.7 Remove Image Background in PhotoShop
- 1.8 Remove Image Background Online
- 1.9 Make PNG Transparent
- 1.10 Remove Image Background in Canva
- 1.11 Remove White Background
- 1.12 Remove Background from Logo
- 1.13 Remove Image Background in Paint
- 1.14 Remove Image Background in PowerPoint
All Topic
- YouTube Tips
-
- AI Tools Tips
-
- AI Photo Enhancer Tips
- Voice Changer Tips
- AI Thumbnail Maker Tips
- AI Script Generator Tips
- Smart Summarizer
- AI Subtitle Generator Tips
- Watermark Remover
- Vocal Remover Tips
- Speech to Text Tips
- AI Video Tips
- AI Image Tips
- AI Subtitle Translator Tips
- Video Extractor Tips
- Text to Speech Tips
- AI Video Enhancer Tips
- DVD Users
- Social Media Users
- Camera Users
- Photography
- Creative Design
- Movie Users
- Travelling Fans
- Educational Users
- More Solutions
- Holidays and Commemoration
- Game Lovers
- Other Tips
How to Remove Background from Image on Mac
by Christine Smith • 2026-01-21 18:52:30 • Proven solutions
If you too have been looking for the solutions to remove the actual background of the image and have a transparent one or how to cut out an image on Mac, then you are reading on the right page.
If your captured image has some unwanted object, person, or scenery in the backdrop affecting the overall look of the picture, removing the background will help. Specialized tools are available to remove background Mac in a smart manner without affecting the overall picture. More about the methods and tools are discussed in the following parts.
- Part 1. How to remove a background in Preview on Mac
- Part 2. The quickest and easiest way to remove background from the image on Mac
- Part 3. 4 Other FREE background remover you may want to know
- Part 4. 4 Mac Preview Vs. Wondershare UniConverter: Which is the best Background Eraser
How to Batch Remove Background from Photos with One Click
Find more video ideas from Wondershare Video Community.
Part 1. How to remove a background in Preview on Mac
Preview is the default and pre-installed image and PDF viewer app on the Mac systems. Besides viewing and printing, the program can also be used for basic editing of the media files and one of the supported features is removing the image background. With Preview, the image background can be removed without any need for third-party apps or programs. There are 2 ways to remove the background using Preview and both the methods to remove background from image Mac are enlisted below.
Method 1:
The first method is suitable when the background does not blend and has different colors than the image part to be retained.
Step 1. On your Mac system, open the desired image in the Preview app, and then at the right-hand side click on the toolbox icon.

Step 2. The editing toolbar will open showing multiple options. At the left-hand side tap on the Instant Alpha tool that resembles a wand.

Step 3. Next, click anywhere in the background and then drag through the image background and the tool will select the pixels of the adjacent matching colors automatically as you move. The selected area will be highlighted in red.

Step 4. After selecting a section, release the mouse button and click on the Delete key. This step can be repeated till the entire background you do not want is deleted.

Method 2: Extracting image using Preview
When the image is complicated and has several colors in the background which is similar to the main image that you want to keep the above Instant Alpha method will not work. Thus, here you would need to extract the part of the image required.
Step 1. In the Preview toolbar, click on the Markup button.

Step 2. Tap on the Selection Tools drop-down list on the left-hand side and choose Smart Lasso.

Step 3. Next, start to trace the part of the image that you want to keep and then finish it by connecting the start and the endpoints.

Step 4. After the selection is visible, choose Edit > Invert Selection and then click on the Delete key that will remove everything outside the selected area. Alternatively, you can also choose Edit > Copy to choose the selected area which can be then pasted at some other location.
Part 2. The quickest and easiest way to remove background from the image on Mac
Preview is a very basic tool for removing the background image that is not only time-consuming but also not very accurate. So, if you are looking for an alternative that is not only quick and easy but effective as well, Wondershare UniConverter for Mac is an apt choice. This is an excellent software supporting multiple functions and the latest version of the program comes with a background remover that removes the background automatically using AI. The process is super quick where you just need to add the images and the background will be removed and become transparent in no time.
Wondershare UniConverter - Best Video Converter for Mac/Windows
-
Helps in removing the image background and back in transparent automatically
-
Batch processing support that helps in removing the background of multiple files at a time
-
Support processing JPG, JPEG, PNG, BMP, and GIF files.
-
Option to preview and check the file details before as well as after removing the background.
-
Windows and Mac support
Steps on how Mac remove background from image using Wondershare UniConverter:
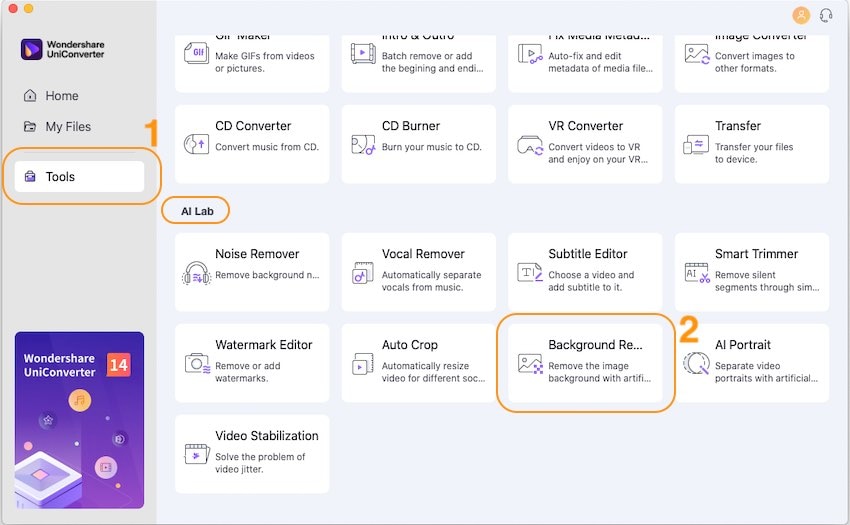
Step 1 Choose Wondershare Backgroun Remover
Launch the installed software on your system and from the main interface choose Toolbox > Background Remover.
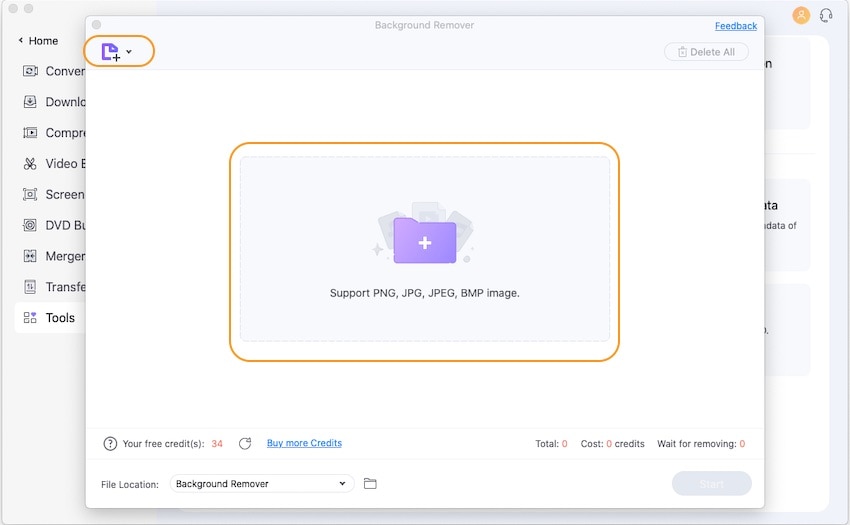
Step 2 Add images to be processed
Click on the Add Files icon on the top-left corner or on the + sign at the center to browse and import the images to be processed. Multiple files for batch processing can be added.
Step 3 Check the details of added files
The added images will appear on the interface. By default, all the images are selected. Move the mouse over an image and tap on Click to check details and the image will open up in a pop-up window for you to preview.
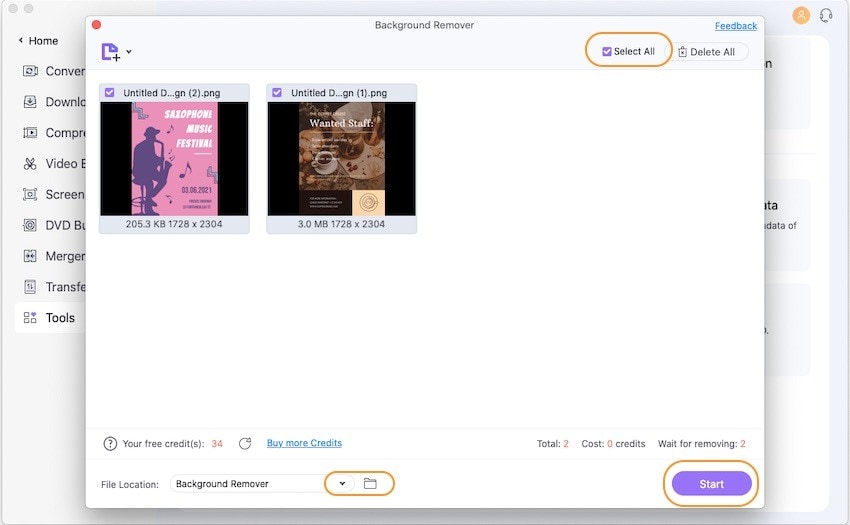
Step 4 Process and remove the background from images on Mac easily
At the File Location tab on the bottom, choose the system folder to save the processed images. Finally, click on the Start button at the bottom-right corner for the software to start processing.
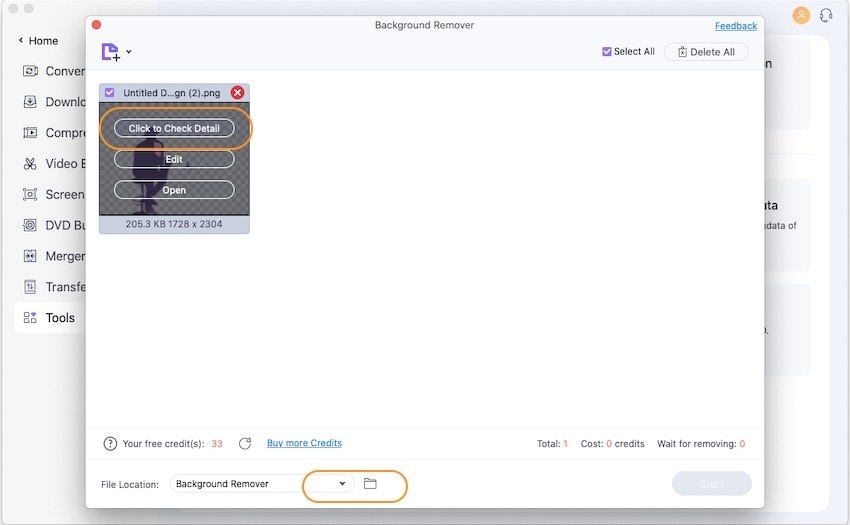
The status of background removal will appear over each of the added images. You can preview the processed image by click on the Click to check details button over the image.
Part 3. 4 Other FREE background remover you may want to know
Check out some other free tools below that will help you to remove the background of an image.
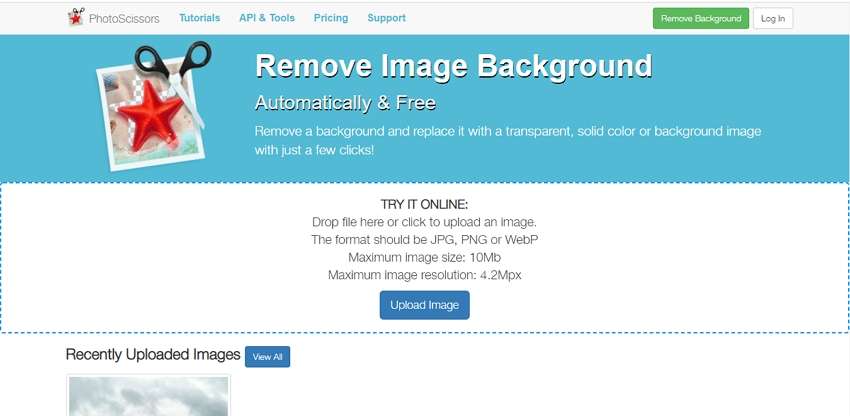
1. PhotoScissors
This is an online tool that does not require any additional software download and allows removing image background quickly and easily. Local JPG, PNG, and WebP files of up to 10 MB can be added to the tool for processing. The maximum supported image resolution is 4.2 Mpx. The tool allows you to add a transparent, solid color or an image as a background. Several preset options like Amazon, eBay, Facebook, and others are also available to set as the background. You can even choose the padding as required. The processed file can be downloaded to the local system.
Pros:
- Allows removing background quickly and easily
- Add transparent, solid color, or an image as the background
- Several presets for background are available
- Allows adding images in JPG, PNG, and WebP format
Cons:
- The maximum supported file size is 10MB and the resolution is 4.2 Mpx
- Images are downloaded in PNG format
- Low-resolution download. To download images in high quality, you need to upgrade to the paid version.
2. Wondershare PixCut
This online tool from Wondershare is simple to use and allows removing the background image quickly. You can either add the local image or can also add the URL in case of an online file. After the image is added and uploaded the background is automatically removed by the tool. The interface also shows the before and the after pictures for you to compare. The processed image can be downloaded for free in standard quality using the tool.

Pros:
- Free and simple to use tool
- Add local as well as online file link
- Automatically removes the background
- Preview the before and after images
- Images can be enlarged with a watermark
Cons:
- No support for batch processing
- No option for any customization
- The free version allows downloading images in standard quality
3. BgEraser
This is a Windows and Mac-based software that allows removing the background of an image automatically. Using the tool, you can also cut the person, a face, or an object and get a transparent background. The software is small in size that makes it quick and easy to install on your system. Batch processing is supported.

Pros:
- Simple software with automatic background removal
- Compatible with Windows and Mac
- Allows to extract a face, object, or a person from an image
Cons:
- Software download required
- No customization option is available
4. EffectMatrix
EffectMatrix Super PhotoCut is a feature-packed software that can be downloaded for free and comes with a 10-day free trial version. The software allows removing the background of images in all key formats. You can mark the area of the image required and the software will remove the remaining one with a transparent background. Multiple options to edit and add effects are available at the tool.
Pros:
- Feature-packed image editing tool
- Windows and Mac compatible
- Allows removing the background automatically
Cons:
- Free trial version only available for 10 days
Part 4. Mac Preview Vs. Wondershare UniConverter: Which is the best Background Eraser
Preview and Wondershare UniConverter are the two main programs for removing the background discussed above. Preview comes installed on the Mac system and does not require any additional software download and this is the only advantage it has over Wondershare. Otherwise, in terms of use, features, quality, support, and everything else, Wondershare UniConverter is a better background eraser tool in comparison to Preview.
Wondershare UniConverter uses an artificial intelligence technique where the background is removed automatically in a hassle-free manner. The software supports key formats and batch processing as well. While background removal is not required, the software will not sit idle on your system as it can be used for several other tasks like video conversion, download, editing, DVD burning, and much more.
Your complete video toolbox
 Batch remove background from PNG, JPG, GIF easily.


Christine Smith
chief Editor