

If your voice always sounds too low or muffled in recordings or video calls, you’re not alone. Whether you’re gaming, podcasting, or in a virtual meeting, mastering your mic volume is crucial—and that’s where microphone boost techniques come in.
This guide dives deep into how to increase mic volume on Windows, Mac, and desktop with easy steps. We’ll also show you how to batch enhance voice recordings using UniConverter’s innovative audio tools. From built-in settings to robust third-party solutions, we’ll help you sound crisp and clear—no distortion, no tech headaches.
Table of Contents:
Part 1. Why Is My Microphone Volume So Low?
If your microphone sounds too quiet, the problem is not always the mic itself. In many cases, low mic volume is caused by incorrect settings, app input issues, background noise controls, or low device gain.
- The microphone input volume is set too low in system settings.
- Microphone Boost is disabled or unavailable on your device.
- The wrong input device is selected in Zoom, Discord, OBS, or other apps.
- Your USB microphone or headset gain is too low.
- Noise suppression or audio enhancements are reducing voice volume.
- You are too far away from the microphone when speaking.
Part 2. How to Boost Mic Volume on Windows with Built-in Settings
Suppose your voice sounds muffled or too quiet on video calls or recordings. Windows 10 and Windows 11 both offer built-in options to boost the volume of your microphone quickly. Whether you're using an internal microphone or an external USB headset, you can easily increase the mic volume on Windows 11 or Windows 10 in just a few steps—no additional tools are needed.
Here's how to boost microphone volume natively through Windows sound settings:
Step 1: Open Sound Settings
On your keyboard, press Windows + I to open the Settings panel. Click on System → Sound. Scroll down and click More sound settings (Windows 11) or Sound Control Panel (Windows 10). This will open a window where you can adjust the properties of input and output devices.
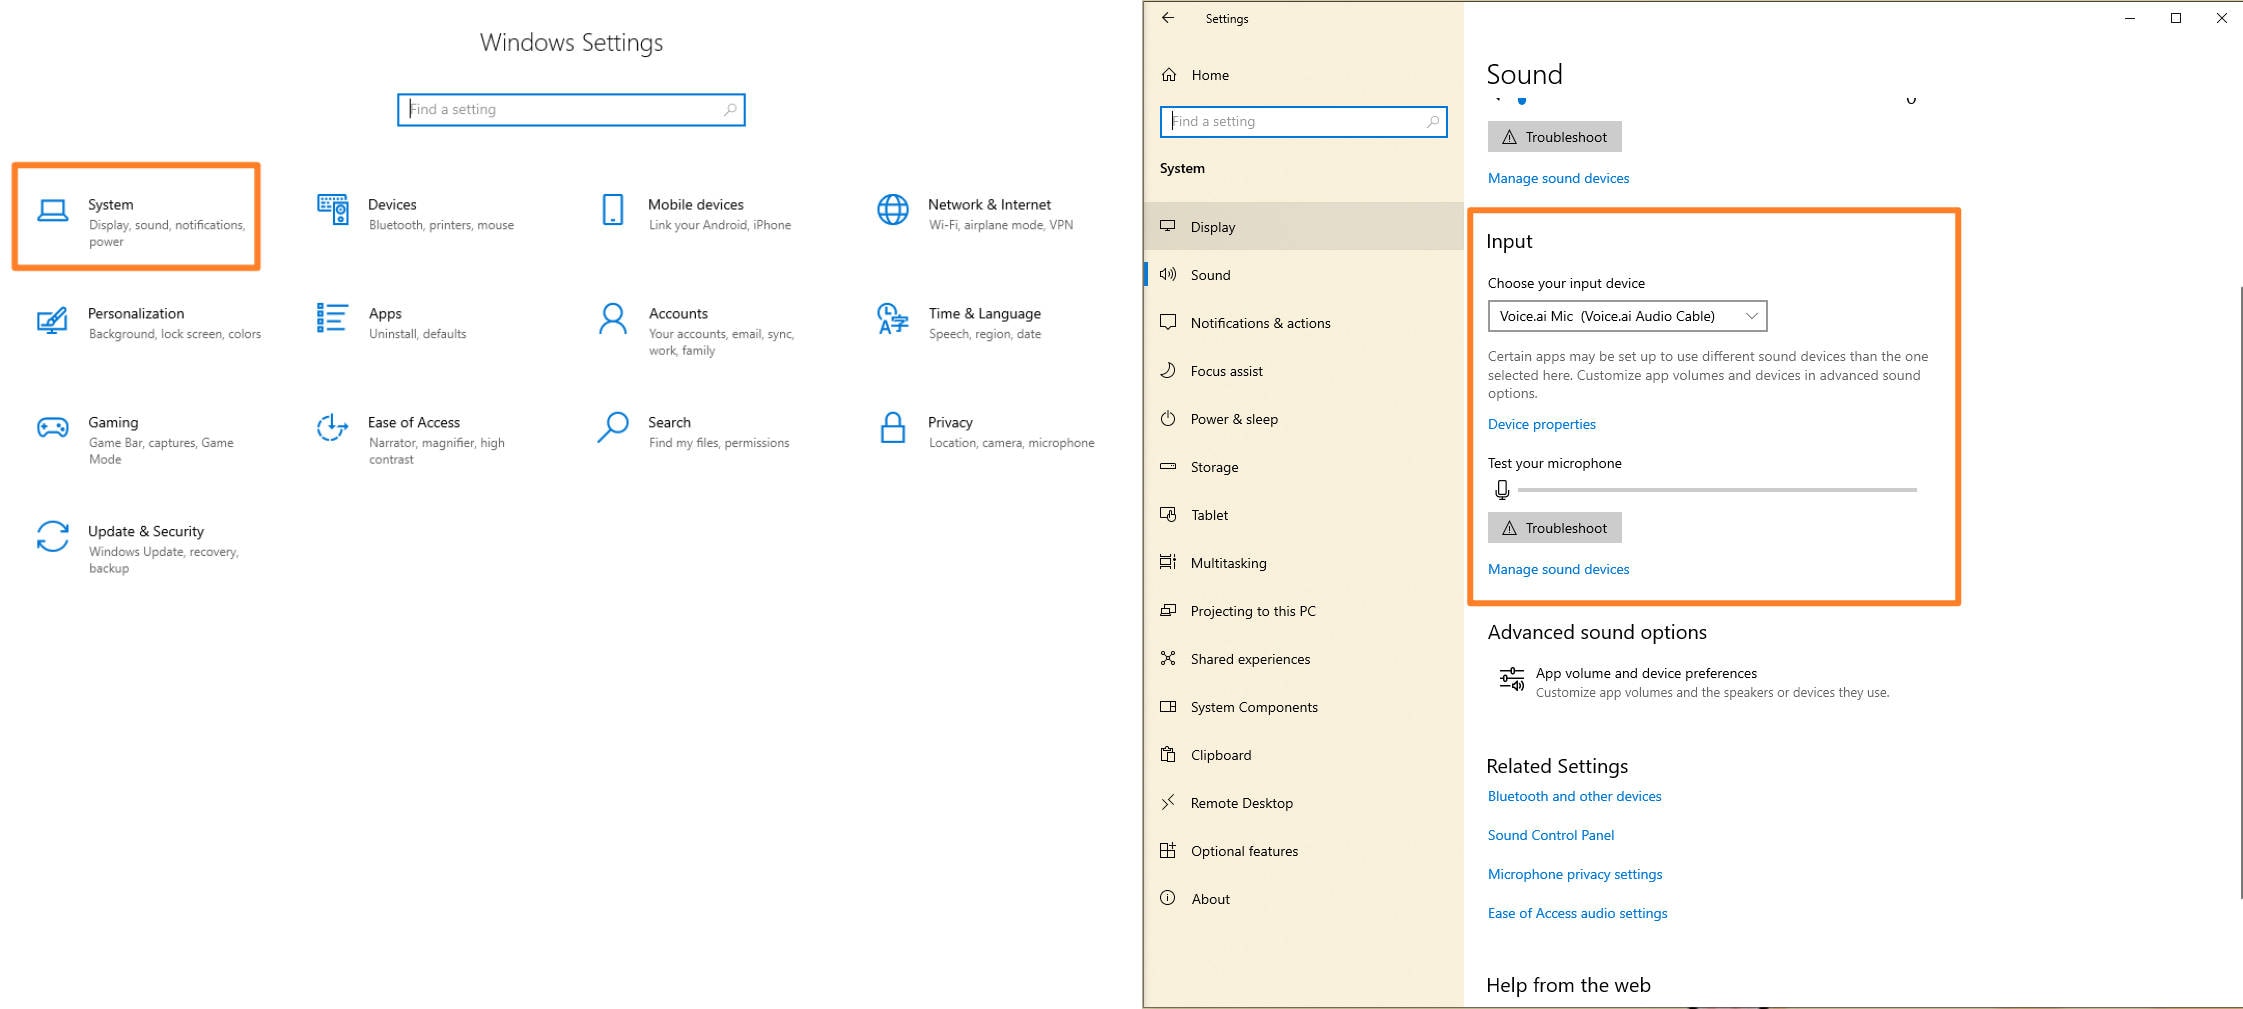
Step 2: Access Microphone Properties
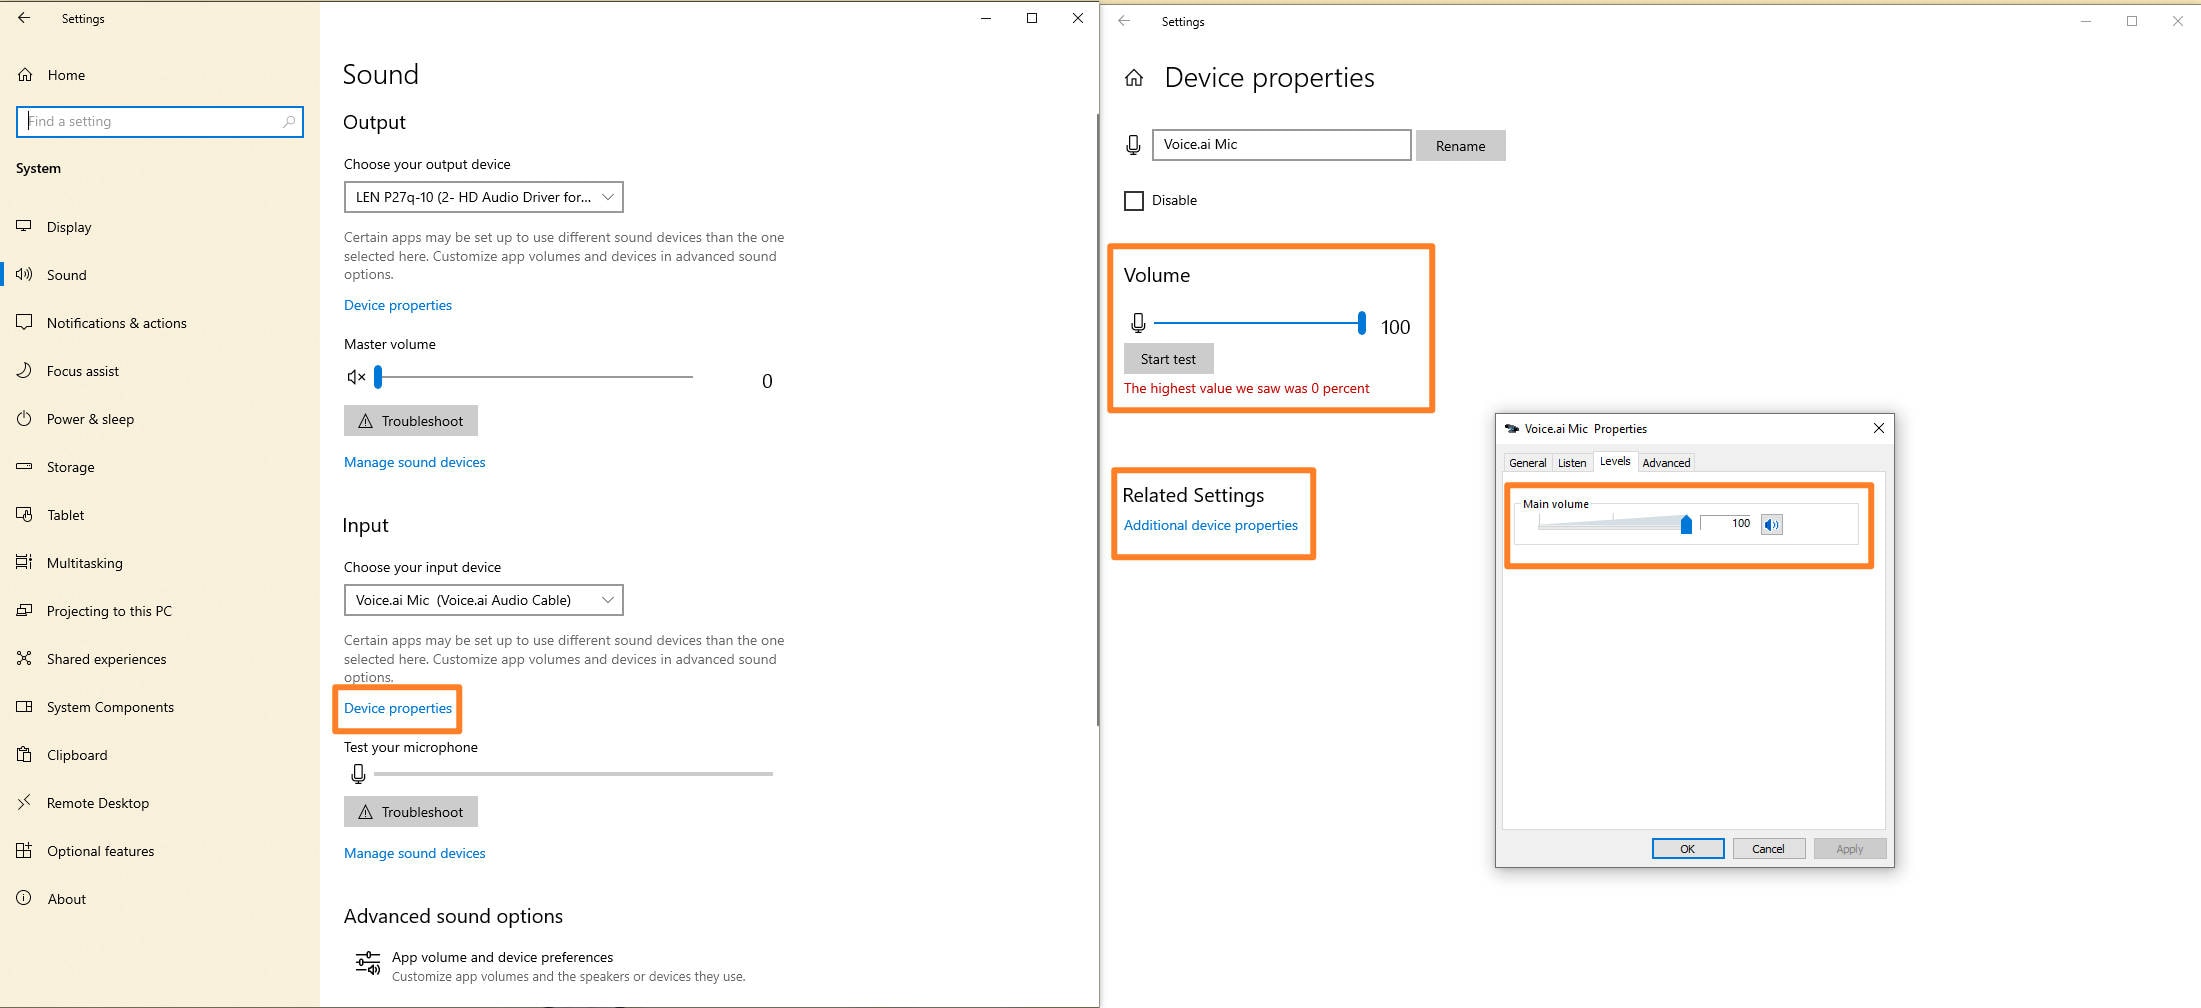
Under the Recording tab, find and right-click your active microphone, then select Properties. In the new window, switch to the Levels tab. Here, you'll see two sliders: Microphone Volume and Microphone Boost. This is where your mic gain booster settings live.
Step 3: Increase Mic Volume and Boost
First, move the Microphone Volume slider up to 80–100. Then, gradually increase the Microphone Boost level (0 dB to +30 dB). Be careful—not all microphones handle +30 dB well, so increase the volume slowly and test with your voice. This is the standard method for boosting the Windows 10 microphone and the Windows 11 microphone, without requiring third-party software.
Pro Tip: Test and Fine-Tune Your Voice
Once you apply the changes, click Apply → OK. Open the Sound settings again and use the built-in Test your mic feature to monitor levels. Speak normally to check if your audio is clearer and louder without distortion. This built-in Windows boost microphone method is a quick fix for most volume issues.
Part 3. How to Boost Mic Volume on Mac with Built-in Settings
If you're a Mac user and your mic sounds too soft during Zoom calls or screen recordings, don't worry—macOS makes it easy to increase microphone volume using built-in controls. While it doesn't offer a dedicated microphone boost slider like Windows, you can still manually adjust input levels and fine-tune your voice input for clarity. Here's how to use macOS system settings as a simple mic volume booster:
Step 1: Go to Sound Settings
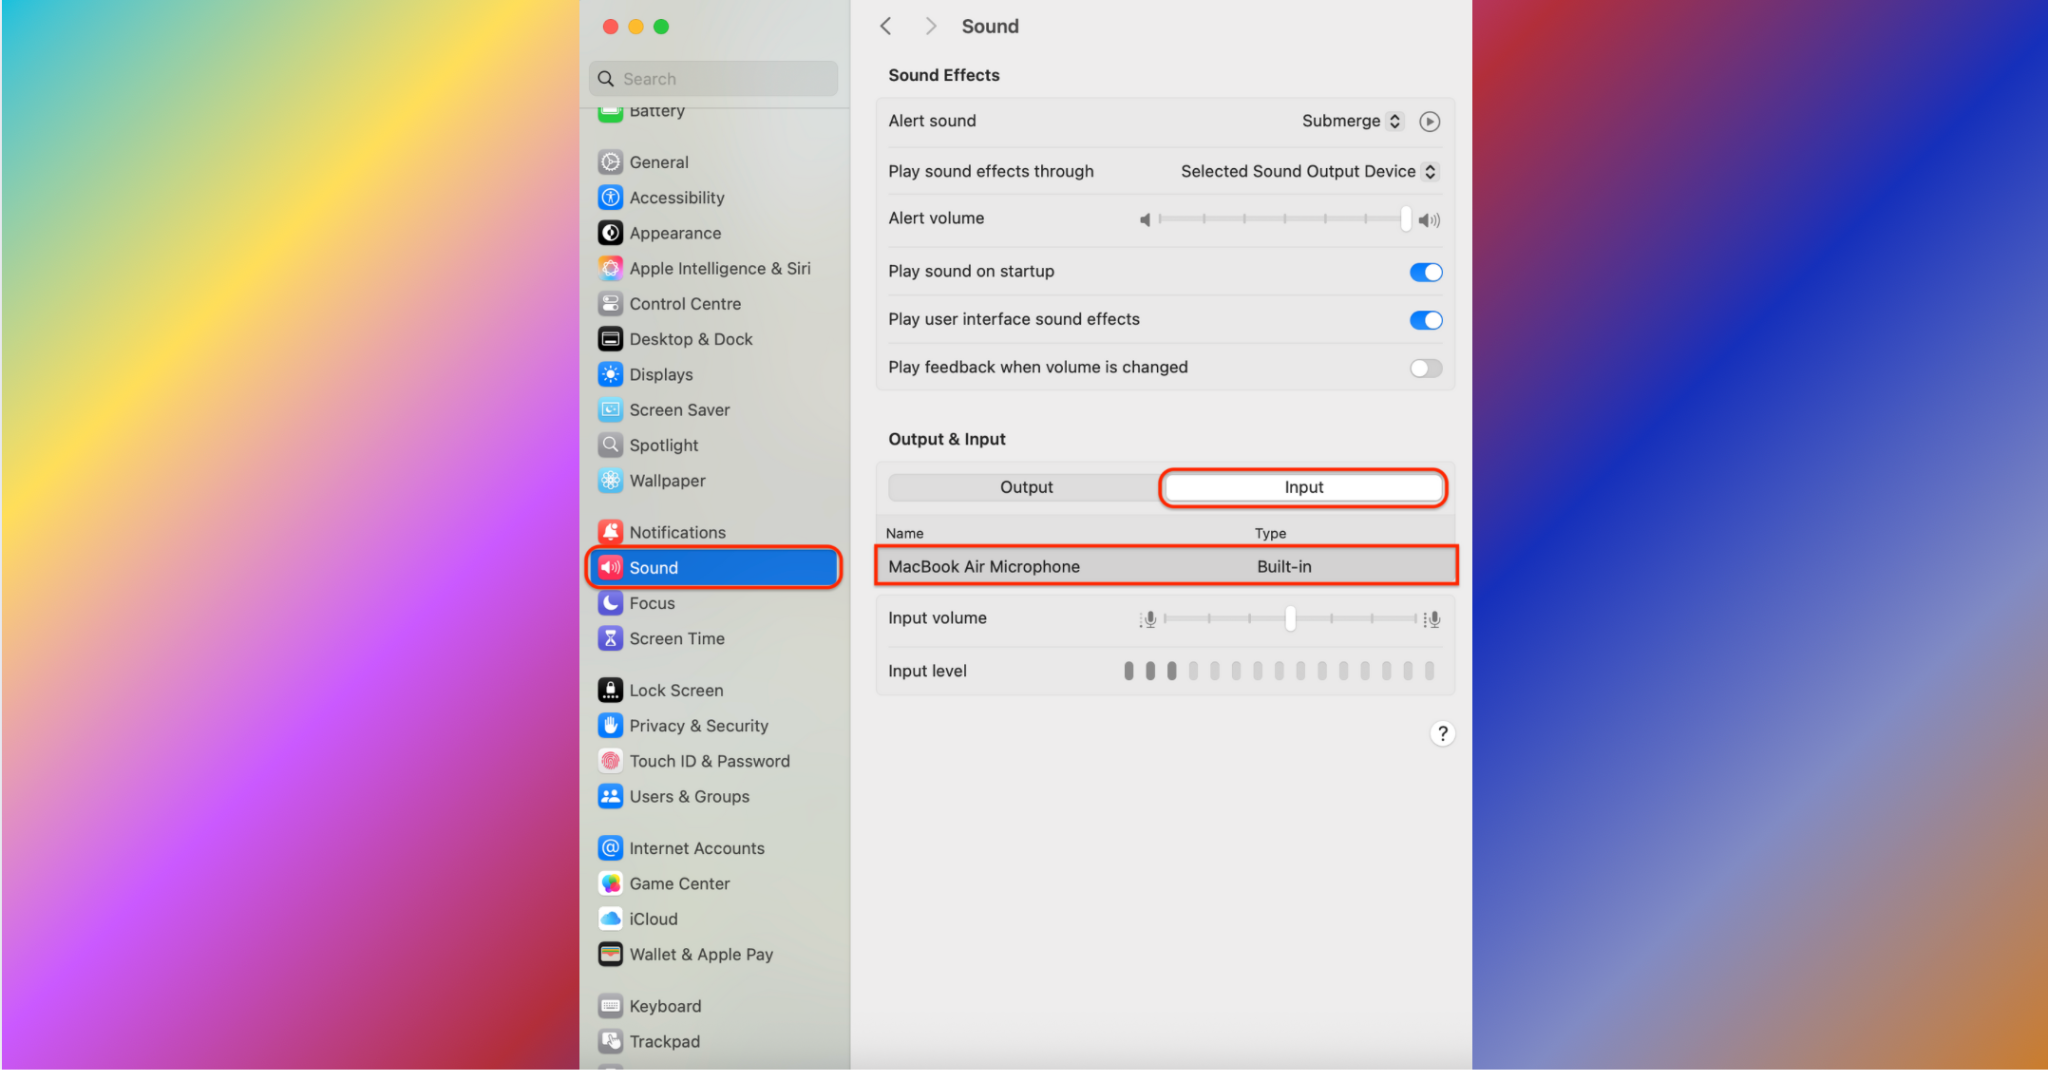
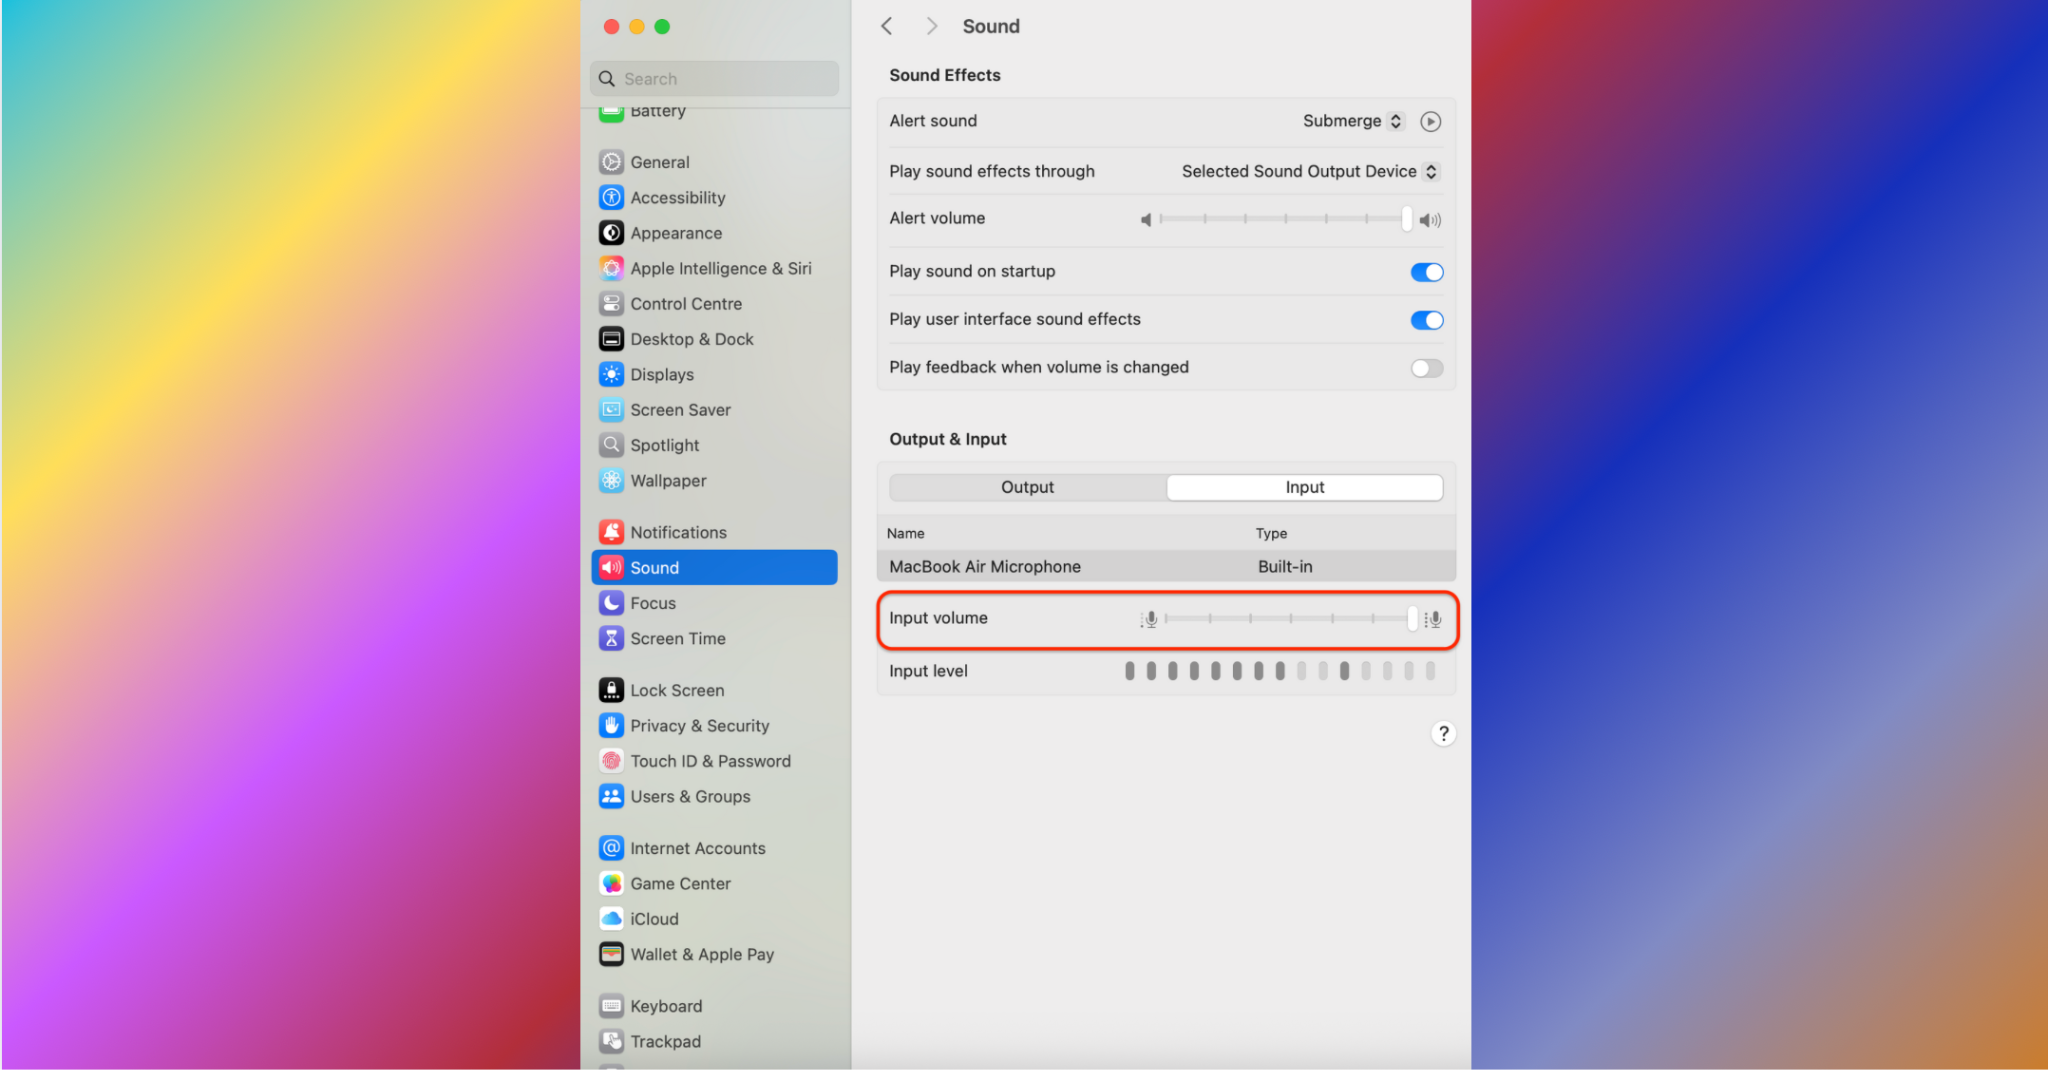
Step 2: Select and Adjust Your Microphone
Click on your active microphone from the list. Below it, you'll find the Input Volume slider. Drag it to the right to increase mic sensitivity and volume. This works as your basic mic gain booster, especially if you're recording podcasts, YouTube voiceovers, or video tutorials.
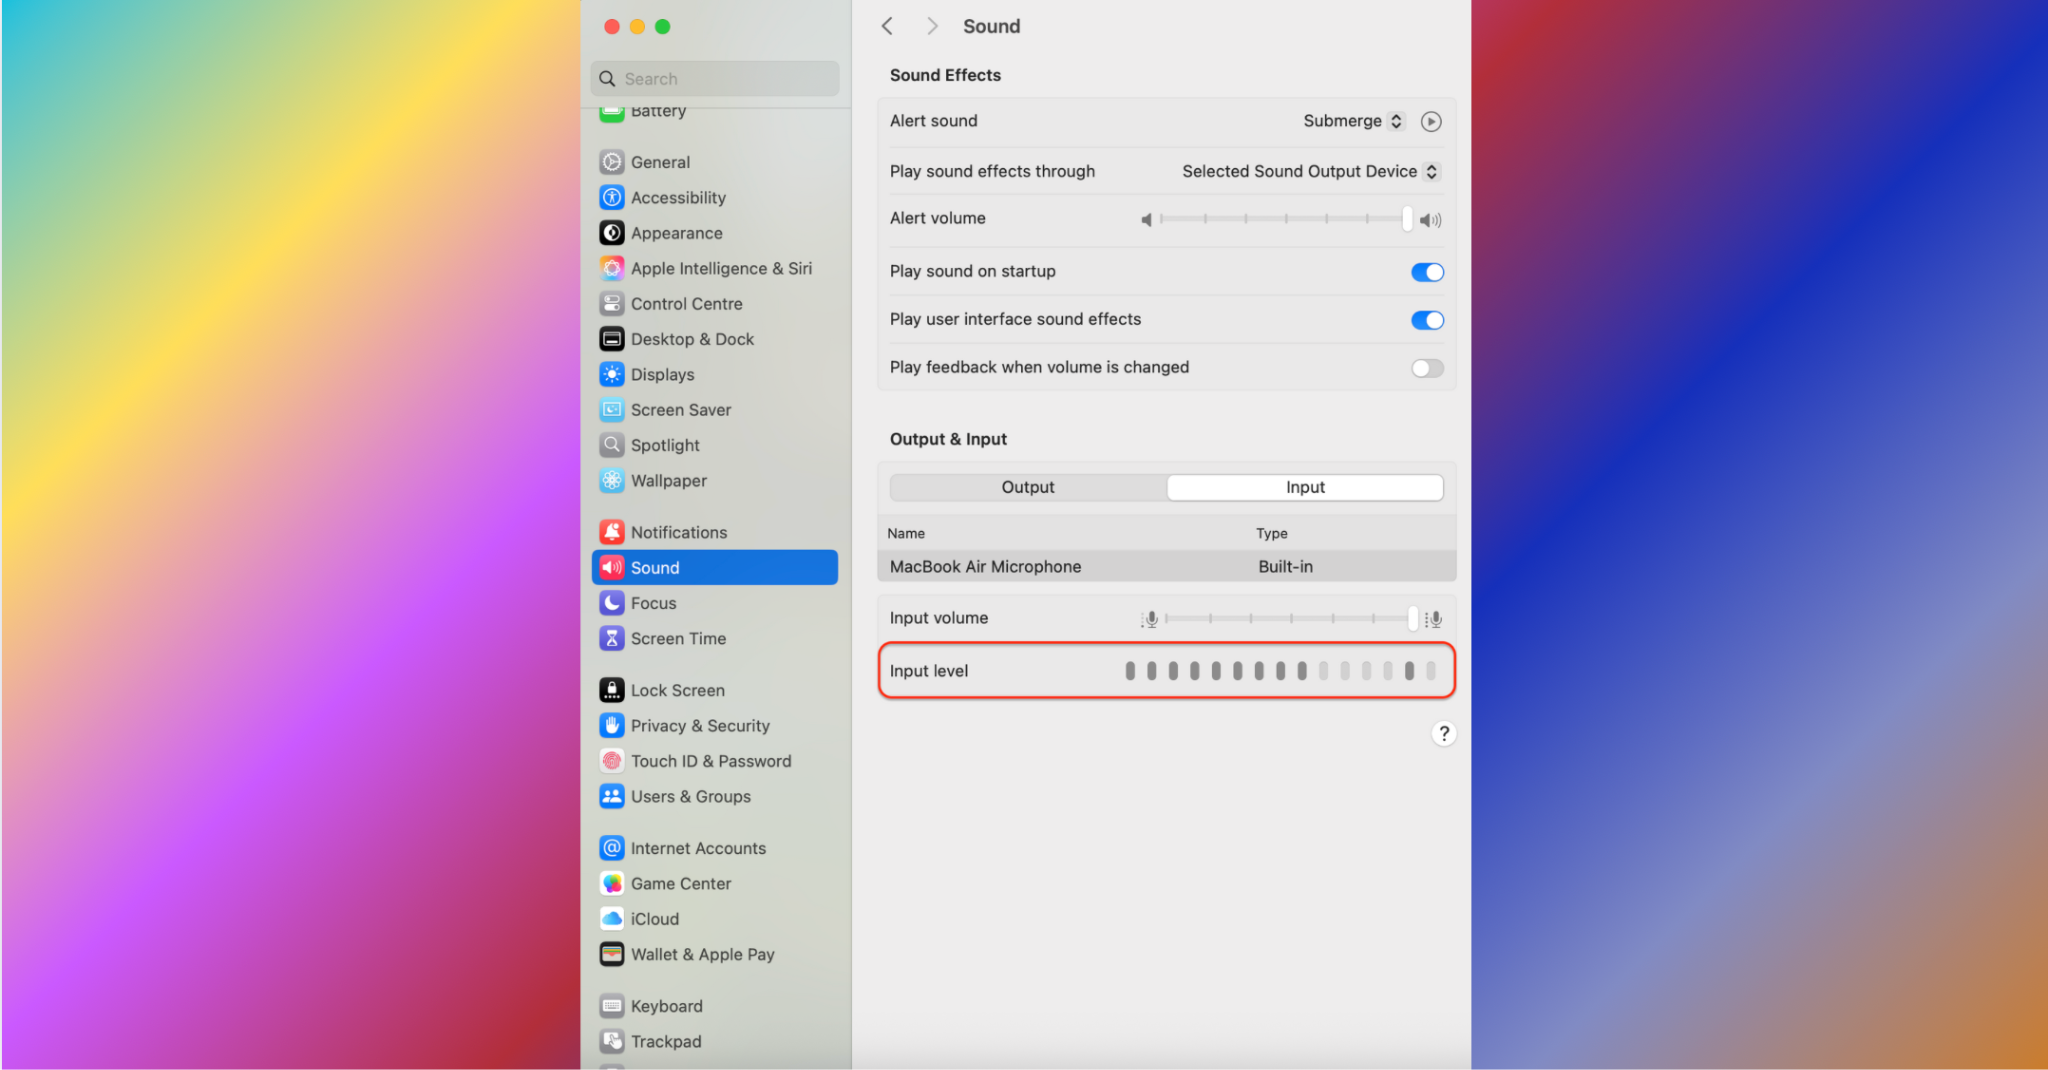
Step 3: Test Your Mic Input
Note: No Boost Slider on Mac?
It's true—macOS doesn't offer a dedicated microphone boost toggle like Windows 10 microphone boost or Windows 11 mic boost. However, most external USB mics include their own mic volume booster app or physical gain controls, giving you even more flexibility.
Part 4. How to Boost Mic Volume on Desktop with a Third-Party Tool
If your microphone sounds too quiet even after adjusting system settings, you likely need more control than your operating system can provide. Built-in mic volume controls on Windows or macOS often lack the depth required for consistent, high-quality audio. Whether you're recording podcasts, using voice chat, or creating content, using a third-party tool to boost mic volume on desktop can make a dramatic difference in clarity and loudness.
The right software will not only increase gain but also reduce background noise, balance audio levels, and give you real-time feedback. One of the most trusted and beginner-friendly tools for this purpose is Audacity—a free, open-source audio editor widely used to boost microphone volume, clean recordings, and apply effects post-recording. Here's how to use it as an effective mic gain booster on your PC.
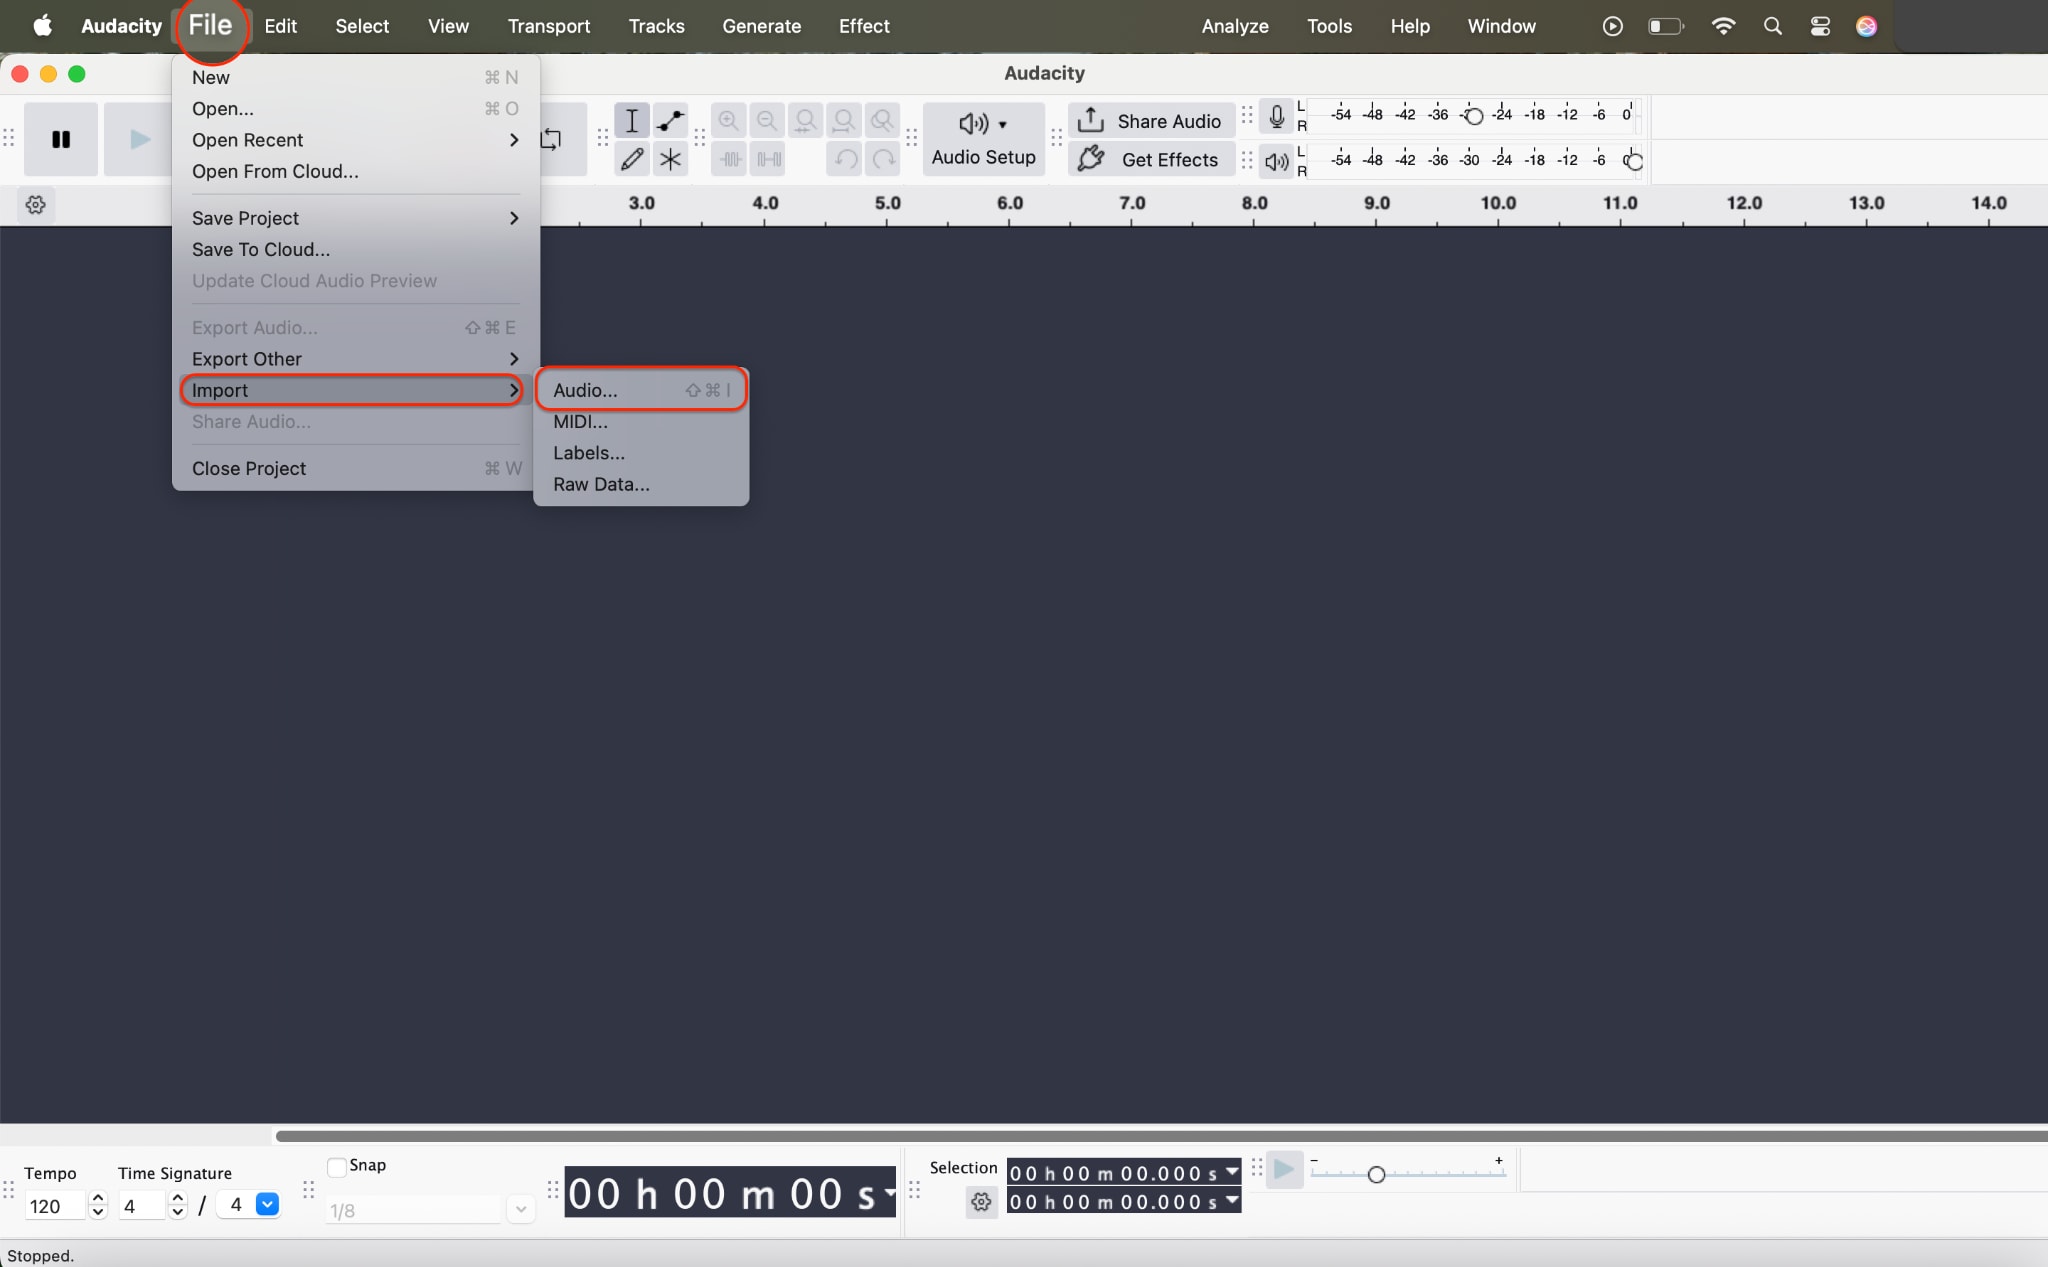
Step 1: Import Your Audio File
Step 2: Amplify the Microphone Volume
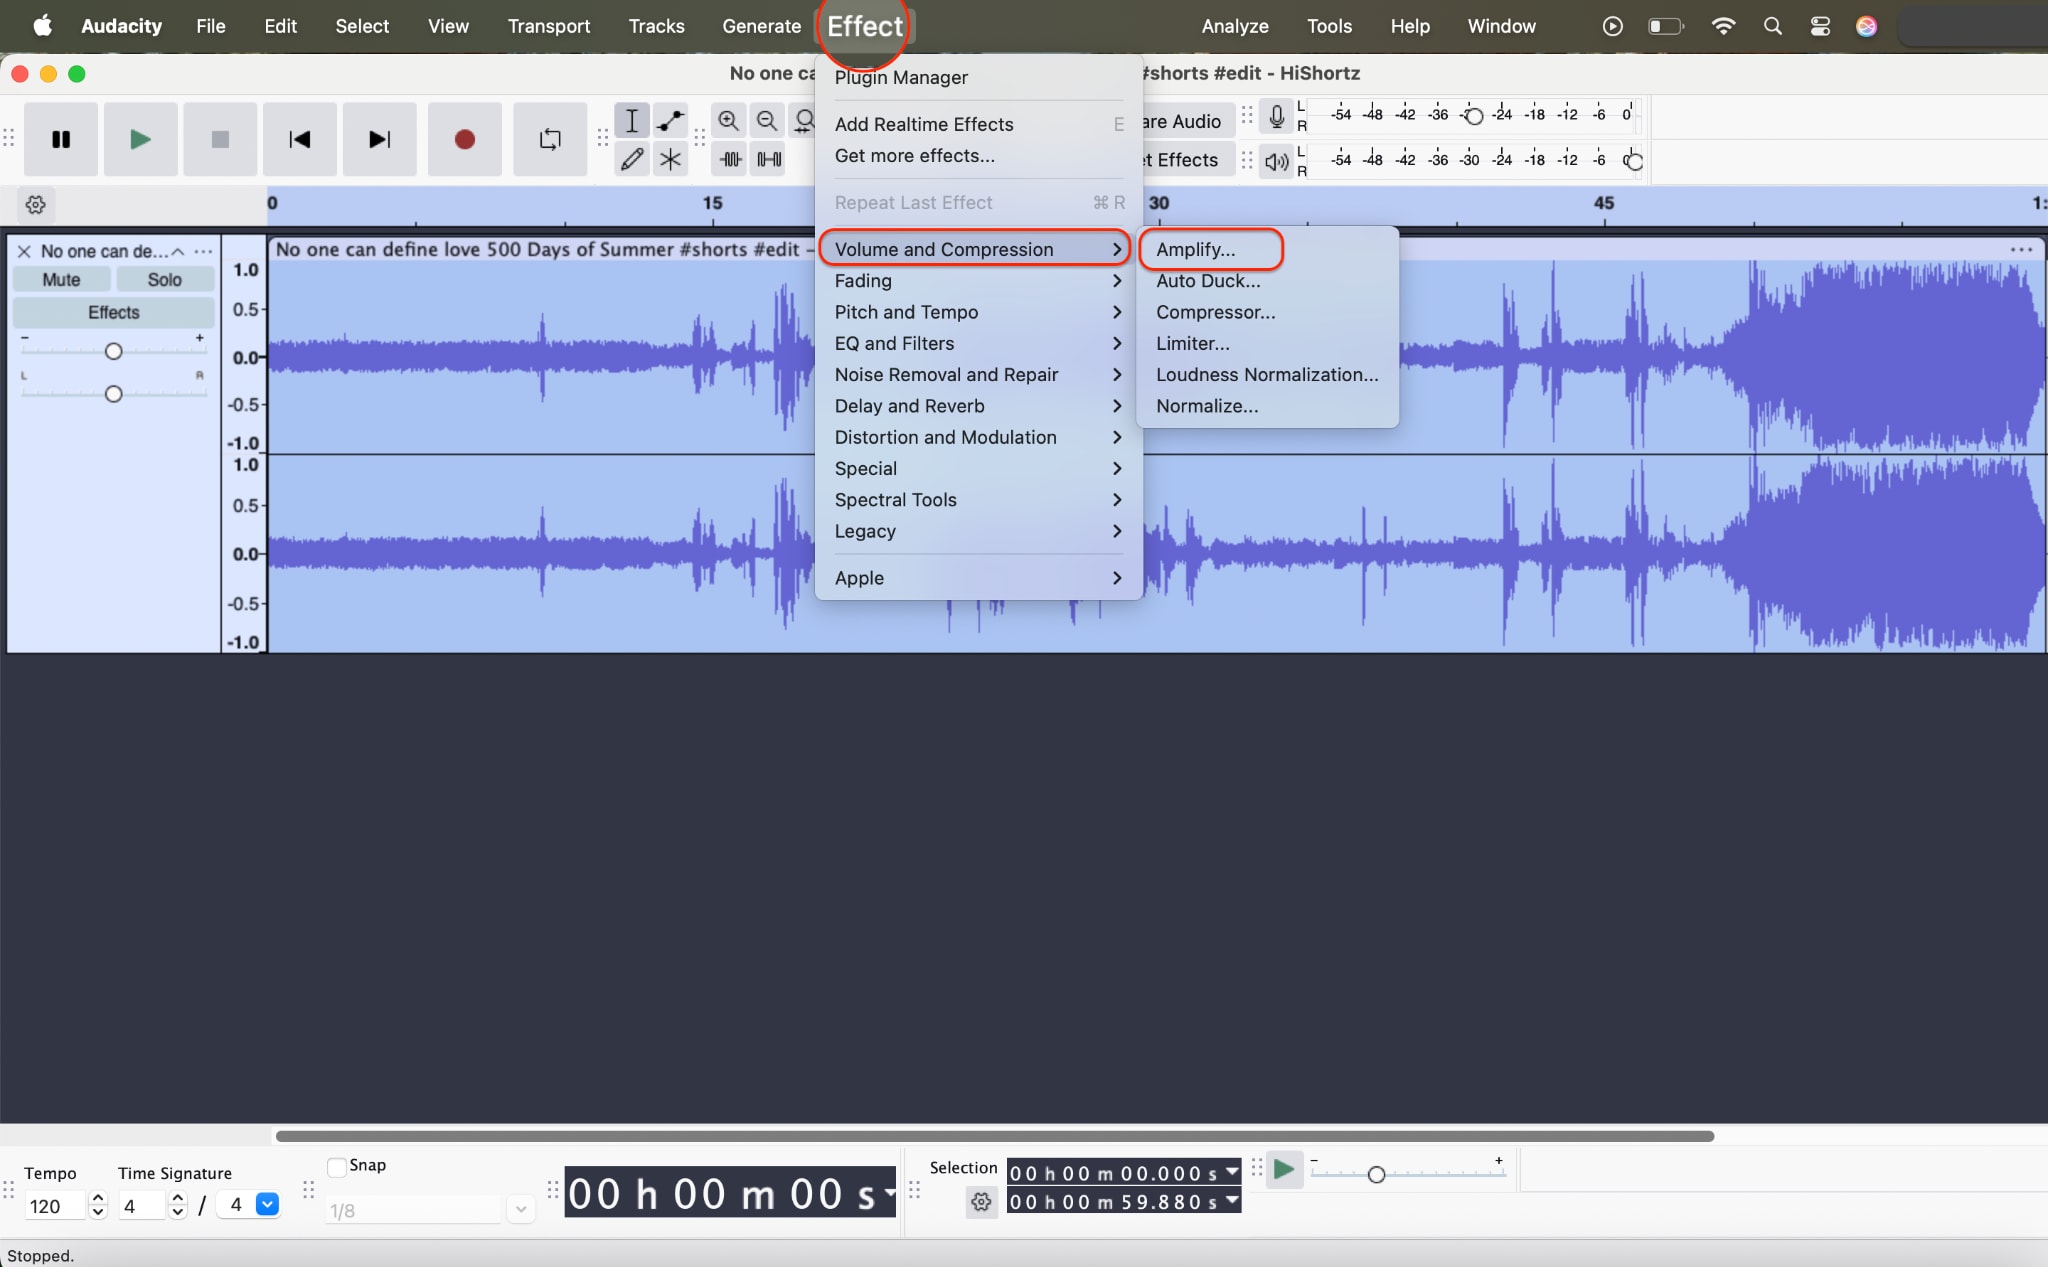
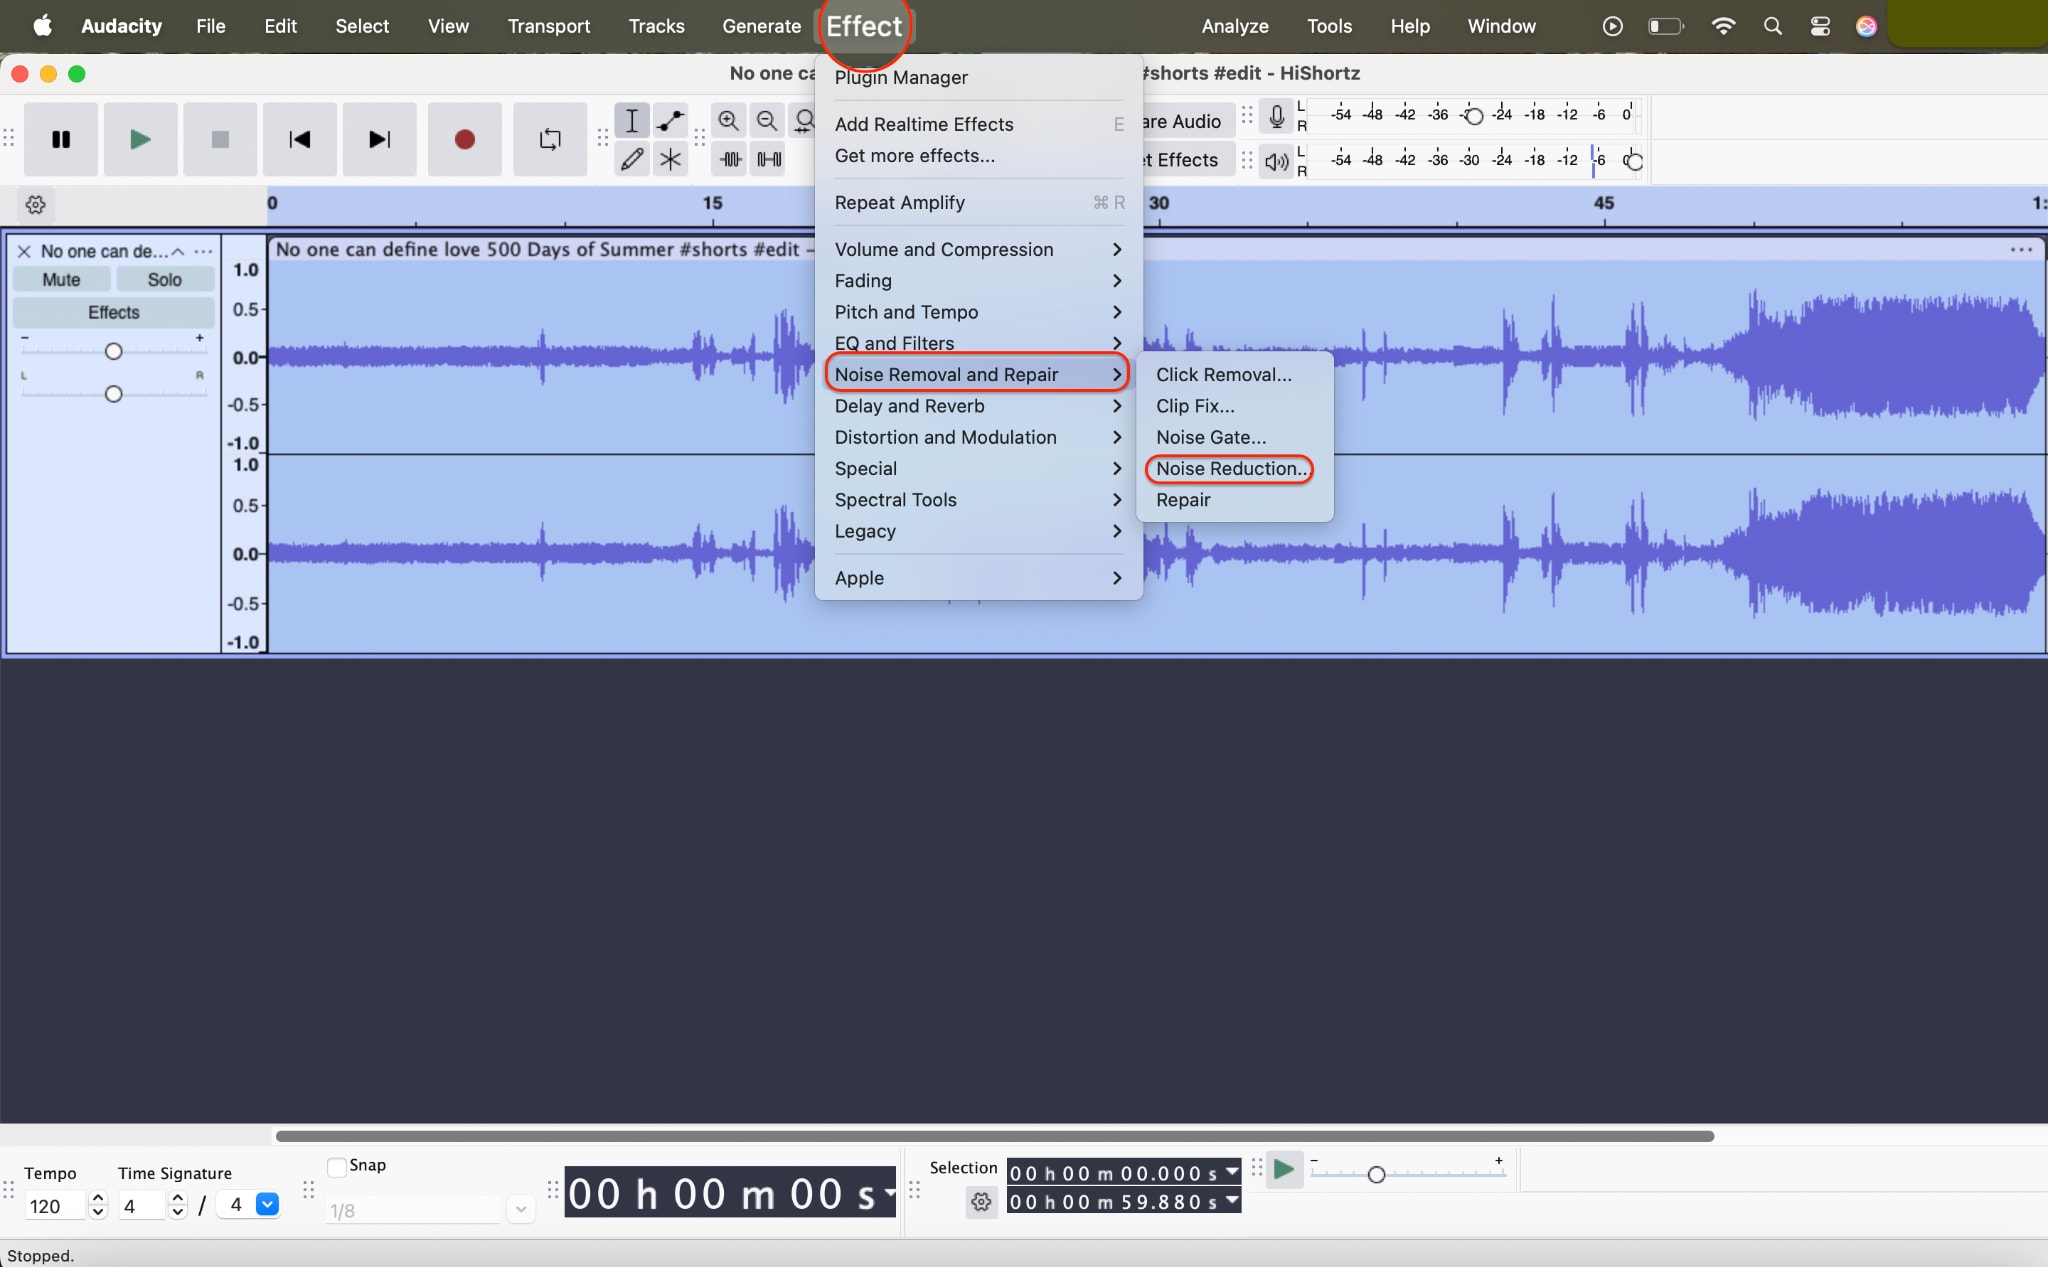
Select the entire audio by pressing Ctrl+A (Cmd+A on Mac). Then navigate to Effect > Amplify. Audacity will automatically suggest a safe amplification level, or you can manually increase the gain. This is the core step to boost microphone volume without distorting the audio. Use the preview option to test how it sounds before applying.
Step 3: Enhance, Export, and Save
For even cleaner audio, consider applying Noise Reduction or Compressor from the Effect menu to even out peaks and eliminate background noise.
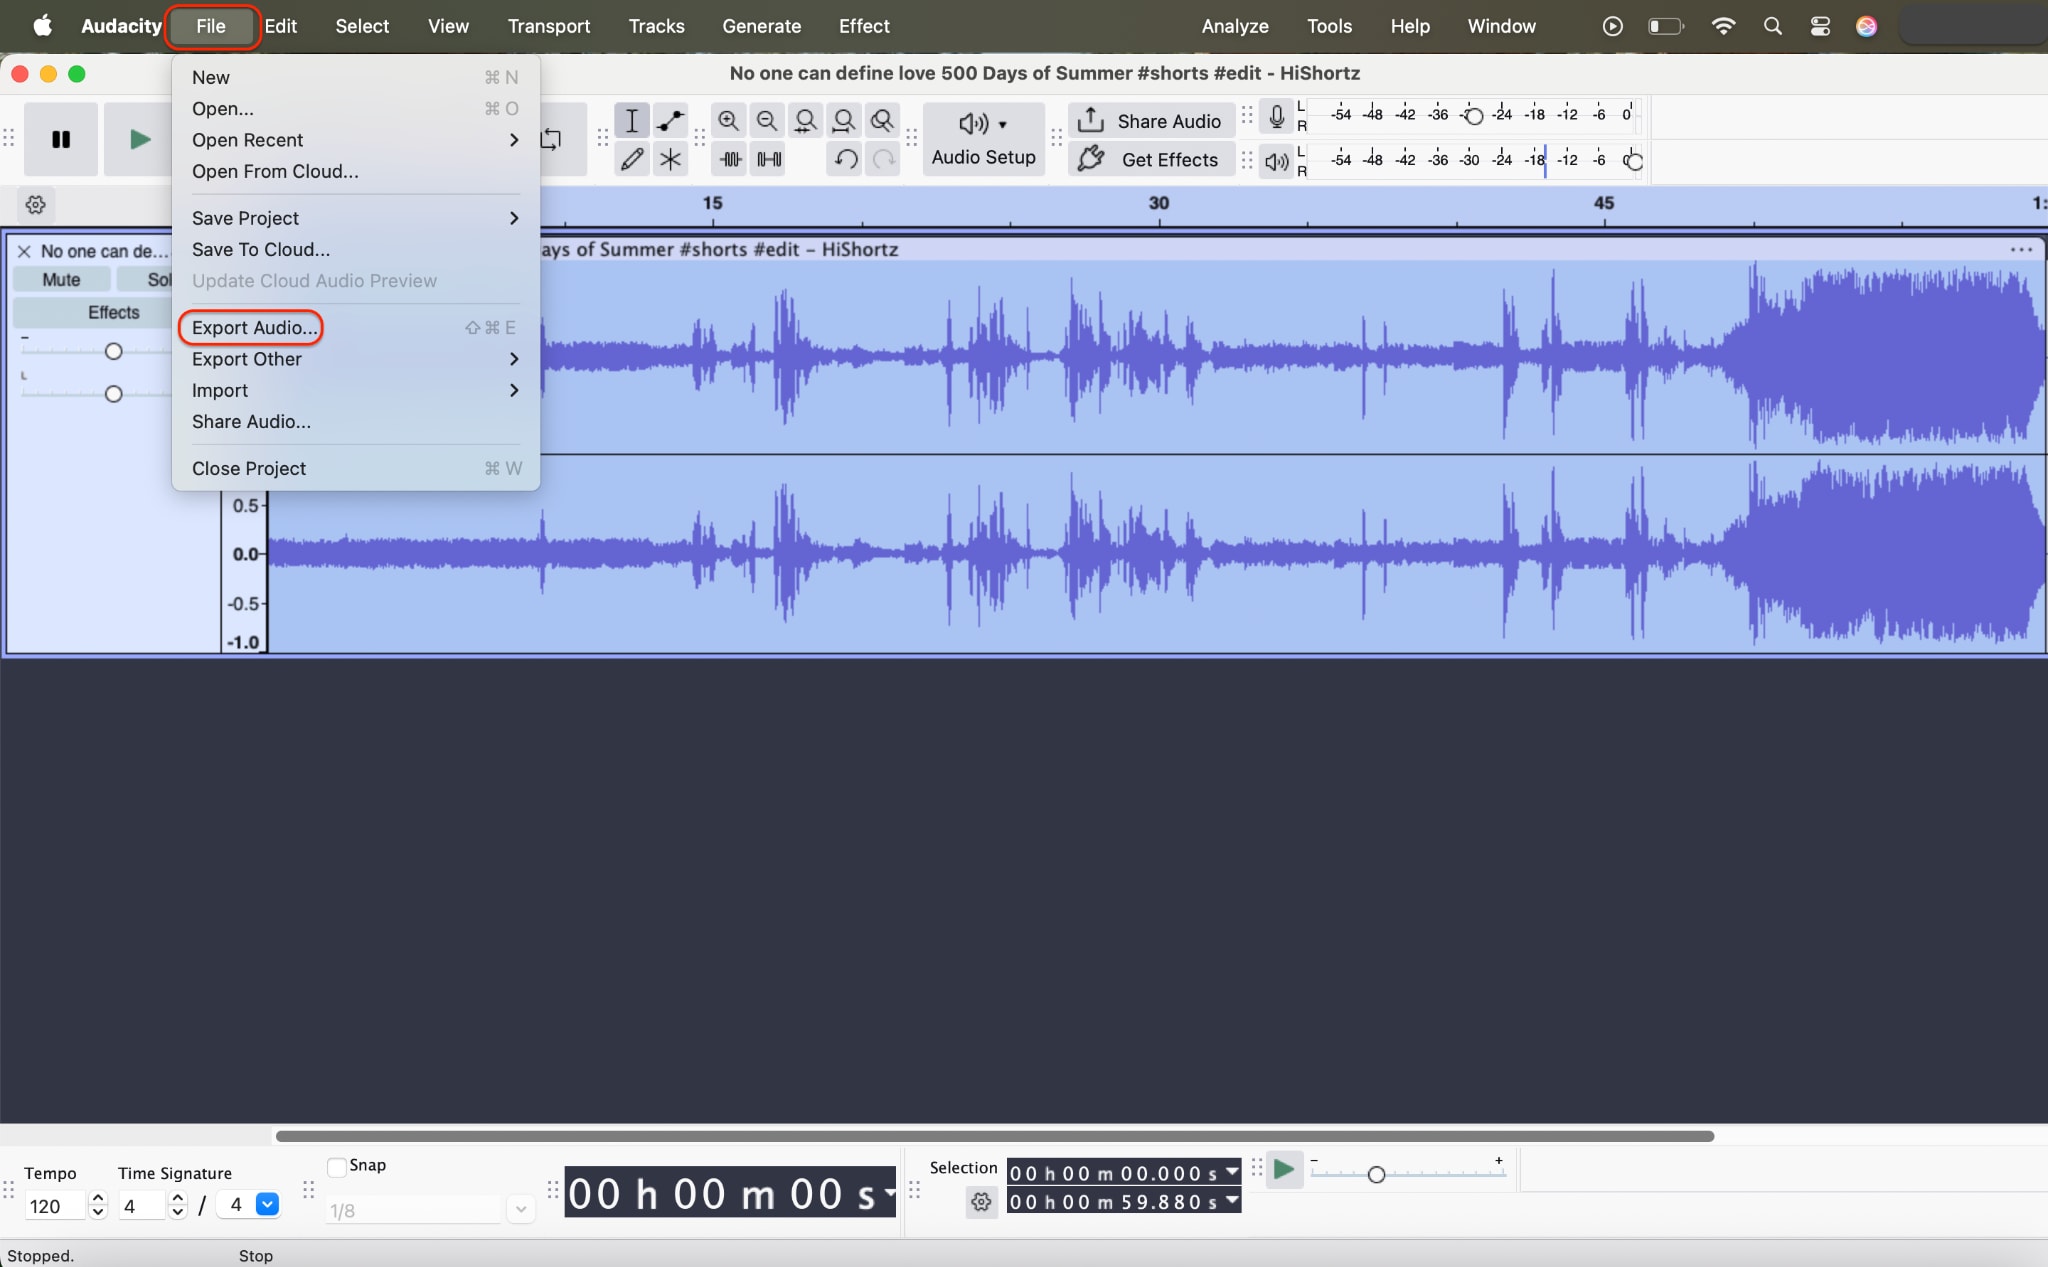
When you're satisfied with the volume and clarity, go to File> Export and save your enhanced File as MP3, WAV, or other formats. You now have a professionally boosted recording using a free, effective mic volume booster.
Whether you’re on Windows 10, Windows 11, or macOS, Audacity offers more precise control than built-in settings, making it one of the best free options for users looking to increase mic volume, clean up noise, and deliver professional-sounding audio.
Best Mic Boost Software and Apps Compared
If built-in sound settings are not enough, using mic boost software can help you increase microphone volume, improve clarity, and reduce background noise. Here is a quick comparison of the best options for different use cases.
| Tool | Best For | Platform | Type | Main Benefit |
|---|---|---|---|---|
| Audacity | Boosting recorded audio | Windows, Mac | Desktop software | Free volume amplification and audio cleanup after recording |
| Equalizer APO | Real-time mic boost on PC | Windows | Mic boost software | Advanced gain control, EQ, and live microphone enhancement |
| Audio Hijack | Advanced microphone control | Mac | Microphone boost app | Powerful routing, gain adjustment, and recording workflows |
| Krisp | Calls and meetings | Windows, Mac | Desktop app | AI voice enhancement and noise reduction for clearer calls |
| UniConverter | Boosting voice in recorded videos | Windows, Mac | Video editing software | Easy audio volume adjustment for single or batch video files |
Part 4. Bonus: How to Batch Improve Voice in Recorded Videos with UniConverter
If you're working with pre-recorded content—such as tutorials, interviews, or webinars—and the voice is too quiet or muffled, you don't need to re-record it. UniConverter offers a straightforward method to adjust the microphone volume in your videos using its built-in audio controls. It's fast, beginner-friendly, and ideal for batch processing.
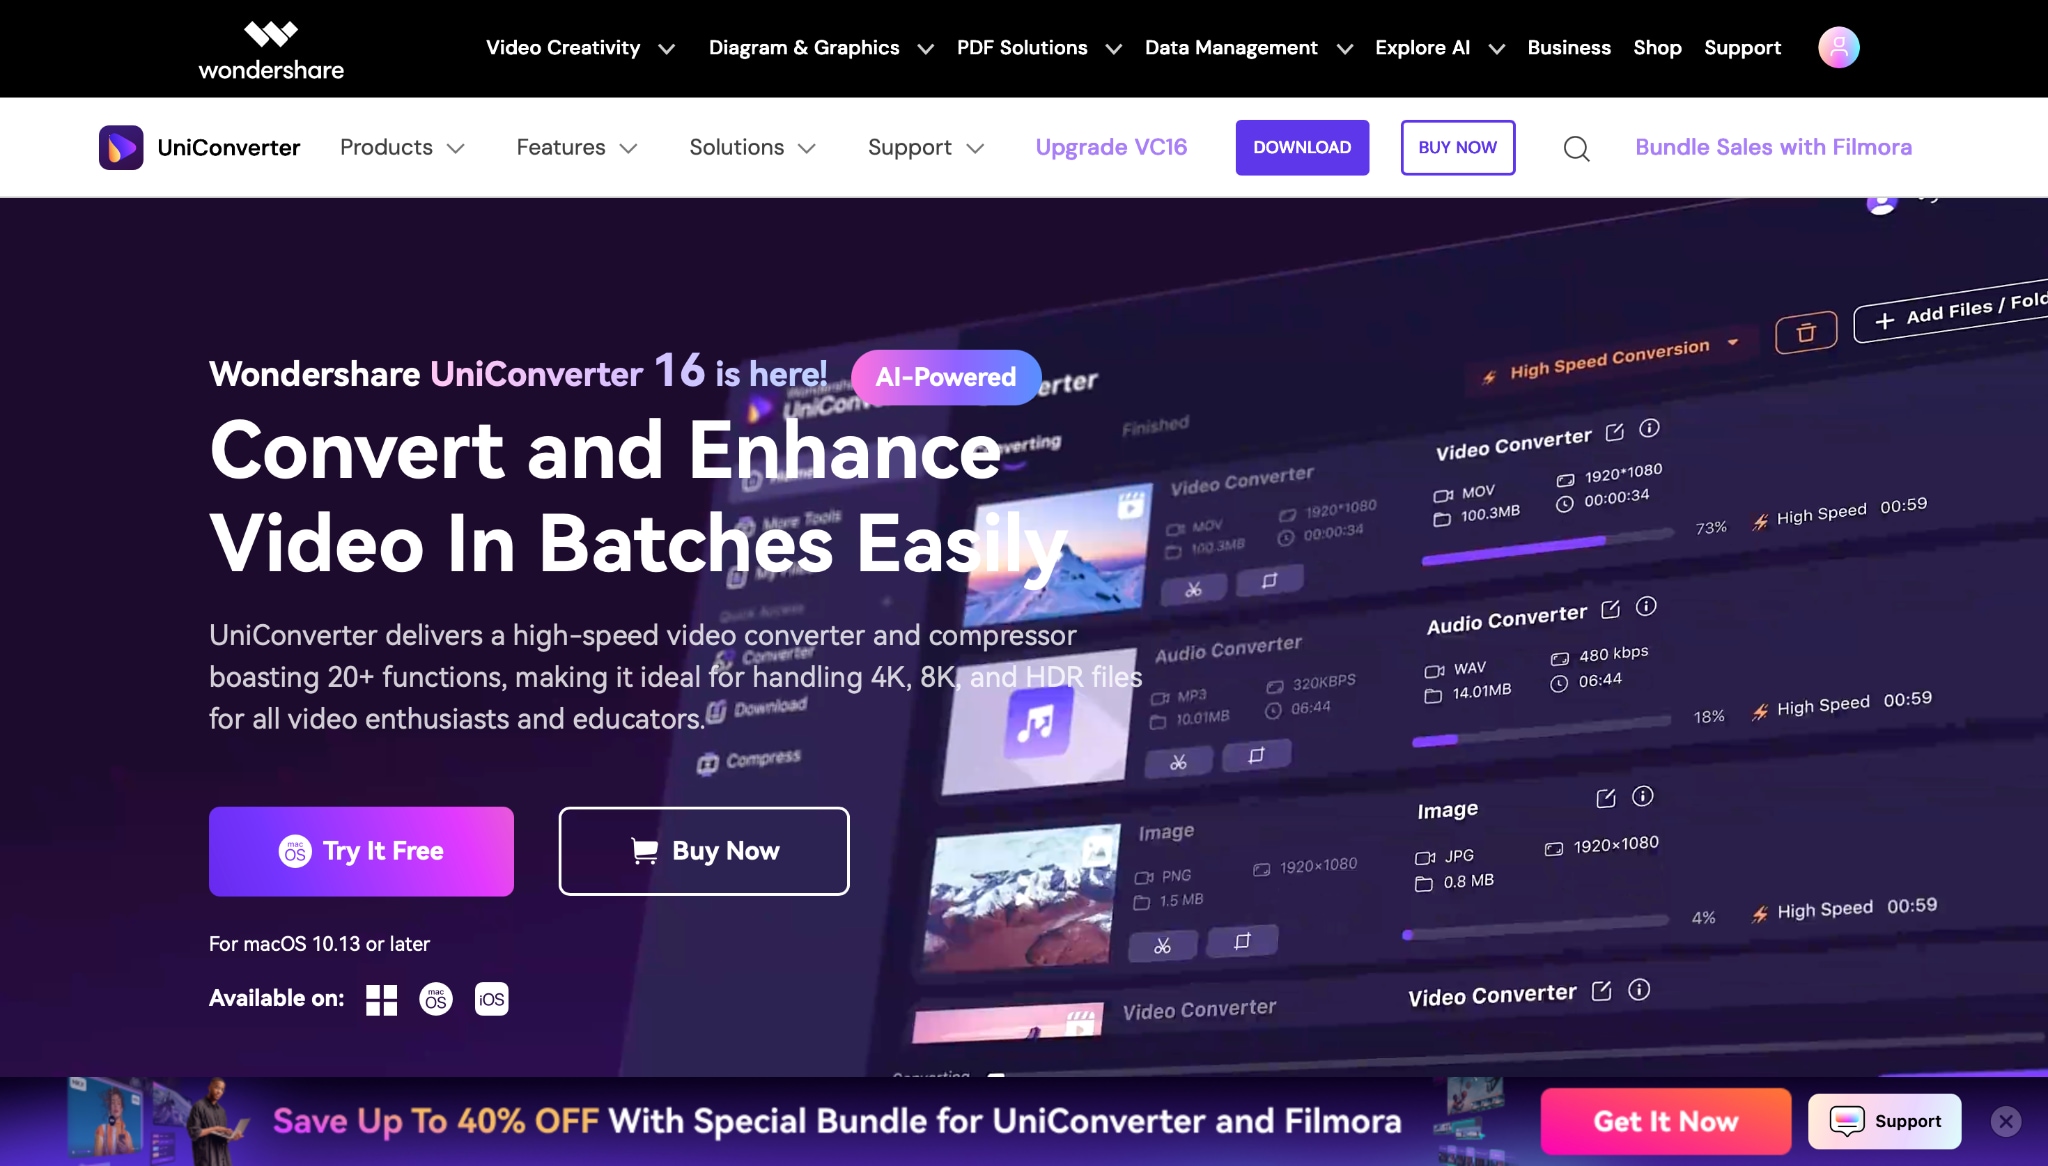
Whether you're trying to increase mic volume on Windows 10 or polish a voiceover from your Mac, this tool does the job without needing a separate mic boost program.
Step 1: Import Video Files into UniConverter
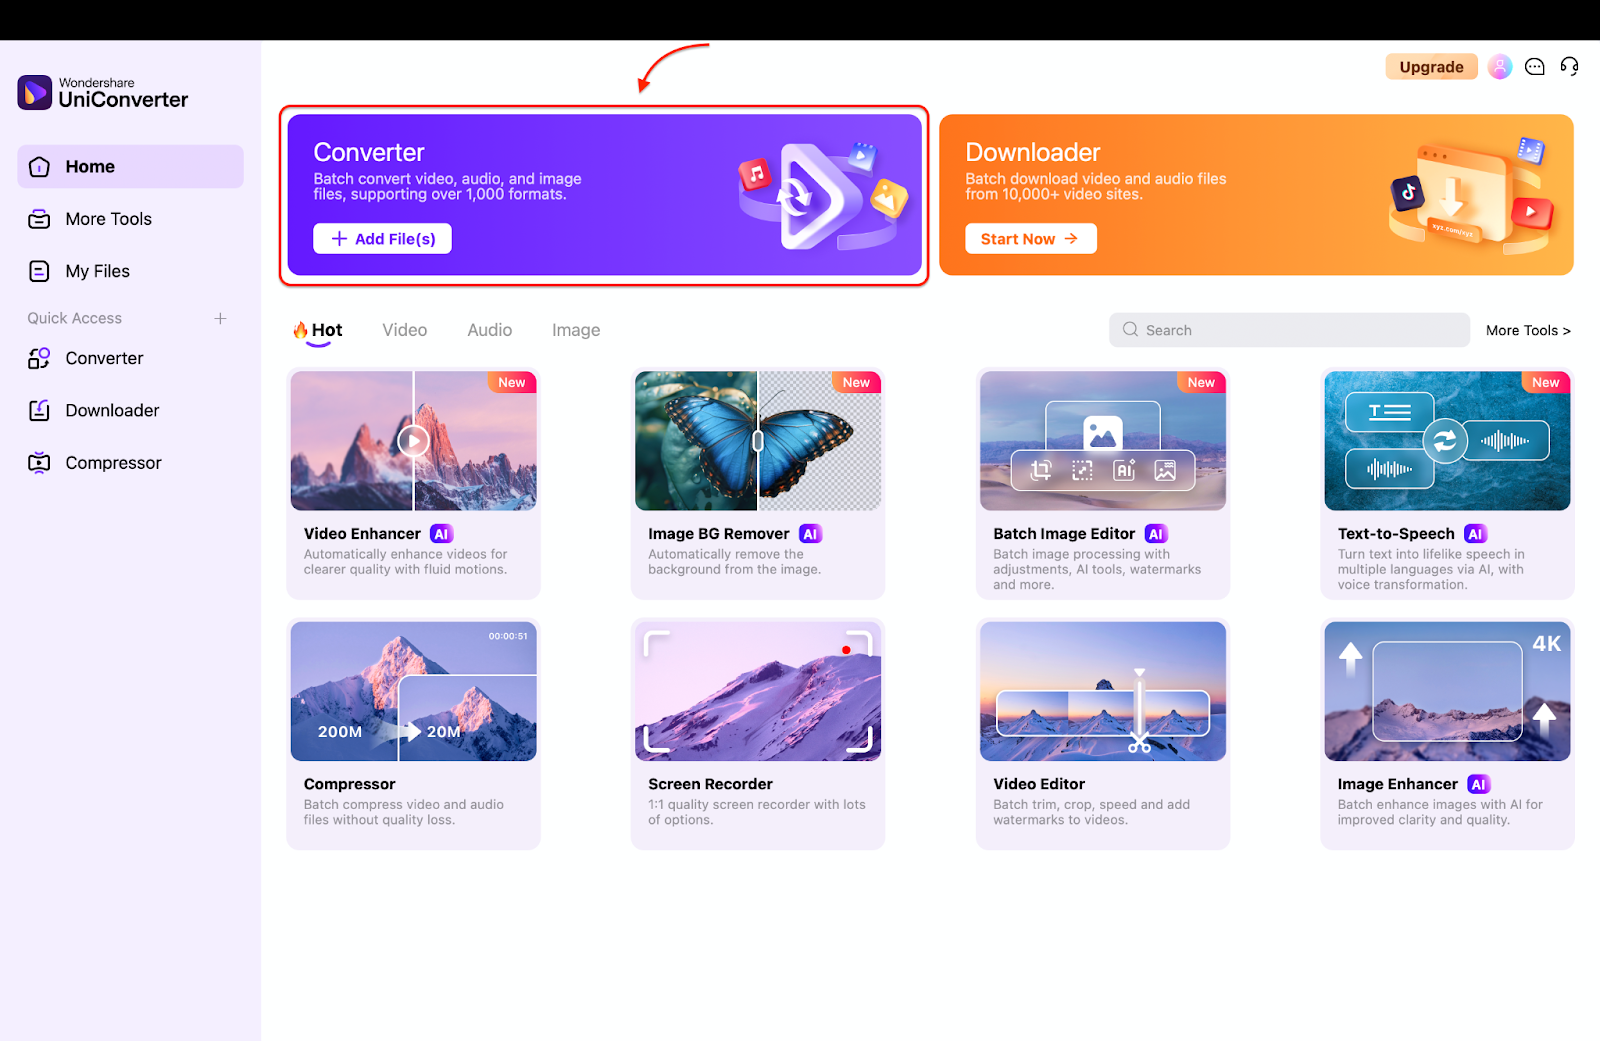
Launch UniConverter and go to the Converter tab on the home screen. Click "Add Files" to upload one or more videos that require a microphone boost. You can drag and drop multiple clips for batch editing—perfect for creators or educators managing several projects at once.
Step 2: Enter the Audio Adjustment Panel via Edit Wand
After importing, click the Edit Wand icon next to your video. Then, navigate to the Audio tab in the new window. Here, you'll find volume and gain controls that allow you to manually adjust the microphone level. Before increasing the volume, choose your desired output format (e.g., MP4, MOV) first and then hit the “Apply to All” button to apply the same settings in each video. This is UniConverter's built-in mic gain booster, and it's available for every clip you add.
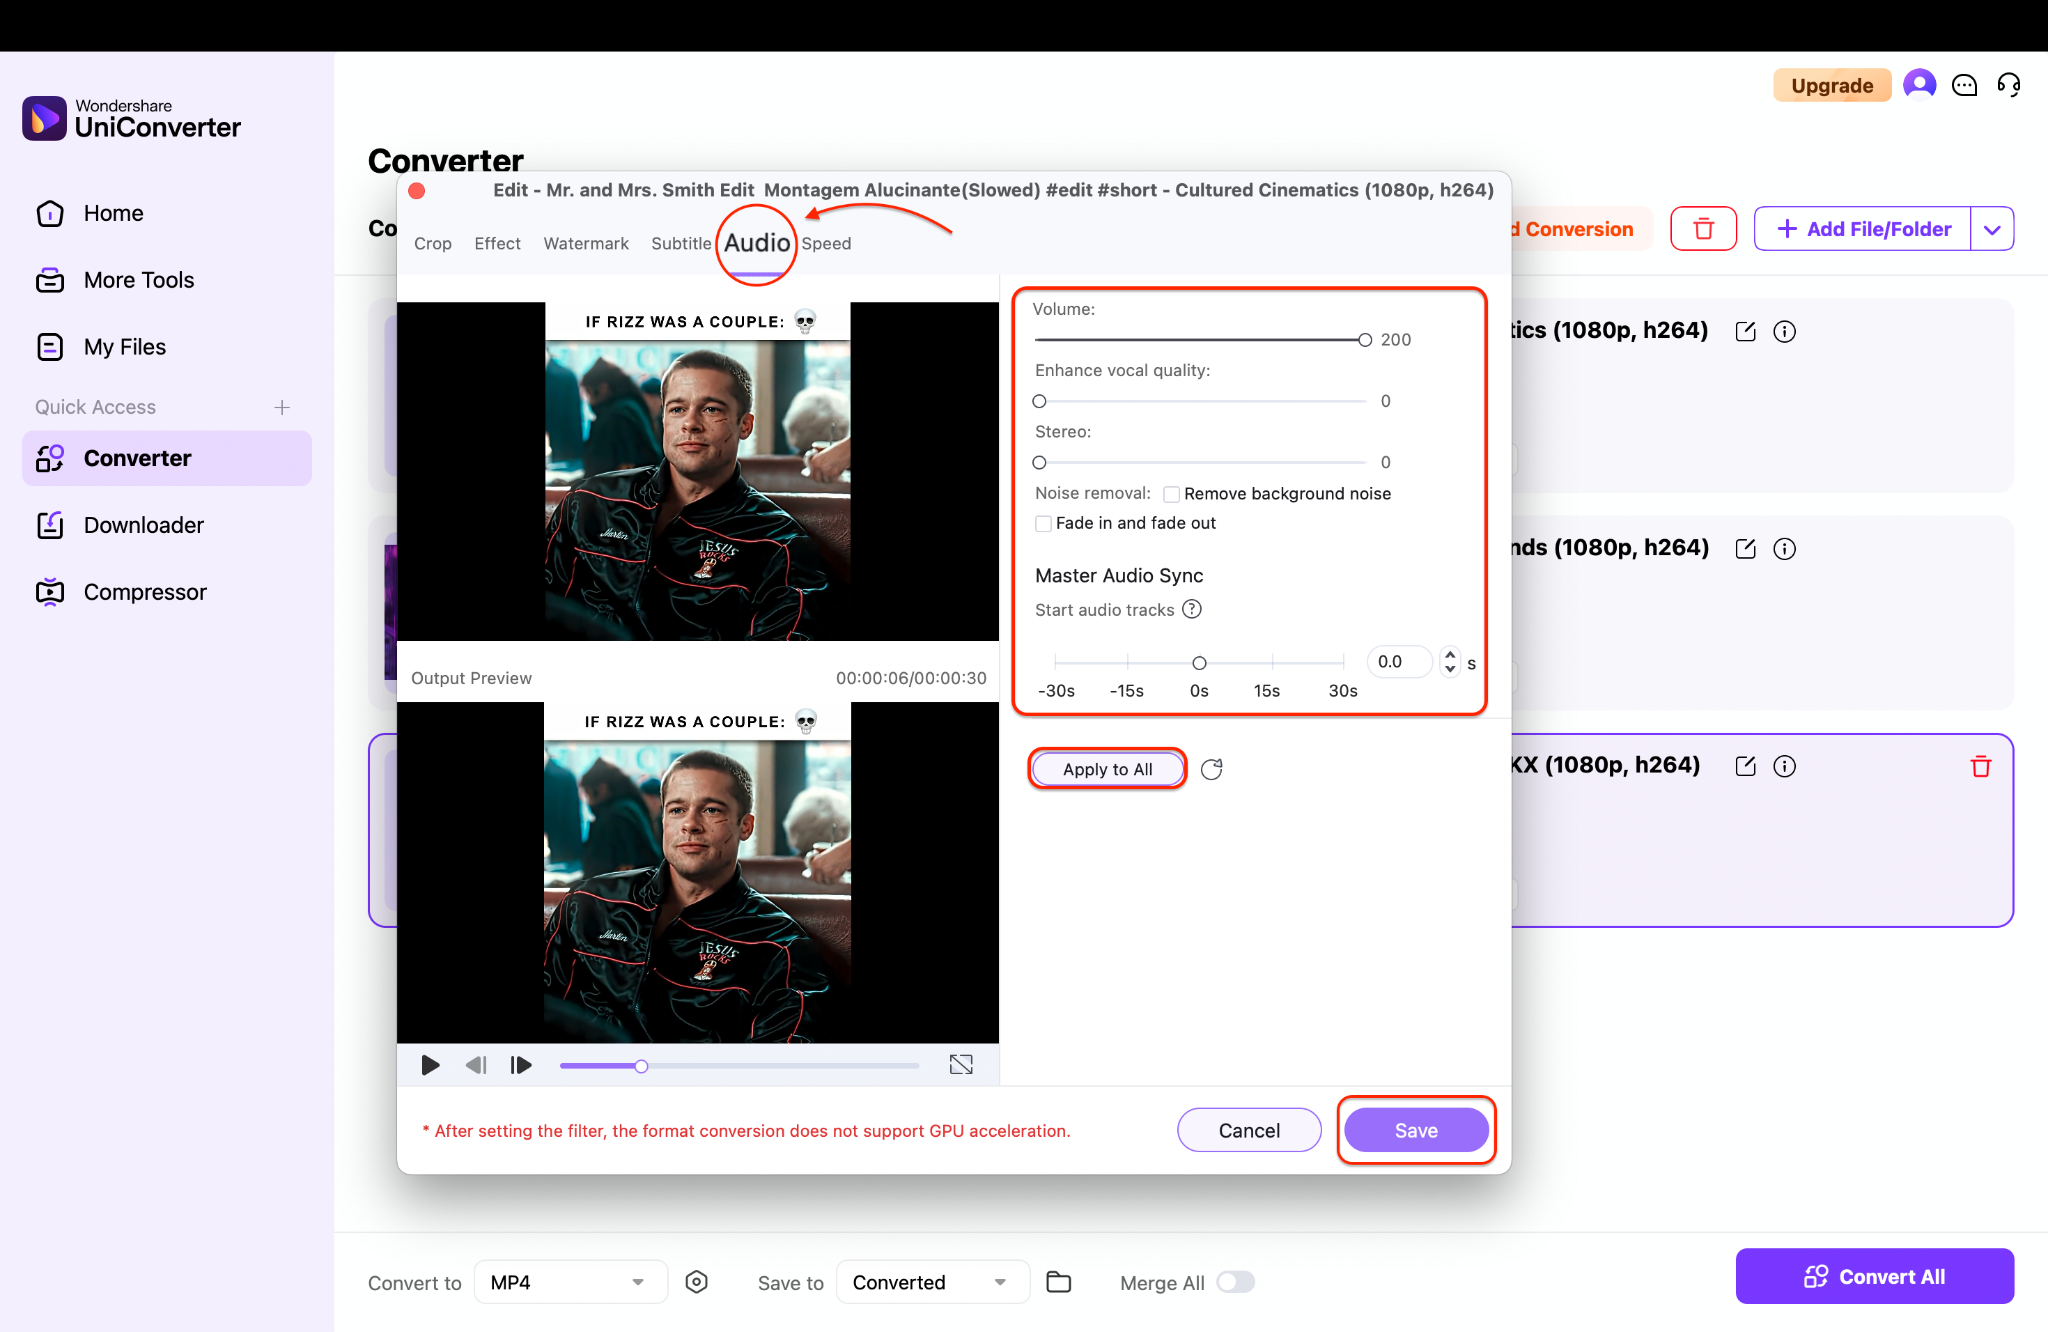
Step 3: Apply and Convert with Enhanced Audio
Once your audio levels are set, click Save to return to the main interface.Now head over to the “Save to” menu and choose your location to save your output, then click Convert All. UniConverter will process all videos and export them with cleaner, louder voice tracks. It's an efficient way to increase microphone volume across multiple recordings, especially useful if you don't have time for detailed audio editing.
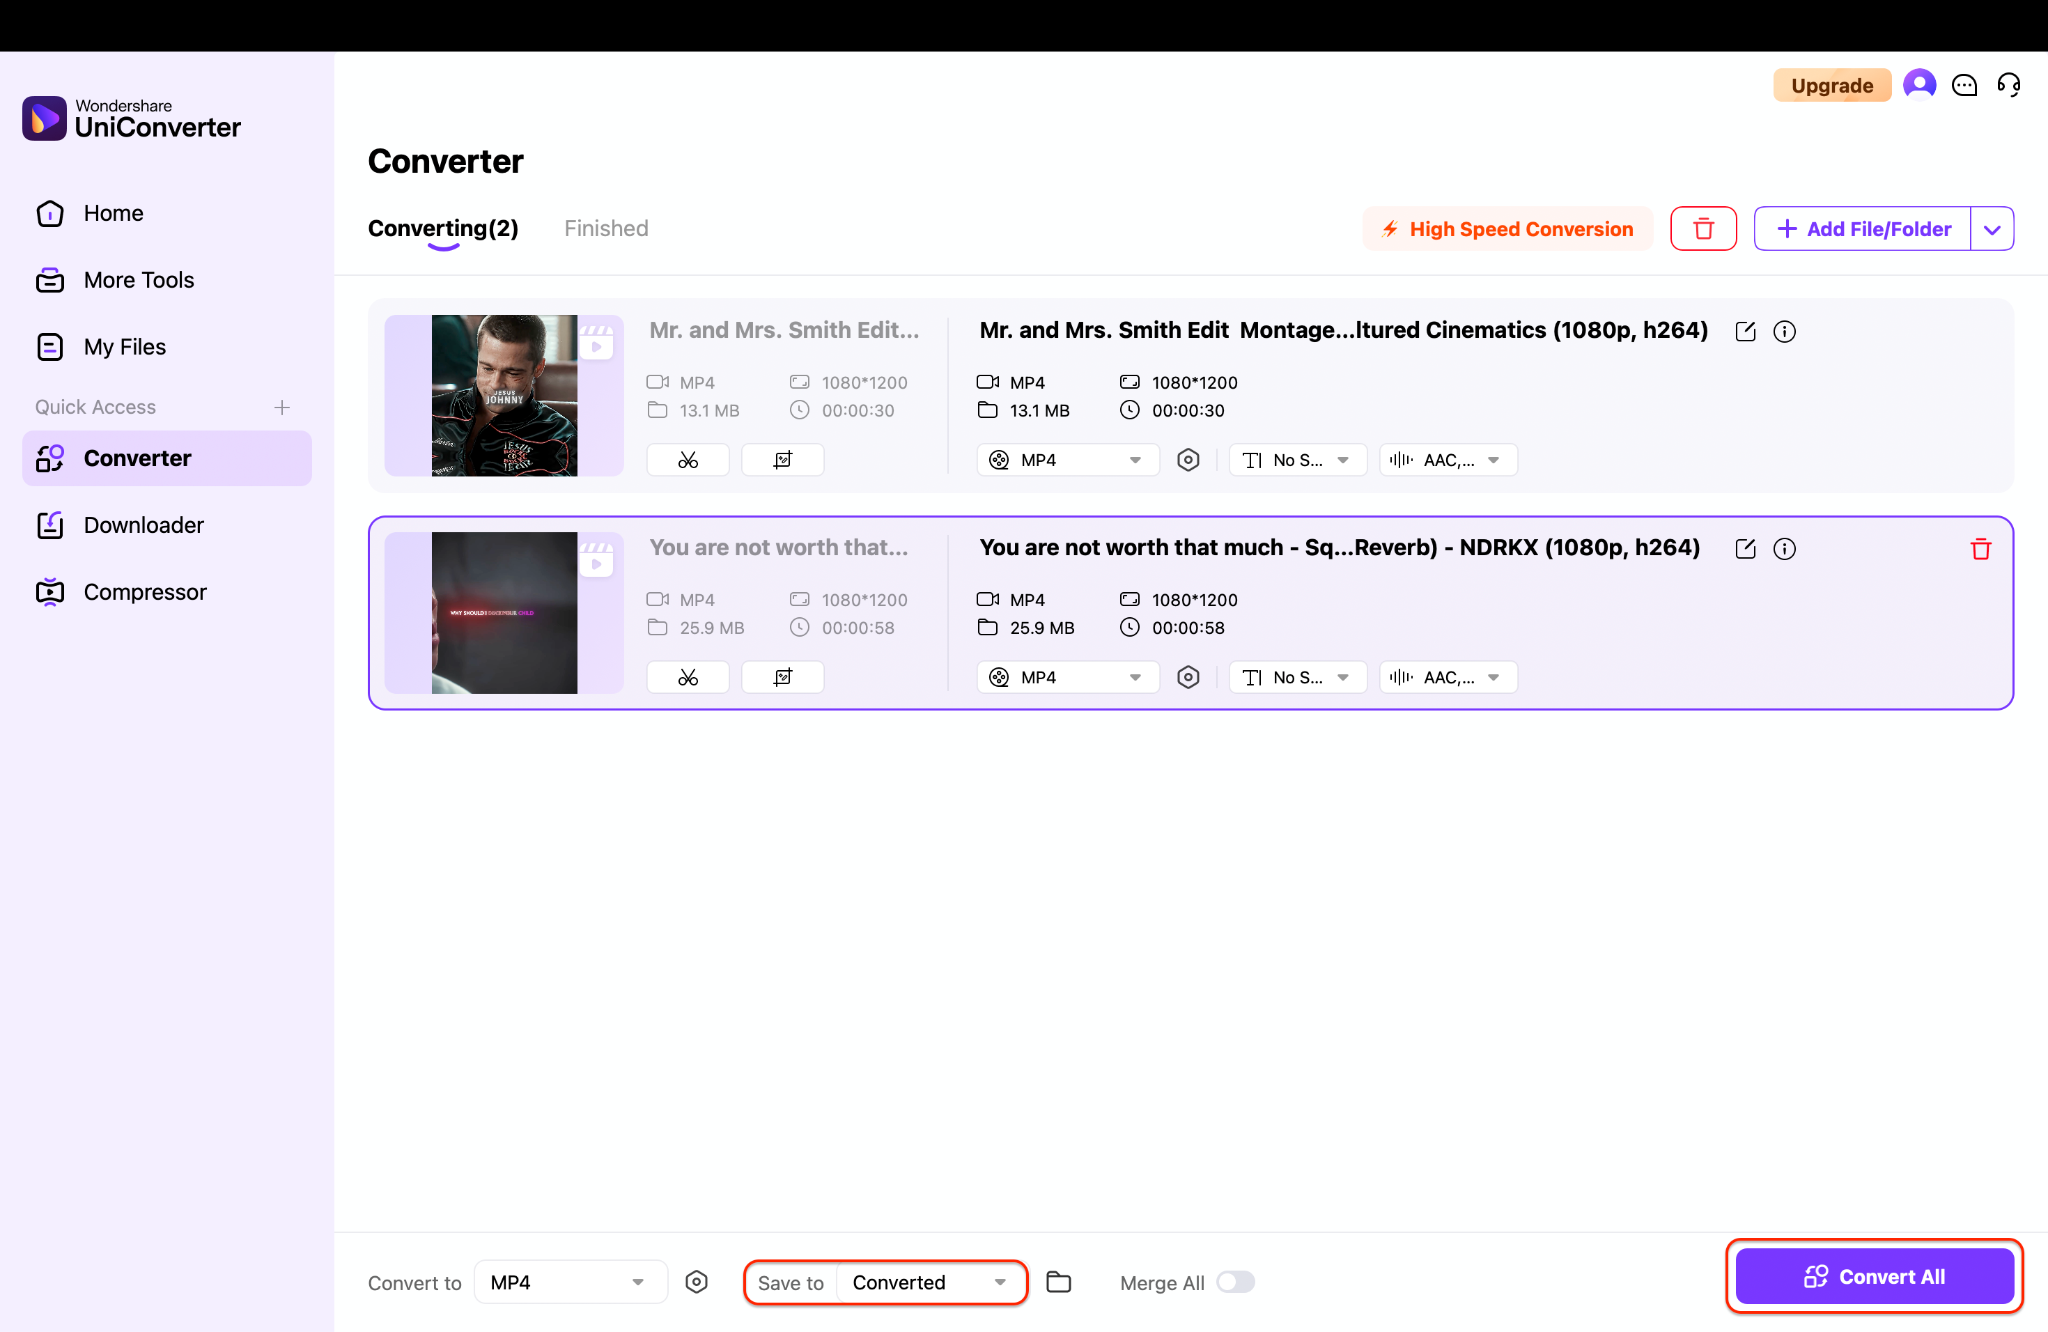
Why This Matters
Unlike most mic volume booster apps, UniConverter enhances both the visual and audio quality of your videos in one place. You don't need separate software for voice adjustments, cropping, or exporting in different formats.
And with UniConverter's high-speed engine and clean interface, boosting voice clarity in your videos has never been easier.
Part 5. How to Boost Mic Volume Without Distortion
- Increase the main microphone input level first before adding boost.
- Raise Microphone Boost in small steps instead of jumping to the maximum.
- Keep a steady speaking distance from the microphone.
- Reduce fan noise and room noise before increasing gain.
- Use noise reduction and compression only when necessary.
- Test your mic in your recording or meeting app after every change.
Conclusion
No one wants to sound distant or muffled, whether you're on a Zoom call, recording a podcast, or creating video content. Thankfully, boosting your mic volume is easier than ever. In this guide, we walked through multiple ways to get clearer, louder voice input across devices.
For Windows users, the built-in microphone boost and mic gain booster settings under sound control work well for most. MacOS users can rely on System Preferences to increase microphone volume, even though it lacks a dedicated boost slider. When you need more control, mic boost programs like Equalizer APO offer professional-grade customization. And if you're working with recorded content, UniConverter stands out as a powerful mic volume booster app—perfect for batch-enhancing your voice with just a few clicks.
FAQs
-
1. How do I increase microphone volume on Windows 11?
Go to Settings > System > Sound > More sound settings, then open your microphone Properties and raise both Microphone Volume and Microphone Boost under the Levels tab. -
2. Why is my microphone volume so low?
Low microphone volume is usually caused by low input settings, disabled mic boost, the wrong input device, app-level settings, or hardware gain that is too low. -
3. How can I boost mic volume without distortion?
Increase the main input level first, raise boost gradually, and test your voice after each adjustment so it stays loud but clear. -
4. Is there a microphone boost app for Mac?
Yes. Apps such as Audio Hijack and Krisp can help Mac users improve microphone input and voice clarity. -
5. What is the best mic boost software for Windows?
Equalizer APO is a popular real-time mic boost software for Windows, while Audacity is better for boosting recorded audio files.