How to Trim Videos on VLC
by Christine Smith • 2026-06-23 15:08:13 • Proven solutions
VLC
- TRY IT FREE TRY IT FREE
- 1. Playing with VLC+
-
- 1.1 Play Blu-Ray Movies
- 1.2 Play DLNA Content
- 1.3 Play Videos in VLC with Airplay
- 1.4 Play YouTube Videos in VLC
- 1.5 Play M2TS with VLC
- 1.6 Play MTS with VLC
- 1.7 Play M4V with VLC
- 1.8 Play MP4 in VLC
- 1.9 Play RTMP with VLC
- 1.10 Play ISO with VLC
- 1.11 Play AVI with VLC
- 1.12 Play WMV with VLC
- 1.13 Play MIDI with VLC
- 1.14 Play 3D Movies with VLC
- 1.15 Play AVCHD with VLC
- 1.16 Play Sopcast in VLC
- 1.17 FLAC Not Playing
- 1.18 MP4 Not Playing
- 1.19 FLV Not Playing
- 1.20 MOV Not Playing
- 1.21 UNDF Not Playing
- 1.22 Use VLC for PS3
- 1.23 VLC Alternative
- 2. Convert & Stream+
- 3. Editing with VLC+
- 4. VLC for Mobile+
- 5. Tips & Tricks+
-
- 5.1 Download VLC 64 bit
- 5.2 VLC Latest Version
- 5.3 Download VLC for Mac
- 5.4 VLC for Windows 7
- 5.5 VLC Skins
- 5.6 VLC Command Line
- 5.7 VLC as Default Player
- 5.8 Convert CD with VLC
- 5.9 Burn VLC Files to DVD
- 5.10 VLC Web Plugin
- 5.11 Remote Control VLC
- 5.12 VLC Shortcuts
- 5.13 Screen Capture with VLC
- 5.14 Sync VLC Audio
- 5.15 KMPlayer vs. VLC
- 5.16 MPC vs. VLC
- 5.17 VLC Old Version
- 5.18 Snapshots in VLC
- 5.19 Is VLC Safe
- 5.20 Best Torrent Player
- 5.21 How to Control the Speed
VLC gives you a great way to edit your video with simple tools. It may not be a premium-editing tool but does the most basic cutting/trimming a video. You can also merge them to create a fun video.
- Part 1. How to Cut Video in VLC
- Part 2. Using Command-Line to Split the Video
- Part 3. Wondershare UniConverter (originally Wondershare Video Converter Ultimate)
Part 1. How to cut a video in VLC
An average user can easily use this video, cutting functionality to save or share it. The steps are simple and easy to follow.
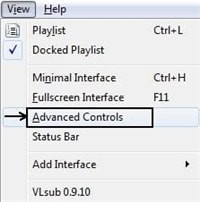
Step 1 Open the video with the VLC player and go to view the menu to open Advanced Controls.
Step 2 Using the status bar, navigate to the starting point of the video, and click on the record button.

Step 3 Now, play the video to reach the end part of the video. To stop the recording, click the record button again. Your video will be saved to default save location for VLC, which usually My Videos on Windows.
This method is nearly the same for both Windows and Mac computers. Just know the default save location of videos on Mac and windows as they differ.
Part 2. Using Command-Line to Split the Video
Using Command-Line is a great way to split the video with simple few lines. This method is only for the advanced users as it involves a good understanding of commands and video formats etc. In this method, you will be using a command prompt to open VLC and Terminal in mac. They are already available on your system. You can find them under programs in Windows or search ‘Terminal’ in Mac.
Step 1 Launch command prompt for windows and terminal for Mac. As we are using the command prompt, you will have to direct the program to the location where VLC is installed on your system. Usually, for windows, it is C: Program FilesVideoLanvlc.exe and for mac, /application/utilities.

Step 2 Let’s assume you are using the terminal after opening the vlc and using the following commands to cut a video.

An important thing to notice here is that you will have to enter the name of the file that you want to cut correctly in “filename=” you will have to specify the start time in “start=” and enter the interval up to the end of the video.
Make sure you know the basics of command before using this method.
Part 3. Wondershare UniConverter (originally Wondershare Video Converter Ultimate)
What do you do if you’re not able to follow the complex instructions above? Command-line interfaces aren’t for everybody and can significantly waste your time. You will probably be better off doing something else unless you’re trying to make a tech career.
If you are using video that is not supported on VLC, then you can use a third-party converter for that video - like the Video convertor Ultimate. It is known to support almost all the video formats and keeps upgrading with new. It would be a perfect assistant for the VLC player while editing. It converts 30 times faster than any converter or VLC itself. Even with heavy formats like 4K format types, this software runs smoothly and gives you the desired result. Now you can convert your videos using Wondershare UniConverter and edit it on the VLC player.
The Best VLC Assistant - All-In-One Video Solution!
- Edit, Enhance & Personalize Your Videos File.
- One player to play all with the conversion function.
- Convert files 120x faster than other converters.
- Convert to fast all Formats, including 4K/3D.
- Download videos from 1000+ video sharing sites.
- Record streaming online videos or screens.
- Burn & customize DVD with DVD menu templates.


Christine Smith
chief Editor