How can I remove black bars from videos? Can I crop videos for YouTube/Tik Tok/Instagram automatically?
Try this best AI-Based Video Cropper for Windows/Mac to auto reframe/resize/crop video to suit different social platforms.
Cropping your videos on a MacBook can be a hassle if you do not have the access to the right tools. Though many MacBook tools claim to crop the videos, to ensure that the cropping is done in the right manner and an effortless manner, the selection of the right program is very important. So, for your convenience, we have shortlisted the top ways to crop video MacBook.
Part 1. All Free Ways to crop video on Mac [iMovie/QuickTime/FFmpeg]
If you are in search of a pocket-friendly tool that can let your crop the videos on your Mac, check the top free tools as listed below.
1.iMovie
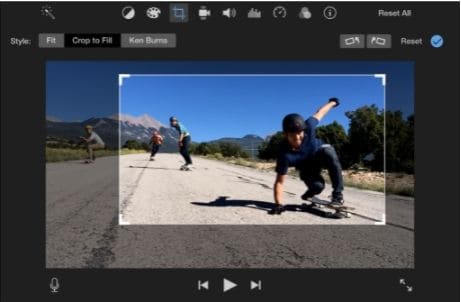
Developed by Apple, iMovie is the default editing app that comes pre-installed on the Mac systems. Multiple functions can be performed using the app like cropping, freeze frames, adding effects, and more. Using the tool, you can crop a clip in the timeline, in the browser, and by restoring the original aspect ratio.
Steps on how to crop videos on MacBook using iMovie
Step 1. Launch the iMovie app on your Mac and choose the video in the time that you want to crop.
Step 2. Tap on the Cropping button to see the cropping controls.
Step 3. Tap on the Crop to Fill button and on the top of the video, an adjustable frame will appear. (This will be in 16:9 aspect ratio).
Step 4. Next start moving and resizing the frame till you get the desired result.
Step 5. Finally, click on the Apply button to process the video.
2.QuickTime Pro
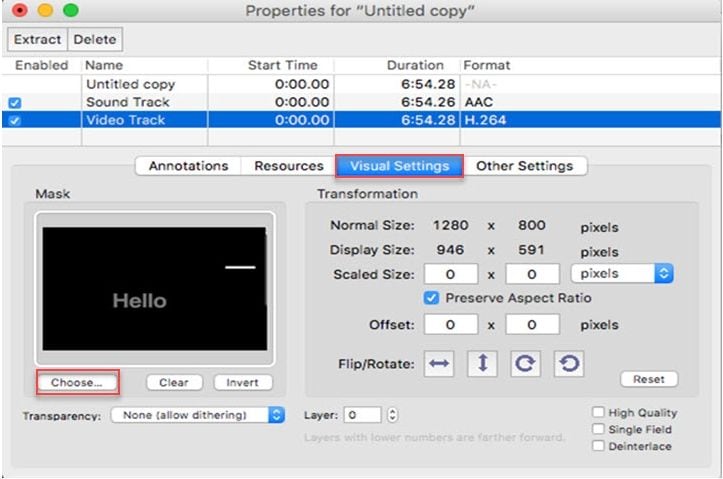
To crop the videos using the QuickTime on your Mac, you need to use the Pro version as the basic version does not support the feature. To crop the video, you need to associate it with a Photoshop mask.
Steps on how QuickTime crop video
Step 1. Open the QuickTime Pro tool on your Mac and then take a picture of the video that needs cropping. The captured image has to be exported as an Image Sequence in .jpg format.
Step 2. Next, launch Photoshop and then go to Edit > Copy and then paste the copied image. Using the Photoshop Rectangular Marquee tool choose the area that is needed to be kept and then fill it with black. The remaining area is the rest area which has to be filled with white as a mask. This file now needs to be saved as a TIFF or a GIF file.
Step 3. Next, open the video and the mask in the QuickTime Pro tool. Move to Window > Show Movie Properties > Visual Settings and here add the mask file.
Step 4. The extra area will hide as the mask file is applied. To save the cropped video on Mac, go to File > Export.
3.FFmpeg
FFmpeg is a command-line tool that helps perform multiple tasks like video transcoding, cropping, and other editing functions. This free and cross-platform tool requires you to know the commands for performing different tasks.
Once the FFmpeg program is successfully installed on your Mac system enter the following command for cropping the video.
ffmpeg -i in.mp4 -filter:v "crop=out_w:out_h:x:y" out.mp4
In the above command, out_w mentioned the width of the output rectangle while out_h is the height. The top and the left corner of the output rectangle are specified through x and y.
Part 2. Best choice for Mac to crop video manually or auto-crop video easily
The above-listed tools can help you crop the videos on your Mac but the process is a hassle and not straightforward. We recommend Wondershare UniConverter as the best software for cropping and editing videos in all key formats.
The software can be quickly installed on your Mac system after which it is all set to perform a wide range of tasks. The videos can be cropped manually as well as automatically using the software.
Wondershare UniConverter — All-in-one Video Toolbox for Windows and Mac.
Crop the videos in all key formats including MP4, MOV, AVI, and many more.
Preview window to check how the changes appear to the file.
A wide range of editing functions is supported like resizing adding filters, trimming, subtitles, and more.
Video conversion in more than 1000 formats supported.
Steps on how to crop a video on MacBook manually using Wondershare UniConverter for Mac:
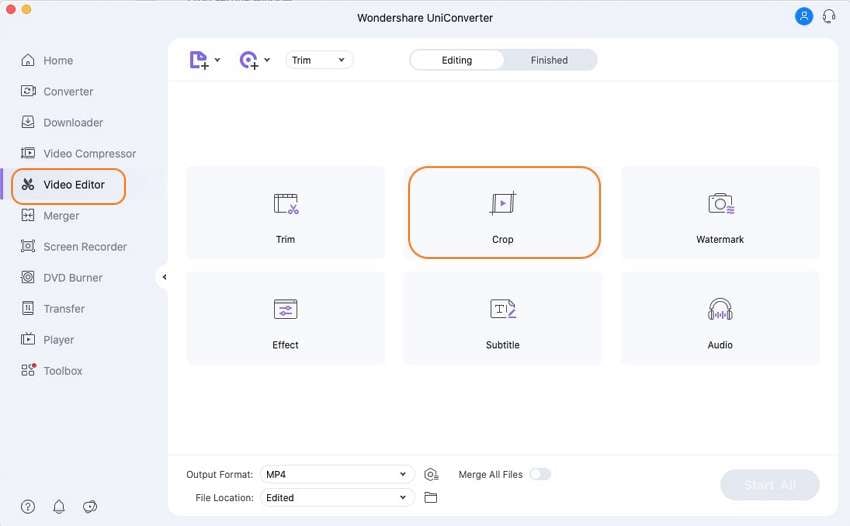
Step 1 Add video to Wondershare UniConverter Crop tool
Open the software and from the Video Editor section click on the Crop option. Browse and add the video that has to be cropped.
Step 2 Select cropping area
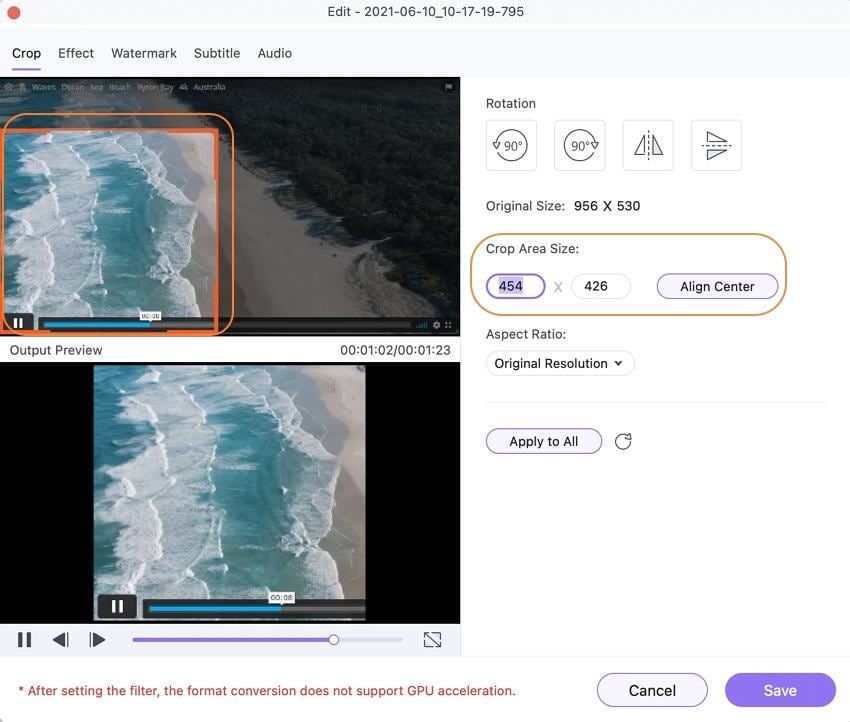
As the video is added, an editing window will open. Move the video frame corner to choose the area of cropping. You can also enter the desired values at Crop Area Size. Select the Aspect Ratio as needed. Click on the OK button when settings are done.
Step 3 Process and crop video
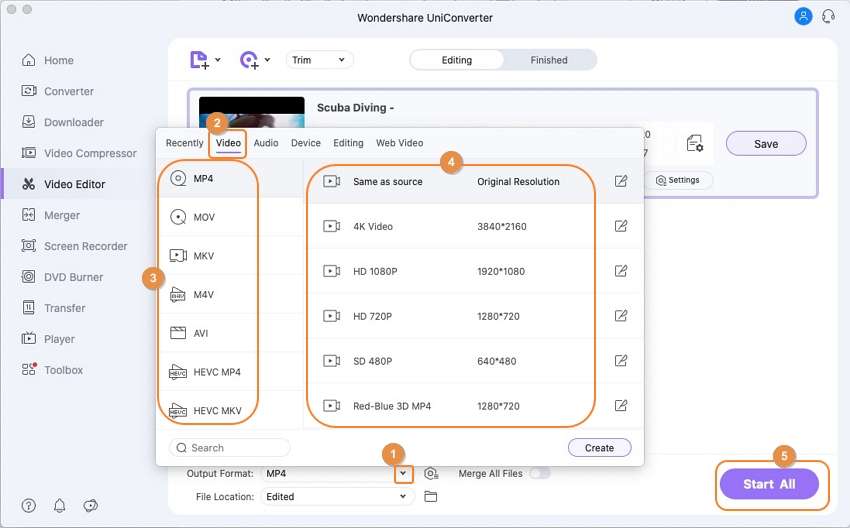
Choose the target format from the Output Format drop-down list and select the system folder at the File Location tab to save the video. Finally, clicking on the Start All button will start processing your added video and the cropped version can be checked from the selected folder on your system.
Advanced Auto-Reframe video on Macbook
The latest software version has an Auto-Reframe function that allows you to crop the videos automatically by choosing the Aspect Ratio from the given options. You can also select the Motion Speed as desired. Read more to How to Auto Reframe Video on Mac Easily>>
Part 3. FAQs about MacOS crop video
1. How do I crop a video to 9/16 on a Mac?
To crop a video to 9/16 on your Mac, use the Auto Reframe function of Wondershare UniConverter. Launch the software and choose the Auto Reframe function. Browse and import the video file and then simply choose 9:16 as the aspect ratio.
2. Can I crop MP4 on Mac online?
Yes, MP4 files on Mac can be cropped online using browser-based programs. A few of these popular tools are as below.
This is a free tool that can be used for cropping videos quickly and easily. In addition to the local videos, you can even add a file from Dropbox, using a link or by recording as well. After the video is added, you can choose from the available aspect ratio options for cropping the file. Multiple other editing options are also supported by the program.
Using these online tools videos in MP4 and other key formats can be quickly cropped. You can add a local file, a URL, or from the cloud storage for the process and the maximum file size can be 100MB. Once is file is cropped and processed; it can be downloaded to the local system.
Using Clideo, videos on your system, Dropbox, and Google Drive can be added and cropped quickly. All key formats including MP4 are supported by the tool. Once the video is added, you can choose the desired frame size and the aspect ratio of the file. The option for selecting the target format is also there.

Full Video, Audio and Image Solutions for Camera Users
Still struggling with your shooting 4K video won't play on other devices or playing with audio and video out of sync? Wondershare UniConverter helps you out! Find your issues and get the full answer now.

