4K Video
- 1. Convert 4K Videos+
-
- 1.1 Convert 1080p to 720p
- 1.2 Convert 4K to 1080p
- 1.3 Convert Videos to HD 1080p
- 1.4 4K vs 1080p
- 1.5 Convert Videos to MP4 HD
- 1.6 4K Online Video Converter
- 1.7 4K Video Converter Apk
- 1.8 Top 4K Video Converters
- 1.9 Convert 4K Tamil Movies
- 1.10 Convert 4K Hindi Movies
- 1.11 4K Video Songs Converter
- 1.12 4K to MP3 Converter
- 1.13 4K Movies Converter
- 2. Tips & Tricks for 4K Conversion+
All Topic
- YouTube Tips
-
- AI Tools Tips
-
- AI Photo Enhancer Tips
- Voice Changer Tips
- AI Thumbnail Maker Tips
- AI Script Generator Tips
- Smart Summarizer
- AI Subtitle Generator Tips
- Watermark Remover
- Vocal Remover Tips
- Speech to Text Tips
- AI Video Tips
- AI Image Tips
- AI Subtitle Translator Tips
- Video Extractor Tips
- Text to Speech Tips
- AI Video Enhancer Tips
- DVD Users
- Social Media Users
- Camera Users
- Photography
- Creative Design
- Movie Users
- Travelling Fans
- Educational Users
- More Solutions
- Holidays and Commemoration
- Game Lovers
- Other Tips
How to Take on A 4K Video Workflow in Final Cut Pro Mac
by Christine Smith • 2026-01-21 18:54:43 • Proven solutions
4K video is the latest resolution standard, which is designed for computer graphics and digital cinema. The format is named 4K because it features approximately 4000 pixels horizontal resolution, and this offers four times more image definition compared to the 1080p resolution. Other advantages of the format include more detailed images, large projection surface, higher image definition quality, etc. If you also wish to edit 4K videos in Final Cut Pro, there are some tips and tricks to help you take on a 4K video workflow in Final Cut Pro on Mac.
- Part 1. How to Edit 4K Videos in Final Cut Pro
- Part 2. Extra Knowledge About 4K Video Editing and Converting
- Part 3. How to Convert 4K Videos to 1080p for Final Cut Pro
Part 1. How to Edit 4K Videos in Final Cut Pro
To import and edit your 4K video in Final Cut Pro, it is always advisable to first downscale the video to 1080 ProRes format through a video converted. Below given are the steps to take on a 4K video workflow in Final Cut Pro.
Step 1: Convert 4k videos to Apple ProRes format.
First of all, you need to install an excellent 4K video converter on your Mac system and then load the media file/files to the software that you wish to edit. Convert your 4K file to the Apple ProRes format.

Step 2: Load the file to Final Cut Pro.
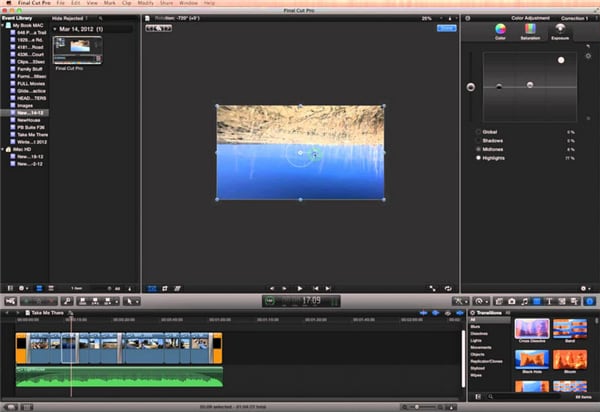
Once the files are converted, load it to your Final Cut Pro software. You can load the files by either dragging and dropping them to the program timeline or going to the Menu Bar, clicking on Edit, and then going for a load media files option.
Step 3: Customize 4k videos in FCP.
Once the files are loaded on Final Cut Pro software, you need to do some enhancements. Go to the Settings option and make the changes in the key parameters.
Step 4: Actual editing of the video.
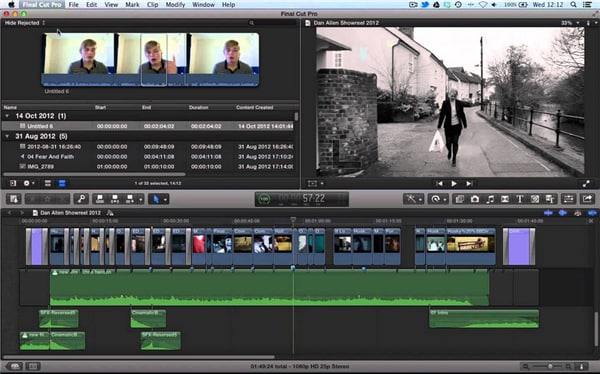
Now it is time for actual editing of the video- trimming, cropping, conversion, or anything else. Edit the video as per your requirements using various features and functions of the software.
Step 5: Saving edited 4k videos.
Once you have completes the editing process, it is now time to save the new version. Click on the Save button to save the changes permanently.
Part 2. Extra Knowledge About 4K Video Editing and Converting
1. Know the compatibility of your hardware and software.
4K videos are getting more and more popular these days due to their high-quality video. Still, if you wish to edit these videos through your Final Cut Pro software, you first need to ensure the compatibility of your hardware and software. First of all, you need to know whether your Final Cut Pro version supports the 4K format. Though the latest versions of the software support the format, it is always advisable to check before uploading or editing the video. Along with software, your hardware requirements also play a major role when it comes to 4K videos. If your system does not support the 4K videos, there is no point, even if you have the latest software version.
2. Downscale 4K format.
Though the latest Final Cut Pro software version supports 4K videos, importing and editing these videos will be a painful experience. The majority of videos are finished in 1080p, and thus, it is always advisable to downscale your 4K video so that they can be easily edited in the software. Your 4K footage can be easily converted using a good video converter.
3. Format to convert your 4K videos.
Final Cut Pro works best with the Apple ProRes codecs and thus for editing your 4K video in final cut pro, converting it to 1080p ProRes or other similar formats compatible with the software. Other popular formats to which your 4K videos can be converted include MPEG-2, F4V, MOV, HD AVI, and MPG. Besides these, many other formats are supported by the software, and you can select the one depending upon your requirements.
So, before editing any 4K video, make sure to check the system and software compatibility, downscale its format through a converter, and then finally load it to Final Cut Pro for making needed changes.
Part 3. How to Convert 4K Videos to 1080p for Final Cut Pro
After learning the above knowledge about 4K video editing in Final Cut Pro, Wondershare UniConverter will be the best video converter for you to convert 4K videos to 1080p for importing to Final Cut Pro. You can change the video resolution to 1080p/720p/480p in any format easily on Windows and Mac. Wondershare UniConverter supports 1000+ formats, so you can also change the video format if it is not compatible with Final Cut Pro.
Wondershare UniConverter - All-in-one Video Converter
-
Convert videos in 1000+ formats to Final Cut Pro compatible formats on Mac/Windows.
-
Customize video resolution from 4K to 1080p, 720p, 480p, and more others.
-
Support 90X faster conversion speed than any conventional converters.
-
Edit video files with trimming, cutting, adding subtitles, applying effects, and more.
-
Burn video to playable DVD with attractive free DVD templates.
-
Download or record videos from 10,000+ video sharing sites by pasting URL.
-
Versatile toolbox combines fixing video metadata, GIF maker, video compressor, and screen recorder.
-
Supported OS: Mac OS 10.15 (Catalina), 10.14, 10.13, 10.12, 10.11, 10.10, 10.9, 10.8, 10.7, 10.6, Windows 10/8/7/XP/Vista.
Steps to Convert 4K Videos to 1080p for Final Cut Pro
Step 1 Add 4K Videos to Wondershare Converter.
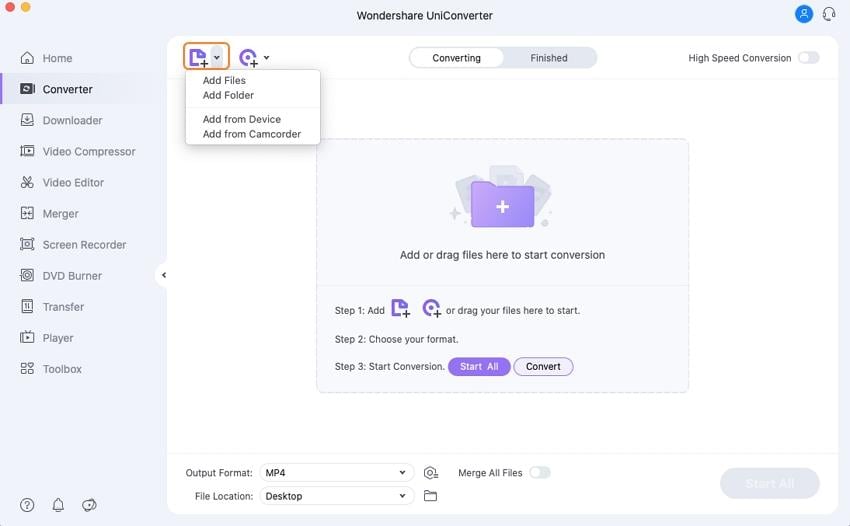
Install and open Wondershare UniConverter, then click on the Add Files button to add 4K videos or other formats videos you need to convert for Final Cut Pro.
Step 2 Customize Video Resolution and Format
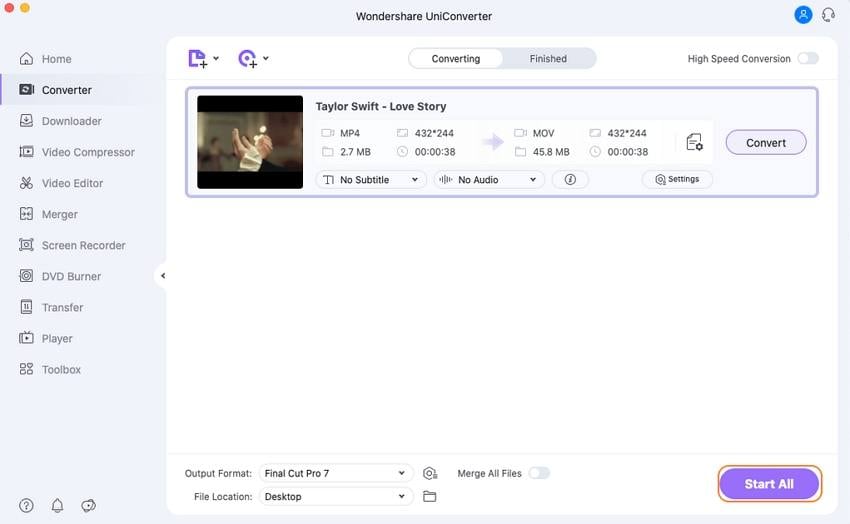
Hit the Output Format option to open the format list, choose the Editing tab to select Final Cut Pro or ProRes format as your choice. You can choose the video resolution directly or customize it by clicking on the Create button.
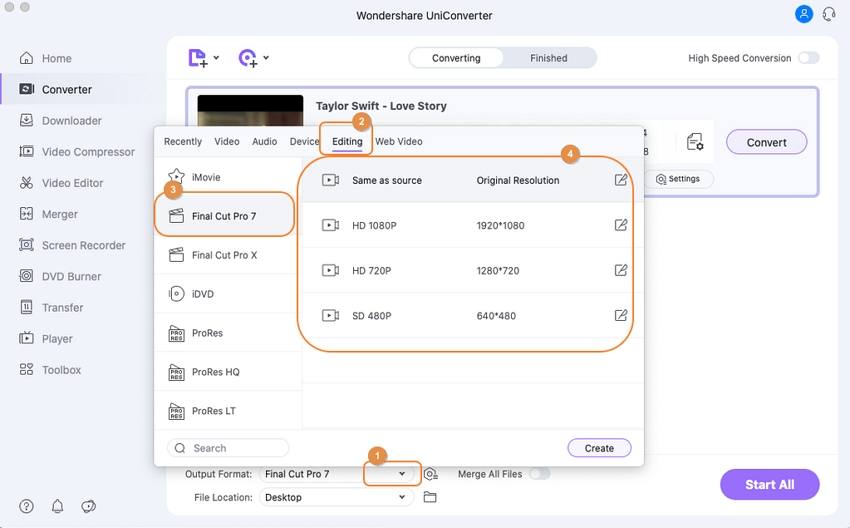
You can also edit the videos by clicking on the Edit icons under the video thumbnail; you can trim, cut, merge, add subtitles, apply effects, and more others.
Step 3 Convert 4K Videos for Final Cut Pro.
Finally, click on the Start All button to convert 4K videos with the customized video format and resolution. After the converting process, you can find the converted files under the Finished tab and then import to Final Cut Pro for editing.
Your complete video toolbox
 Convert 4K videos to 1080p, 720p, 480p and more resolution without losing quality.


Christine Smith
chief Editor