 Converts more than 1000 file formats, including MOV.

All Topic
- AI Tools Tips
-
- AI Photo Enhancer Tips
- Voice Changer Tips
- AI Thumbnail Maker Tips
- AI Script Generator Tips
- Smart Summarizer
- AI Subtitle Generator Tips
- Watermark Remover
- Vocal Remover Tips
- Speech to Text Tips
- AI Video Tips
- AI Image Tips
- AI Subtitle Translator Tips
- Video Extractor Tips
- Text to Speech Tips
- AI Video Enhancer Tips
- DVD Users
- Social Media Users
- Camera Users
- Photography
- Creative Design
- Movie Users
- Travelling Fans
- Educational Users
- More Solutions
- Holidays and Commemoration
- Game Lovers
- Other Tips
3 Tips for QuickTime slow-motion you have to know
by Christine Smith • 2026-05-20 17:36:51 • Proven solutions
- Part 1. How to Disable slow motion in QuickTime
- Part 2. Where is the slow-motion button in QuickTime player?
- Part 3. How to remove slow motion in QuickTime
Part 1. How to Disable slow motion in QuickTime
One of the easiest ways to disable slow motion in QuickTime player is by increasing the playback speed of the video. Increasing the playback speed to the speed that suits you will do the magic.
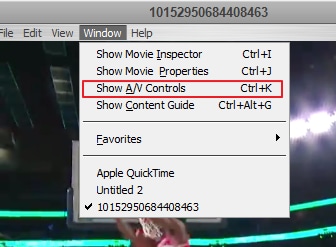
To do that, open the QuickTime player pro and open the video file you want.
On the top menu, go to windows and click on “Show A/V Controls” or simply press “CTRL + K” or “CMD + K” for Mac.
In the new pop-up window, slide the playback slider to the right, as seen in the picture below, to increase the playback speed of the video.
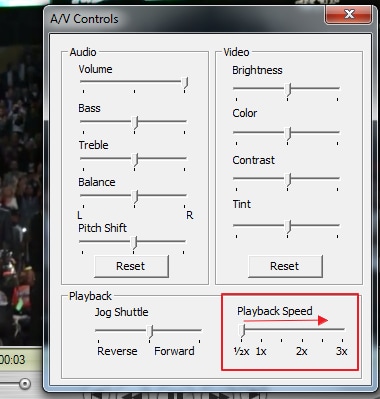
When you are satisfied with the new playback speed, and you are sure the video is no longer running in slow motion, close the A/V Controls.
On your keyboard, press “CTRL + S” or “CMD + S” on Mac to save the new video.
You have successfully disabled slow motion from the video using QuickTime player.
Part 2. Where is the slow-motion button in QuickTime player?

In case you're in the middle of watching a presentation or a lecture, and you feel that you have missed out on something as it was too quick for you and so want to be able to slow the video down a bit, you can do that using QuickTime Player very easily.
QuickTime Player supports the function of rendering videos in slow motion. All that you have to do is to press and hold on to the play-pause button for close to 5 seconds so as to access the menu for a rate change.
This would enable you to slow down the video playback rate without losing the video quality. You can also use it to speed up the video playback if needed.
Part 3. How to remove slow motion in QuickTime
The fundamental issue appears to be the very fact that the capability to record high-speed frame rate video is becoming more and more common on various consumer recording devices. Initially utilized by professional and top-of-the-line devices to offer slow motion sequences during editing, this ability is currently open to the typical home movie editing enthusiast utilizing the existing QT routines built to the most recent Mac OS X v10.10 and iOS 8 applications.
Since using slow-motion routines are automatically triggered by the high frame rate, and there are not any user settings to command these playback actions, you've got three options here:
- Use lower recording frame rates so as not to trip the QuickTime player slow motion routines.
- Record in the 120 fps way and put up with QuickTime playback as it presently is.
- Do not use QuickTime player for media playback.
However, the one solution that works for removing slow motion in QuickTime is as following.
To remove the effect of the slow-motion control during playback, select the "out" point marker and drag it to the beginning of the file. (Or select the "in" point marker and drag it to the end of the file.) Saving the player at this point will store your modified settings to an AAE "video sidecar" file if needed later.
Or, you can always tweak the playback speed using the A/V Controls section on QuickTime.
Other Tips
- Use iOS 8 media players or the current QuickTime share to instantly preview high frame rate clips without needing to obtain dedicated or professional video editing software with slow-motion effects.
- Use iOS 8 media players or the current QuickTime save to make slow motion settings that can be remembered after.
- Make use of a dedicated or professional video editing program to make or share slow-motion job content where fluxing and frame precision is predominant.
- Use an alternate media player to preview high frame rate clips when seeing content at its first frame rate, and it's also an excessive amount of trouble for you to yourself correct these players for non-slow motion playback (i.e., a single swipe of a finger or clicked mouse).
But remember that higher frame rates and higher resolutions mean higher playback data rates that might make playback "choppy" at best on some systems.
Transfer Slow Motion Videos to PC or Mac
Make use of a USB cable to transfer your video to a PC or a Mac using a compatible or iPhoto PC program. When opening the file, you will locate the slow-motion effect that will play in standard 30 frames per second. That is because even though the footage was shot in 120 fps, whatever program you use will play it back. Nevertheless, it is possible to use the QuickTime Movie Inspector to make sure the video was shot in slow motion. That is evidence you have imported a slow-motion video.
After that, you can use Adobe Premiere, Apple Final Cut Pro, iMovie, or any alternative video editing program for setting the portions of the clip you would like in slow motion. Those are tips on how to keep the very best quality in your movie clip. In iMovie, for instance, it is possible to select the segment of the clip you would like in slow motion by going to Clip ">> Slow motion. In the setting, 25% should be used by you because 120fps is four times quicker than 30fps. Notice that when altering the clip speed, there might be some processing time before you'll be able to see it. After saving your clips that are recently edited with slow motion to your own hard disk, after that, you can upload to iCloud your favorite societal website, back up, or import back in your phone.
QuickTime Player shortcuts
| Spacebar | Play and pause video playback |
|---|---|
| J | Rewind movie, you can J multiple times to rewind the movie faster |
| K | Pauses the movie |
| L | Fast forward within the movie, with audio, again you can tap L multiple times to fast forward in the movie at a faster pace. |
| Hold down K and tap J or L | Allows you to scrub the video in slow motion, viewing in either rewind or forward frame by frame |
| I | Sets the “In” or beginning point of the selection |
| O | Set the “Out” or endpoint of the selection |
| Option-Left Arrow | Go to the beginning of the selection of the movie |
| Option-Right Arrow | Go to the end of the selection of the movie |
| Shift-double-click Command-Left Arrow | Playback the movie in reverse |
| Option-Up Arrow | Increase maximum audio volume beyond slider level limit |
| Option-Down Arrow | Mute audio |
| Up Arrow | Increase volume level |
| Down Arrow | Decrease volume level |
| . | Pause video playback, using in combination with the Spacebar you can single in on a single frame quite easily |
Your complete video toolbox

Other popular Articles From Wondershare


Christine Smith
chief Editor