

Apple ProRes is a professional-grade video format created by Apple, valued for its near-lossless quality and the way it runs smoothly in editing programs like Final Cut Pro, Adobe Premiere Pro, and DaVinci Resolve. It’s a favorite in post-production, but the large file sizes and platform-specific nature can make it awkward for everyday playback, sharing, or use across all devices.
For that reason, many editors and creators choose to convert Apple ProRes into more accessible formats such as MP4, MOV, or AVI. If the conversion is done poorly, you can end up with long processing times or noticeable quality loss. Using UniConverter, however, makes the process quick, dependable, and capable of keeping your footage looking its best. In the sections ahead, we’ll look at what Apple ProRes is and how to convert it the right way.
- [What Apple ProRes Is] Apple ProRes is a professional video codec designed for high-quality editing, color grading, and post-production workflows, especially in tools like Final Cut Pro, Premiere Pro, and DaVinci Resolve.
- [Why Convert ProRes] Many users convert Apple ProRes to MP4, MOV, or AVI because ProRes files are large, harder to share, and less practical for playback across Windows, mobile devices, and everyday platforms.
- [Best Conversion Method] UniConverter provides a fast and reliable way to convert Apple ProRes while preserving quality, with support for batch processing, hardware acceleration, and flexible output settings.
- [How to Keep Quality] To maintain the best results during Apple ProRes conversion, keep the original resolution and frame rate, choose a suitable bitrate and codec, test short clips first, and always save the original ProRes master file.
In this article
- What is Apple ProRes and Why Convert Apple ProRes
- Where is Apple ProRes Commonly Used?
- Limitations and Challenges of Apple ProRes
- Apple ProRes vs Other Video Formats – Comparison Table
- How to Convert Apple ProRes with UniConverter – Step-by-Step
- Comparison Table of Apple ProRes Format Converters
- Tips for Maintaining Quality During Apple ProRes Conversion
- Conclusion
- FAQs
Part 1. What is Apple ProRes and Why Convert Apple ProRes
If you've spent time editing video, you’ve likely come across Apple ProRes. This is Apple’s high-quality video format designed to keep footage looking sharp even after heavy color correction, effects, and multiple edits—all without the ridiculous file sizes of raw uncompressed video. It supports everything up to 8K and runs smoothly, especially on Macs.
For editors, this is a game-changer. You can tackle complex projects without your computer choking. That’s why it’s become the standard in film studios, broadcast TV, and even high-production YouTube channels.
But there’s a downside: ProRes isn’t the easiest to share or store. A minute-long clip can eat up multiple gigabytes, and while Macs handle it fine, Windows and mobile users often hit playback errors.
That’s where conversion comes in. Turning ProRes into something like MP4 or MOV solves a few headaches:
- Plays anywhere– No more "file not supported" errors on phones, tablets, or smart TVs.
- Smaller files– Faster uploads, quicker backups, less waiting around.
- No extra hassle– Viewers won’t need to install obscure codecs.
- Better for teams– Everyone gets a file that just works, no matter their device.
Quick Tip:
Hold onto your ProRes originals for editing or archiving, then make compressed copies for sharing. Best of both worlds—top quality when you need it, convenience when you don’t.
Part 2. Where is Apple ProRes Commonly Used?
Apple ProRes has earned its place as one of the most trusted codecs in professional video because it maintains high visual quality while keeping editing smooth. You’ll see it in a wide range of production environments:
- Film and Television Post-Production
Major studios and broadcast networks use ProRes for editing dramas, documentaries, and live event coverage. Its ability to preserve detail during color grading and visual effects work makes it ideal for demanding post-production pipelines.
- YouTube and Streaming Content at a Professional Level
Many top-tier creators edit their projects in ProRes before exporting to delivery formats like H.264 or H.265. This keeps the editing master clean, even after multiple revisions.
- Commercials and Corporate Media
Advertising agencies and corporate video teams rely on ProRes for shoots involving green screens, motion graphics, and complex compositing, where every pixel matters.
- Documentary and Archival Work
ProRes is widely used for long-term preservation of footage, ensuring that the image quality holds up years later, even when viewed on newer display technologies.
Part 3. Limitations and Challenges of Apple ProRes
While Apple ProRes is a favorite in professional editing, it isn’t without drawbacks. Knowing these limitations can help you decide when to use it and when to convert Apple ProRes to something more practical.
- Large File Sizes
Even though ProRes is smaller than uncompressed video, it can still eat through storage quickly. A few minutes of 4K ProRes HQ footage can take up several gigabytes, which adds up fast in long projects.
- Limited Playback Compatibility
ProRes plays flawlessly on macOS, but Windows, Linux, and many mobile devices require extra codecs or compatible software. This can be a problem when sharing files with clients or collaborators who aren’t in the Apple ecosystem.
- Less Efficient Outside macOS
While Macs handle ProRes with ease, editing on other platforms may be slower and put more strain on the system, especially if hardware acceleration isn’t available.
- Bandwidth and Transfer Challenges
Uploading or sending ProRes files over the internet can be slow due to their size, making them impractical for quick delivery.
Part 4. Apple ProRes vs Other Video Formats – Comparison Table
When deciding on a video format, it helps to understand what each one is built for. Here’s a quick overview before we compare them side by side:
- Apple ProRes – A professional, high-bitrate codec developed by Apple for editing and mastering. It keeps visual quality extremely high while being easier to handle than uncompressed video, but produces large files and is best suited for post-production work.
- MP4 (H.264) – A compressed, delivery-focused format that offers good quality at much smaller file sizes. It’s supported on nearly every device and platform, making it the most common choice for playback and online streaming.
- MOV – Originally developed by Apple, MOV is a container format that can hold a variety of codecs, including ProRes. It’s widely used in editing workflows and can be tailored for either high quality or smaller sizes depending on the codec inside.
Comparison Table
|
Feature |
Apple ProRes |
MP4 (H.264) |
MOV |
|
File Size |
Large – ideal for editing, not storage |
Small to medium – efficient compression |
Medium – varies by codec used |
|
Quality |
Visually lossless, excellent for grading |
Lossy – optimized for delivery |
Lossless or lossy – flexible for different uses |
|
Compatibility |
Limited outside Apple ecosystem |
High – plays on almost all devices |
Medium to high – works well with most editing systems |
|
Best Use |
Professional editing, mastering, archiving |
Streaming, online delivery, general playback |
Editing and intermediate workflows |
|
Performance |
Optimized for macOS hardware |
Lightweight, easy to play |
Good performance with the right codec |
In short:
- Apple ProRes – Best for preserving maximum quality during editing and mastering.
- MP4 – Best for universal sharing and streaming.
- MOV – Best for flexible workflows that may require both editing and delivery.
Part 5. Comparison Table of Apple ProRes Format Converters
When it comes to converting Apple ProRes, you have several good options. Some are quick online tools, while others are full-featured desktop programs for larger or more complex projects. Here’s a quick look:
|
Tool |
Type |
Price |
Ease of Use |
Key Strengths |
Best For |
|
Online & Desktop |
Paid (Free trial) |
Very Easy |
Wide format support, batch conversion, GPU speed |
Balanced speed, quality, and flexibility |
|
|
Desktop |
Free |
Moderate |
Advanced compression settings, open-source |
Users who want full control |
|
|
Desktop |
Paid |
Moderate |
Deep Adobe integration, pro-level export options |
Adobe ecosystem professionals |
|
|
Desktop |
Free |
Hard |
Extremely powerful, highly customizable |
Technical users and automation workflows |
|
|
Desktop |
Free |
Easy |
Quick conversions, basic features |
Occasional simple conversions |
|
|
Online |
Free/Paid |
Easy |
No install needed, supports many formats |
Small, one-off conversions |
Part 6. How to Convert Apple ProRes with UniConverter – Step-by-Step
If you need to convert Apple ProRes without losing quality, UniConverter is one of the most reliable tools you can use. Developed by Wondershare, it’s built for both beginners and professionals — offering a simple interface for quick jobs and advanced settings for those who want full control.

Why Choose UniConverter for Apple ProRes Conversion?
-
Two Flexible Options – Use the free online converter for small, one-off tasks, or install the desktop version for large projects, batch processing, and offline privacy.
-
Wide Format Support – Convert Apple ProRes into MP4, MOV, AVI, MKV, and over a thousand other formats.
-
Quality Control – Adjust resolution, bitrate, and codecs to get the perfect balance between quality and file size.
-
Speed and Efficiency – Hardware acceleration takes advantage of your GPU to cut conversion times dramatically.
Step-by-Step Guide
Step 1. Open UniConverter – Launch either the online tool in your browser or the desktop version on Windows or macOS.

Step 2. Add Your File – Drag and drop your Apple ProRes video into the program, or click “Add Files” to browse your computer.

Step 3. Choose an Output Format – Select MP4 for universal compatibility, MOV for editing workflows, or AVI for specific playback needs.

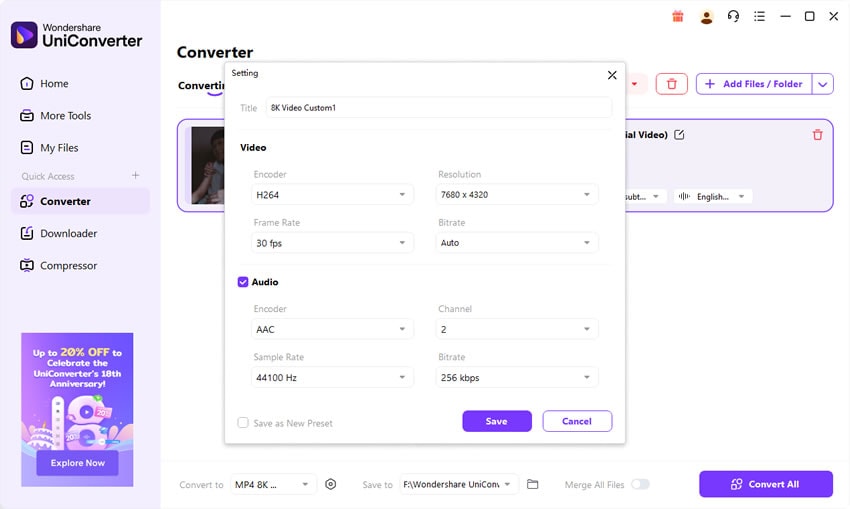
Step 4.Fine-Tune Settings– Adjust resolution, bitrate, frame rate, and codec if you want more control over quality and file size.

Step 5. Start the Conversion – Click “Convert” and let UniConverter process your file. Once done, preview the output to ensure everything looks sharp and plays smoothly.
Pro Tip: If you have multiple Apple ProRes videos, use the desktop version’s batch conversion mode to process them all at once with the same settings — a huge time-saver for large projects.
Part 7.Tips for Maintaining Quality During Apple ProRes Conversion
When you convert Apple ProRes to another format, you want to keep as much of that original quality as possible. ProRes is designed for editing and mastering, so any conversion involves some trade-offs. The goal is to make those trade-offs as small as possible while still getting a file that’s easy to share or store.
1. Choose a High Bitrate
A higher bitrate preserves more visual detail, especially in complex scenes with lots of motion or texture. While lowering the bitrate reduces file size, pushing it too far can cause visible blockiness or banding in gradients.
- Practical Tip: For 4K delivery, aim for at least 35–50 Mbps when using H.264, or 20–30 Mbps with H.265 for similar quality at a smaller size.
2. Keep the Original Resolution and Frame Rate
Changing resolution or frame rate can introduce scaling artifacts or make motion look unnatural. Unless you have a specific reason — like delivering a 1080p version for a client — stick with the original settings.
- Practical Tip: If your ProRes file is 4K at 24fps, match those settings in your converted file for the smoothest results.
3. Use Hardware Acceleration When Available
Modern GPUs can speed up the conversion process without sacrificing quality, freeing up your CPU for other tasks. Hardware acceleration also helps maintain more consistent results when processing large batches.
- Practical Tip: In UniConverter, enable GPU acceleration under preferences before you start a large conversion.
4. Test with a Short Clip First
Before committing to a full export, convert a 20–30 second section of your video with your chosen settings. This lets you see exactly how the quality and file size balance out before processing the entire file.
- Practical Tip: Pick a section with both fast motion and fine detail — if it looks good here, the rest of the video should too.
5. Choose the Right Codec for Your Needs
Different codecs handle compression differently. H.264 is highly compatible and widely supported, while H.265 (HEVC) offers better compression at the cost of slightly reduced compatibility on older devices.
- Practical Tip: For streaming or general sharing, H.264 is safest. For archiving smaller files with good quality, H.265 is worth considering.
6. Keep an Archive Copy in ProRes
Once you compress a file, you can’t get that quality back. Always keep your original Apple ProRes master in case you need to re-export in the future with different settings or for a different platform.
- Practical Tip: Store ProRes masters on an external drive or cloud archive to keep your main system clear.
Conclusion
Apple ProRes remains one of the top professional video formats, but converting it to more common formats is often necessary for playback, sharing, and editing on non-Mac systems. UniConverter makes this process fast, reliable, and simple—whether online or with the desktop version.
FAQs
-
1. Can Apple ProRes be played on Windows?
Yes, but you’ll need compatible software like VLC or convert it using UniConverter for broader playback support. -
2. Does converting Apple ProRes reduce quality?
Not necessarily. UniConverter can maintain original quality when settings are configured properly. -
3. Which format is best to convert Apple ProRes into?
MP4 (H.264) is the most compatible choice for web and general playback, while MOV is good for editing workflows. -
4. Is UniConverter free for Apple ProRes conversion?
The online version is free for basic tasks, while the desktop version offers advanced features. -
5. Can I batch convert multiple Apple ProRes files?
Yes, the desktop version of UniConverter supports batch conversion for multiple files at once.

