Wondershare UniConverter
-
 Record the computer screen in full-screen mode or select a specific capture area.
 - Record screens alongside picture-in-picture effects, microphone narrations, etc.
- Convert videos in 1000+ formats with super fast speed and no quality loss.


All Topic
- AI Tools Tips
-
- AI Photo Enhancer Tips
- Voice Changer Tips
- AI Thumbnail Maker Tips
- AI Script Generator Tips
- Smart Summarizer
- AI Subtitle Generator Tips
- Watermark Remover
- Vocal Remover Tips
- Speech to Text Tips
- AI Video Tips
- AI Image Tips
- AI Subtitle Translator Tips
- Video Extractor Tips
- Text to Speech Tips
- AI Video Enhancer Tips
- DVD Users
- Social Media Users
- Camera Users
- Photography
- Creative Design
- Movie Users
- Travelling Fans
- Educational Users
- More Solutions
- Holidays and Commemoration
- Game Lovers
- Other Tips
How to Annotate Screen When Recording on Windows 10
by Christine Smith • 2025-11-14 10:38:51 • Proven solutions
If you want to draw or highlight something on your computer screen as you capture it, get the perfect screen drawing tool for Windows 10. However, doing that is easier said than done as most computer screen recording apps are complicated to use. So, this article makes it easy for you by listing several methods on how to annotate screen when recording on Windows.
- Part 1. How to Annotate Screenshots on Windows 10?
- Part 2. [Recommended] The Best Screen Drawing Tool for Windows 10
- Part 3. 3 Different Ways to Annotate Screenshots on Windows 10
Part 1. How to Annotate Screenshots on Windows 10?
Fortunately, you don’t necessarily need a third-party app to capture screenshots on your Windows PC. That’s because Windows already comes with a powerful inbuilt tool to help you do that. Below is how to go about it:
Step 1. Open the app you want to screenshot, then click Windows + Shift + S. This will open Window’s ultra-modern screen-capture tool.
Step 2. Here, you can complete the following actions:
- Rectangular Snip– Choose this option to form a rectangle on the area you want to record.
- Free-form Snip– Select this option to create a free-form shape on the area to screenshot.
- Full-Screen Snip– This option is for capturing the entire screen.
Step 3. Now click the Notifications button at the bottom-right corner of your screen, then click the captured image. This will open your screenshot on the Snip & Sketch app.
Step 4. On the Snip & Sketch app, you’ll see a pen, a ballpoint pen, a ruler, and other tools for adding annotations. After adding annotations, save your new image.
Part 2. [Recommended] The Best Screen Drawing Tool for Windows 10
Now that you finally know how to add annotations to a screenshot, let’s take it a notch higher by learning how to draw while recording with Wondershare UniConverter. With this software, you can record videos in full screen or customized modes. As you record, you can add voice narrations, a webcam overlay, and system sounds. You can also add annotations such as texts, drawings, shapes, arrows, and lines. Moreover, users can preset the output quality, format, and frame rate.
Wondershare UniConverter – Best Computer Screen Recorder
Wondershare UniConverter - Best Video Converter for Mac/Windows
-
Records computer screens in full-screen or customized modes.
-
It allows users to preset the output format, quality, frame rate, keyboard shortcuts, etc.
-
Users can apply annotations like drawings, lines, shapes, texts, and arrows as they record videos.
-
Edits the recorded video by cropping, trimming, compressing, adding subtitles, etc.
-
Converts between 1000+ file formats without compromising quality.
-
It features a robust all-in-one toolbox with a GIF maker, image converter, CD ripper, etc.
-
It’s the best screen drawing tool for Windows 10/8/7 & Mac OS X 10.9+.
Below is how to annotate screen when recording on Windows/Mac using Wondershare UniConverter:
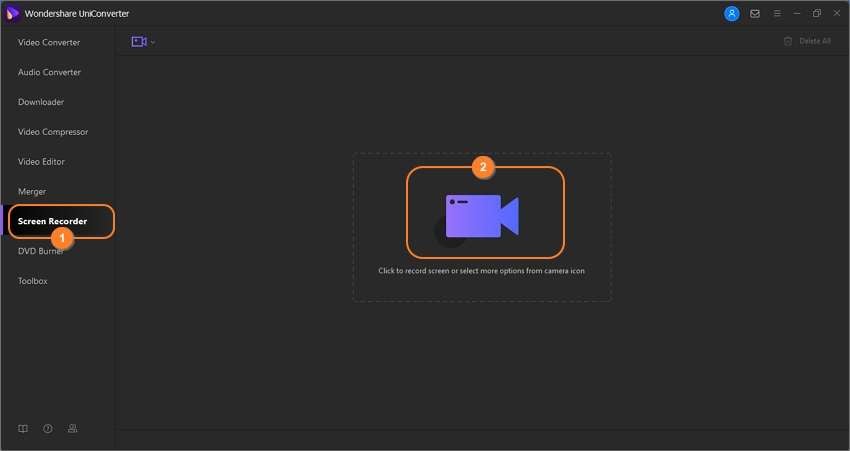
Step 1Launch the Screen Recorder.
After installing and opening Wondershare UniConverter, click Screen Recorder, then tap the Camcorder button. The screen capture function will load immediately.
Step 2Select a capture area.
Start by running the app you want to record. After that, drag the recording frame to fit an area you want to capture. Alternatively, open the recording mode menu and choose Full Screen or Custom. With the Custom mode, you can enter the frame dimensions then tap Lock Aspect Ratio.
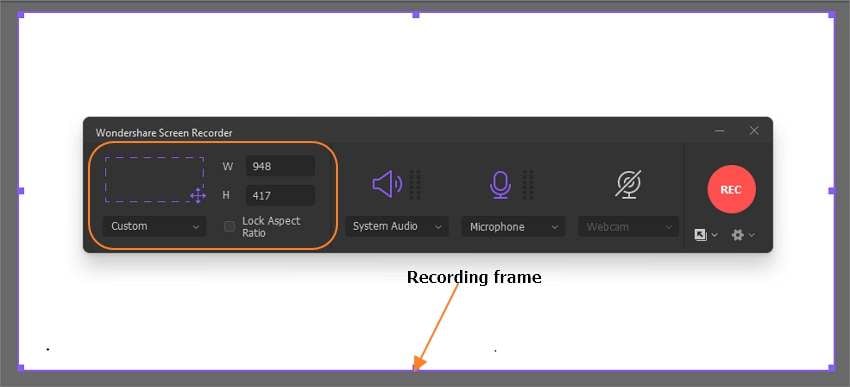
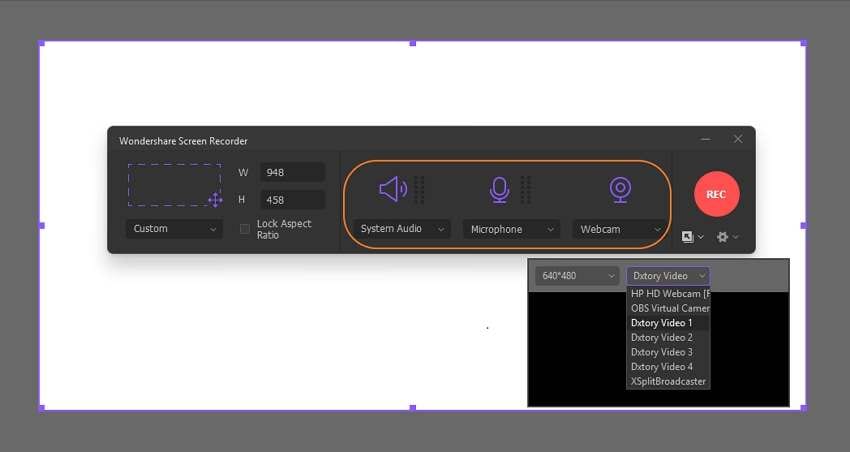
Step 3Configure the recording preferences.
Now choose a sound output device on the System Audio menu. Next, choose a mic for adding a voice overlay on the Microphone menu. Last but not least, select a camera for applying a video overlay on the Webcam menu.
Most importantly, open the Settings menu, then set your output format, frame rate, and quality. You can choose FLV, AVI, or MP4 as the output formats. And lest I forget, enter the folder path, recording timer, and customize the keyboard shortcuts.
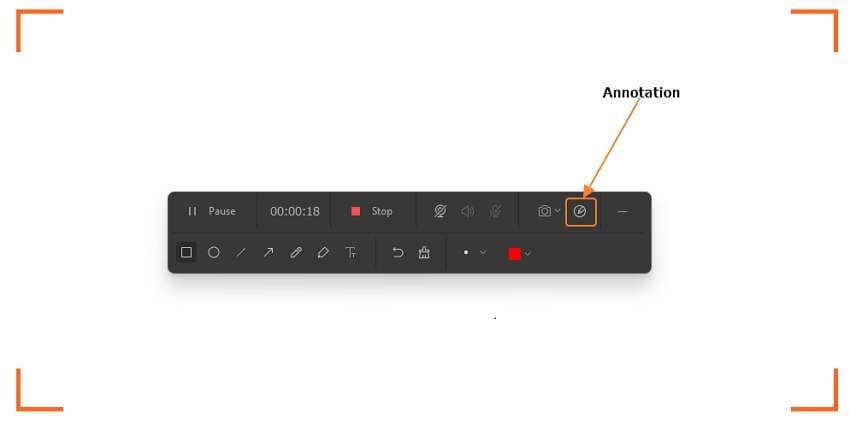
Step 4Start recording and drawing the computer screen.
Preview the recording area, then press REC to start capturing the computer screen. To apply drawings as you record, launch the recording taskbar and then click the Annotation (or pen-like) icon. Apart from drawing, this feature also allows you to add shapes, lines, arrows, and texts. You can even customize the colors to make the annotations look more beautiful. Finally, press Stop to finish recording the video. And there is that!
Part 3. 3 Different Ways to Annotate Screenshots on Windows 10
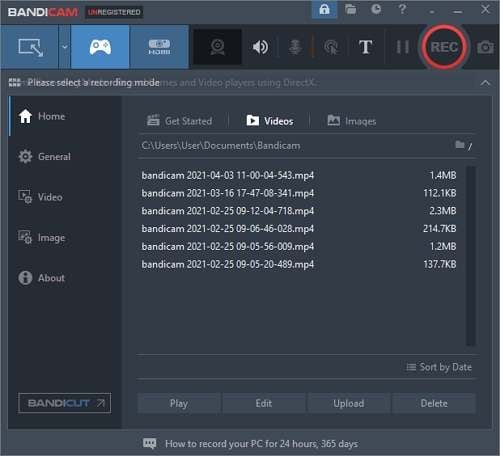
1. Bandicam
Honestly, Bandicam is one of the most straightforward screen recorder tools you can find. This multi-purpose app lets users record the computer screen and capture high-quality screenshots. As you record the computer screen, Bandicam allows you to apply drawings, shapes, arrows, lines, and so much more. You can even add a logo or watermark as you record.
Pros:
- Super-easy to use.
- Includes many annotation tools.
Cons:
- It doesn’t feature editing tools.
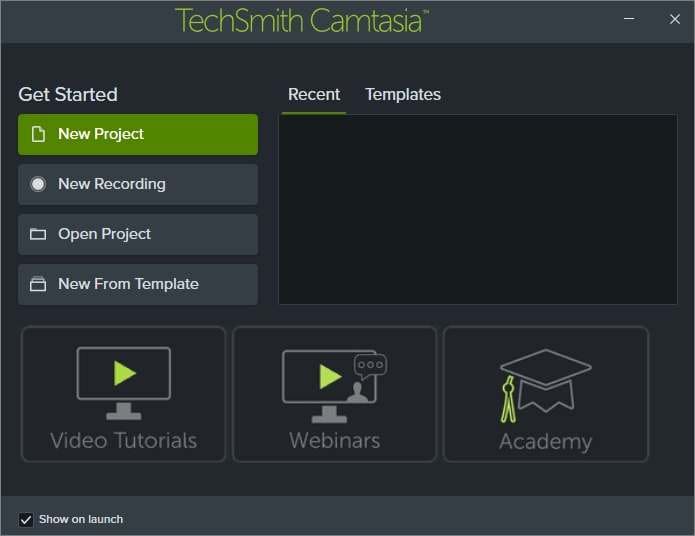
2. Camtasia
Camtasia never disappoints when it comes to recording and editing screen activities on Mac or Windows. This app is quick to learn as it doesn’t require advanced editing skills. That said, Camtasia can record your computer screen activities by allowing you to choose an entire screen or a specific region. While recording, you can add audio, webcam, and annotations. And after that, you can use the drag and drop editor to make the video more appealing to watch.
Pros:
- Simplified video editing.
- It comes with multiple templates to reduce editing time.
Cons:
- It only works on 64-bit systems.
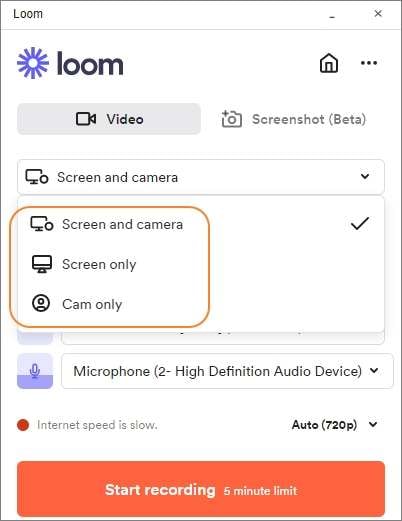
3. Loom
The third and final screen drawing tool for Windows 10 on this list is Loom. Just as expected, Loom allows you to record your computer activities with or without a webcam. After recording a clip, it allows you to edit it by trimming, adding a thumbnail, and apply a call-to-action. What’s more, Loom is available to use Mac, Chrome, and iOS.
Pros:
- Multiplatform screen recorder.
- Allows users to share recordings to social platforms.
Cons:
- No screen drawing tools.
Conclusion
As you can see, Wondershare UniConverter stands out from the crowd. It’s simple to use, fast, and comes with many additional features. Nevertheless, the other programs can come in handy as well.
Your complete video toolbox

Other popular Articles From Wondershare


Christine Smith
chief Editor