

Capturing your screen along with clear audio is essential for creating tutorials, gameplay videos, presentations, or sharing app demos.QuickTime screen recording with audio is a popular choice for Mac and iPhone users because it’s free, easy to use, and built-in.
Whether you want to record internal sound, microphone input, or both, this guide covers everything you need to know about QuickTime record screen with sound, including practical steps and helpful tips. Plus, we’ll explore how to improve your recorded audio quality by batch reducing noise using UniConverter, a powerful and user-friendly video editing tool.
In this article
Part 1. Pros and Cons of Screen Recording by QuickTime
Before diving into the QuickTime screen recording with sound process, it’s important to weigh the advantages and drawbacks of using QuickTime for your screen and audio capture needs.
Pros & Cons

Batch Reduce Video Background Noices for Win and Mac
Part 2. How to Record Screen with Audio by QuickTime on iPhone
Recording your iPhone screen with audio is effortless thanks to the built-in screen recording feature, which uses QuickTime technology behind the scenes. This lets you capture both your screen and sound — including internal audio and microphone input — without needing extra apps. Here’s a simple guide to QuickTime screen recording with audio directly on your iPhone.
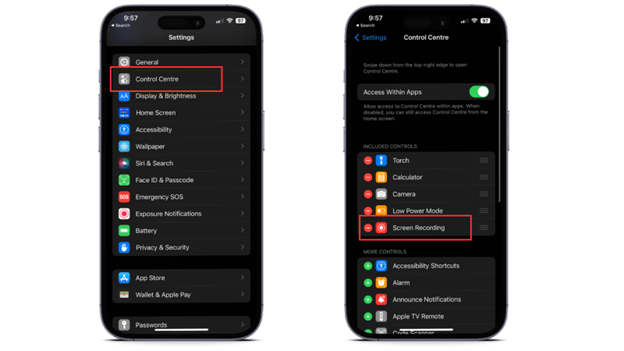
Step 1: Add Screen Recording to Control Center
First, you need to add the screen recording option to your Control Center for quick access. To do this, open the Settings app, scroll down to Control Center, and tap the plus icon next to Screen Recording. This makes it easy to start a QuickTime screen recording with audio anytime.
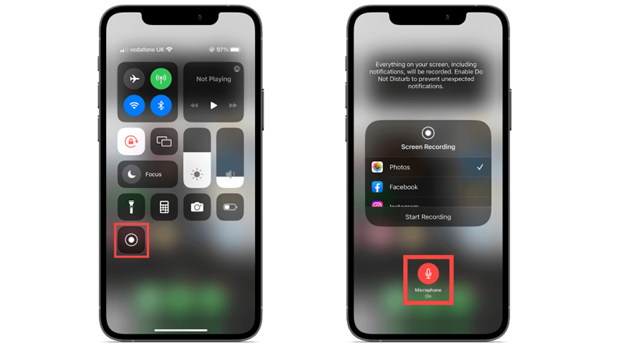
Step 2: Start Screen Recording with Audio
To begin recording, swipe down from the upper-right corner of your iPhone to access the Control Center. Press and hold the screen record button — a circle inside a circle — until a menu pops up. Here, tap the Microphone Audio icon at the bottom to enable recording of external sound, like your voice, along with the screen. Then tap Start Recording and exit the Control Center to capture your screen and audio simultaneously.
Step 3: Stop Screen Recording
When you want to finish your screen recording, simply tap the red status bar located at the top of your iPhone screen. A confirmation will appear — tap Stop to end the recording. Your video with audio will automatically save to your Photos app, ready for playback, editing, or sharing. This method ensures you have both screen visuals and sound perfectly captured using QuickTime’s reliable features.
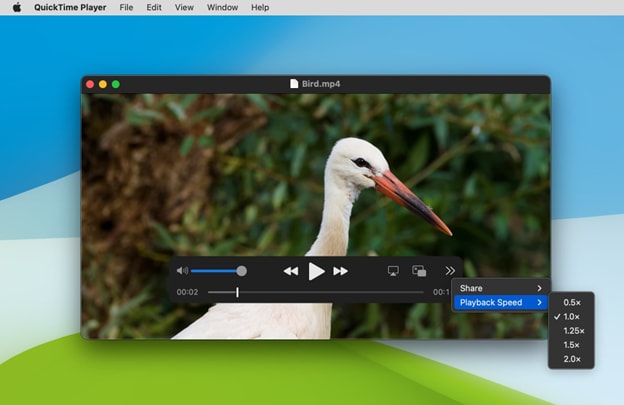
Part 3. How to Record Screen with Audio by QuickTime on Mac
If you want to record screen and audio with QuickTime on your Mac, the process is also straightforward but requires attention to capturing system sound. Here’s how to do QuickTime record screen and audio effectively on Mac.
Step 1: Open QuickTime Player
Start by launching QuickTime Player from your Applications folder or use Spotlight search to find it quickly. This built-in Mac app is your go-to tool for screen recording with audio. Once opened, you’re ready to begin the capture process.
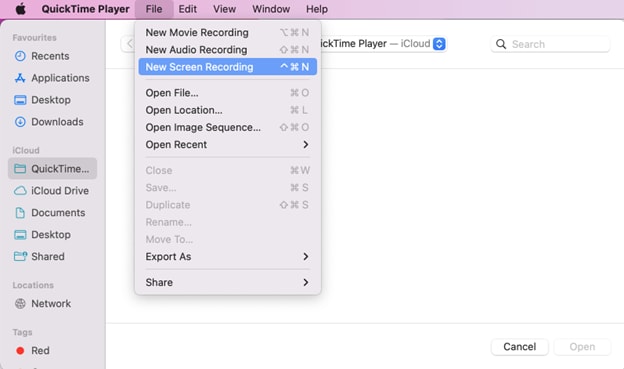
Step 2: Select New Screen Recording
Next, go to the File menu at the top of your screen and select New Screen Recording. This opens the recording interface where you’ll configure your audio and video settings. It’s the starting point for your QuickTime screen capture with sound.
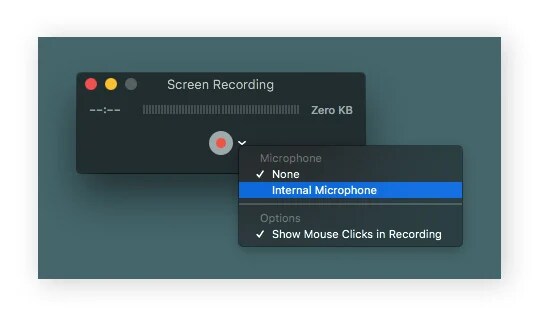
Step 3: Choose Audio Input Source
In the screen recording window, click the small arrow next to the red record button to open audio options. Here, select your desired input—either the built-in microphone to record your voice or external sounds, or system audio through tools like Soundflower or Loopback if installed. (Tip: Installing Soundflower enables capturing internal app sounds for richer recordings.)
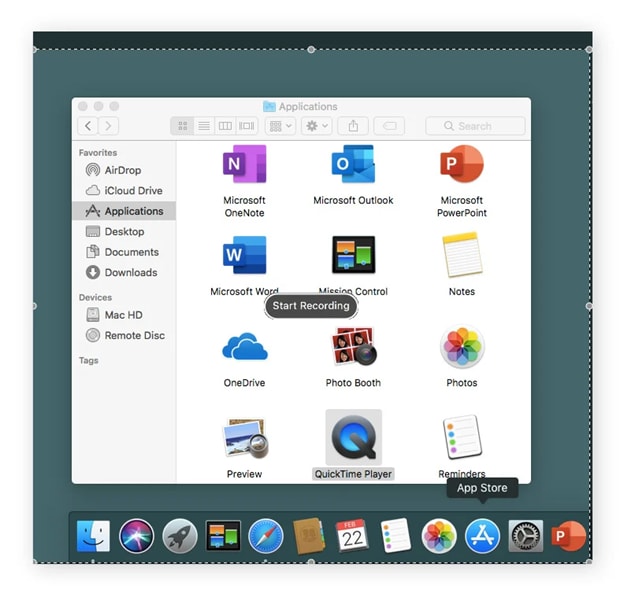
Step 4: Start Recording
Click the red Record button to begin your screen capture. You can either click anywhere on the screen to record the entire display or drag to select a specific area before starting. This flexibility lets you tailor the recording to your needs.
Step 5: Stop Recording
When finished, click the Stop button located in the menu bar at the top right of your screen. QuickTime will then automatically open your recorded video for preview, allowing you to watch, save, or edit the file. Your screen and audio are now successfully captured.
Batch Reduce Video Background Noices for Win and Mac
Part 4. How to Batch Reduce Noise of Screen Recorded from QuickTime
Screen recordings made with QuickTime are convenient, but they often include unwanted background noise — keyboard clicks, room sounds, or low-level hum. If you're working with multiple clips, manually cleaning each one can be time-consuming. That’s where UniConverter by Wondershare comes in. It allows you to batch process videos and apply noise reduction efficiently, making your QuickTime audio and screen recording much cleaner and more professional.
Key Features
1. AI-powered noise reduction: UniConverter uses advanced AI algorithms to automatically detect and remove background noise—such as wind, keyboard taps, and hum—from your video or audio recordings with a single click.
2. Batch processing support: You can add multiple files at once and apply noise reduction to all of them in a single operation. This is perfect for content creators handling numerous QuickTime screen recordings.
3. Supports video and audio formats: The tool is compatible with a wide range of formats including MOV, MP4, MP3, WAV, and more. It’s ideal for processing both QuickTime screen recordings and standalone audio files.
4. Real-time preview: Before finalizing the export, you can preview the effect of the noise reduction to ensure it meets your quality expectations—especially helpful for fine-tuning professional recordings.
5. Clean and intuitive interface: Even first-time users can navigate the Noise Remover with ease. Drag-and-drop support, clear labels, and simple toggles make the process hassle-free.
6. Preserves voice clarity: Unlike some tools that reduce noise but make voices sound muffled, UniConverter’s AI ensures speech remains clear and natural even after the noise is filtered out.
7. Custom output directory: You can choose or create a specific folder for saving the cleaned files, helping you stay organized when working with large volumes of recordings.
Pros & Cons
How to Batch Reduce Noise in QuickTime Screen Recordings Using UniConverter
Cleaning up noisy screen recordings from QuickTime is quick and easy using UniConverter's AI-powered Noise Remover. This feature lets you remove background noise from multiple video or audio files in a single workflow.
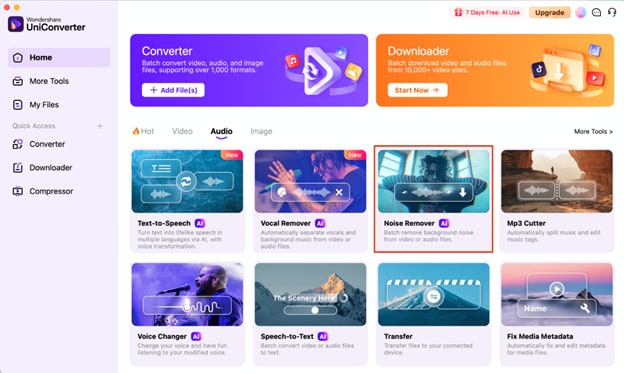
Step 1: Launch UniConverter and Go to Noise Remover
Open Wondershare UniConverter and navigate to the Home screen. Under the Audio section, click on Noise Remover. This tool is specifically designed for batch removal of background noise from both video and audio files.
Step 2: Add Your Files
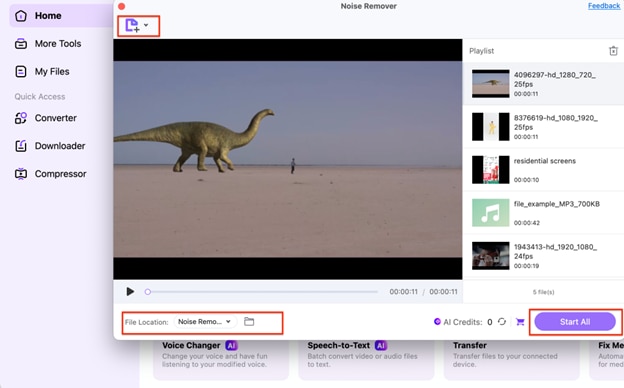
Once the Noise Remover window opens, click the central “+” folder icon or drag and drop your QuickTime screen recordings into the window. You can upload multiple MOV or MP4 files at once to apply noise removal in batch mode.

Step 3: Set Output Folder and start
At the bottom of the screen, choose your File Location to define where the cleaned files will be saved. You can create a new folder or use the default directory labeled "Noise Remover." When you're ready, click the purple Start All button on the bottom right. Once completed, your cleaned-up videos will be available in the folder you selected.
Conclusion
QuickTime screen recording with audio is an easy, reliable way to capture high-quality videos on Mac and iPhone. While QuickTime has some limitations with internal audio on Mac, tools like Soundflower or BlackHole solve this issue. For clearer audio, batch noise reduction with UniConverter greatly improves your recordings. UniConverter also offers handy features like Audio Converter and Audio Enhancer to further polish your audio. Together, these tools ensure your screen recordings look and sound professional every time.
Batch Reduce Video Background Noices for Win and Mac
FAQs
-
1. What’s the best format to export QuickTime recordings for sharing or uploading?
MOV is the default, but MP4 is more universally compatible. Use tools like UniConverter to convert MOV to MP4 without quality loss for easier sharing on platforms like YouTube or Instagram. -
2. Why does my screen recording lag or stutter?
Recording at high resolution or while multiple applications are running may overload system resources. Try closing background apps and reducing the screen area being recorded for smoother performance. -
3. Does QuickTime compress screen recordings automatically?
No, QuickTime saves screen recordings in MOV format without compression. The file size may be large. Use a tool like UniConverter to compress and convert your files if needed. -
4. Can I pause a screen recording in QuickTime and resume later?
No, QuickTime doesn’t support pausing and resuming during a screen recording session. You’ll need to stop and start a new recording or edit the clips together afterward using a video editor. -
5. How do I record only audio using QuickTime?
Select File > New Audio Recording in QuickTime Player. Choose your microphone input and click Record. This is useful for creating podcasts or narrations without video.

