

Have you ever wished to freeze time and capture the moments of a video as images? Whether you are making an animation or applying motion, converting a video to an image sequence opens up new possibilities for you. Basically, it's like turning a movie into a flipbook that is ready for editing and artistic exploration.
However, know that there’s no “one-size-fits-all” approach to this, but there are smart ways to do it efficiently. From online tools to various mobile apps, various solutions exist that will be discussed in this guide. So, review these techniques and pick the desired one so you can bring your ideas to life, one frame at a time.
In this article
Part 1. Why Convert a Video to an Image Sequence?
Before diving into the methods of converting videos to a sequence of images, let’s first explore why this process is so useful.
- Modification of a Specific Frame
Mostly, a single frame needs to be edited, whether you want to extract the unwanted object or enhance the color. Hence, by converting a video into an image sequence, users can seamlessly isolate and modify the frame without affecting the other footage parts. After proper editing, it can be inserted back into the video clip like it was part of it.
- Video Detail Analysis
For professional video editors, animators, and scientists, analyzing a video frame can uncover various hidden details. Through this, they can examine motion patterns, track objects with precision, or make detailed adjustments in post-production.
- Select Key Frames And Make GIFs
Besides video analysis, when you convert video to an image sequence, you can select a certain frame and turn it into a GIF that highlights key actions and expressions. This method is widely used in social media, marketing, and entertainment to create eye-catching visuals.
- Compatibility
There are many software programs out there that work ideally with images rather than videos. Thus, converting the videos into image sequences ensures compatibility with tools like Photoshop that excel in image processing. This allows for advanced editing, restoration, or even machine-learning applications.
Part 2. Frame by Frame: Transform Videos into Image Sequences on Your PC
Now that you know why there is a need to convert video to a sequence of images, you might be wondering through which tool it is done on a PC. Hence, to answer that, this guide covers 2 foremost options that are versatile and beginner-friendly.
1.Wondershare UniConverter
Being accessible on Windows and Mac, Wondershare UniConverter is an ideal tool for MP4 to JPG sequence creation. Supporting batch processing, the tool enables you to import multiple images. Not just that, users can trim certain frames before converting them to any image format. While saving the results, you can also pick the desired image resolution for the targeted results.
Unlike other tools, the transformed image sequences are displayed in a separate "Finished" folder to make this process organized. Using its advanced settings, users can pick the desired framerate and file name.
Key Features
- The tool supports over 1000 formats, making it a versatile solution.
- Users can preview the trimmed files before exporting them.
- The trim tool lets you undo and redo the results while trimming.
Pros & Cons of Uniconverter

Easy to Use Versatile Video to Image Squence Converter
How to Use UniConverter for Video to Image Conversion?
Here is how you can use Wondershare UniConverter for MP4 to JPEG sequence formation:
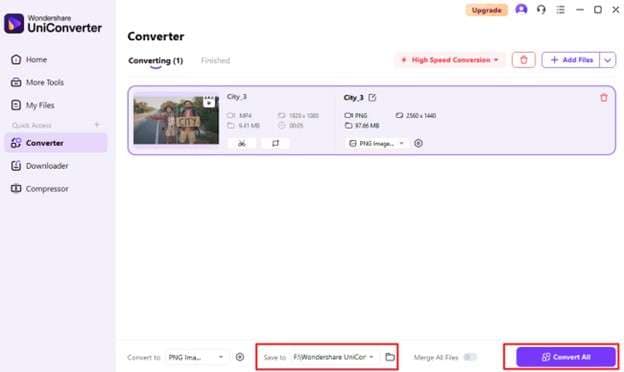
Step 1
Launch the tool and access the “Converter” tool from the home page. After that, import the file by picking the “+ Add Files” button.

Step 2
When the video is displayed, extend the “PNG Image…” menu and select the “PNG Image Sequence” option.

Step 3
After that, head to the “Save To” menu and determine the export file location. Once done, tap the “Convert All” button to save the image file.
2.VLC Media Player
VLC Media Player is another solution that enables you to transform an image sequence into a video of high quality since it's a free and open-source cross-platform. Using its scene filter settings from preferences, users can pick the desired image format while converting video to an image sequence. Additionally, it lets you adjust the height and width of converted pictures to get personalized outcomes.
Key Features
- VLC supports scripting and automation to capture multiple screenshots.
- You can play videos frame by frame using VLC's "Frame by Frame" mode.
- It allows you to set up custom hotkeys for taking snapshots.
Pros & Cons of VLC Media Player
Detailed Guide on How to Transform Videos into Image Sequences with VLC
Here is how you can turn a video into a PNG sequence using VLC Media Player:
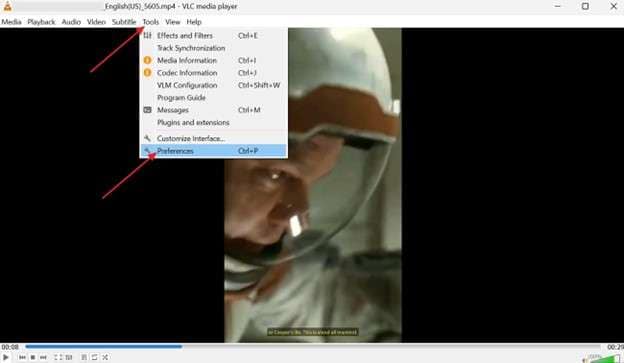
Step 1
Start by playing the video in VLC and head to the “Tools” tab to pick the “Preferences” option.
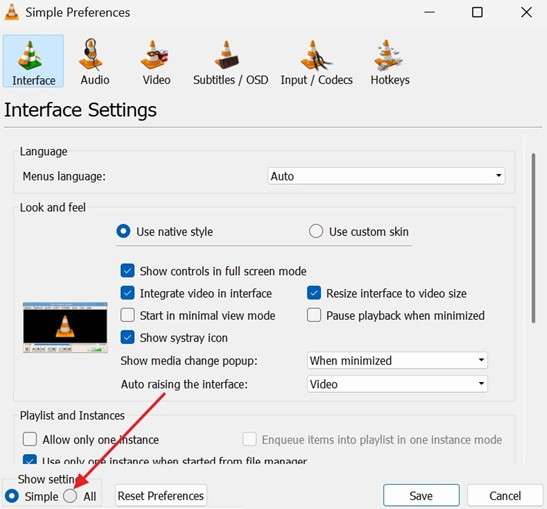
Step 2
After that, enable the “All” settings option at the bottom of the pop-up menu.
Step 3
As it's enabled, locate the "Video" option from the list and extend the "Filter" menu to pick "Scene Filter" from the list.
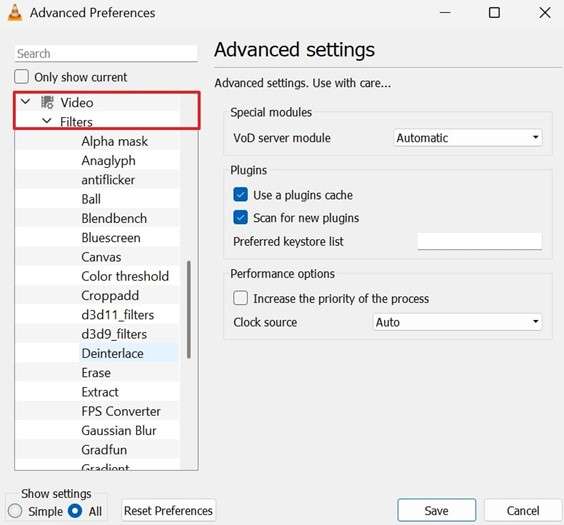
Step 4
Now, on the new screen, pick the image format and other settings, and hit the "Save" button. To ensure VLC turns video into an image sequence, head back to the ‘All' settings, pick the “Video” option, and from the “Filter” menu, tick the “Scene Filter” option. Upon saving the changes, the tool will automatically tap snaps of the videos.
Easy to Use Versatile Video to Image Squence Converter
Part 3. Unlock the Power of Converting Videos to Image Sequences Online
For MP4 to PNG sequence creation, if you think desktop solutions are time-consuming, consider using online tools. This section has covered 3 of them, letting you pick the one that suits your expertise.
1. Ezgif
Offering you the facility to import video of 200MB, Ezgif is an easy-to-use video-to-JPG converter. As the video is transformed into pictures, the tool ensures Full HD (1920px) resolution. While converting video to PNG or JPG, users can select the frame rate from 5 to 10.
Key Features
- During the MP4 to PNG frame making, users can rotate the video.
- This tool also lets you trim certain video parts to get targeted results.
- You can adjust the speed during the image sequence formation.
Pros & Cons of Ezgif
Comprehensive Guide to Transform Video to JPG With Ezgif
For MP4 to JPEG sequence creation, follow the steps mentioned below:
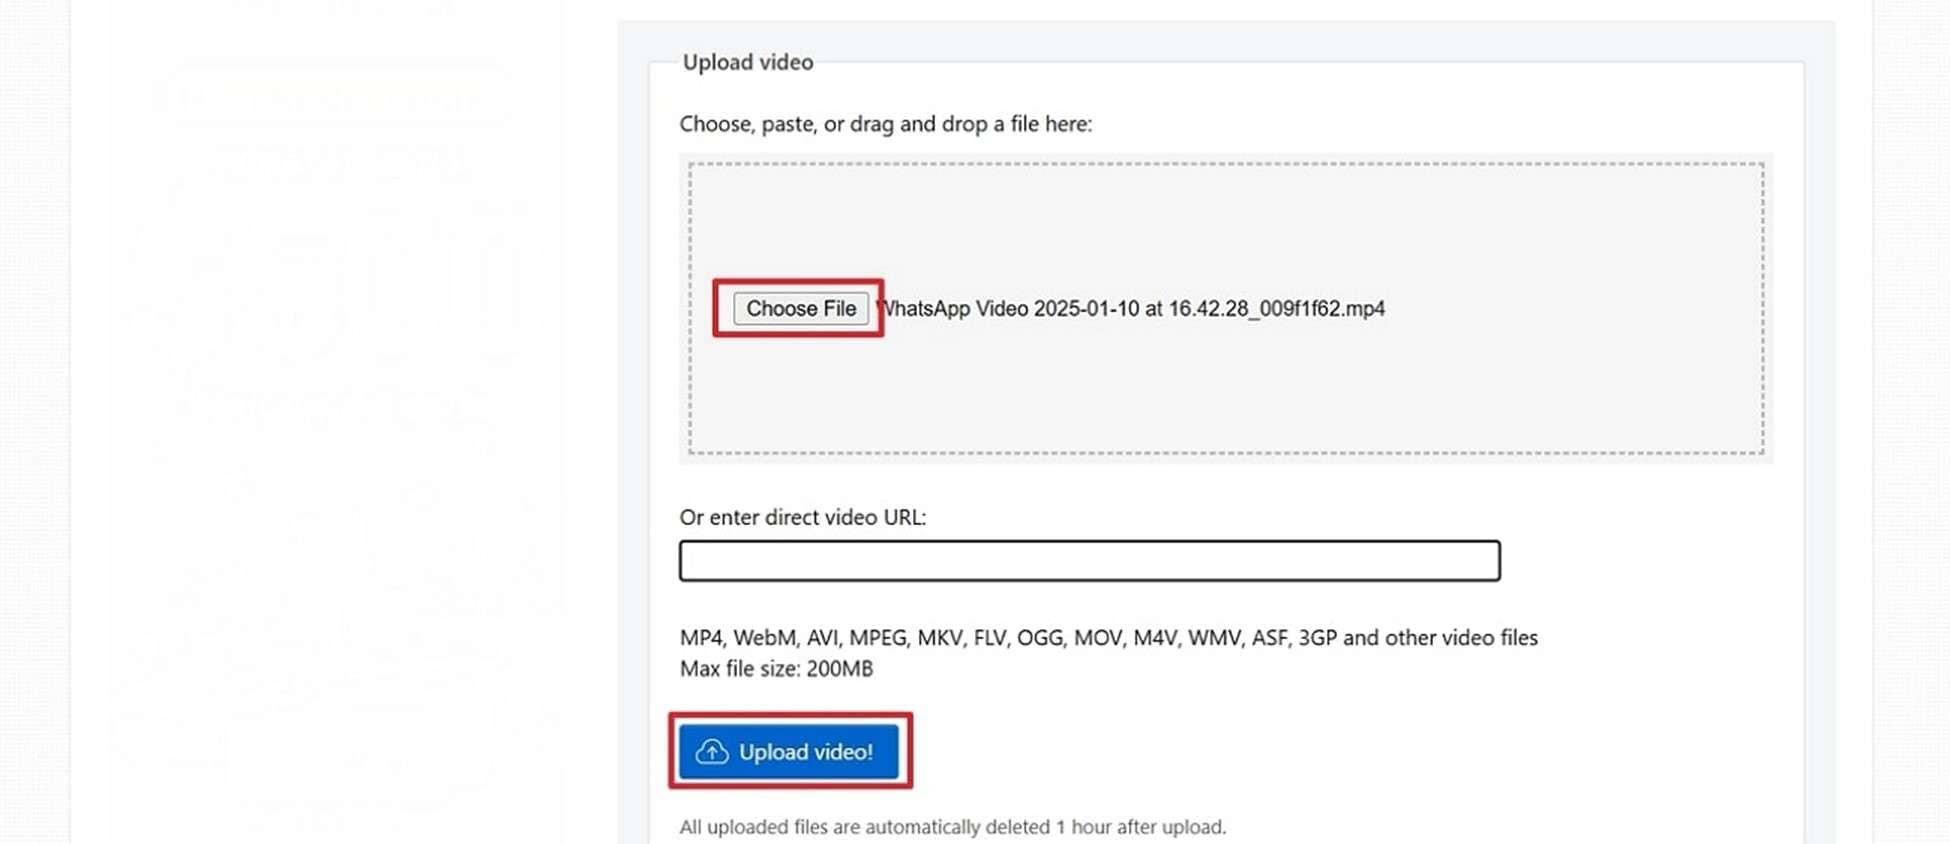
Step 1
Access the tool and upload the video by pressing the “Choose File’ button. As the video is there, press the “Upload Video” button to start the process.
Step 2
On the new screen, tailor the video settings and hit the “Convert to JPG” button.

Step 3
When the tool creates JPG files, save them by selecting the “Download Frames As ZIP” button.

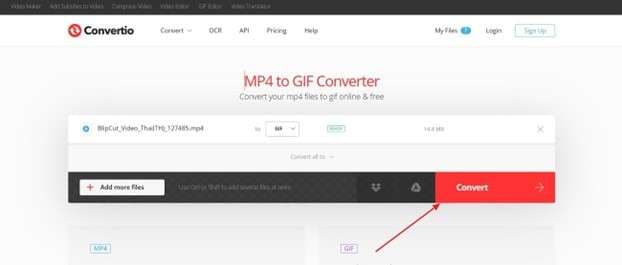
2.Convertio
Supporting 300+ formats,Convertio i s an ideal tool for MP4 to JPG sequence creation. Besides format, the tool is simple to use and lets users import files from the device, Dropbox, and Google Drive. The foremost aspect is that all the conversion takes place in the Cloud, ensuring no device capacity is consumed.
Key Features
- While conversion, you can choose aspect ratio, codec, and other settings.
- All the uploaded files are instantly deleted to maintain the user’s privacy.
- Being browser-based, the tool is accessible on all platforms.
Pros & Cons of Convertio
Guide to Transform Video to Image with Convertio
To learn how to make a video-to-image sequence possible, follow the given steps:
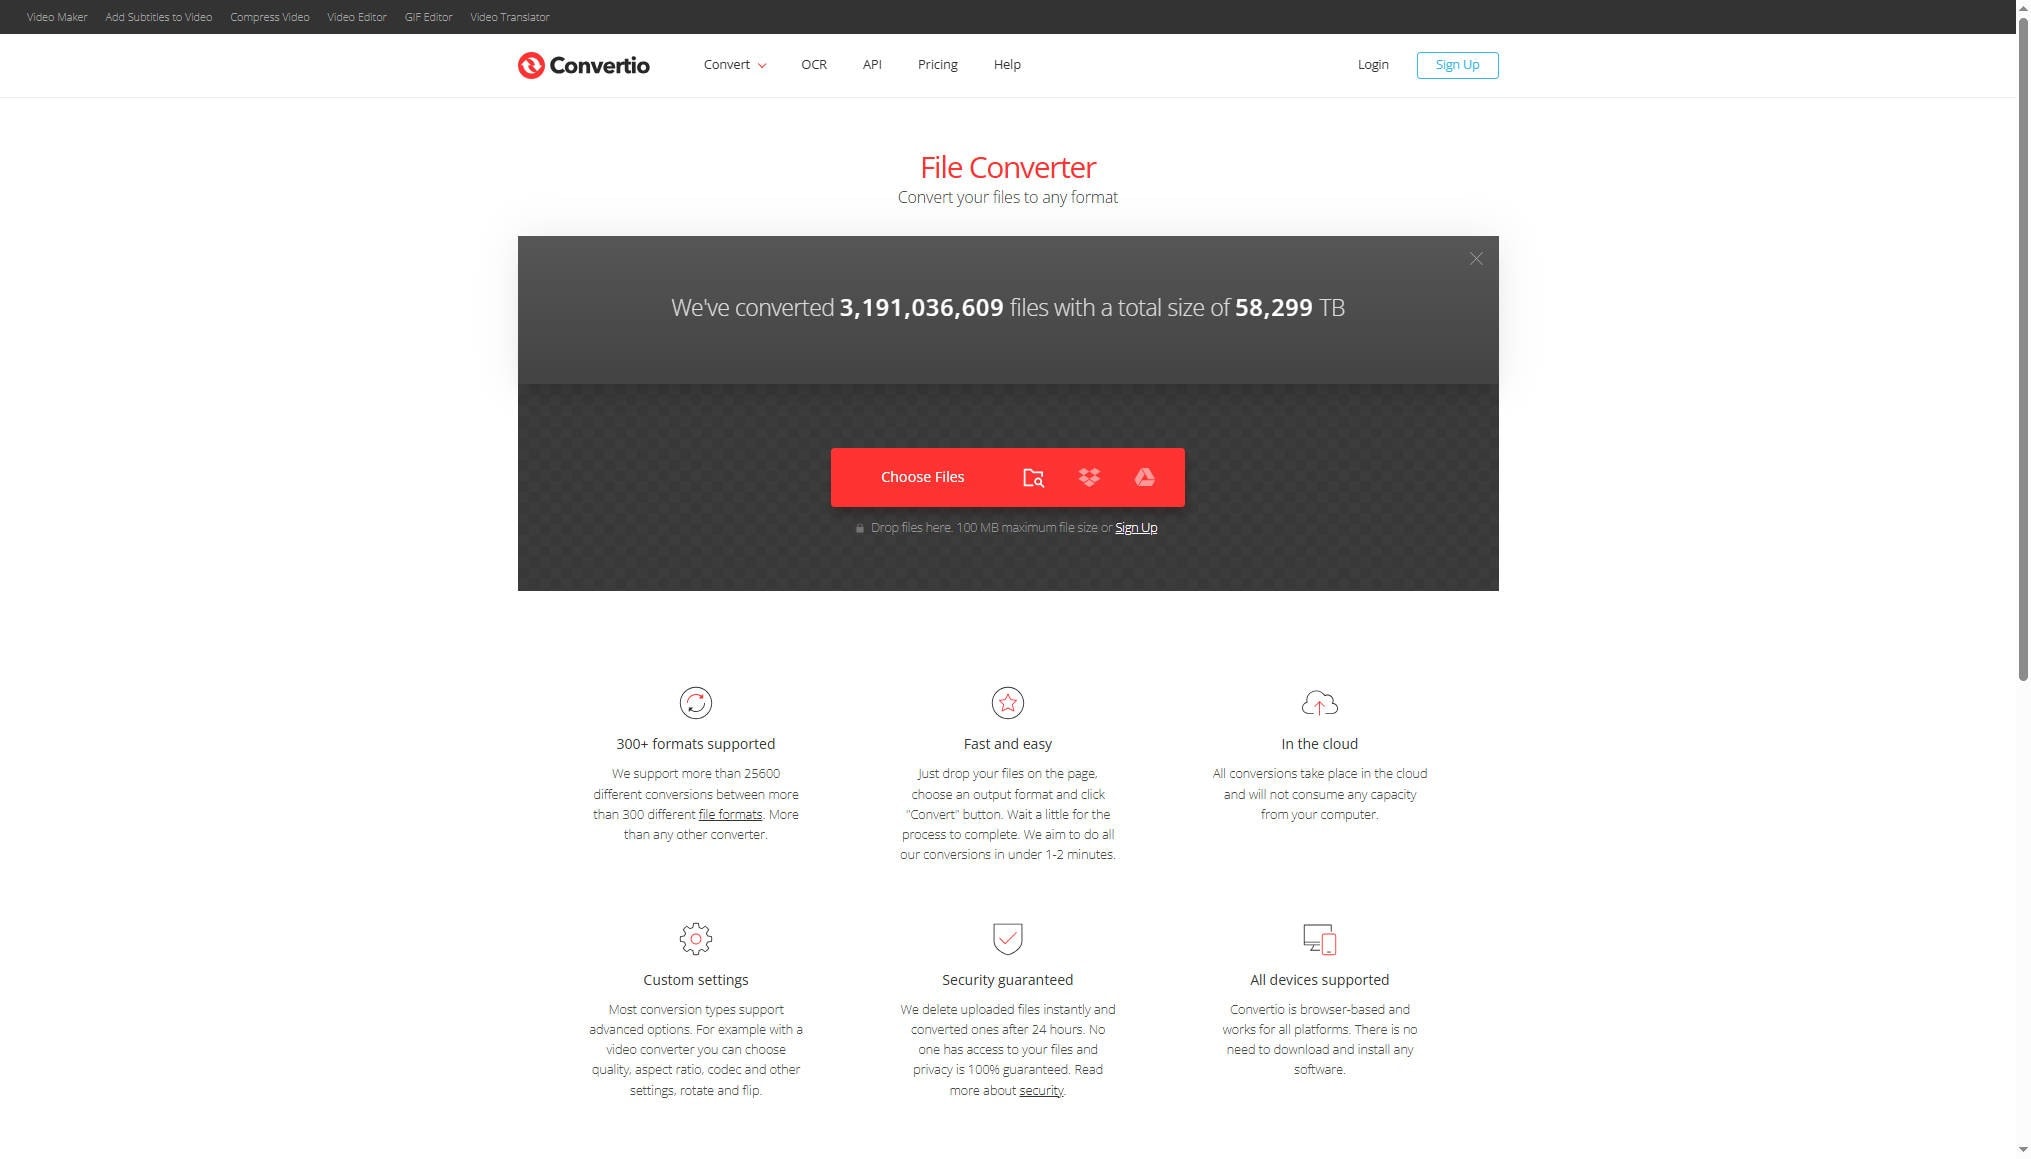
Step 1
Open the tool and hit the “Choose Files” button to upload the video.
Step 2
On the homepage, go to the “Converter” that you will find under the “Quick Access” section. From here, a pop-up will open where you will need to upload your HDR files for conversion.
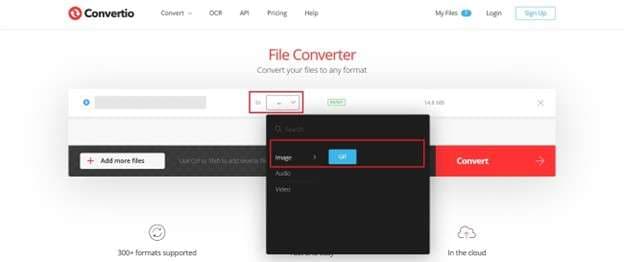
Step 3
Click on “+Add File/Folder” or drag the file you need to convert into a different format. Once the file is loaded, click the bottom drop-down option to choose the final conversion format that you require, and click on “Convert All” to start converting the uploaded file into the desired format.
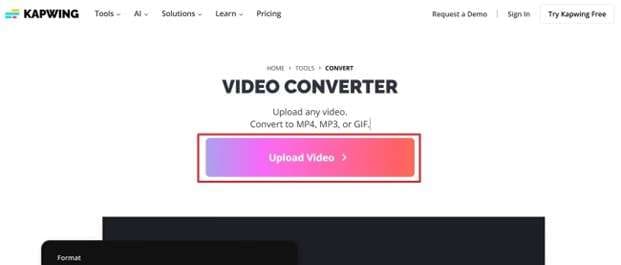
3.Kapwing
For effortless video-to-sequence image creation, Kapwing allows you to trim certain parts. Additionally, users can lock the video changes to restrict anyone from making changes. What makes this platform unique is that users can adjust the speed to transform the frames to PNG or GIF.
Key Features
- You can undo and redo results to easily correct mistakes.
- Users can adjust the video brightness and saturation while exporting.
- You can even add borders and strokes to images in the sequence to enhance their visual appeal.
Pros & Cons of Kapwing
How to Transform Video to Images With Kapwing - Simple Guide
Here is how Kapwing lets you transform an image sequence into a video high quality.
Step 1
To begin with, press the “Upload Video” button after launching the tool.
Step 2
On the new screen, hit the “Click to Upload” button to upload the video.
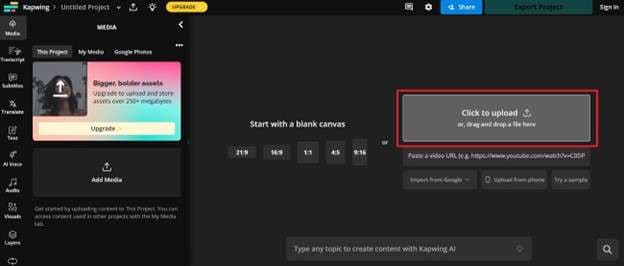
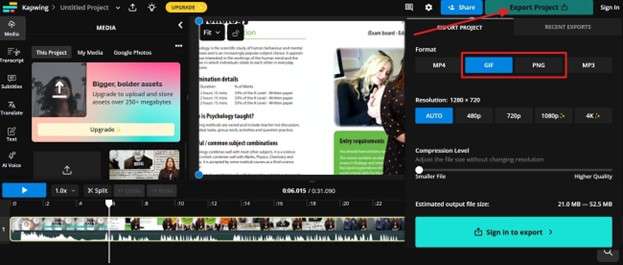
Step 3
As the video is there, make the desired changes and export it by picking the "Export Project" option. From the pop-up menu that appears, select "GIF" or "PNG" image format and save the file.
Easy to Use Versatile Video to Image Squence Converter
Part 4. Transform Videos into Image Sequences on Mobile with Ease
To convert video to a sequence of images, users can also try mobile apps that are explained in this section.
1. VivaVideo (Android | iOS)
Regarding video to PNG sequence generation,VivaVideo is accessible for both Android and iPhone users. To make a video-to-picture sequence, it allows you to trim certain parts of the video. Furthermore, you can add effects and filters while editing to boost the image's appeal.
Key Features
- It enables users to pick the desired framerate while exporting.
- You can import multiple videos since it supports batch processing.
- While saving the converted images, VivaVideo displays the file size.
Pros & Cons of VivaVideo
Guide on How to Convert Video to Image Sequence with VivaVideo
Using VivaVideo for MP4 to JPG sequence is simple through the steps given below:
Step 1
Install the app and hit the "+ New Project" button to import the file. As the file is there, hit the "Next" button and make the desired changes. After doing so, press the "Export" button in the top right corner.
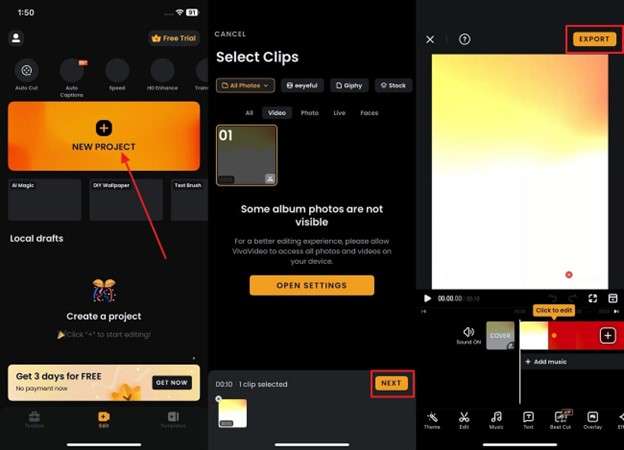
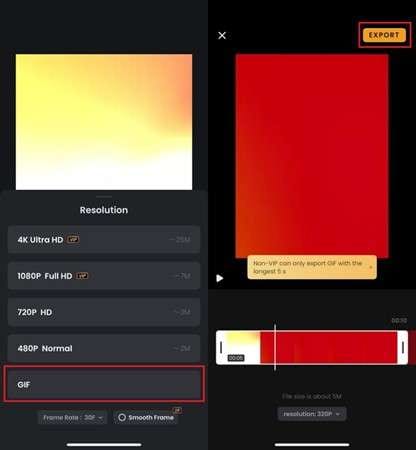
Step 2
From the new screen, select the “GIF” option and save the file by choosing the “Export” button again.
2. CapCut (Android | iOS)
You can easily convert a video into a sequence of images with CapCut, as this tool trims certain parts of the video you seek to turn into a GIF. Before doing so, users can apply certain effects to boost the image appeal.
Key Features
- You can undo and redo the changes while tailoring the video.
- Users can select the aspect ratio while editing to ensure the image fits their desired format.
- For GIFs, CapCut offers 3 different export quality options.
Pros & Cons of CapCut
Simple Steps to Transform Video to Image Sequence with CapCut
Here is how CapCut lets you convert a video to an image sequence:
Step 1
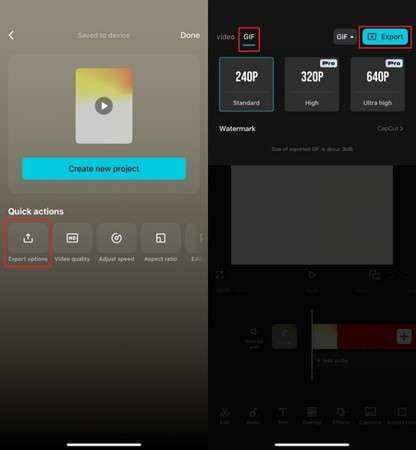
Upon launching the app, hit the “+New Project” button to import the video by picking the “Add” button. When the video is displayed, edit it and choose the “Export” button.
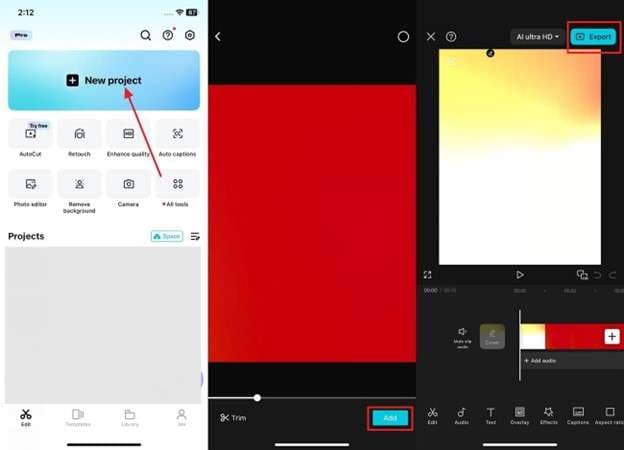
Step 2
When the file is saved, a new screen will appear where you have to pick the “Export Options” option. There, head to the “GIF,” choose the desired quality, and save it by selecting the “Export” button.
3. Frame Grabber (Android | iOS)
Letting you choose the picture quality for MP4 to JPG sequence, Frame Grabber is another foremost option. This app offers 3 image format options, ranging from JPEG to PNG and HEIF. Additionally, users can decide whether to apply a filter on the converted images or not.
Key Features
- Users can tailor the sharing options with this application.
- As an editor, you can pick a certain time format.
- With Frame Grabber, you can fetch the video metadata to know its details.
Pros & Cons of FrameGrabber
Guide on How to Transform Video to Image Sequence
To convert video to an image sequence with Frame Grabber, adhere to the given steps:
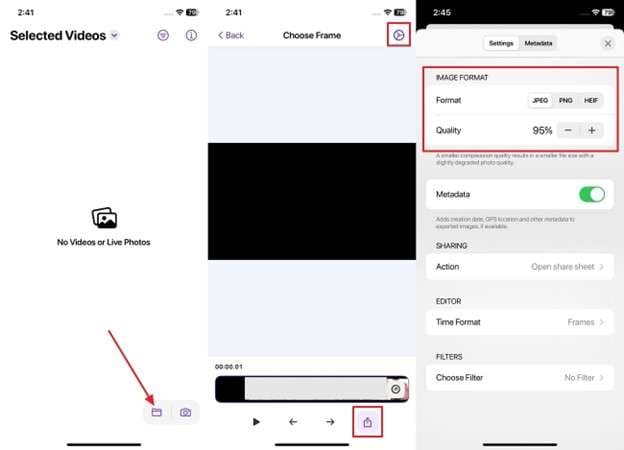
Step 1
Start by fetching the video to the app by pressing the “File” icon and pressing the “Settings” icon to select the image format upon trimming the desired part. After that, hit the “Export” icon to save the image to your device.
Part 5. Pro Tips for Perfect Video-to-Image Conversions
To make the most out of the MP4 to JPEG sequence process, here are five pro tips for perfect results:
- Use the Right Frame Rate: Choose a frame rate that aligns with your desired output to ensure accurate sequences.
- Focus on High-Quality Settings: Export images in the highest resolution possible to maintain sharpness in every frame.
- Crop or Adjust Aspect Ratios: Always crop unwanted areas or adjust the aspect ratio to better fit the images for your needs.
- Avoid Compression Loss: Use lossless formats to preserve image quality during the conversion.
- Leverage Batch Processing: When working with long videos, use batch processing to save time and avoid manual hassle.
Conclusion
Summing up, to convert video to a sequence of images, you can unlock greater flexibility for editing. Hence, various offline, online, and mobile apps are discussed in the guide with comprehensive details to make this process seamless. Review and pick the one that suits your needs, but above all, we recommend using Wondershare UniConverter as it supports 1000 formats with a batch processing facility.
Easy to Use Versatile Video to Image Squence Converter
FAQs
-
1. How do I convert a video to an image sequence?
You can use software like Wondershare UniConverter to extract frames from videos since this tool supports multiple formats. -
2. What is the best format for saving video frames?
From all, PNG is considered the best for high-quality images, while JPEG is suitable for smaller file sizes. -
3. Can I convert MP4 to PNG or JPG sequence on mobile?
Yes, apps like CapCut allow you to extract frames and save them as PNG or JPG images. -
4. What is the difference between frame extraction and screen capture?
Frame extraction refers to retrieving frames directly from a video file at precise intervals, while screen capture involves manually taking screenshots from a video while it’s playing.

